

MCP Client Configuration
This guide provides the step-by-step instructions for connecting the CoreStack MCP server to Claude (Chat, Cowork, and Code), Visual Studio Code, n8n, and ChatGPT — including authentication setup, server configuration, and validation.
Overview
The Model Context Protocol (MCP) is an open standard that allows AI clients to connect to external data sources and tools. CoreStack exposes its FinOps, Assessment and Graphion capabilities as MCP servers, enabling users to query cloud assessment data, manage workloads, analyze frameworks, and investigate policy violations — all from within their preferred AI client using plain language.
This guide covers configuration for the following clients:
- Claude Chat / Cowork / Code (Claude Desktop, desktop automation tool, and CLI-based coding assistant)
- Visual Studio Code (via the native MCP extension)
- n8n (open-source workflow automation platform — for automated, scheduled workflows)
- ChatGPT (via a built-in custom connector with OAuth authentication, or via a local Node.js proxy and ngrok tunnel to support custom API header injection)
- Microsoft Copilot (via a Copilot Studio agent with an MCP tool, authenticated with OAuth using your CoreStack credentials)
Note: MCP availability — By default, MCP is disabled. It is enabled on a per-account basis by your Account Administrator. Once enabled, users can integrate CoreStack MCP servers with any supported client. The MCP server and its data are not exposed to any LLM unless the user explicitly integrates with an MCP client — at which point the data is available to the LLM selected by the user for reasoning.
Note: Unified endpoint updateThe CoreStack MCP server has been consolidated into a single unified endpoint (/mcp). All existing functionality is preserved.
Prerequisites
Before configuring any MCP client, the MCP server must be enabled for your account by an Account Administrator.
Enable the MCP Server
- In CoreStack, navigate to Settings > Account Management > Account Info.
- Click Advanced Settings.
- Toggle on MCP Server.
- Click Save Configuration.
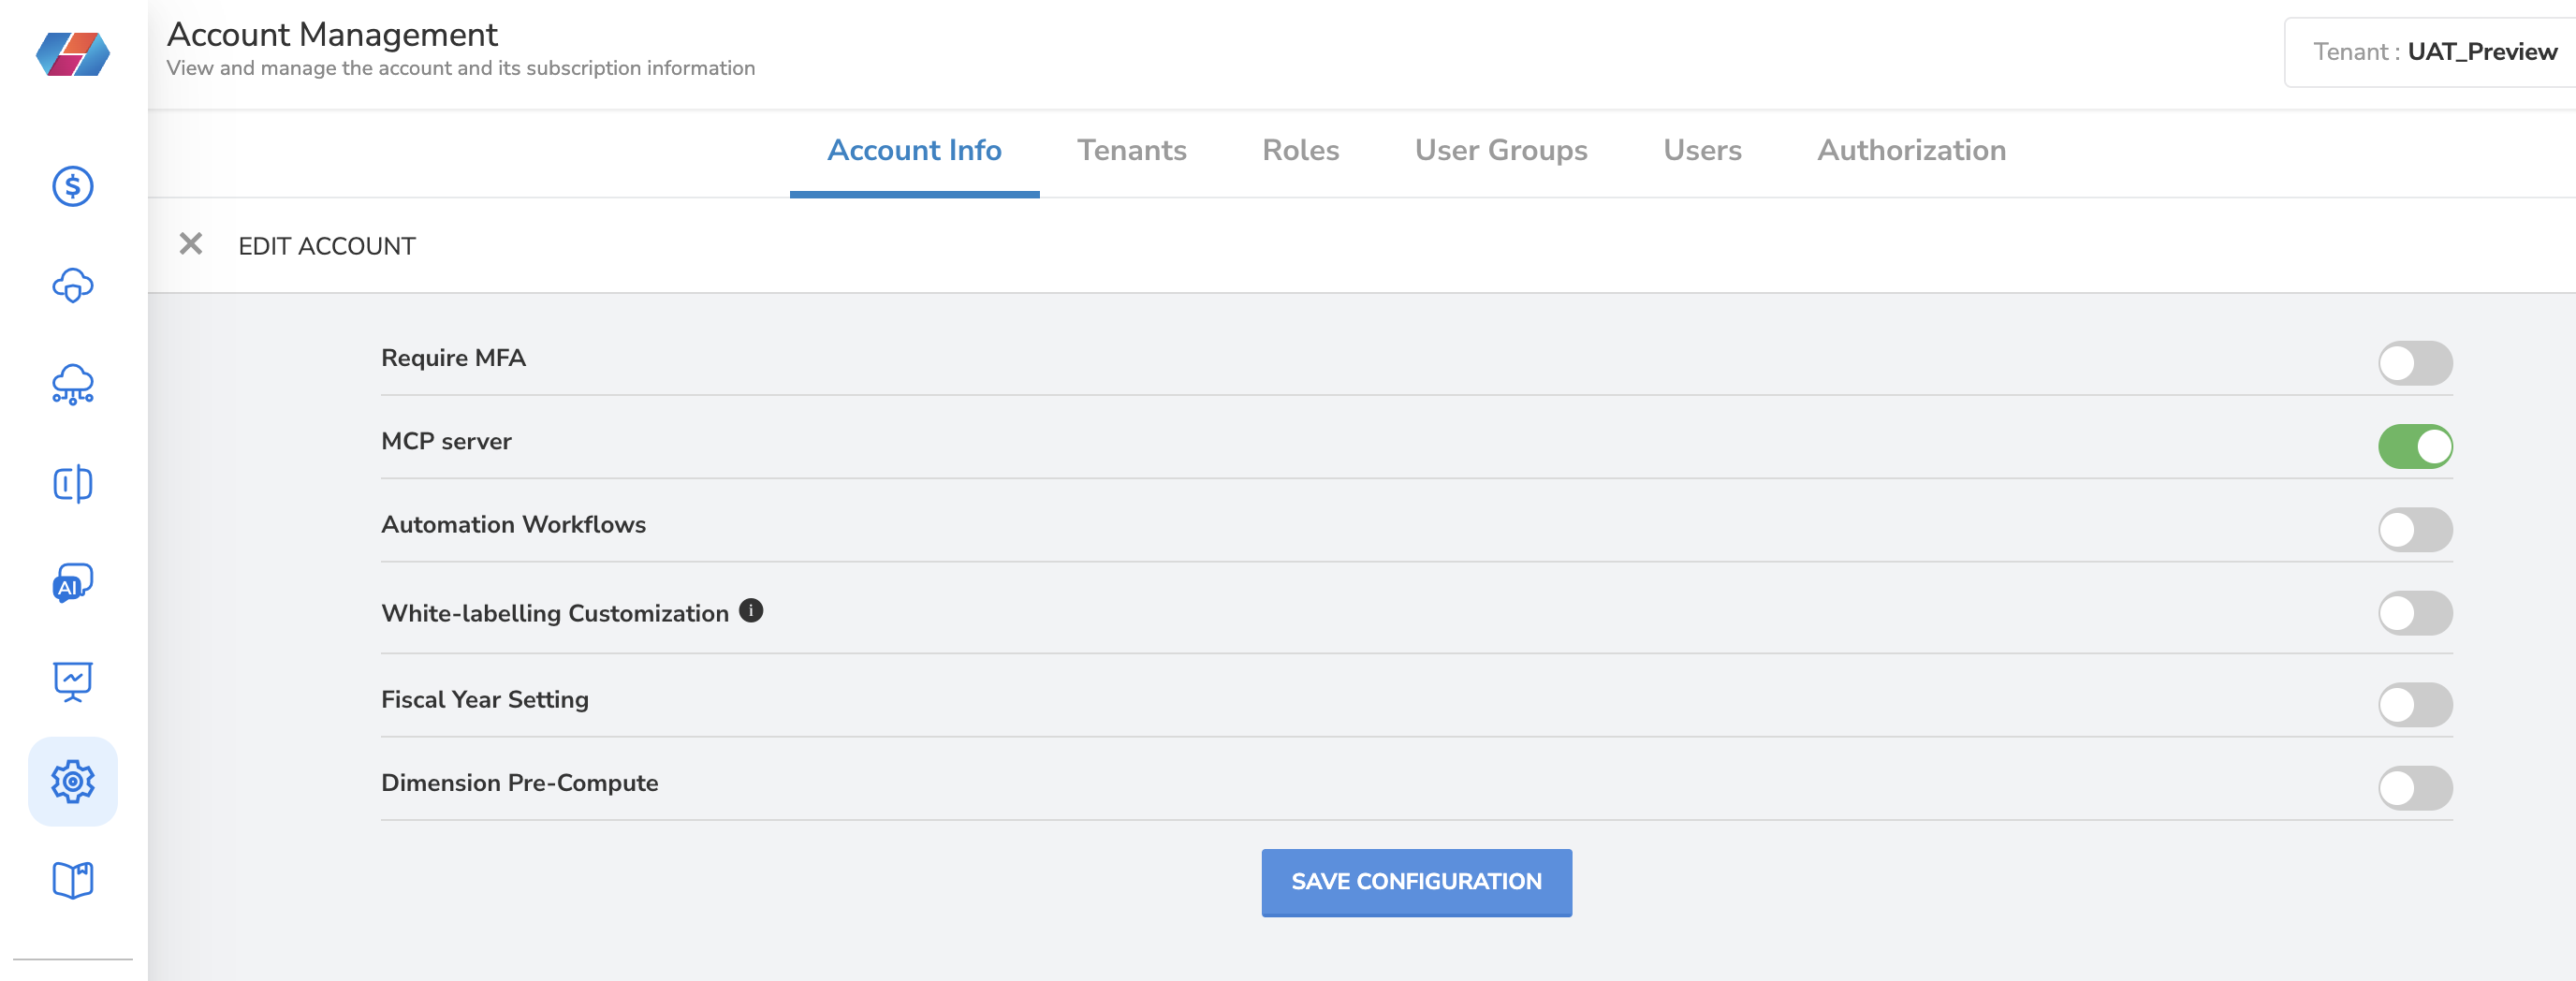
Note: Only users with the Account Administrator role can enable this setting. If you do not have Account Administrator access, contact your CoreStack administrator to request that the MCP Server toggle be enabled before proceeding with client configuration.
MCP Server Specifications
The following parameters apply across all client configurations. Replace {environment} with the subdomain for your environment in all URLs. Example URL to access assessment mcp server ishttps://cloud.corestack.io/mcp. Your administrator can confirm the correct subdomain for your account.
| Parameter | Value |
|---|---|
| Type | HTTP |
| Base URL | https://{environment}.corestack.io/mcp |
| Environment | cloud / portal / mea / in / us3 |
| Auth Header 1 | X-API-Access-Key: <CoreStack API-Access-Key> |
| Auth Header 2 | X-API-Secret-Key: <CoreStack API-Secret-Key> |
Generating API Access Keys
API access keys are required to authenticate with the CoreStack MCP server. Only users with the Account Administrator role can generate these keys.
Step 1: Navigate to Identity and Access Management
In CoreStack, navigate to Identity and Access Management > Users. Locate your username in the user list.
Step 2: Generate the key
In the user configuration panel next to your username, click Generate Key. CoreStack sends an email containing your X-API-Access-Key and X-API-Secret-Key credentials.
Step 3: Share credentials securely
These credentials can be shared with other users who need to integrate CoreStack MCP servers with their clients. Store and share them securely — do not include them in public repositories or unencrypted messages.
Note: If you do not have Account Administrator access, contact your CoreStack administrator to request API credentials.
Configuring Claude
Claude Chat, Cowork, and Code support two configuration methods.
- Custom Connector uses Claude’s built-in connector flow with OAuth authentication — no API keys or local setup required.
- Developer Settings uses a local configuration file
(claude_desktop_config.json)with API key headers viamcp-remote.
Prerequisites
Node.js and npx
Node.js v18 or later version is required for configuring Claude. If not already installed, download it from https://nodejs.org (LTS version recommended). After installation, verify both tools are available:
node --version
npx --version
Both commands should return a version number.
mcp-remote package
The mcp-remote package acts as a bridge between the Claude desktop application and the CoreStack MCP server. Install it globally using the following command:
npm install -g mcp-remoteVerify the installation using the following command:
npm list -g mcp-remoteYou should see the mcp-remote version listed in the output.
Custom Connector
This method connects CoreStack directly to Claude using the built-in custom connector flow. It requires no configuration files, no API keys, and no Node.js setup — authentication is handled via OAuth using your CoreStack credentials.
Step 1: Open the Connectors Panel
You can open the Connectors panel in two ways.
From the chat:
Click the + icon in the Claude message input area, at the bottom of the chat. This opens the tools menu, which contains options for adding the connectors, files, skills, and other capabilities to your conversation.
From Settings:
Navigate to Profile > Settings > Customize > Connectors.
Step 2: Navigate to Connectors
In the tools menu, click the Connectors. The Connectors panel expands, showing a list of your existing connected services along with options to browse pre-built connectors or add a custom one.
Step 3: Open the Add Custom Connector Dialog
In the Connectors panel, click + Add connector to expand the connector options, then click Add custom connector in the upper-right corner. The Add custom connector dialog opens, where you will enter the CoreStack MCP server details.
Step 4: Enter the Connector Details and Add
Complete the form and click Add to save the connector.
| Name | A display name for your connector (for example, CoreStack) |
| Remote MCP server URL | https://{environment}.corestack.io/mcp |
Replace {environment} with your CoreStack environment subdomain (for example, cloud, portal, us3). Click Add to save the connector.
Step 5: Select the Connector to Authenticate
After saving, click Connectors in the tools menu to return to the Connectors panel. Your newly added connector will appear in the list. Click its name to open the connector detail view in Settings.
Step 6: Initiate the OAuth Connection
The connector detail view displays a Connection Issue status, indicating that authentication has not yet been completed. Click Connect to begin the OAuth flow. Claude will redirect you to the CoreStack login page in your browser.
Step 7: Log In to CoreStack
On the CoreStack login page, enter your CoreStack email address and password, then click LOG IN. CoreStack authenticates your credentials and initiates the OAuth handshake with Claude.
Step 8: Confirm the Browser Redirect
After a successful login, a browser prompt appears asking whether to open Claude. Click Open Claude to return to the application. The browser tab confirms the connector status as Connected and takes you back to Claude.
Step 9: Verify the Connection and Approve the First Tool Call
The CoreStack connector now appears at the top of your active connectors list with an active status indicator. To verify the connection, start a conversation in Claude and ask a question that requires CoreStack data. When Claude calls a CoreStack tool for the first time, a prompt appears asking you to confirm. Click Always allow to approve the tool automatically in future conversations, or Deny to block it.
Developer Settings
Both applications use the same claude_desktop_config.json file and the same mcp-remote setup. Once configured, Claude Cowork can additionally save MCP outputs — such as reports and spreadsheets — directly to your desktop using plain-language instructions.
Step 1: Locate the configuration file
Open the configuration file at the path for your operating system.
macOS:
~/Library/Application Support/Claude/claude_desktop_config.jsonWindows:
%APPDATA%\Claude\claude_desktop_config.jsonTip: You can also access this file directly from the application by going to Settings → Developer → Edit Config.
Step 2: Add the MCP server configuration
Run the following command in your terminal, replacing {environment} with your CoreStack environment subdomain and the placeholder keys with your actual credentials:
macOS / Linux:
{
  "mcpServers": {
    "corestack-assessment-server": {
      "command": "npx",
      "args": [
        "-y",
        "mcp-remote@latest",
        "https://{environment}.corestack.io/mcp",
        "--header",
        "X-API-Access-Key: <YOUR_ACCESS_KEY>",
        "--header",
        "X-API-Secret-Key: <YOUR_SECRET_KEY>"
      ]
    }
  }
}
Windows:
{
  "mcpServers": {
    "corestack-assessment-server": {
      "command": "cmd.exe",
      "args": [
        "/C", "npx", "-y", "mcp-remote@latest",
        "https://{environment}.corestack.io/mcp",
        "--header", "X-API-Access-Key: <YOUR_ACCESS_KEY>",
        "--header", "X-API-Secret-Key: <YOUR_SECRET_KEY>"
      ]
    }
  }
}
Step 3: Restart the application
Close and reopen Claude Chat or Claude Cowork for the configuration changes to take effect.
Step 4: Verify the connection
In a conversation, type:
Connect to CoreStackOn success, Claude will authenticate and display your Master Account, Tenant, and available accounts.
Claude Code (CLI)
Claude Code uses the claude mcp add-json CLI command to register MCP servers directly — no configuration file needs to be edited manually.
Prerequisites: Ensure that Node.js 18+ and Claude Code are installed (npm install -g @anthropic-ai/claude-code).
Step 1: Register the CoreStack MCP server
Run the following command in your terminal, replacing {environment} with your CoreStack environment subdomain, and the placeholder keys with your actual credentials:
claude mcp add-json corestack-assessment '{
  "type": "http",
  "url": "https://{environment}.corestack.io/mcp}",
  "headers": {
    "X-API-Access-Key": "<YOUR_ACCESS_KEY>",
    "X-API-Secret-Key": "<YOUR_SECRET_KEY>"
  }
}'WARNING: Do not commit real API keys — Never share or commit real API keys to version control. For team deployments, use environment variable references and inject keys at runtime.
Step 2: Choose a scope
Append one of the following flags to control where the configuration is stored:
| Flag | Scope | When to use |
|---|---|---|
| (no flag) | Local (default) | Available only to you in the current project folder. |
--scope user | Global (your account) | Available to you across all projects on this machine. |
--scope project | Shared via .mcp.json | Committed to the repo — shared with your entire team. |
Note: Team-wide setup — For team-wide use, run with
--scope project. This creates or updates a.mcp.jsonfile in your project root. Commit this file to share the configuration with your team — but do not include real API keys in a committed file.
Step 3: Verify the connection
Use the following command to confirm the server was registered.
claude mcp listYou should see corestack-assessment listed with type: http. Then start a session and check MCP status:
claude
/mcp
The CoreStack server should appear as connected.
Step 4: Query CoreStack
Once connected, use plain language inside a Claude Code session. Examples:
Check my CoreStack connection status and tell me which tenant and master account I am connected to.List all assessment definitions available in CoreStack for my tenant.Get the pillar-wise Well-Architected Framework scores for assessment run ID <your-run-id>.Managing the connection
Remove the server:
claude mcp remove corestack-assessmentUpdate the server (remove and re-add with new keys):
claude mcp remove corestack-assessment
claude mcp add-json corestack-assessment '{...updated config...}'
Configuring Visual Studio Code
VS Code supports MCP natively via the .vscode/mcp.json workspace file. No additional packages are required — VS Code communicates with the CoreStack MCP server directly over HTTP.
Step 1: Create the configuration file
Create or edit .vscode/mcp.json in your workspace root, replacing {environment} with your CoreStack environment subdomain:
{
  "servers": {
    "assessment-mcp": {
      "type": "http",
      "url": "https://{environment}.corestack.io/mcp",
      "headers": {
        "X-API-Access-Key": "<CoreStack API-Access-Key>",
        "X-API-Secret-Key": "<CoreStack API-Secret-Key>"
      }
    }
  }
}
Step 2: Enable auto-discovery (optional)
To allow VS Code to automatically discover MCP servers, add the following to your VS Code user settings:
"chat.mcp.discovery.enabled": trueStep 3: Restart VS Code
Close and reopen Visual Studio Code to apply the configuration changes.
Step 4: Validate the setup
In the VS Code chat interface, type:
List available tools.The assessment-mcp or graphion-mcp server should appear in the available tools list.
Configuring n8n
Prerequisites
n8n via Docker
n8n must be running via Docker with terminal access to the host. If you are setting up n8n for the first time, see Configuring n8n below for full container setup instructions.
Note: This step is only needed if you're looking to test the n8n integration. If you already have n8n configured, feel free to skip ahead.
CoreStack API Credentials
You will need a valid CoreStack Access Key ID and Secret Access Key to authenticate with the CoreStack MCP server. These are used when configuring the MCP credential and when passing the secret key via the Headers Override field in each MCP node. See Generating API Access Keys above if you have not yet generated these credentials.
OpenAI API Credential
n8n is an open-source workflow automation platform. By connecting it to the CoreStack MCP server, you can build automated workflows that retrieve cloud assessment data, generate compliance summaries, and deliver formatted reports — all without manual intervention. This section walks you through a sample workflow to help you get started; the node configuration, tools, and AI prompt can all be adapted to build your own custom automation.
Note: This section applies to n8n running via Docker, using the
n8n-nodes-mcpcommunity node (tested on n8n v2.12.3).
Step 1: Prepare the n8n container
To use community nodes as tools in AI Agent workflows, you must enable community package support in Docker. This requires recreating the n8n container.
Note: All the steps below are for testing the CoreStack MCP integration with n8n using a sample workflow. If you already have n8n set up, you can skip ahead and directly integrate by creating a credential in Step 3.
WARNING: Back up your data first — Before proceeding, confirm your workflow data is persisted to a volume by running:
docker inspect n8n --format='{{range .Mounts}}{{println .Source .Destination}}{{end}}'.If no path is returned, add
-v ~/.n8n:/home/node/.n8nto recreate the command below.
Stop and remove the existing container:
docker stop n8n && docker rm n8nRecreate the container with community package support, replacing <your-hostname> with your actual hostname.
docker run --hostname=<your-hostname> \
  --user=node \
  --env=NODE_ENV=production \
  --env=N8N_RELEASE_TYPE=stable \
  --env=N8N_COMMUNITY_PACKAGES_ALLOW_TOOL_USAGE=true \
  --network=bridge \
  --workdir=/home/node \
  -p 5678:5678 \
  --restart=no \
  -d n8nio/n8n:latest
Step 2: Install the community node
In n8n, navigate to Settings > Community Nodes and click Install. Enter n8n-nodes-mcp and click Install. Restart n8n if prompted.
Step 3: Configure the MCP Credential
Save your CoreStack API credentials as an MCP credential in n8n. This credential authenticates all MCP calls in your workflows.
Navigate to Credentials > Add Credential, search for MCP Client HTTP API, and select it. Fill in the fields as follows:
| Setting | Value |
|---|---|
| URL | https://{environment}.corestack.io/mcp |
| Header Name | X-API-Access-Key |
| Header Value | <Your CoreStack API Access Key> |
Click Save.
Note Second header — The
X-API-Secret-Keycannot be stored in this credential. It is passed via the Headers Override field directly in each MCP node.
Step 4: Build the Sample Assessment Summary Workflow
This sample workflow retrieves assessment definitions from CoreStack and formats them into a summary using an AI model.
Note: Sample workflow — The steps below are provided as a sample to help you get started with n8n and CoreStack. The node configuration, tools called, and AI prompt can all be adapted to suit your own use case.
Step 4a: Add a Manual Trigger node
Create a new workflow and add a Manual Trigger node. No configuration is needed.
Step 4b: Add a Connect to CoreStack node
Add an MCP Client node (community node) with these settings:
| Setting | Value |
|---|---|
| Operation | Execute Tool |
| Tool Name | connect_to_corestack |
| Headers Override | X-API-Access-Key=<Your Access Key> X-API-Secret-Key=<Your Secret Key> |
Step 4c: Add a List Assessment Definitions node
Add a second MCP Client node with these settings:
| Setting | Value |
|---|---|
| Operation | Execute Tool |
| Tool Name | assessment_definition_list_and_retrieval |
| Tool Parameters | {} |
| Headers Override | X-API-Access-Key=<Your Access Key> X-API-Secret-Key=<Your Secret Key> |
Step 4d: Add an AI Format Summary node
Add an OpenAI node (model: gpt-4o-mini) with the following prompt:
You are a cloud governance assistant. Below is raw assessment data from CoreStack.

Convert this into a clean HTML email body with:
1. A brief 2-line executive summary
2. An HTML table: Assessment Name | Status | Severity | Resource Count | Last Run
3. Short bullet-point recommendations

No markdown — pure HTML only.

Data: {{ JSON.stringify($json) }}
Step 4e: Connect the nodes and run
Connect: Manual Trigger → Connect to CoreStack → List Assessment Definitions → AI Format Summary. Click Execute Workflow and inspect each node's output to confirm data flows correctly.
Tip: Automate delivery — Replace the Manual Trigger with a Schedule Trigger and add a Send Email node at the end to deliver reports automatically.
Configuring ChatGPT
ChatGPT’s built-in connector interface supports either OAuth authentication or no authentication — it cannot send custom HTTP headers directly. Two configuration methods are available:
- Custom Connector: uses ChatGPT’s built-in plugin flow with OAuth authentication — no proxy, API keys, or local setup required.
- Developer Settings: The method below uses a lightweight Node.js proxy, exposed to the internet via ngrok, to inject your CoreStack API credentials into every request. The connection flow is: ChatGPT → ngrok (public HTTPS URL) → Local Node.js Proxy (injects API key headers) → CoreStack MCP Server (https://cloud.corestack.io/mcp).
Custom Connector
This method connects CoreStack directly to ChatGPT using a custom MCP plugin. It requires no proxy, no ngrok tunnel, and no API keys — authentication is handled via OAuth using your CoreStack credentials.
Step 1: Turn On Developer Mode
Open ChatGPT, click your profile icon, then click Settings. Select Security and login from the list on the left, then in Advanced security, turn on the Developer mode toggle. This allows ChatGPT to add and use custom connectors, such as the CoreStack MCP plugin.
Step 2: Add a New Plugin
Click Plugins in the left sidebar of ChatGPT. This opens the Plugins page, where you can browse installed plugins or add a new one. Click + in the top-right corner to open the new plugin form.
Step 3: Configure the CoreStack MCP Plugin
Complete the New Plugin form with a name and the CoreStack MCP server URL (https://{environment}.corestack.io/mcp), select OAuth authentication, check I understand and want to continue, then click Create. This registers the CoreStack MCP server as a custom plugin in ChatGPT.
Step 4: Sign In with CoreStack
Click Sign in with CoreStack MCP to authorize the connection. This redirects you to the CoreStack login page. Enter your CoreStack username and password, then click Log In.
Step 5: Confirm the Connection
Review the CoreStack MCP page showing Connected to CoreStack MCP. This confirms the plugin is authenticated and displays its permissions and connection details. Click the ⋯ menu next to CoreStack MCP, then select View plugin detail at any time to review or manage the connection.
Step 6: Query CoreStack
In a chat, tag CoreStack MCP and enter a prompt, such as asking for the current month’s cost for AWS. ChatGPT calls the CoreStack MCP tool and returns the live data pulled from CoreStack.
Developer Settings
This method uses a local Node.js proxy and an ngrok tunnel to inject CoreStack API key headers, since ChatGPT’s connector interface cannot send custom headers directly.
Prerequisites
Before you begin, ensure you have the following:
- Node.js (v18 or later) installed on your machine
- ngrok installed with a free account and authtoken configured (see setup steps below)
- ChatGPT Business, Enterprise, or Edu plan (required for full MCP/Developer Mode support)
- CoreStack API Credentials:
X-API-Access-Key— Your CoreStack API access keyX-API-Secret-Key— Your CoreStack API secret key
Note: Contact your CoreStack administrator to obtain valid API credentials.
Install Node.js
If Node.js is not already installed, download it from https://nodejs.org (LTS version recommended). After installation, verify by running:
node --version
npx --version
Both commands should return a version number.
Install and Configure ngrok
ngrok creates a public HTTPS URL that tunnels traffic to your local proxy. Follow these steps to set it up:
-
Download ngrok from https://ngrok.com/download and install it for your operating system.
Windows: Download the ZIP, extract
ngrok.exe, and add it to your PATH or run it from the extracted folder.macOS: Install via Homebrew:
brew install ngrokAlternatively, download the ZIP from the ngrok website, extract it, and move the binary to
/usr/local/bin/. -
Create a free ngrok account at https://dashboard.ngrok.com/signup (you can sign up with Google or GitHub).
-
After signing in, go to https://dashboard.ngrok.com/get-started/your-authtoken to find your authtoken.
-
Copy the authtoken and run the following command in your terminal:
ngrok config add-authtoken YOUR_AUTHTOKEN_HERE -
Verify ngrok is installed correctly by running:
ngrok versionYou should see the ngrok version number in the output.
Note: Without a valid authtoken, ngrok will fail with error
ERR_NGROK_4018. You must create an account and configure the authtoken before proceeding.
Step 1: Start the CoreStack MCP Servers
Before ChatGPT can connect, the CoreStack MCP server must be running. You can run either or both of the following servers depending on your needs.
Step 2: Create the Proxy Script
ChatGPT's MCP connector only supports OAuth or no authentication — it cannot send custom API key headers. To bridge this gap, we use a lightweight Node.js proxy that intercepts ChatGPT's requests and injects the required CoreStack headers before forwarding them.
Create a file named proxy.cjs (the .cjs extension ensures Node.js treats it as CommonJS). Paste the following code:
Windows: Open Notepad, paste the code, and save as proxy.cjs (set "Save as type" to "All Files" to avoid .txt extension).
macOS / Linux: Open Terminal, navigate to your desired folder, and create the file with nano proxy.cjs or use any text editor. Paste the code and save.
const http = require("http");
const https = require("https");
const ACCESS_KEY = "<YOUR_ACCESS_KEY>";
const SECRET_KEY = "<YOUR_SECRET_KEY>";
const server = http.createServer((req, res) => {
  let body = [];
  req.on("data", (chunk) => body.push(chunk));
  req.on("end", () => {
    const targetPath = "/mcp/assessment/";
    const headers = {};
    for (const [key, value] of Object.entries(req.headers)) {
      if (key === "host" || key === "connection") continue;
      headers[key] = value;
    }
    headers["host"] = "qa.corestack.io";
    headers["X-API-Access-Key"] = ACCESS_KEY;
    headers["X-API-Secret-Key"] = SECRET_KEY;
    const options = {
      hostname: "qa.corestack.io",
      port: 443, path: targetPath,
      method: req.method, headers: headers,
    };
    const proxy = https.request(options, (proxyRes) => {
      res.writeHead(proxyRes.statusCode, proxyRes.headers);
      proxyRes.on("data", (chunk) => {
        res.write(chunk);
        if (typeof res.flush === "function") res.flush();
      });
      proxyRes.on("end", () => res.end());
    });
    proxy.on("error", (e) => {
      res.writeHead(502);
      res.end("Proxy error: " + e.message);
    });
    if (body.length) proxy.write(Buffer.concat(body));
    proxy.end();
  });
});
server.listen(8000, () =>
  console.log("Proxy running on http://localhost:8000")
);Note: Replace
<YOUR_ACCESS_KEY>and<YOUR_SECRET_KEY>with your actual CoreStack API credentials.
Step 3: Run the Proxy
Open a terminal, navigate to the folder containing proxy.cjs, and run:
Windows: Open PowerShell or Command Prompt.
macOS / Linux: Open Terminal.app (or your preferred terminal).
node proxy.cjsYou should see:
Proxy running on http://localhost:8000Tip: If you get an error "require is not defined in ES module scope", make sure the file is named
proxy.cjs(notproxy.js). The.cjsextension is required if your folder has apackage.jsonwith"type": "module".
Step 4: Start ngrok
Open a second terminal window (keep the proxy running in the first one) and run:
Windows: Open a new PowerShell or Command Prompt window.
macOS / Linux: Open a new Terminal.app tab or window (Cmd+T or Cmd+N).
ngrok http 8000When ngrok starts successfully, you will see output similar to this:
ngrok (Ctrl+C to quit)

Session Status    online
Account           Your Name (Plan: Free)
Region            India (in)
Web Interface     http://127.0.0.1:4040
Forwarding        https://your-unique-id.ngrok-free.dev -> http://localhost:8000
Important: Copy the Forwarding URL (the https://….ngrok-free.dev address shown in the Forwarding line). This is your public MCP server URL that you will enter in ChatGPT. Each time you restart ngrok, this URL changes — always use the latest URL.
Note: On the free ngrok plan, the forwarding URL changes every time you restart ngrok. If the URL changes, you must update the connector URL in ChatGPT Settings → Apps → CoreStack Assessment Server.
Step 5: Enable Developer Mode in ChatGPT
- Open ChatGPT at [https://chat.openai.com] (https://chat.openai.com)
- Click your profile icon → Settings
- Navigate to the Apps tab
- Click Advanced settings (or Create app)
- Toggle on Developer mode (marked as "Elevated Risk")
Note: Developer Mode disables memory for conversations that use custom connectors. This is a security measure by OpenAI.
Step 6: Create the CoreStack MCP Connector
-
In the Apps settings page, click Create app
-
Fill in the following details:
Field Value Connector Name CoreStack Server Description CoreStack MCP server for cloud assessments, frameworks, policies, and workload management MCP Server URL https://<YOUR_NGROK_URL>.ngrok-free.dev/mcpAuthentication No Auth Important: The MCP Server URL must end with
/mcp. Use the exact Forwarding URL from your ngrok output and append/mcpto it. For example, if your ngrok Forwarding URL ishttps://abc123.ngrok-free.dev, then enter:https://abc123.ngrok-free.dev/mcp -
Check the "I understand and want to continue" checkbox
-
Click Create
On success, you will see CoreStack Assessment Server listed under Enabled apps with a DEV label.
Step 7: Verify the Connection
In a new ChatGPT conversation:
- Click the "+" icon in the message composer
- Select More → Developer Mode
- Toggle on CoreStack Assessment Server
- Type
Check connection status - Click Confirm when ChatGPT shows the tool call
ChatGPT will attempt to authenticate using your credentials. On success, you'll see your Master Account, Tenant, and available accounts listed.
Configuring Microsoft Copilot
Microsoft Copilot connects to CoreStack through a Copilot Studio agent with the CoreStack MCP server added as a tool. This method requires no API keys or local setup — authentication is handled via OAuth using your CoreStack credentials.
Prerequisites
- Access to Microsoft Copilot Studio with permission to create and publish agents.
- A Microsoft 365 or Microsoft Teams license that supports publishing Copilot Studio agents to those channels.
- The CoreStack MCP server enabled for your account
Step 1: Create a New Agent
In Microsoft Copilot Studio, click Agents in the left navigation panel, then click + Create blank agent. In the Name your agent field, enter a name (for example, CoreStack MCP), then click Create. This opens the agent’s configuration workspace.
Step 2: Add a Tool
Click the Tools tab in the agent’s top navigation bar, then click + Add a tool. This opens the tool catalog, where you can create a custom Model Context Protocol server.
Step 3: Configure the MCP Server
Complete the Add a Model Context Protocol server form with the server name, description, and URL (https://{environment}.corestack.io/mcp), select OAuth 2.0 authentication, then click Create.
Step 4: Create a Connection
On the Add tool page, click Not connected next to Connection, then click Create new connection from the dropdown. This starts the process of authorizing Copilot Studio to connect to the CoreStack MCP server.
Step 5: Name and Create the Connection
Enter an optional label in the Display name field to identify this connection, then click Create. This step is optional — leaving the field blank still creates a valid connection.
Step 6: Sign In with CoreStack
Enter your CoreStack username and password, then click Sign In. This authenticates the connection so Copilot Studio can securely access your CoreStack data.
Step 7: Add and Configure the Tool
Click Add and configure now that the connection shows as connected. This adds the CoreStack MCP server to the agent and opens its tool configuration page, where the Tools tab lists the available MCP operations.
Step 8: Test the Agent
In Test your agent, send a prompt, such as asking for the current month’s cost by provider. If the agent is not yet authenticated, click Open connection manager in its response to verify your credentials.
Step 9: Connect the Tool
In Manage your connections, click Connect next to the CoreStack MCP OAuth connection. Select the connection from the Connection dropdown, then click Submit. This confirms which CoreStack environment the agent will use for authenticated requests.
Note: If the agent cannot retrieve data after connecting, contact the CoreStack team to confirm MCP server access is enabled for your account.
Step 10: Select the Agent Model and Publish
Click the Overview tab, then in Select your agent’s model, choose the model the agent will use for reasoning and responding. Click Publish, turn on Force newest version to ensure users in persistent channels like Microsoft Teams receive the latest version immediately, then click Publish again to confirm.
Step 11: Add Microsoft 365 and Teams Channels
Click Channels in the top navigation bar, then select Microsoft 365 and Microsoft Teams under Share a preview. Confirm Make agent available in Microsoft 365 Copilot is turned on, then click Availability options to set which users in your organization can access the agent.
Step 12: Share the Agent
Click Manage sharing, add or select the users or groups who should access the agent, then click Share. This grants the selected users permission to use the agent in Microsoft Teams and Microsoft 365 Copilot.
Step 13: Verify in Microsoft Copilot
Open Microsoft Copilot and confirm the agent appears in the Agents list in the side panel. Send a prompt, such as asking for a cost breakdown by cloud provider, and confirm Copilot returns live data pulled from the CoreStack platform.
Available Tools
Once connected, the following tools are available across all clients — including n8n workflows. Tools with no required parameters are the safest starting point for testing.
| Tool | Description |
|---|---|
connect_to_corestack | Establishes an authenticated session with CoreStack and walks through auth steps. |
check_connection_status | Returns the current master account, tenant, and available account options. |
switch_master_account | Changes the active master account. |
switch_tenant | Changes the active tenant. |
agent_type_retrieval | Lists agent types available to the tenant. |
framework_list_and_retrieval | Returns all available frameworks with pillars and questions. |
assessment_definition_list_and_retrieval | Lists assessment definitions (all parameters have defaults). |
assessment_run_list_and_retrieval | Views assessment run details for given definition IDs. |
assessment_run_question_list_and_retrieval | Gets question details for specific assessment runs. |
get_question_level_risk | Gets a question-level risk summary per pillar for an assessment run. |
get_pillar_wise_scores | Gets pillar-wise scores for an assessment run. |
workload_definition_list_and_retrieval | Lists workload definitions. |
create_workload_definition | Creates a new workload definition. |
get_workload_definition_version_details | Gets version details for a workload. |
workload_query_list_and_retrieval | Queries resources in a workload. |
get_workload_resource_filters | Gets resource filter options for workloads. |
find_related_policies | Finds policies related to a given framework. |
get_policy_descriptions | Gets policy descriptions by URI. |
get_policy_job_batch | Retrieves batch policy job execution details. |
get_policy_job_details | Retrieves single policy job execution details. |
get_violations_by_policy_job | Lists resources that violated a specific policy job. |
get_resource_batch | Batch retrieves resource details. |
generate_assessment_report | Generates an assessment report for a given run and framework. |
Troubleshooting
| Issue | Solution |
|---|---|
| "Invalid AccessKey/SecretKey" | Double-check your API keys. Ensure there are no extra spaces or characters. Verify the keys are active with your CoreStack administrator. |
| Still connecting to /mcp/finops, /mcp/graphion, or /mcp/assessment | These endpoints are deprecated. Update your client configuration to use the unified endpoint /mcp. |
| "Method not found" | The MCP server may already be connected. Try calling check_connection_status instead. |
| "No access key" | The configuration file is missing or the keys are not set correctly. Re-check the config file path and JSON format. |
| Connection timeout | Ensure your network allows outbound access to your CoreStack environment URL. Check firewall or proxy settings. |
| npx errors (Claude Chat / Cowork) | Ensure Node.js and mcp-remote are installed. Run npx --version to verify. If mcp-remote is missing, run: npm install -g mcp-remote |
| Tools not appearing after restart | MCP servers are loaded at application startup. Make sure you fully closed and reopened the application after editing the config file. |
| Server not in /mcp (Claude Code) | Run claude mcp list to confirm registration. If missing, re-run the mcp add-json command. Confirm you are in the correct project directory if using local scope. |
| mcp add-json invalid input (Windows) | Use the legacy command: claude mcp add --transport http corestack-assessment https://qa.corestack.io/mcp/assessment --header "X-API-Access-Key: KEY" --header "X-API-Secret-Key: KEY" |
| Node.js version error on install | Claude Code requires Node.js 18 or higher. Check your version with node -v and update before re-running the install command. |
| Tools not called automatically (Claude Code) | Ensure you are inside an active Claude Code session (run claude). Type /mcp to confirm the server shows as connected. If disconnected, restart the session. |
| "Credentials not found" on MCP node (n8n) | Go to Credentials > New > MCP Client HTTP API, create and save the credential, then assign it to the node. |
| Headers not being sent (n8n) | In Headers Override, enter one header per line with no quotes or spaces around the equals sign. |
| Community package setting not active (n8n) | Run: `docker exec -it n8n printenv |
| AI node returns no output (n8n) | Confirm your OpenAI credential is valid. Run the preceding MCP node first to verify assessment data is available in the execution panel. |
| "Received error from MCP server: Not Found" (ChatGPT) | Ensure the MCP Server URL in ChatGPT ends with /mcp. The proxy forwards all requests to /mcp/assessment/ on CoreStack. |
| "No access key, check your configuration" (ChatGPT) | The proxy is not injecting headers. Verify proxy.cjs has the correct API keys and is running. |
| "Session terminated" (ChatGPT) | The proxy may not be handling SSE streaming correctly. Ensure you are using the latest proxy code from this guide. |
| ngrok URL changed after restart (ChatGPT) | Free ngrok URLs change on restart. Update the connector URL in ChatGPT Settings → Apps → CoreStack Assessment Server. |
ngrok ERR_NGROK_4018 | You need a free ngrok account. Sign up at https://dashboard.ngrok.com/signup, get your authtoken, and run: ngrok config add-authtoken YOUR_TOKEN |
ngrok ERR_NGROK_334 | Another ngrok instance is already running. Find that terminal and press Ctrl+C to stop it, then try again. |
| "require is not defined in ES module scope" (ChatGPT) | Rename proxy.js to proxy.cjs. The .cjs extension is required if your folder has a package.json with "type": "module". |
| Tools not appearing in ChatGPT | Delete and re-create the connector in ChatGPT. Ensure both the proxy and ngrok are running. |
| "Error creating connector" (ChatGPT) | Verify both the proxy (node proxy.cjs) and ngrok (ngrok http 8000) are running. Check the MCP Server URL is correct and ends with /mcp. |
Security Notes
- Never share your API keys in public repositories, chat messages, or unencrypted files.
- Store credentials securely and rotate them periodically. Update the MCP registration after rotating keys.
- Use environment variables where possible instead of hardcoding keys directly in configuration files.
- For team deployments with Claude Code, use environment variable references in the committed
.mcp.jsonfile and inject keys at runtime. - The
--scope userregistration in Claude Code stores keys in your local~/.claude.jsonfile — treat this file as sensitive. - MCP servers can read and act on your CoreStack data — only register servers from trusted sources.
Updated 3 months ago