

Configuring Cost Anomaly Settings
Learn how to configure Cost Anomaly thresholds and notification channels in CoreStack FinOps at the cloud account and tenant levels to detect and alert on spending anomalies.
Feature Overview
Cost Anomaly Settings is a configuration feature within CoreStack's FinOpsmodule that allows you to define the thresholds and notification channels used for detecting unexpected spending in your cloud accounts. It is most relevant when you need to tailor anomaly sensitivity and route alerts to email, webhook, Teams, or Slack channels. This feature is most valuable to FinOps Adminsand FinOps Practitioners who manage cloud cost governance. Settings can be configured at the cloud account levelfor account-specific thresholds, or at the tenant level for a baseline across all accounts.
Note: Real-time (On Detection) notifications are applicable only to active accounts. Daily Summary notifications include both active and not-onboarded accounts.
How It Works
Cost Anomaly Settings evaluates cloud spend against conditions you define — each scoped to a cloud account or resource category. When spend meets or exceeds the configured thresholds, CoreStack flags an anomaly and dispatches alerts to configured notification channels. Each channel — Email, Teams Webhook, Webhook, and Slack — operates independently, so a failure on one does not block others.
Prerequisites
Before you begin, ensure the following:
- Role: You have the FinOps Admin or FinOps Account Admin role assigned in CoreStack.
- Cloud account: The target cloud account is onboarded and active with the FinOps product enabled
- Notification endpoints(if configuring notifications): Email addresses and Incoming Webhook URLs for Teams, Webhook, and Slack
- Access: You can navigate to
Governance > Account Governance > Cloud Accounts and Settings > Tenant Management
Configuring Anomaly Thresholds at the Cloud Account Level
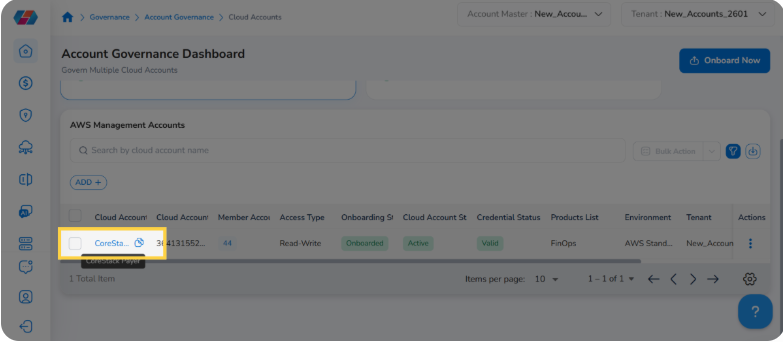
Navigate to Governance > Account Governance > Cloud Accounts.
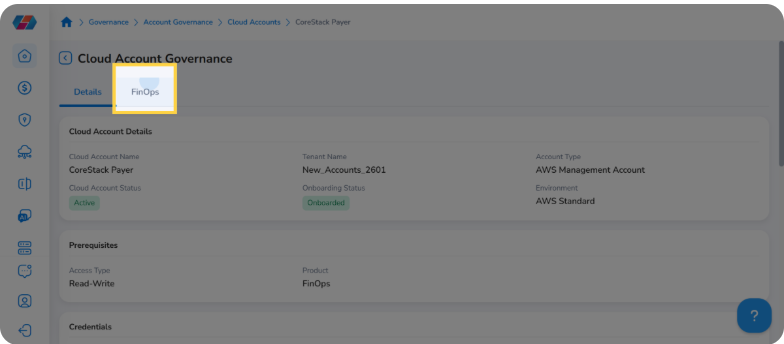
In the Actions column of your taghet account, click the ellipses and select view. Click the FinOps tab, then expand Cost Anomaly to view the configuration sections.
Step 1: Open the Anomaly Threshold Configuration
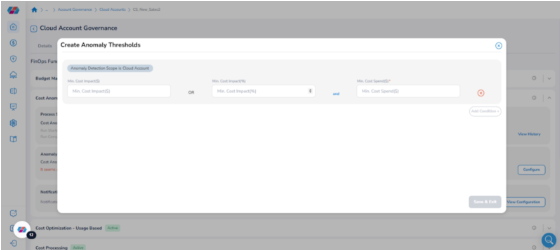
Click Configure in the Anomaly Thresholds section. The anomaly threshold configuration form opens.
Step 2: Add a Detection Condition
Click Add Condition +. A new condition row appears in the form.
Step 3: Set the Anomaly Detection Scope
In the Anomaly Detection Scope drop-down for the new row, select one of the following:
- CloudAccount — Detects anomalies at the cloud account level
- Resource Category — Detects anomalies for a specific resource category. A Resource Category drop-down appears — select the applicable value and click Ok
Step 4: Enter the Cost Threshold Values
Enter the cost threshold values using one of the following combinations:
- Min. Cost Impact($) alone — enter only this value
- Min. Cost Impact(%) and Min. Cost Spend($) together — both fields must be filled when using percentage-based detection
Repeat Steps 2–4 to add additional conditions. To remove a condition row, click the red cross icon on that row.
Step 5: Save the Anomaly Threshold Configuration
Click Save and Exit to save the threshold settings.
Configuring Cost Anomaly Notifications at the Cloud Account Level
Navigate to Governance > Account Governance > Cloud Accounts.
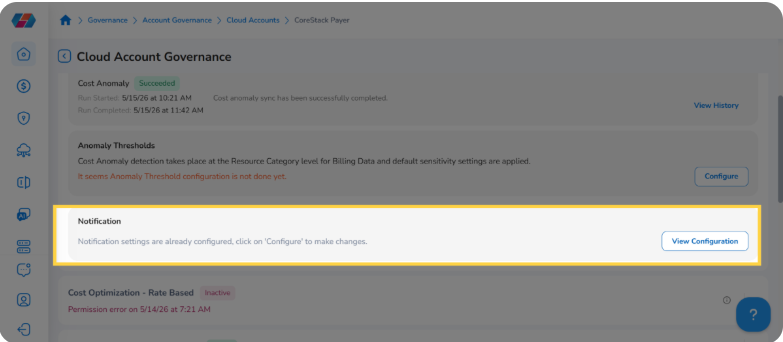
Click the cloud account name to open the Cloud Account Governance view, then click the FinOps tab.
The FinOps Functionalitysection loads, listing all configured financial operations for this account. Confirm Cost Anomaly shows an Active status before proceeding.
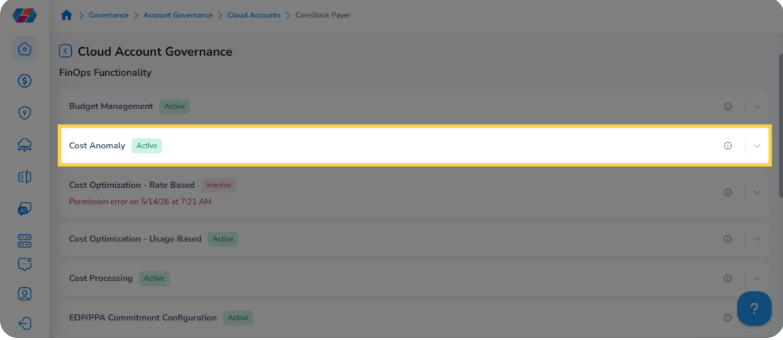
Note: Account-level Cost Anomaly supports Email, Teams Webhook, and generic Webhook notifications. Use the Dimension Grouping Rule level configuration if you need account filters or Slack.
Step 1: Open Notification Settings
Click View Configuration in the Notification section to open the existing notification settings for this account's cost anomaly alerts. Notifications will only dispatch if the master notifications_enabled toggle is active for this configuration.
Step 2: Review and Configure Notification Channels
The Notification Settingspanel opens in edit mode, displaying all configured channels. Review and update the following:
- Email — The recipient email address with Daily Summaryand On Detection checkboxes. Select one or both to control when alerts are sent.
- Teams Webhook— Enter your Microsoft Teams Incoming Webhook URL in the Add Microsoft Teams Webhookfield and click Add. Select Daily Summary and/or On Detection for that channel.
- Webhook — Enter your HTTPS webhook URL in the Add Webhook field and click Add.
Each channel dispatches independently — a failure on one does not prevent delivery to the others.

Step 3: Save and Apply Changes
Click Save & Apply to apply the updated notification settings to this account's cost anomaly configuration.
Configuring Cost Anomaly Settings at the Tenant Level
Note: Tenant-level Cost Anomaly settings are applicable only for cloud accounts.
Navigate to Settings > Tenant Management.
Expand Cloud Account Settings for the target active account and click VIEW FULL SETTINGS. Expand the Cost Anomaly Settings section to view configuration options.
Step 1: Configure Tenant-Level Anomaly Thresholds
Click Configure in the Anomaly Thresholds section. The Anomaly Detection Scope is fixed to Cloud Account at the tenant level and cannot be changed. Enter the minimum cost impact percentage in the Min. Cost Impact(%) box and click Save & Exit
Step 2: Configure Tenant-Level Notifications
Click Configurein the Notification section and click Enable Notifications. Add email recipients and configure webhook channels using the same steps as the cloud account level. Click Save & Applyto save the settings.
Additional Actions
Editing Anomaly Thresholds
In the Anomaly Thresholds section, click Edit. Update values as needed and click Save and Exit.
Viewing Anomaly Thresholds
Click View Settings in the Anomaly Thresholds section to see a read-only summary. Click Edit to modify, then Save and Exit.
Updating Notification Settings
Click View Configuration in the Notification section to reopen the panel. Remove or update entries and click Save and Apply.
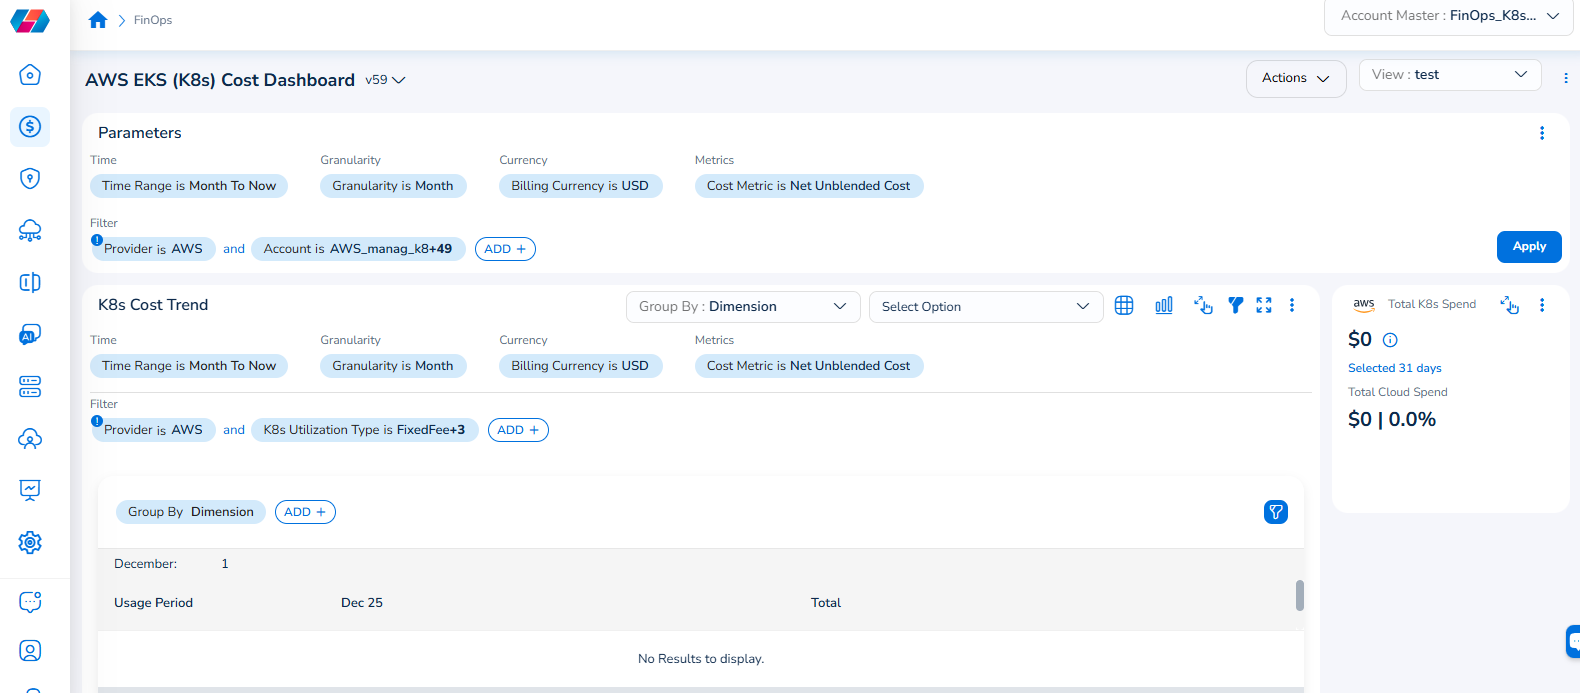
Note that the Cloud Account filter has been renamed to Account, and the Cloud Provider filter has been renamed to Provider.
For example, if you see the dashboard shown in the screenshot below, the Parameters > Filter section shows the Provider filter for which the value selected is AWS.
To add the Account filter, users can click ADD+ and select Account. In the drop-down list that appears, users can select all applicable values, and click Ok. Details will be displayed in widgets as per the selected filter(s).
In every widget that is available within a dashboard, users can click the Filter icon that appears on the top-right side of the widget and view the pre-defined filters. The Provider filter appears as a pre-defined filter. Users can use the ADD+ option to add custom filters and they have the option to add the Account filter from here.
Frequently Asked Questions
Q: What is the difference between cloud account level and tenant level configuration?
Cloud account level settings apply to a single specific account. Tenant level settings apply a baseline across all cloud accounts in the tenant.
Q: Can I add multiple anomaly detection conditions?
Yes. Click Add Condition + to add additional rows. Each row is an independent condition — if any is met, an anomaly is flagged.
Q: When should I use Min. Cost Impact($) alone versus both percentage fields?
Use Min. Cost Impact($) alone for absolute dollar detection. Use Min. Cost Impact(%) together with Min. Cost Spend($) for percentage-based detection — both fields are required together.
Q: Can I enable both Daily Summary and On Detection for the same channel?
Yes. The recipient receives an immediate alert when anomaly is detected and a consolidated daily summary. Each delivery generates a separate notification history record.
Q: Can I update or remove a webhook URL after saving?
Yes. Click View Configuration in the Notification section, update or remove the field, and click Save and Apply.
Troubleshooting
The Configure button is not visible in the Notification section
Cause: The cloud account may not be active, or the FinOps product may not be enabled.
Solution:
- Navigate to
Governance > Account Governance > Cloud Accountsand confirm Active status - Open the account's FinOps tab and confirm FinOps is enabled under Prerequisites
- Contact your CoreStack administrator if the account is not active or FinOps is not enabled
Notifications are not being received after configuration
Cause: The notifications_enabled toggle may be off, the webhook URL may be incorrect, or the account may not be active for On Detection alerts.
Solution:
- Click View Configuration and confirm the notifications toggle is active
- Verify each email address and webhook URL is correctly entered
- For On Detection alerts, confirm the account is Active
- Test webhook URLs using curl or Postman to confirm a 2xx response
If the issue persists, contact CoreStack support with the cloud account name, notification channel type, and timestamp of the missed alert.
Save and Exit does not save the threshold configuration
Cause: One or more required fields in a condition row may not be filled correctly.
Solution:
- Min. Cost Impact(%) and Min. Cost Spend($) must be filled together when using percentage-based detection
- EnsureAnomaly Detection Scope is set for every condition row
- If Resource Category is selected, confirm a value is selected in the Resource Category drop-down
Updated 2 months ago