

Policies
Overview
A policy describes how services (either individually or as a whole) ought to behave. More specifically, a policy describes which states of the cloud are permitted and which are not. Policies are used to assess, audit, and evaluate the configurations of your cloud resources, so that those resources stay compliant with your corporate standards and service level agreements.
The platform supports the following types of policies:
- AWS Config
- AWS Organization Policy
- Azure Policy
- OpenStack Congress
- Chef Inspec
- CoreStack Policy
- GCP Policy
- GCP Organization Policy
You can bring any of these policies into the platform with ease and re-use them outside of it later if required.
AWS Config
AWS Config provides a detailed view of the configuration of AWS resources in your AWS account. With AWS Config, you can ensure compliance with internal policies and best practices. You do this by creating AWS Config policies, which represent your ideal configuration settings.
AWS Config provides customizable, predefined rules called managed rules to help you get started. You can also create your own custom rules. CoreStack supports both managed rules and custom AWS Config rules.
CoreStack requires following permissions to execute managed AWS Config Policy.
- config:DeleteConfigRule
- config:DescribeConfigRuleEvaluationStatus
- config:GetComplianceDetailsByConfigRule
- config:PutConfigRule
Custom Config rules will require Lambda and IAM permissions other than this.
Azure Policy
Azure Policy helps to enforce organizational standards and to assess compliance at scale. Common use cases for Azure Policy include implementing governance for resource consistency, regulatory compliance, security, cost and management. Policies for these common use cases are already available in your CoreStack environment as part of the Marketplace policies. You can also upload custom policies as required.
Azure Policy evaluates resources in Azure by comparing the properties of those resources to business rules. These business rules, described in JSON format, are known as Policy Definitions.
Azure Policy Execution through CoreStack requires access to the following services.
- Microsoft.Authorization
- Microsoft.PolicyInsights
Roles required:
- Resource Policy Contributor (for Azure Policy related operations)
- Contributor (to perform remediation actions on the resources)
Note: Contributor role has only read access to Azure Policy and hence cannot be used to execute policies.
UI Navigation
Navigate to Guardrails submenu under Governance in the Left navigation menu and select Policies option to land in Policies (Marketplace).
The tabs at the top represent the scope of the policies. You can see 2 tabs: Marketplace and My Policies.
Marketplace
CoreStack provides a wide range of pre-defined policies which can help in realizing multiple use cases. The marketplace lists the policies available across multiple clouds. These are pre-loaded for all subscriptions and are FREE to be executed on-demand or scheduled.
These policies are available across all tenants and are usually created by the Product Administrator. In our SaaS version, it is managed by CoreStack. In on-premises installations, it will be managed by the on-site administrator.
Tip:These policies have the scope value set to Global.
My Policies
These policies have been created by users within the tenant. These are available only for users within the tenant. You can add more policies or edit/delete existing policies in this tab based on your role and access policies.
Tip:These policies have the scope value set to Tenants.
Search and Filter
CoreStack offers search and filter functions to help quickly look for the policies you need to execute. The Search bar is available just above the policies list. To Filter Policies, you can click on the "Filter" icon placed to the right end above the templates list.

The Text Search helps you search using any string available in the following fields:
- Name of the Policy
- Description of the Policy
- Engine Type
- Classification
- Service
The text search is thus quite useful in refining your search results based on any little information you have on the preferred result set.
CoreStack also offers Filters to help you narrow down the list of policies by using one or a combination of filters. On clicking the Filter icon, you will see the list of Filter options available as shown below. Select the preferred options and click on "Apply Filter" button at the bottom of this box.
Tip:Use the Reset button to quickly remove all selected filters and view all results.
Once you decide on a policy that you would like to try out, you can execute it on-demand or schedule it for a one-time or recurring execution(s) in future.


View Policy Details
To get more information about a specific policy, click on the policy row to open the 'Policy Detail' page. It will show 4 tabs Metadata, Content, Compliance and Remediation.
- Metadata – Properties collected during Policy creation
- Content – Policy content uploaded using file can be viewed
- Compliance – Details of compliance controls which are configured with this Policy
- Remediation – Details of Policy Remediation Action and the mapped template(s)

Policy Actions
The actions that can be performed on a policy will be shown when you hover your mouse on a policy. The list of actions depends on the scope of the policy (Marketplace, My Policies) and the RBAC access for the user.

| Action Icon | Action Name | Action Description | Marketplace Policies | My Policies (Shared) |
|---|---|---|---|---|
 | View Schedules | Will redirect to Schedules page and filters the schedules by selected Policy | Yes | Yes |
 | View Executions | Will redirect to Job history page and filters the Jobs by selected Policy | Yes | Yes |
 | Execute | Executes the policy immediately and redirects to "Job history" where you can see the execution result | Yes | Yes |
 | Edit | Modifies the properties, content, metadata and remediation details of the Policy (same as Policy Create workflow) | No | Yes |
 | Schedule | Similar to Execute but schedules the execution to be run later once/multiple times | Yes | Yes |
 | Delete | Deletes the Policy | No | Yes |
 | Auto Remediation | Configures remediation actions for the policy violations. Note: This option is available only for system policies. | Yes | Yes |
View Schedules
Lists all policy execution schedules of the current tenant. The tabs at the top right represents the schedule status. You can see 2 tabs: Upcoming and Past.
"Upcoming" will list the schedules which are active and are to be executed in future. "Past" will list the schedules which were already executed. A sample screenshot is shown below:

Policy Schedules page has search and filter functions to help quickly look for the schedules. The Search bar is available just above the schedules list. To Filter Jobs, you can click on the "Filter" icon placed to the right end above the Schedule detail tab.
Policy Schedules list show the following columns in the list.
- Schedule Name – Name of the schedule
- Policy – Name of the Policy Scheduled
- Recurrence – Recurrence of the Schedule (Once/ Daily / Weekly / Monthly / Yearly)
- Next Run Time – Date and Time of the Next execution
- Requested By – CoreStack username who created the schedule.
The details of the schedule will be shown on the right panel for the selected schedule from the list. This will show the execution history of the schedule which will redirect to Job history page and filter by this schedule. It also supports the following actions on schedule.
- Edit (All Occurrences) – Modifies the Schedule and impacts all occurrences
- Delete (All Occurrences) – Deletes the Schedule and removes all future occurrences
- Edit Next Occurrence – Modify the execution time for next immediate occurrence alone
- Delete Next Occurrence – Delete the next immediate occurrence alone
View Executions (Job History)
Lists all policy executions of the current tenant. A sample screenshot is shown below. The tabs at the top right represents the archive status of jobs. You can see 2 tabs: Active Jobs and Archived Jobs.

Policy Job History page offers search and filter functions to help quickly look for the executions. The Search bar is available just above the jobs list. To Filter Jobs, you can click on the "Filter" icon placed to the right end above the Job detail tab.
Policy Job History page also has Archive, Un-Archive and Delete Actions. These actions can be used to have limited number of executions in Job history page.
Policy Jobs list show the following columns in the list.
- Policy Name – Name of the policy executed
- Job Name – Name of the Job which is generated by the CoreStack with Policy Name and some random characters.
- Cloud Accounts – Name of the Cloud Account selected when executing
- Run Date – Date & Time of the Job execution
- Type – Execution Type (On-Demand, Scheduled or System)
- Status – Status of the Job execution.
Policy Job Detail will be shown on clicking Job from the list. This will show two tabs. Inputs and Execution Logs.
- Inputs – Cloud Account details and input parameters passed for the execution
- Execution Logs – Short list of non-compliant resources from the Cloud Account for the executed Policy. You can click on "VIEW FULL LOG" button to view all the resources.

Execute Policy
Executes the policy against Cloud Accounts and returns the non-compliant resources in 'Job History' execution results. Execute requires following inputs:
- Cloud Account – Cloud Account in which the Policy check is to be done.
- Cloud Account Additional Info – Scope on Cloud Account (Eg. Resource Group, Location, Region). These details will be prompted based on the policy content. For example, Policies which can configured at subscription level will not require Resource Group.
- Execution Parameters – Additional parameters from the Policy. Eg. "Azure Allowed Locations" policy will prompt for array of Allowed locations.
While executing a policy, the Remediation section will allow you to configure the remediation types and actions.
- Auto Trigger: For this remediation type, the remediation action will be triggered automatically whenever policy violations are detected. You can configure the action to be performed for remediation in the Remediation Action field.
- User Triggered: For this remediation type, the remediation action must be triggered manually whenever policy violations are detected.

Schedule Policy
Schedules the policy execution to be run later once or multiple times. Schedule requires the following details:
- Name – Name of the schedule
- Description – Detailed description about the schedule
- Schedule Settings – Execution options. Policy can be scheduled to execute Once or to repeatafter specified Minutes, Hours, Daily, Weekly, Monthly, and Yearly.
- Cloud Account – Cloud Account need to be used for executions.
- Cloud Account Additional Info – Scope on Cloud Account (Eg. Resource Group, Location, Region). These details will be prompted based on the policy content. For example, Policies which can configured at subscription level will not require Resource Group.
- Execution Parameters – Additional parameters from the Policy. Eg. "Azure Allowed Locations" policy will prompt for array of Allowed locations.

Note:If a schedule is created by a user and then that user is deleted during the subsequent run, the Updated By field of the schedule gets updated to either the tenant admin or the account admin and then it is executed on that user's context.
Auto Remediation
You can enable auto remediation for system policies that will be performed if any policy violations are detected during the execution of the specific system policy. Perform the following steps to enable auto-remediation:
- Navigate to Policies screen.
- Mouse-over the required system policy. The Auto Remediation option will appear for the system policy.
- Enable the Auto Remediation option using the toggle button.
- Click Enable button in the confirmation dialog box.
Auto remediation will be enabled for the selected system policy.
NoteIf the selected system policy has input parameters, the Auto Remediation cannot be enabled.
The actions defined in the Remediation section of the policy template will be executed in case of any policy violations.
You can view the remediation actions of the policy template by clicking on the system policy and selecting the Remediation tab.
Once the system policy is enabled with auto remediation, the policy will be executed automatically every 12 hours.
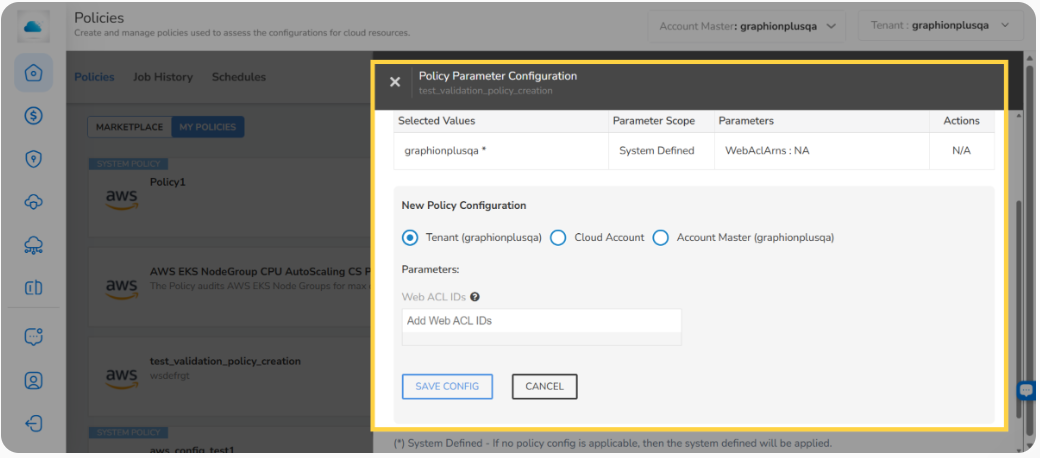
Policy Parameter Configuration
The Policy Parameter Configuration panel lets you define threshold values used when a policy executes. Under New Policy Configuration, three scope options are available: Tenant, Cloud Account, and Account – Master Tenant ([master tenant name]).
Note: The Account – Master Tenant option is visible only to Account Admins operating within a Master Tenant context. When saved, the configuration cascades automatically to all child tenants and cloud accounts.
Perform the following steps to configure a policy at the Account Master level:
- Select a policy from the Policies list and open the Policy Parameter Configuration panel.
- Under New Policy Configuration, select Account – Master Tenant ([master tenant name]). The parameter fields for the policy appear.
- Enter the threshold values in the parameter fields.
- Click Save Config. The configuration is saved and appears in the List of Parameter Configurations table with Parameter Scopeshown as Account Master.
When a user initiates a manual execution and an Account Master configuration exists, the execution panel pre-populates the values labeled “Inherited from Account Master”. Edited fields show an “Overridden” badge and apply to that run only — the saved configuration is not changed. Account Master configurations are also applied automatically during FinOps Assessment runs.
Note: If both a Tenant-level and an Account Master configuration exist for the same policy, the Tenant-level configuration takes precedence at execution time.
Create Custom Policies
CoreStack also provides the option for users to upload their own policies and use them to execute against their accounts.
To start with, first navigate to Governance > Guardrails > Policies > MY POLICIES tab and then click the '+' button next to the Search bar at top right to create a policy.
Note:Custom policies can now be created and supported for the CoreStack Assessments bundle.
Policy creation involves four tabs:
- Policy
- Remediation
- Trigger
- Notification
Policy Tab
The metadata of the policy and the policy content are required in the Policy tab. This tab has three sections, Policy Property, Policy Content, and Policy Metadata. You must fill all these sections with relevant information or options.
Policy Property
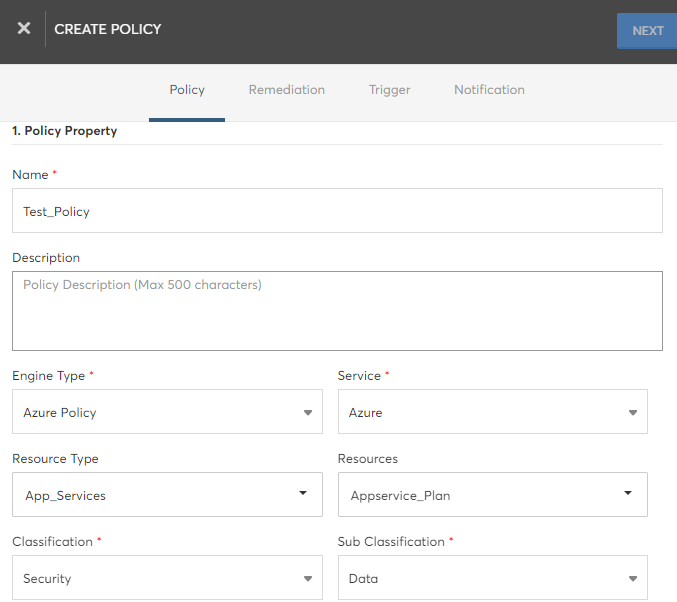
The table below describes the property fields that needs to be filled:
| Field | Description |
|---|---|
| Name | Name of the policy – any preferred name for identification. |
| Description | Detailed description about the policy – free format text. |
| Engine Type | Engine type of the policy. Choose from one of the supported types (Azure Policy, AWS Config, AWS Organization Policy, GCP Organization Policy, GCP Policy, Oracle Cloud Guard, and Kubernetes Policy). |
| Service | Cloud service that is relevant for this policy (AWS, Azure). Note: This is loaded based on the engine type selected. |
| Resource Type | The resource type(s) within the selected cloud that are relevant to this policy. Can select multiple resource types. |
| Resources | Resources from the selected resource type(s) that are relevant to this policy. Can select multiple resources. |
| Severity | Severity of the policy (High/Medium/Low). |
| Classification | Classification of the policy (Security/Cost/Operation/Access/Resource). |
| Sub Classification | Sub classification of the policy (choose from values in the dropdown). |
| Scope | Scope of the policy (defaults to Tenant for custom policies). |
Policy Content
CoreStack supports File and Git options for policy content upload.
File: Policy content file can be uploaded by using Browse button.
Git: Policy content can be maintained in Public or Private Git repositories. CoreStack will access the content from Git whenever required. Git option requires the following details to access policy content.
| Field | Description |
|---|---|
| URL | Clone URL of the Git project which has the policy content. |
| Username | Git username if the project is not public. This field appears for the private option. |
| Password or Private SSH key | Password or SSH Key file if the project is not public. This field appears for the private option. |
| Content Path | Folder path to the policy content file from the root directory of project. |
| Content Branch | Provide the content branch if the policy is located in any specific branch. Default branch is master. This field is not mandatory to be filled. |
Policy Metadata
Mark it as System Policy: System policies will be executed by CoreStack for all the cloud accounts added for the specific cloud (AWS/Azure). Hence, this must be selected only if it is a policy that has to be executed by default for all cloud accounts to be onboarded.
Remediation Tab
When a policy violation is detected, the actions required to remediate/resolve this violation needs to be readily available. This will help the cloud engineers to immediately trigger the appropriate action to remediate the violation.
You can configure multiple actions that can help remediate the cloud resource violating this policy in order to make it compliant. The cloud engineer taking action after seeing a violation can apply any of these actions on violated resources through Recommendations dashboard.
Note:Each action is essentially a cloud API call or an existing template in CoreStack. Hence you need to ensure that there are templates already uploaded or available in the Templates module if the action is based on template.
Perform the following steps to fill details in the Remediation tab:
- In the Name box, type the name of the remediation.
- In the Description text box, type the detailed description about the actions involved in the remediation.
- To add new action for remediation, click Add New Action. The Fill Policy Action Details section appears.
- In the Fill Policy Action Details section, fill the following fields:
- In the Name box, type the name of the remediation action.
- In the Description text box, type the detailed description about the action.
- In the Action Type field, the option Template is selected by default.
- In the Select a Template list, click to select a template.
- In the Map Template Inputs section, select relevant options from the fields that appears below. This step helps in mapping the resource details to template input parameters. If any input parameters are not mapped, those parameters will be prompted when applying the action on violated resources.
- Click Save Policy.
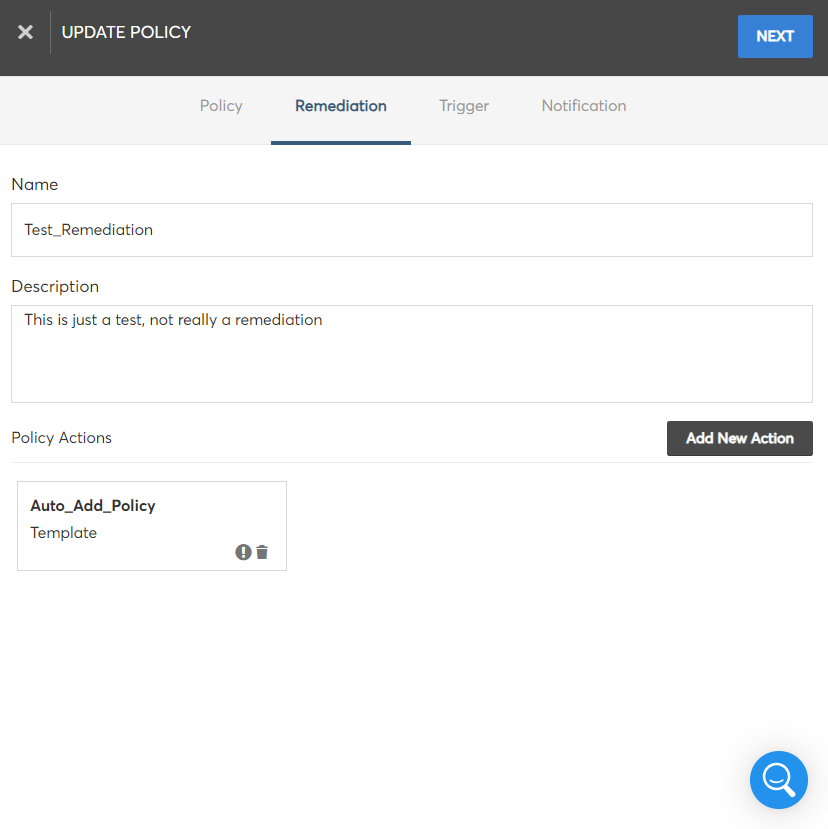
You can view the added policy action details in a box below. You can even click the delete icon to delete a policy action.
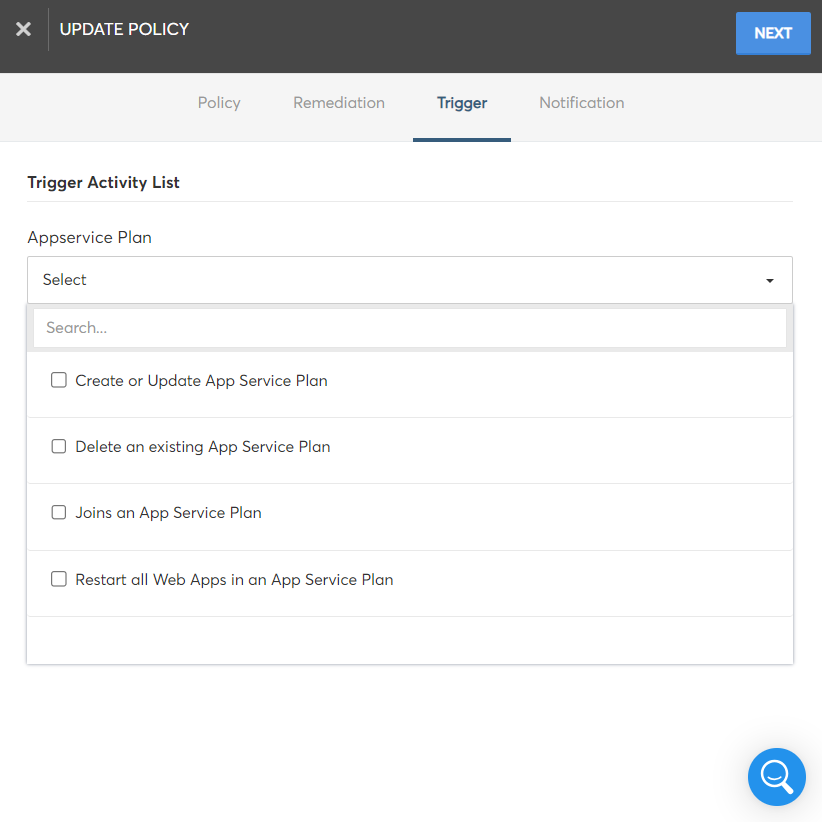
Trigger Tab
Cloud-native actions that are specific for the resource type can be configured in this section to resolve the policy violation. The configured action(s) will be triggered automatically for the resource when a policy violation is detected. You can configure multiple triggers for each policy.
Based on the resources involved in the policy, the list of cloud-native actions will be available for configuration in this section.
Select the required action(s) that needs to be triggered to resolve the policy violation from the Trigger Activity List field and then click Next to save the triggers.
Notification Tab
The policy violations can be resolved by making any required changes in specific resources. All stakeholders involved in managing and sharing responsibility over the impacted resources must be informed.
You can configure notifications that are available in your existing tools/platforms or specify the email addresses/mailing lists that must be notified about the policy violation and the corresponding changes.
The supported notification methods are:
- ServiceNow
- ZOHO ServiceDesk
- JIRA ServiceDesk
- JIRA DataCenter
The defined notifications will be initiated in the respective tools/platforms automatically and helps in integrating the cloud account management with the existing ITSM and other monitoring mechanisms in the organization.
Perform the following steps to configure policy notifications:
- Click the Add button in the Custom Notifications section and the available notification methods will be listed.
- To configure external tools/platforms (such as JIRA, ServiceNow, ZOHO ServiceDesk) for notifications, enable the corresponding checkbox from the list. Select the configured tools/platforms from the resulting drop-down list.
- To configure email notifications, you can specify the email addresses and mailing lists that need to be notified in the Email Address field.
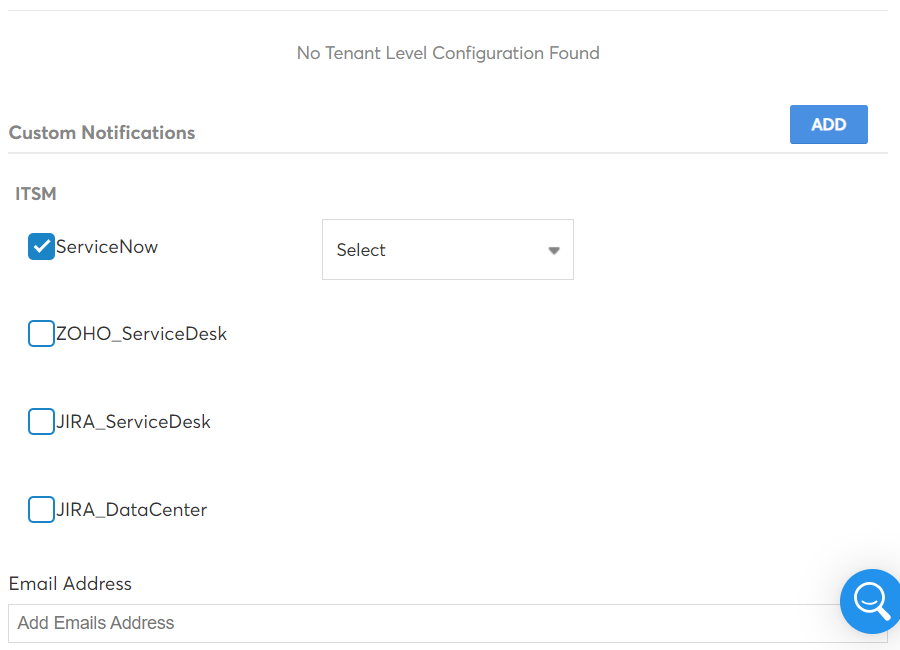
- To finish creating the policy, click the Confirm button.
Note:The notification options ServiceNow, ZOHO ServiceDesk, JIRA ServiceDesk, and JIRA DataCenter will not appear in the Custom Notifications section unless they are enabled in CoreStack.
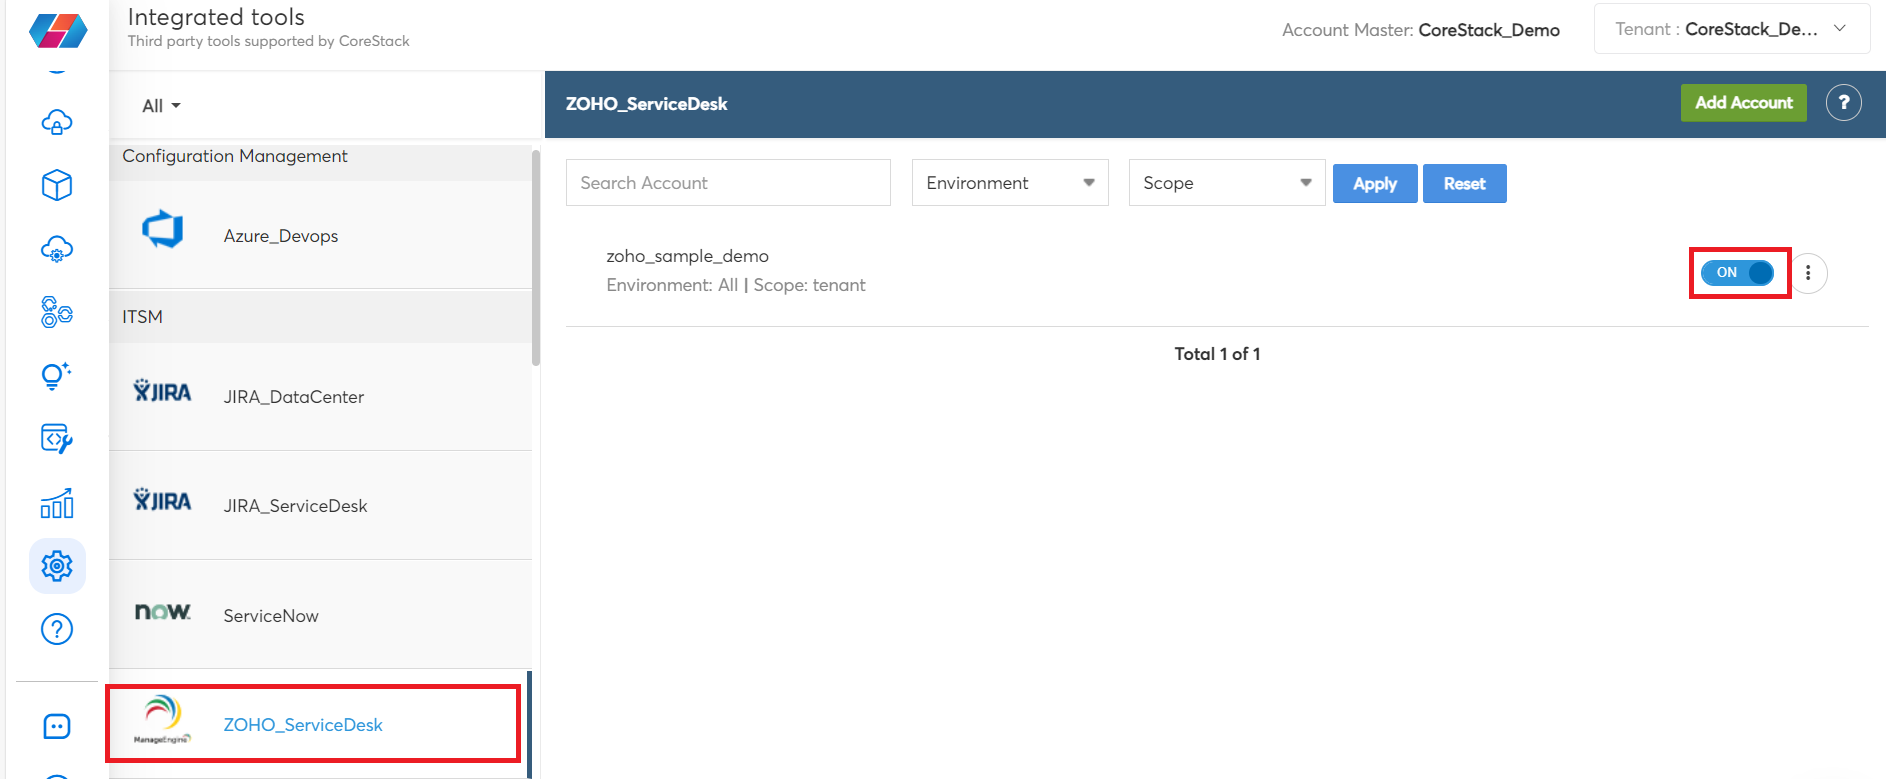
To enable these options:
- Go to Settings > Integrated Tools.
- On the left vertical pane, select the notification method that needs to be enabled (JIRA_DataCenter/JIRA_ServiceDesk/ServiceNow/ZOHO_ServiceDesk).
- Use the Search Account box to search for an account and based on the requirement, select the appropriate option in the Environment and Scope fields, and then click Apply.
- Move the slider to right to enable the notification option.
- To view notification details, edit details, or delete the notification configuration, select the three vertical dots and select View Settings/Edit/Delete to take the appropriate action.
Updated 2 months ago