

Bulk Onboarding
Learn how to onboard AWS, Azure, and GCP cloud accounts into CoreStack using the Onboarding Hub's Single Account and Bulk Onboarding paths, including Azure CSP.
Feature Overview
The CoreStack Onboarding Hub (onboard.corestack.io) is the entry point for connecting AWS, Azure, and GCP cloud accounts to the CoreStack platform. Once an account is onboarded, CoreStack can bring it under FinOps, CloudOps, Assessments, and SecOps capabilities. This guide is intended for Customer Success, Professional Services, and Cloud Operations teams onboarding customer or internal cloud accounts.
This guide covers every onboarding path currently available in the Hub:
- Single Account Onboarding — onboard one Azure subscription at a time using an interactive Azure sign-in to discover accessible subscriptions.
- Bulk Onboarding — onboard many accounts, subscriptions, or projects in one pass, for AWS, Azure (EA, MCA, or CSP), and GCP.
- Parent Account Onboarding — onboard EA and MCA billing accounts through an interactive Azure sign-in to complete the required prerequisites and proceed with the onboarding process.
How It Works
The Onboarding Hub is the landing page after login and offers the two onboarding paths above. A "Need Help?" panel at the bottom of the Hub links to internal documentation and support for any issues encountered during onboarding.
Prerequisites
Before you begin, ensure the following:
- CoreStack access: Active login credentials with access to the Onboarding Hub.
- Account Master & Tenant: Know the correct Account Master and Tenant to onboard the subscription or accounts under.
- Modules: Decide which CoreStack modules to enable — FinOps, CloudOps, Assessments, SecOps.
- Access level: Decide whether onboarding needs Read Only or Read Write access.
- Azure App registration: You have created an app in
Azure Portal > Microsoft Entra ID > App registrations. - App credentials: You have the app's Application (client) ID, Tenant ID, and client secret.
- Service Principal Object ID: You have the Object ID of the Service Principal (Enterprise application). Do not use the App Registration's Object ID. The wizard grants this Service Principal the Storage Blob Data Reader role on the storage account.
- Billing Account ID: You have the ID from the billing account's Properties page in Cost Management + Billing.
- Azure user: You can sign in as an Azure user who can create cost exports on the billing account and create or manage the storage account.
- Existing storage account (optional): If you plan to reuse a storage account, you have its subscription, resource group, name, and container.
- Note: Each onboarding path below has additional, path-specific prerequisites (for example, an Azure App Registration for Single Account Onboarding, or an IAM role for AWS Bulk Onboarding). These are listed at the start of that path's section.
Logging In
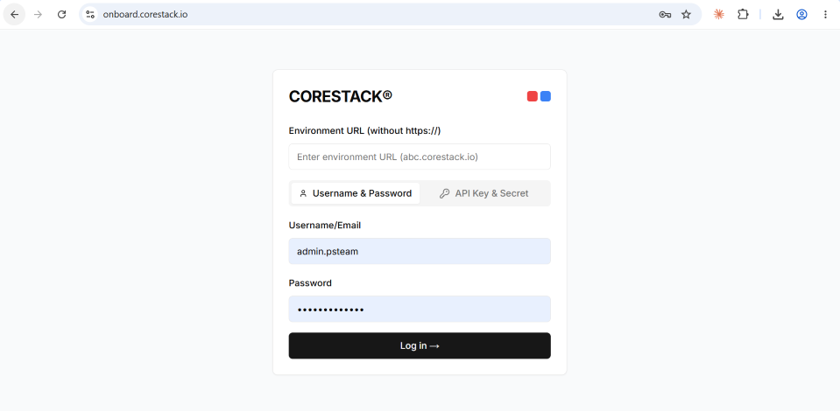
- Navigate to
https://onboard.corestack.io/in your browser. - In the Environment URL field, enter your CoreStack environment without the "https://" prefix, for example
xxxxx.corestack.io.- Username & Password — enter your Username/Email and Password, then select Log in.
- API Key & Secret — enter the API Key and Secret issued for the environment, then select Log in.
- On successful authentication, the Onboarding Hub is displayed.
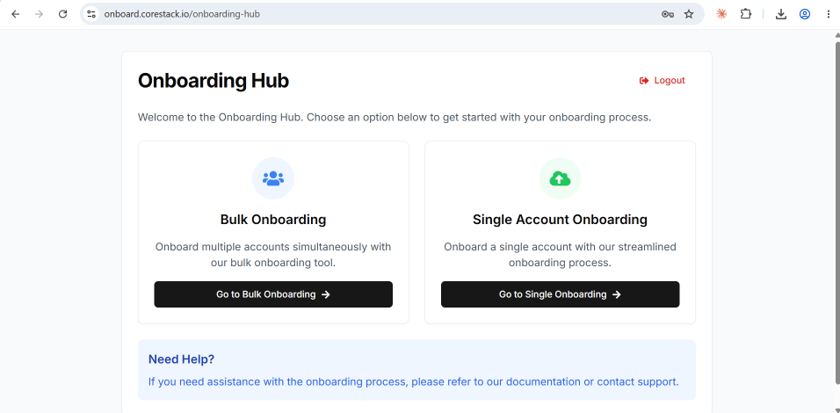
The Onboarding Hub
The Onboarding Hub is the landing page after login and offers two onboarding paths.
| Requirement | Details |
|---|---|
| Single Account Onboarding | Onboard one Azure subscription at a time using an interactive browser/device sign-in to discover accessible subscriptions before entering App Registration details. |
| Bulk Onboarding | Onboard multiple AWS accounts, Azure subscriptions, or GCP projects in one pass under a single set of credentials (e.g., all subscriptions under one Azure EA enrollment, or all accounts under one AWS management account). |
A "Need Help?" panel at the bottom of the Hub links to internal documentation and support for any issues encountered during onboarding.
Single Account Onboarding (Azure — Interactive Login)
This path onboards one Azure subscription at a time. You sign in interactively to Azure (via a device login code) so CoreStack can discover the subscriptions your account can access, then complete onboarding with an existing App Registration's credentials. Use this when you want to browse and confirm available subscriptions through your own Azure sign-in before committing App Registration details.
Before You Start
| Requirement | Details |
|---|---|
| CoreStack access | Active login credentials with access to the Onboarding Hub. |
| Account Master & Tenant | Know the correct Account Master and Tenant to onboard the subscription under. |
| Azure sign-in | Azure credentials for a user with access to the target subscription(s), for the interactive sign-in step. |
| Azure App Registration | Created in advance in Azure Active Directory → App registrations, with: Application (Client) / App Registration ID; Directory (Tenant) ID; Object ID of the Service Principal (not the App Registration's own object ID); Client Secret. |
| Access level | Decide whether onboarding needs Read Only or Read Write access. |
| Modules | Decide which CoreStack modules to enable: FinOps, CloudOps, Assessments, SecOps. |
| Billing currency | The currency to associate with the subscription. |
Important: The App Registration must exist before you start. CoreStack does not create it for you — the interactive login only authenticates the signed-in user to discover subscriptions and assigned roles to the subscription, which is a prerequisite for onboarding; the App Registration credentials are still required to grant CoreStack ongoing access.
Procedure
Step 1 — Open Single Account Onboarding
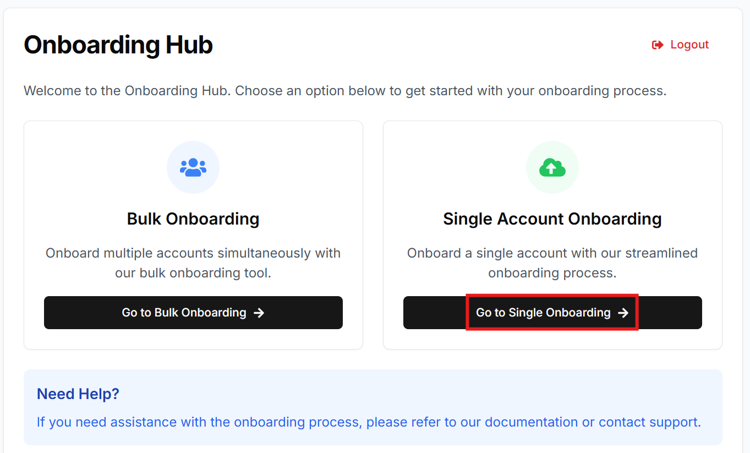
From the Onboarding Hub, click Go to Single Onboarding under the Single Account Onboarding card.
Step 2 — Select Account Master, Tenant, and Azure
- Under Select Account Master, choose the relevant account master (e.g.,
admin.psteam). - Under Select Tenant, choose the target tenant.
- Select the Azure tile from the cloud provider options (AWS / GCP / Azure).
Step 3 — Choose Individual Subscription Onboarding
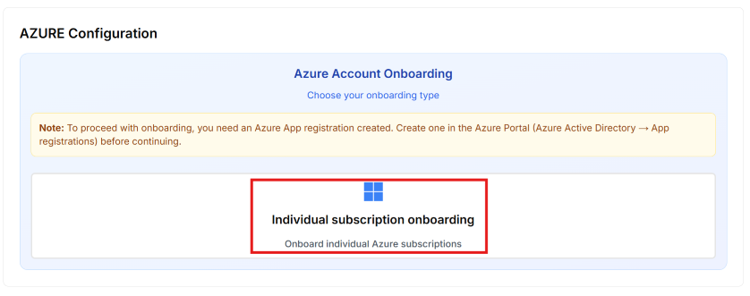
The Azure Configuration panel opens with a single onboarding type. Click Individual subscription onboarding to onboard one Azure subscription at a time.
Step 4 — Start Azure interactive login
Click Start Azure Interactive Login to begin device-code authentication. A new browser tab opens to Microsoft's sign-in page.
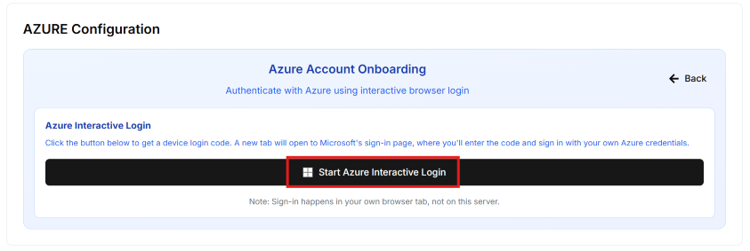
Step 5 — Complete the device login sign-in
- In the new tab, confirm the device code shown on the CoreStack page matches the one displayed, then sign in with Azure credentials that have access to the target subscription(s).
- When prompted "Are you trying to sign in to Microsoft Azure CLI?", verify the account shown and click Continue.
- Once Microsoft confirms sign-in was successful, close the browser tab and return to CoreStack.
Step 6 — Select the subscription(s) to onboard
An "Azure Login Successful!" banner appears with the list of subscriptions the signed-in account can access. Already-onboarded subscriptions are labeled accordingly.
- Check Select All, or choose specific subscriptions to onboard.
- Click Continue Onboarding. Use Clear Token and Login Again to sign in with a different Azure account.
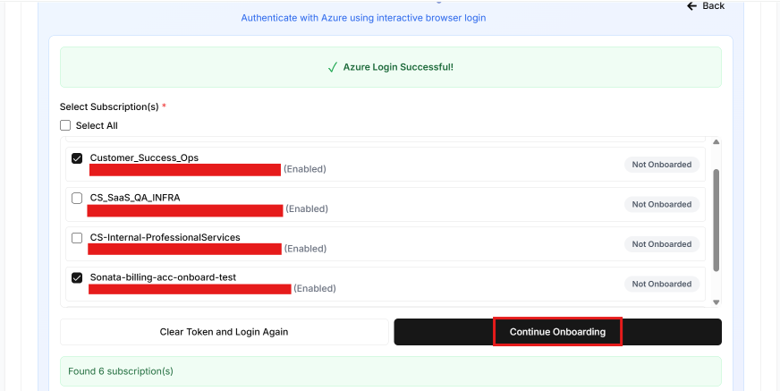
Step 7 — Enter the Azure Onboarding Configuration
Provide the App Registration details for the Service Principal that will grant CoreStack ongoing access. Fields marked with a red asterisk (*) are required.
-
App Registration ID and Tenant ID — from your Azure AD App Registration.
-
Object ID — the Object ID of the Service Principal (not the App Registration's own object ID).
-
Secret Key — the client secret value for the App Registration.
-
Currency — the billing currency, e.g., USD - US Dollar.
-
Access Type — Read Only for visibility-only access, or Read Write if CoreStack must also perform remediation/automation.
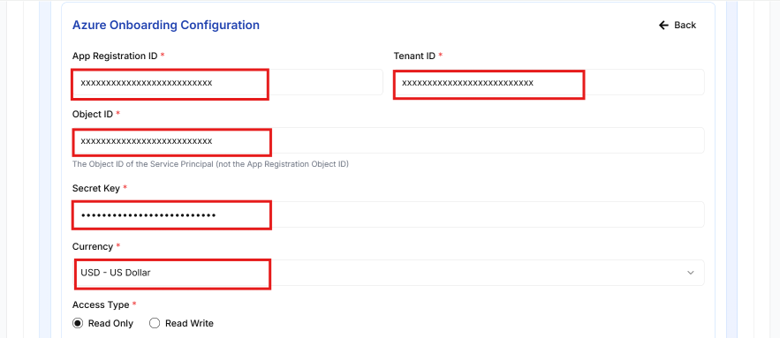
Important: Double-check the App Registration ID, Tenant ID, Object ID, and Secret Key before submitting — incorrect values will cause onboarding or role assignment to fail.
Step 8 — Select modules and onboard
-
Under Select Module(s), check Select All, or individually check FinOps, CloudOps, Assessments, and/or SecOps.
-
Click Onboard Cloud Accounts to submit.
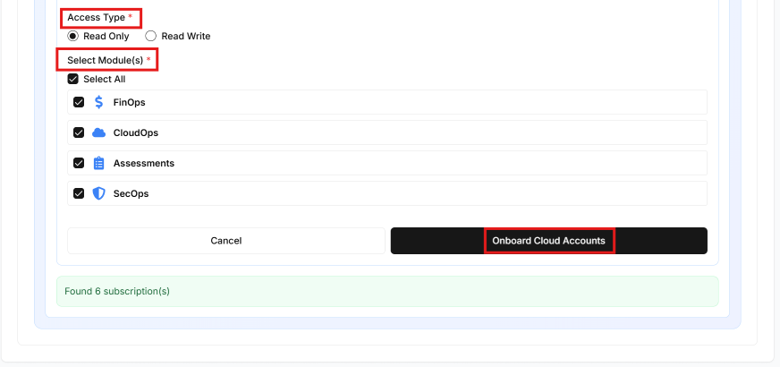
Note: Role assignment and propagation on the Azure side can take several minutes. Avoid resubmitting the form while onboarding is in progress.
Step 9 — Review the onboarding results
CoreStack displays the status of each selected subscription, with counts for Onboarded, already onboarded, and failed.
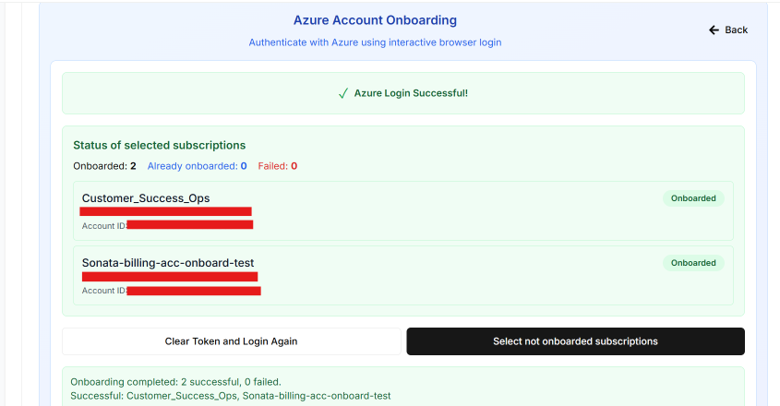
Step 10 — Onboard any remaining subscriptions
If the signed-in account has access to additional subscriptions that weren't selected initially, they can be onboarded in the same session:
- Click Select not onboarded subscriptions to return to the subscription list.
- Check the additional subscription(s) — already-onboarded ones are highlighted and labeled Onboarded.
- Click Continue Onboarding and repeat Steps 7–9 (configuration, module selection, and review) for the newly selected subscriptions.
Bulk Onboarding
Bulk Onboarding connects multiple accounts, subscriptions, or projects in a single pass, under one set of credentials. It supports AWS, Azure (EA, MCA, and CSP), and GCP.
Common Setup
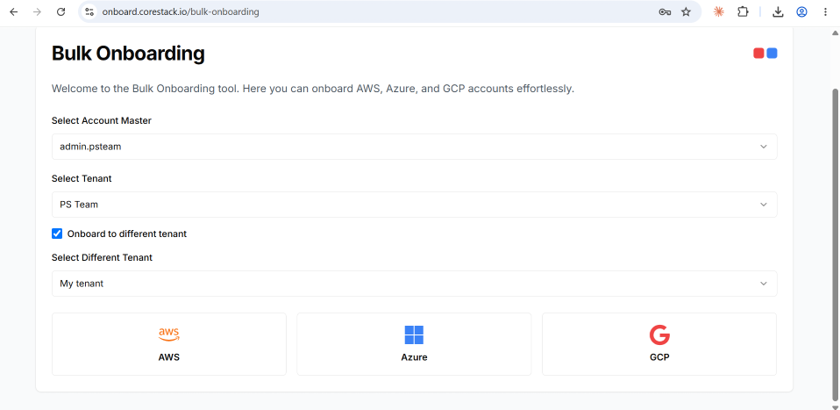
From the Onboarding Hub, select Go to Bulk Onboarding. The steps below are shared across all cloud providers before you reach provider-specific configuration.
- Select Account Master — choose the CoreStack account master under which the cloud accounts will be onboarded (pre-populated based on login context).
- Select Tenant — choose the CoreStack tenant the billing accounts belong to.
- (Optional) Check Onboard to different tenant to onboard into a tenant other than the one selected, then choose it from the Select Different Tenant dropdown.
- Select the target cloud provider tab: AWS, Azure, or GCP.
AWS
| Requirement | Details |
|---|---|
| Access | A Management/Payer account with permission to assume roles or create a CloudFormation stack. |
| IAM role | Role Name and External ID for the IAM role already established for CoreStack to assume in the AWS accounts. |
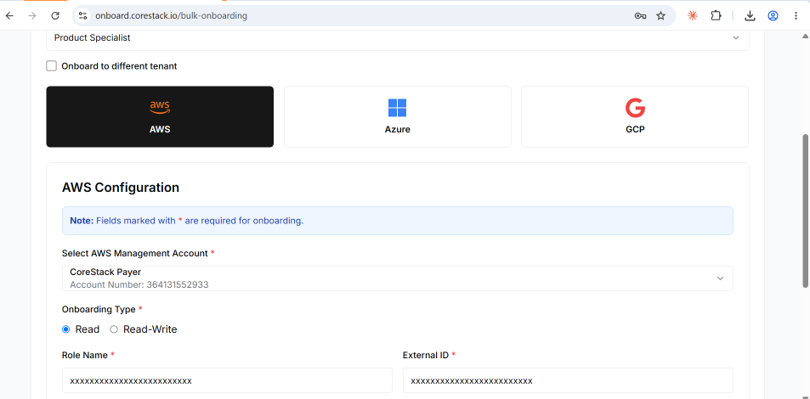
- Select AWS Management Account from the dropdown (required).
- Choose the Onboarding Type: Read or Read-Write.
- Enter the Role Name and External ID (required).
- Under Select Product(s), check the CoreStack modules to enable: FinOps, CloudOps, Assessments, SecOps (or Select All).
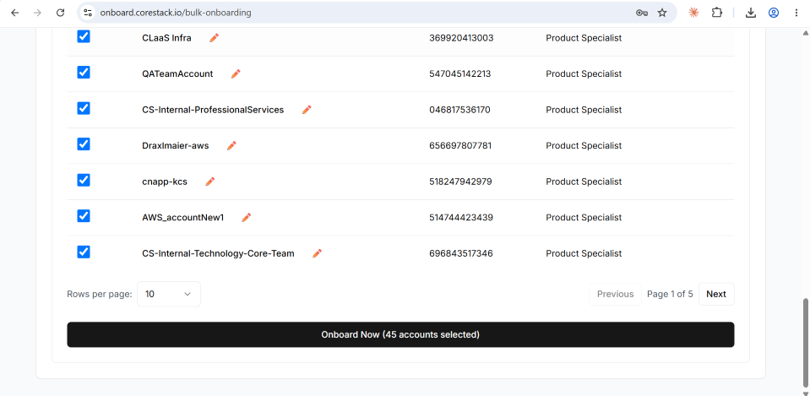
- Select List Child Account to retrieve the list of AWS accounts available under the management account.
- In the resulting account table, check the accounts to onboard (or Select All), then select Onboard Now.
Azure — EA and MCA Subscriptions
Selecting the Azure tab first presents an Azure Onboarding Options chooser:
| Requirement | Details |
|---|---|
| Onboard Azure EA Subscriptions | For customers on an Enterprise Agreement — onboard subscriptions under an EA enrollment. |
| Onboard Azure MCA Subscriptions | For customers on a Microsoft Customer Agreement. |
The steps below cover the EA path (selected by default in most PS tenants); MCA follows an equivalent flow with MCA-specific fields.
- Select Onboard Azure EA Subscriptions. Use the × in the panel header to return to the chooser if a different option is needed.
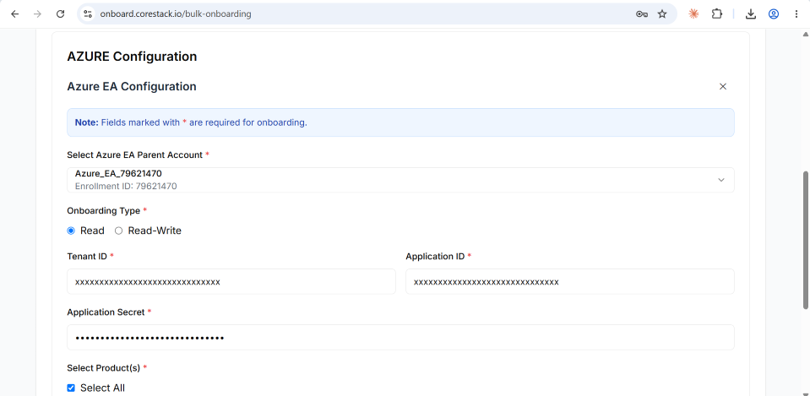
- Select the Azure EA Parent Account (shows the Enrollment ID).
- Choose the Onboarding Type: Read or Read-Write.
- Enter the Tenant ID, Application ID, and Application Secret for the Azure App Registration used for EA access.
- Under Select Product(s), check the desired CoreStack modules (FinOps, CloudOps, Assessments, SecOps) or Select All.
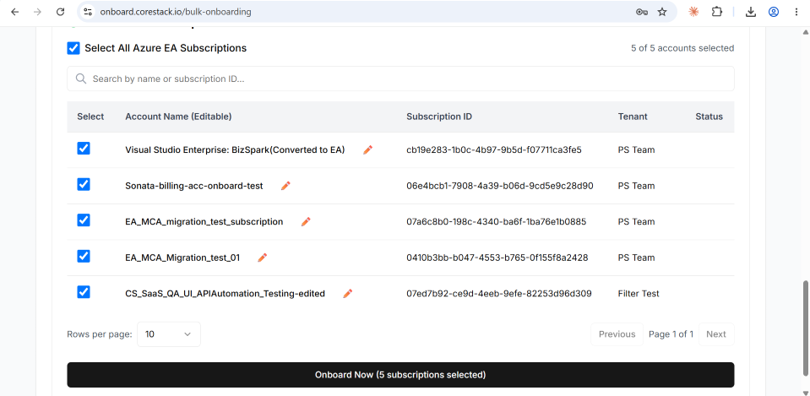
- Select List EA Subscriptions to load the Azure EA Subscriptions table.
- In the table, use Search by name or subscription ID if needed, then check the subscriptions to onboard (or Select All Azure EA Subscriptions). Account names are editable inline via the pencil icon before onboarding.
- Review the Status column for each subscription (e.g., Failed indicates a previous onboarding attempt did not succeed) and use pagination to review all results.
- Select Onboard Now (n subscriptions selected) to onboard the checked subscriptions.
Azure — CSP Subscriptions
This path is used to onboard subscriptions belonging to Azure CSP (Cloud Solution Provider) end-customers, in bulk, in a single session.
| Requirement | Details |
|---|---|
| CSP App Registration | An Azure AD App Registration (Service Principal) created against the CSP partner tenant, with: Tenant ID, Application (Client) ID, and Application (Client) Secret. |
| Access level | Confirm the required onboarding access level: Read-only or Read-Write. |
| Modules | Decide which CoreStack modules to enable: FinOps, CloudOps, Assessments, SecOps. |
-
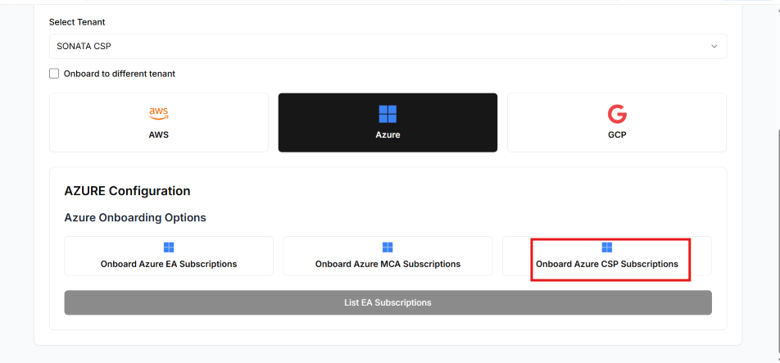
Under Azure Onboarding Options, click Onboard Azure CSP Subscriptions.
- In the Azure CSP Configuration dialog, select the Azure CSP Parent Account — the CSP partner (parent) account under which the customer sits.
- Select Customer — the specific end-customer whose subscriptions you are onboarding.
- Choose the Onboarding Type: Read (monitoring/visibility-only) or Read-Write (remediation/automation).
- Enter the Tenant ID and Application ID from your Azure AD App Registration.
- Enter the Application Secret (client secret value) for that App Registration.
- Under Select Product(s), check Select All or the individual modules to enable.
- Click List CSP Subscriptions to validate the credentials and retrieve the available subscriptions for the selected customer.
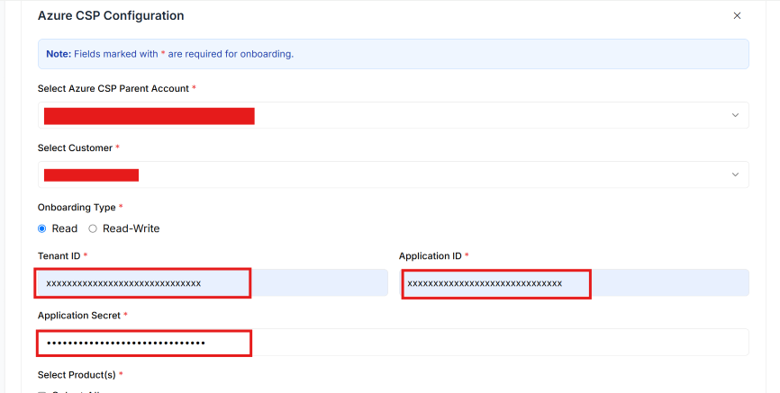
Important: Double-check the Tenant ID, Application ID, and Application Secret before submitting. Incorrect credentials will cause the subscription lookup to fail.
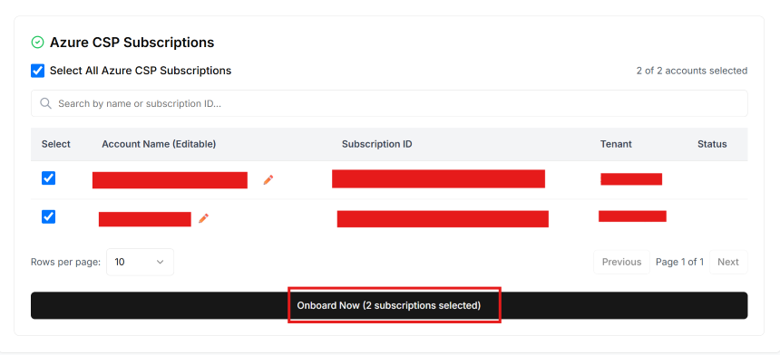
- Review the Azure CSP Subscriptions list, showing Account Name, Subscription ID, Tenant, and Status.
- Check Select All Azure CSP Subscriptions to onboard every listed subscription, or check individual rows for a subset. Use the search bar to find a subscription by name or ID if the list is long.
- Optionally, click the pencil icon next to any Account Name (Editable) field to rename the subscription as it will appear in CoreStack.
- Click Onboard Now — the button label shows the number of subscriptions selected, e.g., "Onboard Now (2 subscriptions selected)".
Note: Onboarding time varies with the number and size of subscriptions selected. Progress and completion status can be tracked from the Bulk Onboarding hub after submission.
Azure — Parent Account Onboarding (EA and MCA Billing Accounts)
Parent Account Onboarding connects an Azure Enterprise Agreement (EA) or Microsoft Customer Agreement (MCA) billing account to CoreStack. The wizard creates cost exports on the billing account, writes them to a storage account, and onboards that account for FinOps cost processing.
Both account types follow the same flow: pick the account master and tenant, choose EA or MCA, sign in to Azure, then fill in the configuration form. The screens and fields are the same for both, so the steps below cover EA and MCA alike.
Onboarding a Billing Account
From the Onboarding Hub, find the Parent Account Onboarding card and click Go to Parent Account Onboarding.
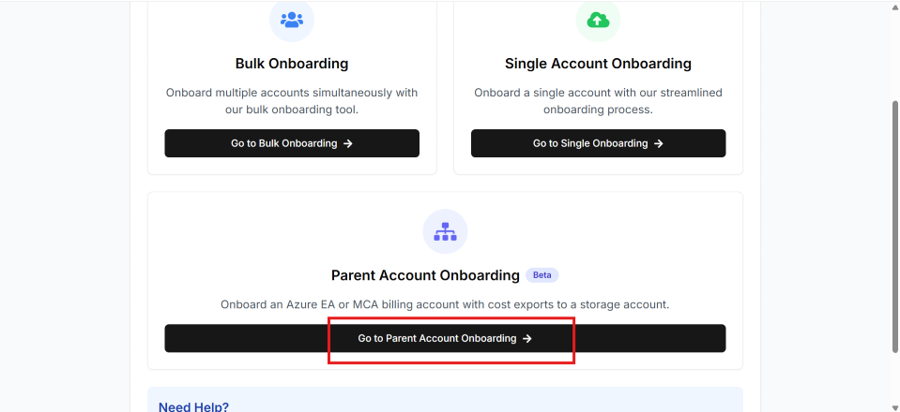
Follow these steps to onboard an EA or MCA billing account:
Step 1: Select the account master and tenant
Select the following:
Account Master: Select
Tenant: Select
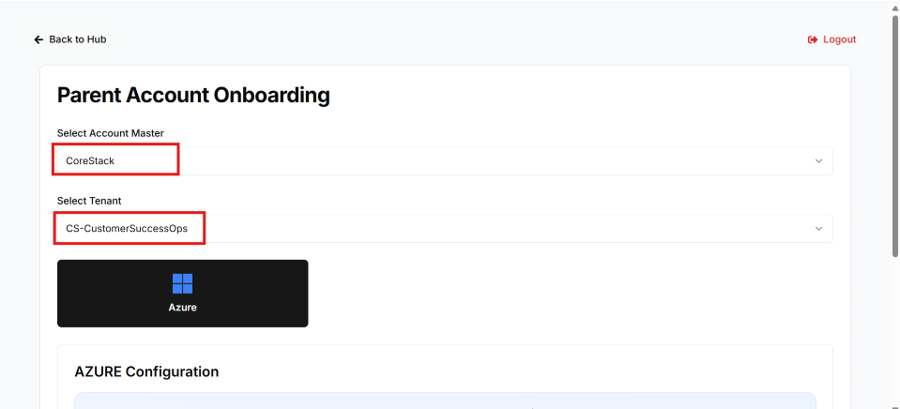
Step 2: Select the Azure tile
Click the Azure tile. The AZURE Configuration panel opens.
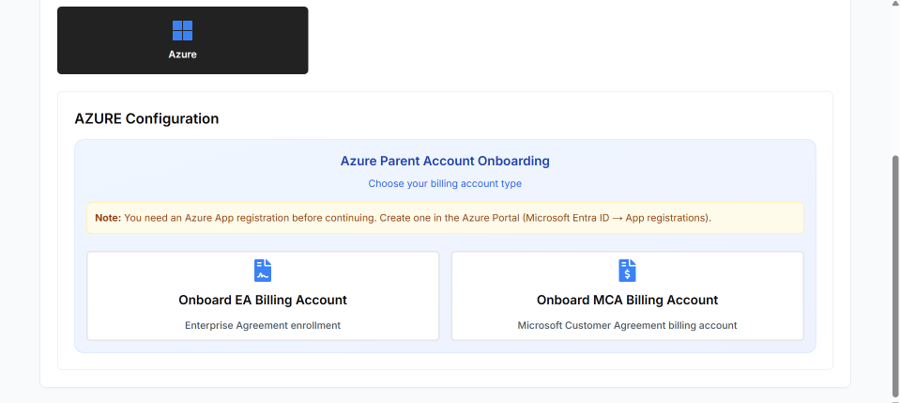
Step 3: Choose the billing account type
Under AZURE Configuration > Azure Parent Account Onboarding, click one of the following:
- Onboard EA Billing Account: For an Enterprise Agreement enrollment.
- Onboard MCA Billing Account: For a Microsoft Customer Agreement.
A yellow note reminds you that an Azure App registration must already exist.
Step 4: Start the Azure interactive login
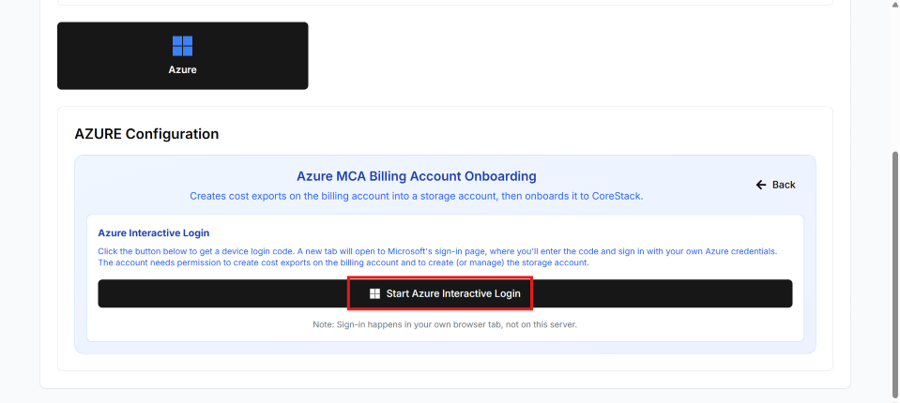
Click Start Azure Interactive Login. A device login code appears, and a new tab opens on Microsoft's sign-in page.
Step 5: Sign in to Azure
Enter the device code on Microsoft's sign-in page. Sign in with your own Azure credentials. Sign-in happens in your browser, not on the CoreStack server.
Step 6: Fill in the Azure Onboarding Configuration
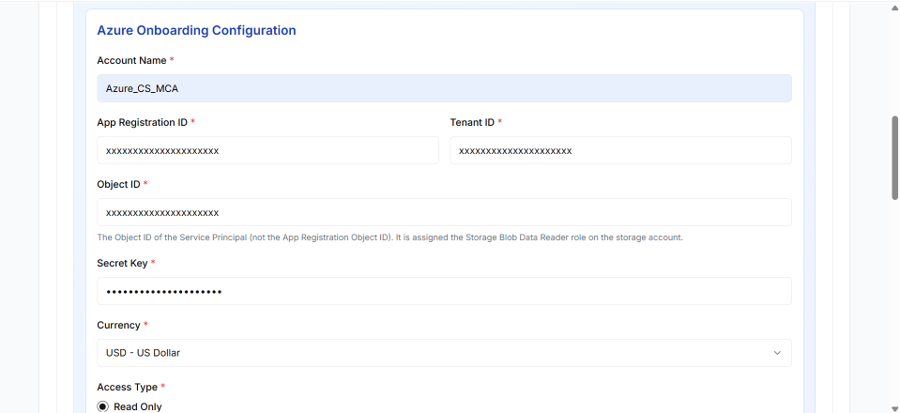
Enter the following details. All fields are required.
| Field | What to enter |
|---|---|
| Account Name | A display name for the account in CoreStack |
| App Registration ID | The app registration's Application (client) ID |
| Tenant ID | The Microsoft Entra tenant ID |
| Object ID | The Service Principal's Object ID, not the App Registration's Object ID |
| Secret Key | The app registration's client secret value |
| Currency | The billing currency, for example, USD - US Dollar |
| Access Type | Read Only |
| Select Module(s) | FinOps (selected) |
Step 7: Set up the billing account and cost exports
In Billing Account & Cost Exports, enter the following details:
| Field | What to enter |
|---|---|
| Billing Account ID | The ID on the billing account's Properties page |
| No. of Months to Export | The number of previous full months to export as one-off exports, from 0 to 13. The daily export covers the current month. |
| Export Name Prefix | A prefix such as cscostexport. Daily exports are named cscostexportActual and cscostexportAmortized. |
| Also export Amortized cost | Select this option to create the amortized report path as well |
Step 8: Choose the storage account
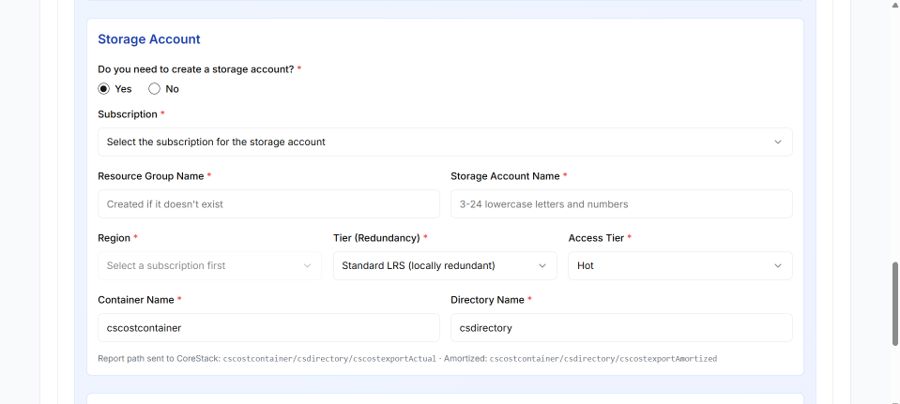
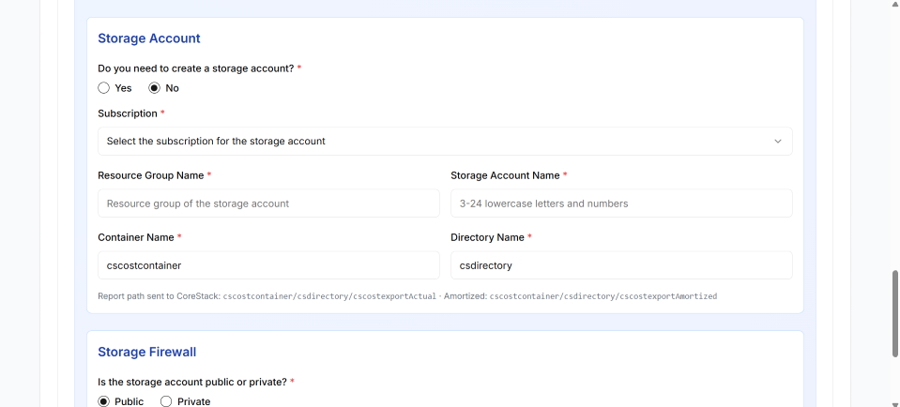
Answer Do you need to create a storage account?
- Yes: The wizard creates the storage account. Select the Subscription. Enter a Resource Group Name, which the wizard creates if it does not exist. Enter a Storage Account Name of 3–24 lowercase letters and numbers. Select the Region, Tier (Redundancy) (for example, Standard LRS), and Access Tier (for example, Hot). Enter the Container Name and Directory Name.
- No: The wizard reuses an existing account. Select its Subscription. Enter its Resource Group, Storage Account, Container, and Directory names.
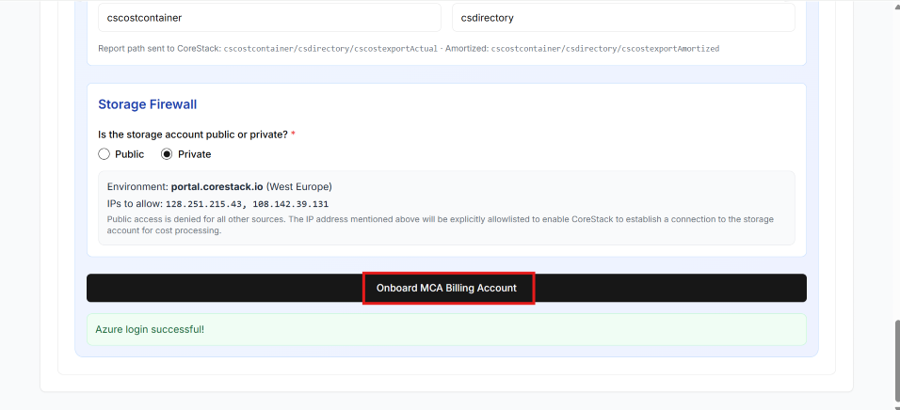
Step 9: Set the storage firewall
Select Public or Private. If you select Private, CoreStack allowlists its IPs for your environment and denies public access from all other sources.
Step 10: Submit the onboarding
Click Onboard MCA Billing Account. For an EA enrollment, click Onboard EA Billing Account. The wizard displays each step as it runs and completes the onboarding in CoreStack.
Tips and common mistakes
- Wrong Object ID: Use the Service Principal (Enterprise application) Object ID. The App Registration's Object ID will not get the Storage Blob Data Reader role correctly.
- Login permissions: The Azure user from step 4 must be able to create cost exports on the billing account and create or manage the storage account. Missing rights will stop the export or storage setup.
- Region is blank: Select a Subscription first; the Region list loads from it.
- Private storage: Keep CoreStack's IPs allowlisted on the storage firewall, or cost processing cannot read the exports.
- Historical data: Set No. of Months to Export above 0 to backfill previous months; otherwise only the current month arrives through the daily export.
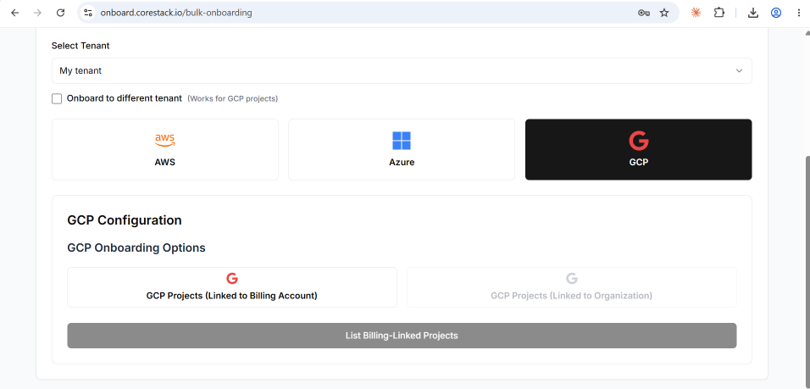
GCP
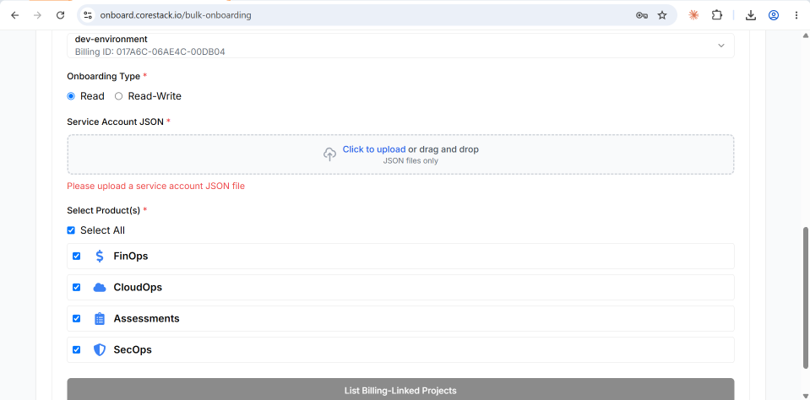
- Under GCP Onboarding Options, choose GCP Projects (Linked to Billing Account) or GCP Projects (Linked to Organization) — the Organization option is only enabled when the relevant organization-level connection is available.
- Select List Billing-Linked Projects (or the equivalent for the Organization option) to retrieve the eligible GCP projects.
- Select the projects to onboard and select Onboard Now.
Frequently Asked Questions
Q: What's the difference between Single Account Onboarding and Bulk Onboarding, and which should I use?
Use Single Account Onboarding when you want to onboard one Azure subscription at a time and confirm which subscriptions your Azure sign-in can access before entering App Registration details. Use Bulk Onboarding when you're onboarding many accounts, subscriptions, or projects in one pass under a single set of credentials — for AWS, Azure (EA, MCA, or CSP), or GCP.
Q: Can I use Single Account Onboarding for AWS or GCP?
No. Single Account Onboarding is Azure-only and uses an interactive Azure sign-in. To onboard AWS accounts or GCP projects, use Bulk Onboarding and select the AWS or GCP tab.
Q: What does it mean if a subscription or account shows as "already onboarded"?
It means that subscription or account is already connected to CoreStack under the tenant you selected. You can still select it again — CoreStack will indicate its existing status in the results — but re-onboarding an already-connected account isn't necessary. [VERIFY: confirm whether re-selecting an already-onboarded subscription re-runs onboarding or is a no-op.]
Q: Should I choose Read Only or Read Write access?
Choose Read Only if CoreStack only needs visibility into the account for monitoring and reporting. Choose Read Write if you also want CoreStack to perform remediation or automation actions on the account. [VERIFY: confirm whether access type can be upgraded from Read Only to Read Write later without re-onboarding.]
Q: Can I change which modules (FinOps, CloudOps, Assessments, SecOps) are enabled after onboarding?
This isn't covered in the onboarding flow itself. [VERIFY: confirm the correct place to change enabled modules after initial onboarding — for example, via account settings — and update this answer accordingly.]
Troubleshooting
An account or subscription shows a "Failed" status after onboarding
Cause: This is typically caused by incorrect credentials (App Registration ID, Tenant ID, Object ID, Secret Key for Azure; Role Name/External ID for AWS; Tenant ID/Application ID/Secret for CSP), insufficient permissions on the role or Service Principal, or the role assignment still propagating on the provider side.
Solution:
- Re-check the credential fields you entered against the values in your Azure App Registration, AWS IAM role, or CSP App Registration — the guide's Important callouts flag these as the most common source of failures.
- If the failure appeared shortly after submitting, wait a few minutes for role assignment/propagation to complete before retrying, rather than resubmitting immediately.
- For Single Account Onboarding, use Select not onboarded subscriptions to return to the list and retry the failed subscription(s).
If the issue persists, contact CoreStack support with the subscription/account ID, the cloud provider, the onboarding path used (Single or Bulk, and which tab), and the exact status/error shown.
The Azure interactive device login doesn't complete
Cause: The device code wasn't confirmed correctly, the wrong Azure account was used to sign in, or the browser tab was closed before Microsoft confirmed the sign-in.
Solution:
- Restart the flow with Start Azure Interactive Login and confirm the device code shown on the CoreStack page matches the one on Microsoft's sign-in page before entering credentials.
- When prompted "Are you trying to sign in to Microsoft Azure CLI?", verify the account shown is the one with access to your target subscription(s) before clicking Continue.
- Wait for Microsoft to confirm sign-in was successful before closing the browser tab and returning to CoreStack.
If sign-in keeps failing with the correct account, contact CoreStack support with the Azure account used and approximately when the attempt was made.
"List [Child Account / EA Subscriptions / CSP Subscriptions]" returns no results or an error
Cause: The Tenant ID, Application ID/App Registration ID, or Secret entered doesn't match the App Registration, or that App Registration/IAM role doesn't have the permissions needed to enumerate accounts or subscriptions. [VERIFY: confirm the exact permission requirements for the listing calls to succeed.]
Solution:
- Double-check the Tenant ID, Application/App Registration ID, and Secret against the values in Azure AD or AWS IAM — the guide's Important callouts note that incorrect values here cause the lookup to fail.
- Confirm the App Registration or IAM role was created against the correct tenant, management account, or CSP partner tenant.
- Retry the List action (List Child Account / List EA Subscriptions / List CSP Subscriptions) after correcting the credentials.
If the list still comes back empty or errors, contact CoreStack support with the Tenant ID / Management Account ID used, the onboarding path (AWS, Azure EA/MCA, or CSP), and the exact error message.
Updated 3 days ago