Pre-Onboarding for Azure Enterprise Agreements (EA)
Introduction
This user guide will explain how to perform the pre-onboarding steps required for onboarding an Azure Enterprise Agreement (EA) Subscription into the platform.
Note:
- If the Azure subscription's value is $0, this will not be displayed under the Azure EA Parent Account in the platform for onboarding. However, this will start listing after the cost data is available in the subscription.
- This kind of account is used for Billing Purposes only. No resources will be associated.
Pre-Onboarding
There are certain prerequisites that need to be set up in your Azure Subscription before it can be onboarded into CoreStack.
The platform uses the Daemon Application scenario with Client Credentials flow for OAuth2.0 flow and grant type as depicted here. Client Credential flow requires a valid Application registration to be created for a specific Azure subscription to successfully allow access to the required Azure resources.
There are two authentication options available to onboard an Azure EA account to the platform, with two options to choose from:
- Application Method
- API Key Method
Pre-requisites for Application Method of Onboarding
- Azure Enterprise Administrator role is required to run the below script.
- The resource provider Microsoft.CostManagementExports should be registered in the subscription level (it is part of the script in step 1).
- We need to assign the Reader and Data Access role to the service principal (which we used while onboarding) at the storage account level (Assessment Only).
- The basic storage account is required with standard (locally-redundant storage - LRS) configuration to store the exported cost data under the same tenant subscription.
- Run the script in the billing scope level to export the last three months cost and daily month-to-date cost (script available in step 1).
Application Method
To onboard your Azure Enrollment subscriptions into the platform, the following values must be generated/copied from your Azure console and configured in the platform:
- Tenant ID
- Application ID
- Application Secret
As you retrieve each of these values, keep them ready in a notepad to be able to copy and paste into the platform during the onboarding steps.
Step 1: Fetch Storage Account and Report Path
A data export must be created to export cost data of the subscription. To configure the data export and retrieve its storage account and report path information, perform the following steps:
-
Login to the Azure portal: https://portal.azure.com/
-
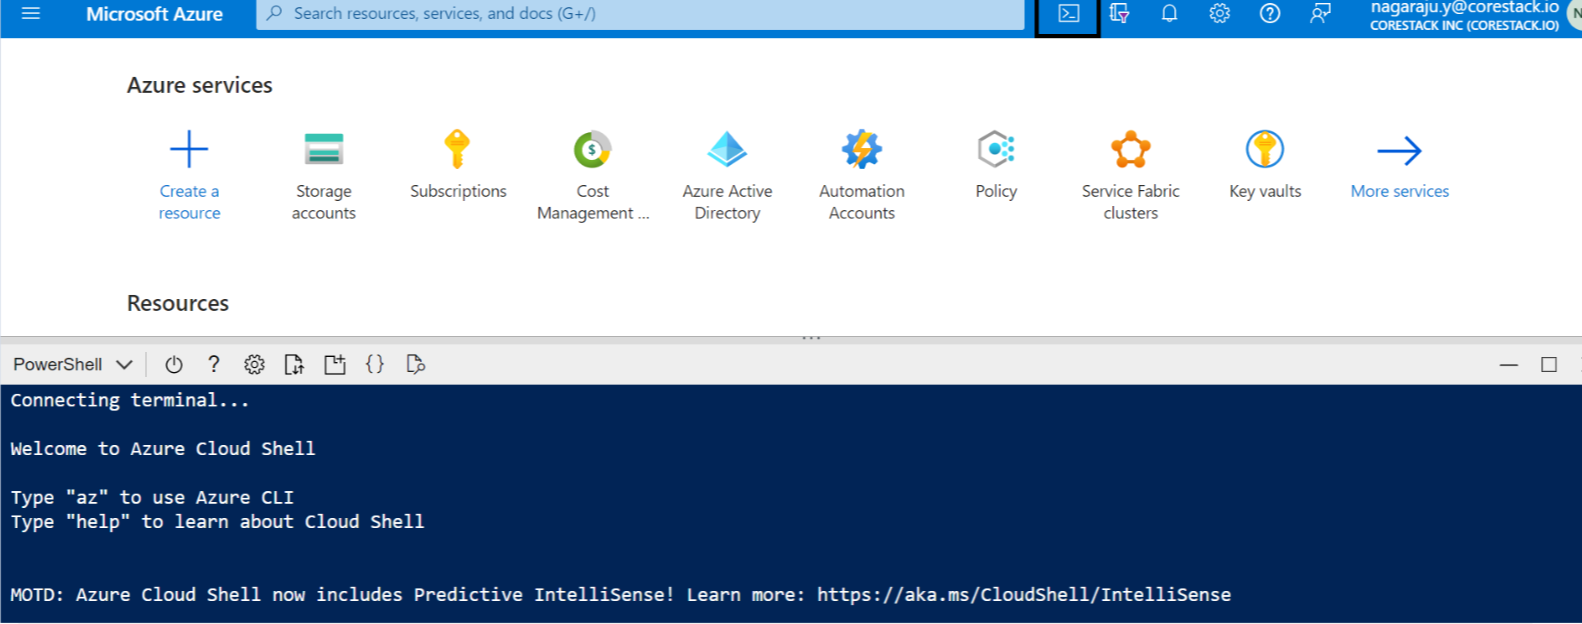
Open the CloudShell on the top.
-
Run the below script to create required cost exports automatically. Some of the fields are explained below:
Note:- The script will create a new export along with the new storage blob container and directory. It will also create an export for the last three months and store it in a storage blob container for each and every month and month-to-date costs.
- The below script will take 15 - 20 minutes to complete the cost export. Meanwhile, proceed with "Step 2: Fetch Storage Account and Report Path".
To run the below script, we need to set the subscription where the storage account is hosted. Please run the following commands:
(a) az account show
(b) az account set --subscription<Subscription_name>
(c) az account show
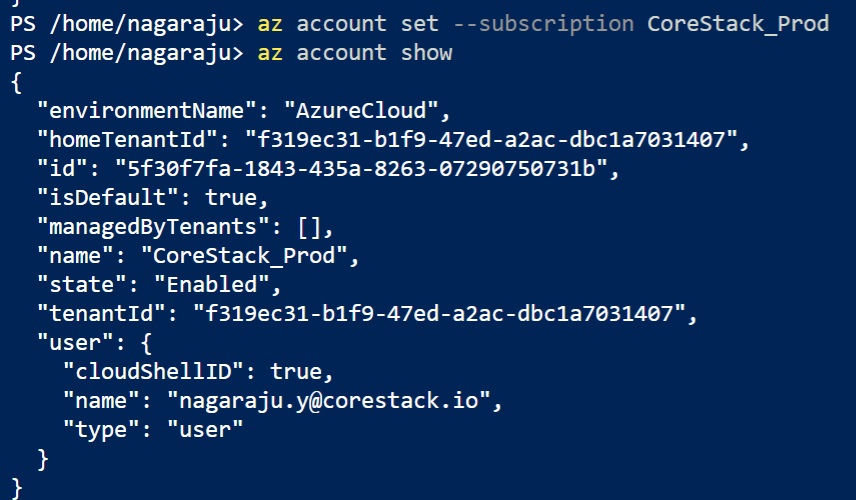
Ensure that the right subscription is selected.
(d) Set-AzContext -Subscription 'xxxxxx-xxxxx-xxxx-xxxx-xxxxxxxxxx' (subscription ID or subscription name)
- {billingAccountId} = Azure EA Enrollment ID
- {subscription_id} = Subscription ID of where the storage account was created.
- {storageAccount_name} = Name of the storage account that is created for cost export.
- {resourcegroup_name} = Mention the resource group name where the storage account is created.
- {TimePeriodFrom} = Mention the start date of the previous three month to export (for example, February '2023-02-01T00:00:00Z').
- {TimePeriodTo} = Mention the end date of previous three month to export (for example, February '2023-02-28T00:00:00Z').
- {RecurrencePeriodFrom} = This date cannot be a past date. The date format is: '2023-07-20T00:00:00Z'
- {RecurrencePeriodTo} = This is a constant value - '2028-12-31T00:00:00Z'
Register-AzResourceProvider -ProviderNamespace Microsoft.CostManagementExports
Start-Sleep -Seconds 100
Install-Module Az.CostManagement
Start-Sleep -Seconds 90
$Params = @{
  Name = 'cscostexport'
  DefinitionType = 'ActualCost'
  Scope = 'providers/Microsoft.Billing/billingAccounts/{billingAccountId}'
  DestinationResourceId = '/subscriptions/{subscription_id}/resourceGroups/{resourcegroup_name}/providers/Microsoft.Storage/storageAccounts/{storageAccount_name}'
  DestinationContainer = 'cscostcontainer'
  DefinitionTimeframe = 'Custom'
  TimePeriodFrom = '2023-02-01T00:00:00Z'
  TimePeriodTo = '2023-02-28T00:00:00Z'
  DestinationRootFolderPath = 'csdirectory'
  Format = 'Csv'
}
New-AzCostManagementExport @Params
Invoke-AzCostManagementExecuteExport -ExportName cscostexport -Scope 'providers/Microsoft.Billing/billingAccounts/{billingAccountId}'
Start-Sleep -Seconds 120
$Params = @{
  Name = 'cscostexport'
  DefinitionType = 'ActualCost'
  Scope = 'providers/Microsoft.Billing/billingAccounts/{billingAccountId}'
  DestinationResourceId = '/subscriptions/{subscription_id}/resourceGroups/{resourcegroup_name}/providers/Microsoft.Storage/storageAccounts/{storageAccount_name}'
  DestinationContainer = 'cscostcontainer'
  DefinitionTimeframe = 'Custom'
  TimePeriodFrom = '2023-03-01T00:00:00Z'
  TimePeriodTo = '2023-03-31T00:00:00Z'
  DestinationRootFolderPath = 'csdirectory'
  Format = 'Csv'
}
New-AzCostManagementExport @Params
Invoke-AzCostManagementExecuteExport -ExportName cscostexport  -Scope 'providers/Microsoft.Billing/billingAccounts/{billingAccountId}'
Start-Sleep -Seconds 120
$Params = @{
  Name = 'cscostexport'
  DefinitionType = 'ActualCost'
  Scope = 'providers/Microsoft.Billing/billingAccounts/{billingAccountId}'
  DestinationResourceId = '/subscriptions/{subscription_id}/resourceGroups/{resourcegroup_name}/providers/Microsoft.Storage/storageAccounts/{storageAccount_name}'
  DestinationContainer = 'cscostcontainer'
  DefinitionTimeframe = 'Custom'
  TimePeriodFrom = '2023-04-01T00:00:00Z'
  TimePeriodTo = '2023-04-30T00:00:00Z'
  DestinationRootFolderPath = 'csdirectory'
  Format = 'Csv'
}
New-AzCostManagementExport @Params
Invoke-AzCostManagementExecuteExport -ExportName cscostexport  -Scope 'providers/Microsoft.Billing/billingAccounts/{billingAccountId}'
Start-Sleep -Seconds 120
$Params = @{
  Name = 'cscostexport'
  DefinitionType = 'ActualCost'
  Scope = 'providers/Microsoft.Billing/billingAccounts/{billingAccountId}'
  DestinationResourceId = '/subscriptions/{subscription_id}/resourceGroups/{resourcegroup_name}/providers/Microsoft.Storage/storageAccounts/{storageAccount_name}'
  DestinationContainer = 'cscostcontainer'
  DefinitionTimeframe = 'MonthToDate'
  ScheduleRecurrence = 'Daily'
  RecurrencePeriodFrom = '2023-07-20T00:00:00Z'
  RecurrencePeriodTo = '2028-12-31T00:00:00Z'
  ScheduleStatus = 'Active'
  DestinationRootFolderPath = 'csdirectory'
  Format = 'Csv'
}
New-AzCostManagementExport @Params
Invoke-AzCostManagementExecuteExport -ExportName cscostexport -Scope 'providers/Microsoft.Billing/billingAccounts/{billingAccountId}'
Start-Sleep -Seconds 10
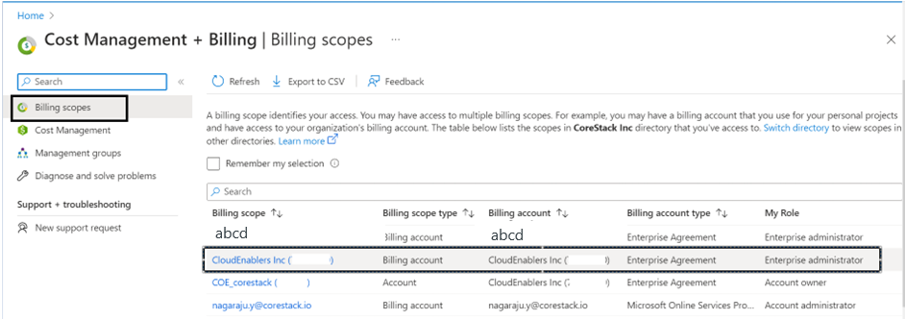
Exit- In the search bar at the top of the screen, search for Cost Management + Billing.

- In the Billing scopes field, ensure that the required enrollment account is selected.
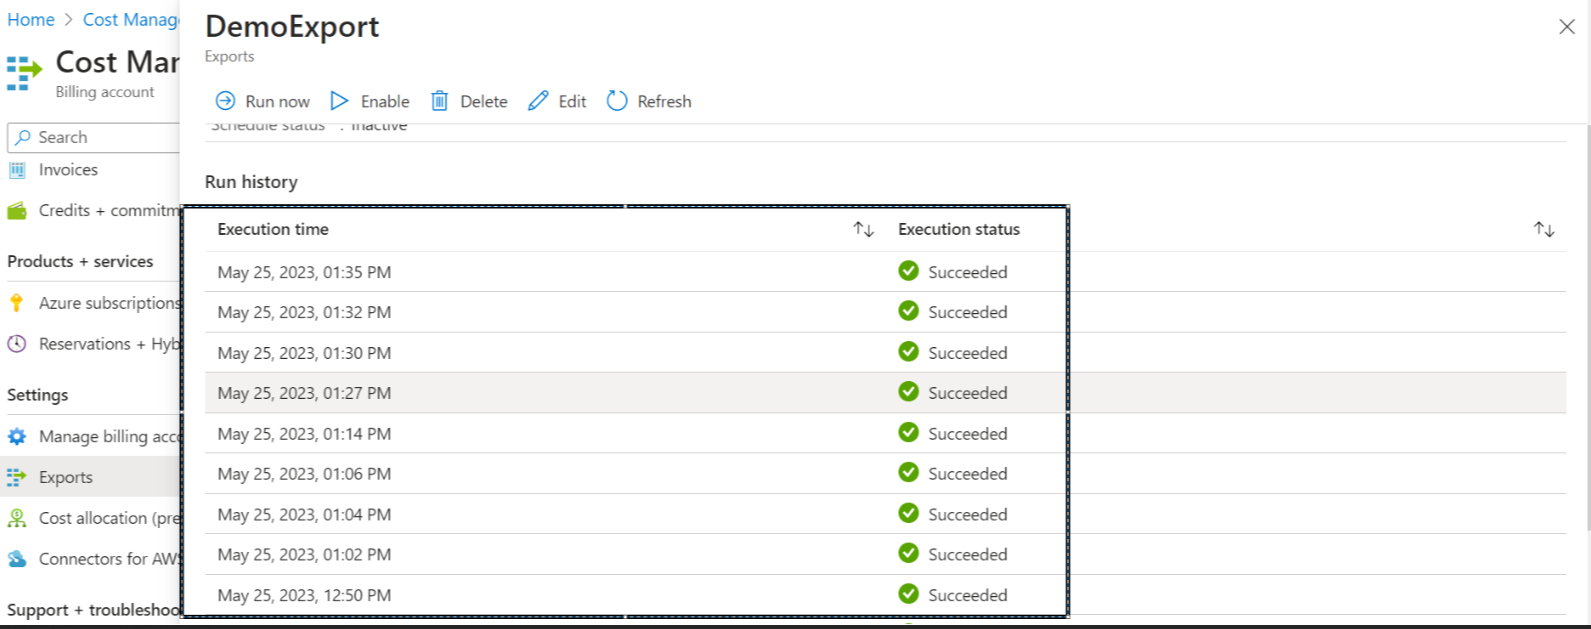
- Select Settings > Exports and select the export that is created using the above script. For example, cscostexport.
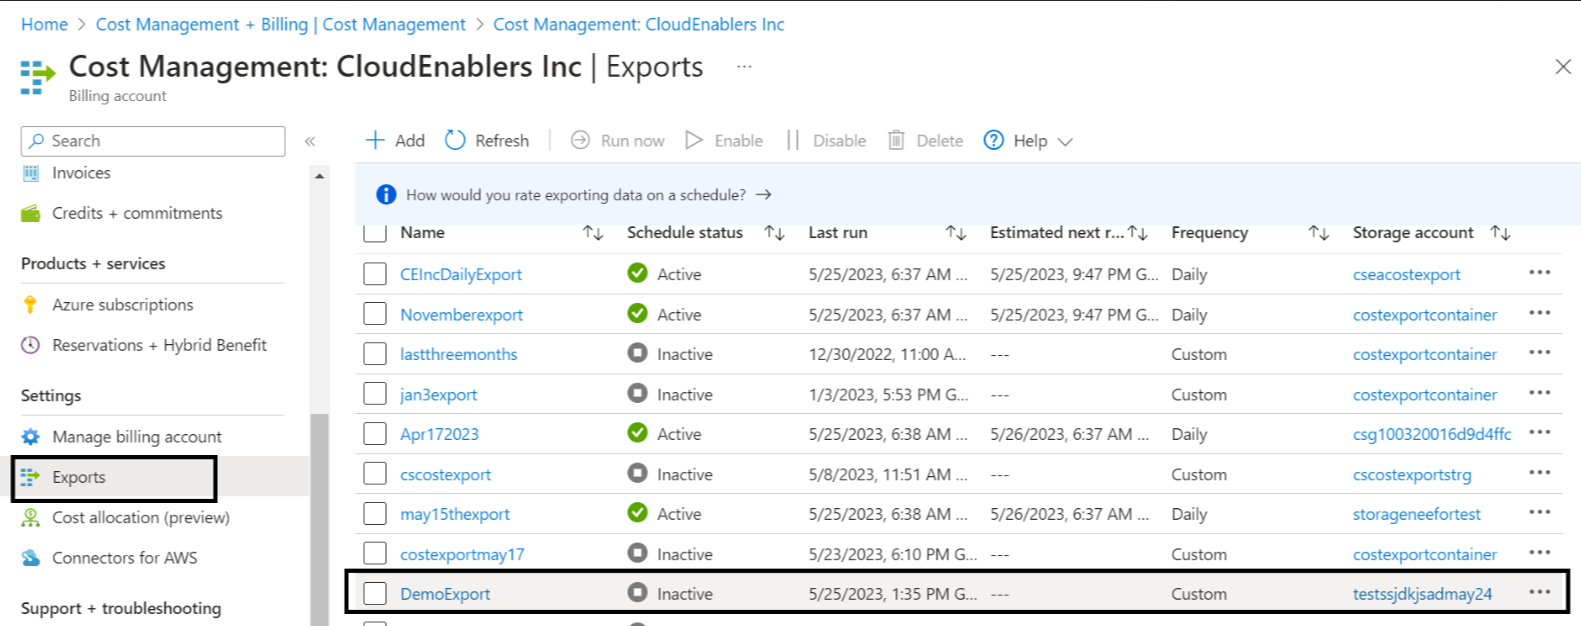
- Verify the exports execution run history; count should be 4.
- Select the storage account used for cscostexport.
- Copy the values from the Export name, Storage account, Container, and Directory fields that were used while creating the data export.
- The Storage account name will be used in the Storage Account field in the platform.
- The Export name, Container, and Directory values will be used for the Report Path field in the platform. The Report Path must be entered in this format:
<container name>/<directory path>/<export name>
Copy all the details from the above step in a safe location and provide them while onboarding your Azure Subscription account in the platform.
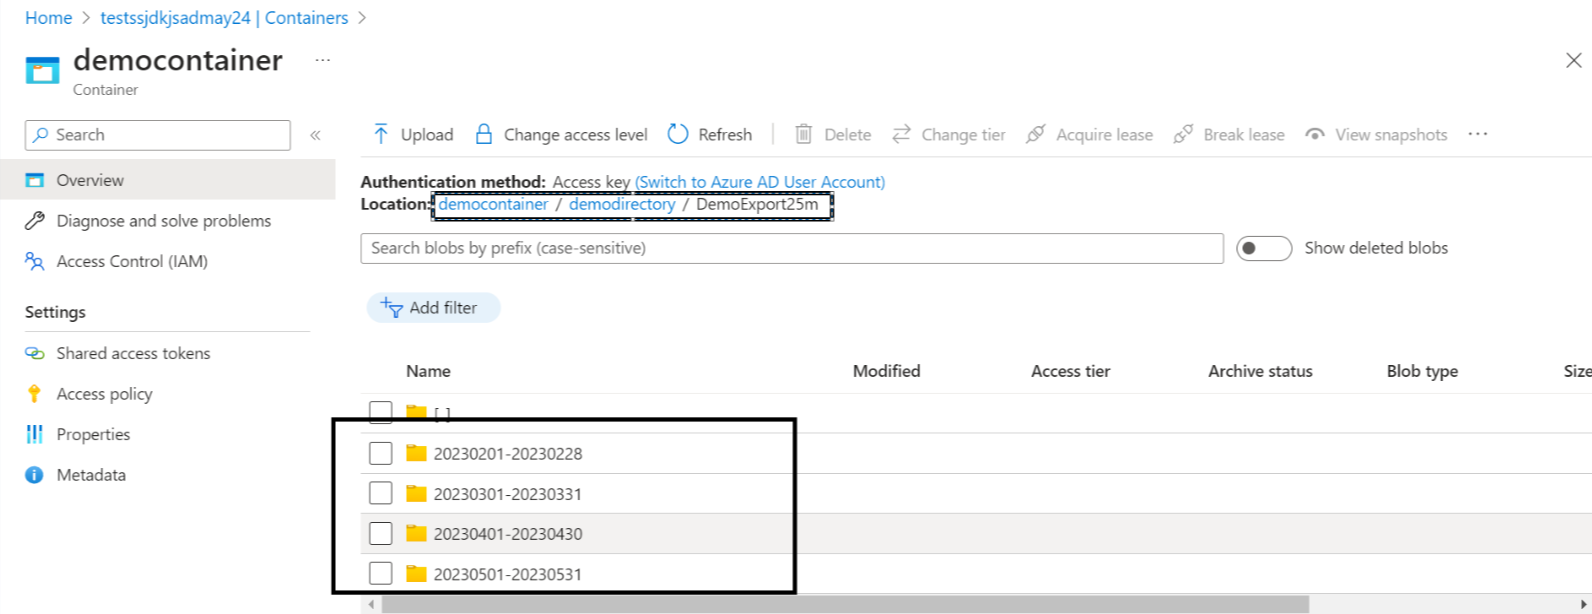
Note:The last three months export and daily export data will be available for reference.
For example: in the location costexport/costdataexport/cscostexport.
Step 2: Fetch Application ID and Tenant ID
- In the Azure Portal, navigate to Azure Active Directory > App registrations > New registration. The Register an application screen appears.
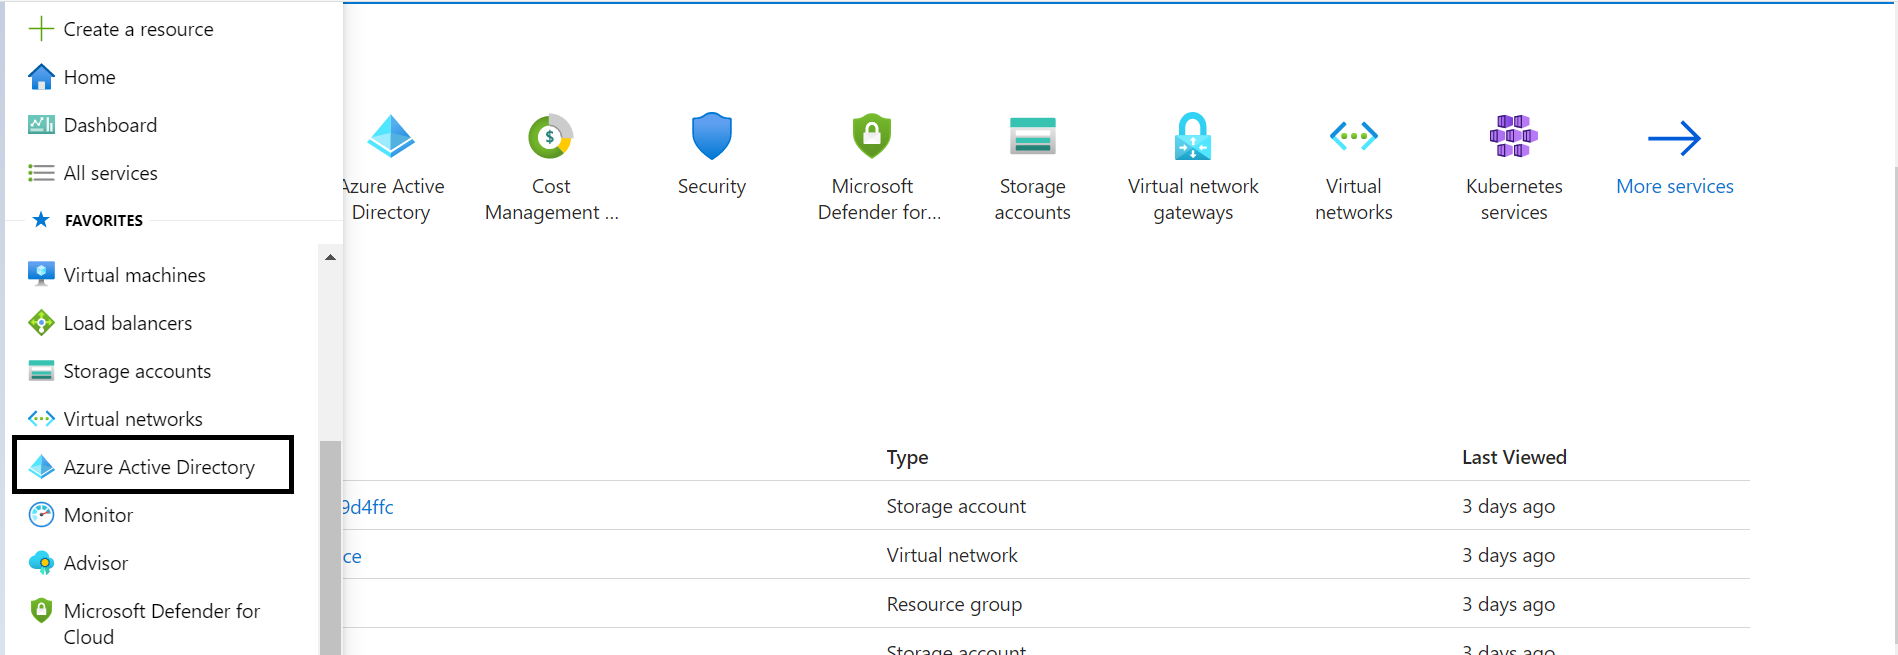
- On the left pane, click App registration and click + New registration.

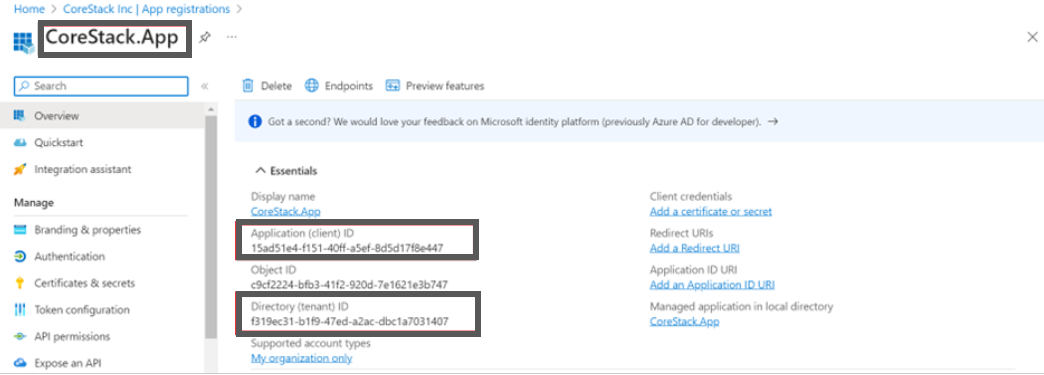
- In the Name box, type a name for the application, for example, CoreStack.App.
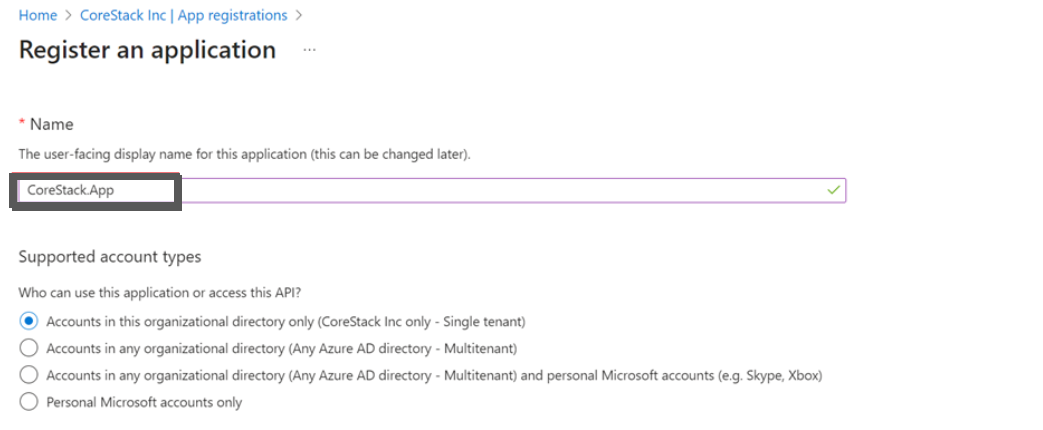
The other fields can be left with the default options.
- The value of the Supported account types field can be Single Tenant.
- The value of the Redirect URI field can be blank.
- Click Register.
The application will be registered, and the Application (client) ID and Directory (tenant) ID will be displayed on the Overview screen. Copy the Application ID and the Tenant ID and paste the details in a notepad.
Step 3: Fetch Application Secret
The Application Secret is the password or key that you need to provide for the specific app that was just created.
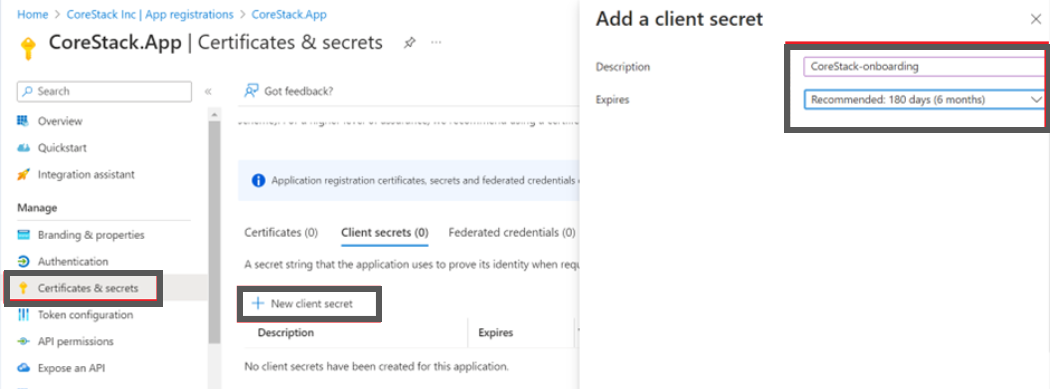
- On the Overview screen, click Certificates & secrets.
- Click + New client secret.
- Provide a description and expiry duration for the secret. You can leave the duration with the default value of 1 year. You can revoke this anytime later, if required.
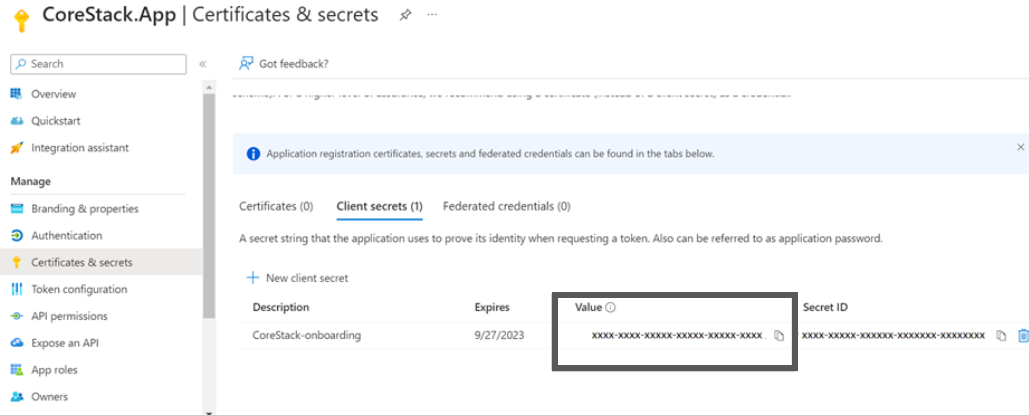
- Click Add. The Client secret will be created and displayed.
Note:Ensure that you copy this secret value and paste it in a notepad, since you cannot retrieve this later.
Step 4: IAM Access for App
The app that is created in Step 1 must have the required access within the subscription. To provide that access, follow the below steps:
-
In the Azure Portal, navigate to Subscriptions .
-
Select the Subscription that will be used for onboarding into the platform. The Overview screen appears.
-
Click Access Control (IAM).
-
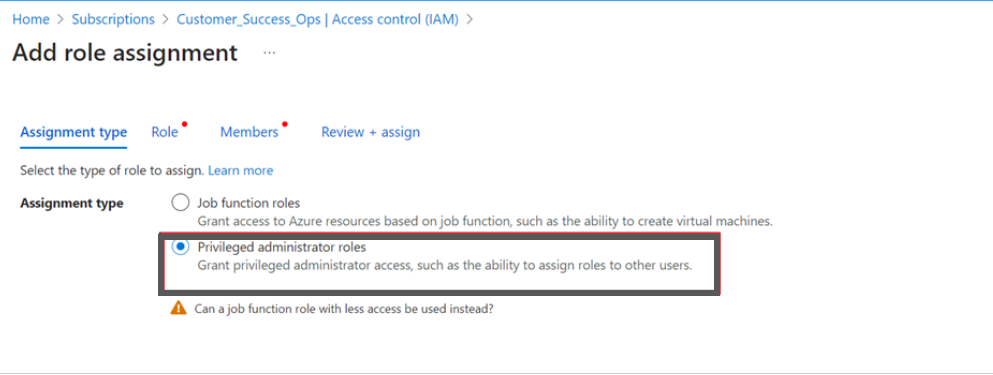
Click + Add and then click to select Add role assignment. The Add role assignment screen appears.

- Select Job function roles for Assessment Only.

- Select the Reader role for Assessment Only.

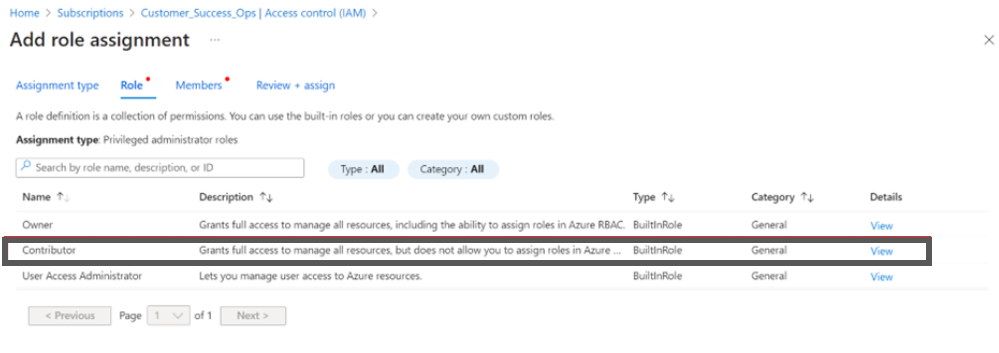
- Select the privileged administrator roles for Assessment + Governance.
- Select Contributor for Assessment + Governance.
- Select job function roles for Assessment + Governance.

- Select the Resource Policy Contributor for Assessment + Governance.

- Ensure that the User, group, or service principal option is selected in the Assign access to field.
- Click + Select members and in the Select field, search and select the app that was created earlier. In this example, select CoreStack.App.

- Click the Save button to assign the role.
After the role is assigned, it will be listed in the Role Assignments tab.
Note:The "Resource Policy Contributor" role assignment is required only if you intend to use CoreStack to create policies for your Azure subscription.
Step 5: Reservation Reader Role
Note:You can skip this step if you don’t have any reserved instances in your subscription.
Note:Be sure to update the Reservation Reader role that will be required for assigning roles to tenants. Perform the following steps to update the Reservation Reader role:
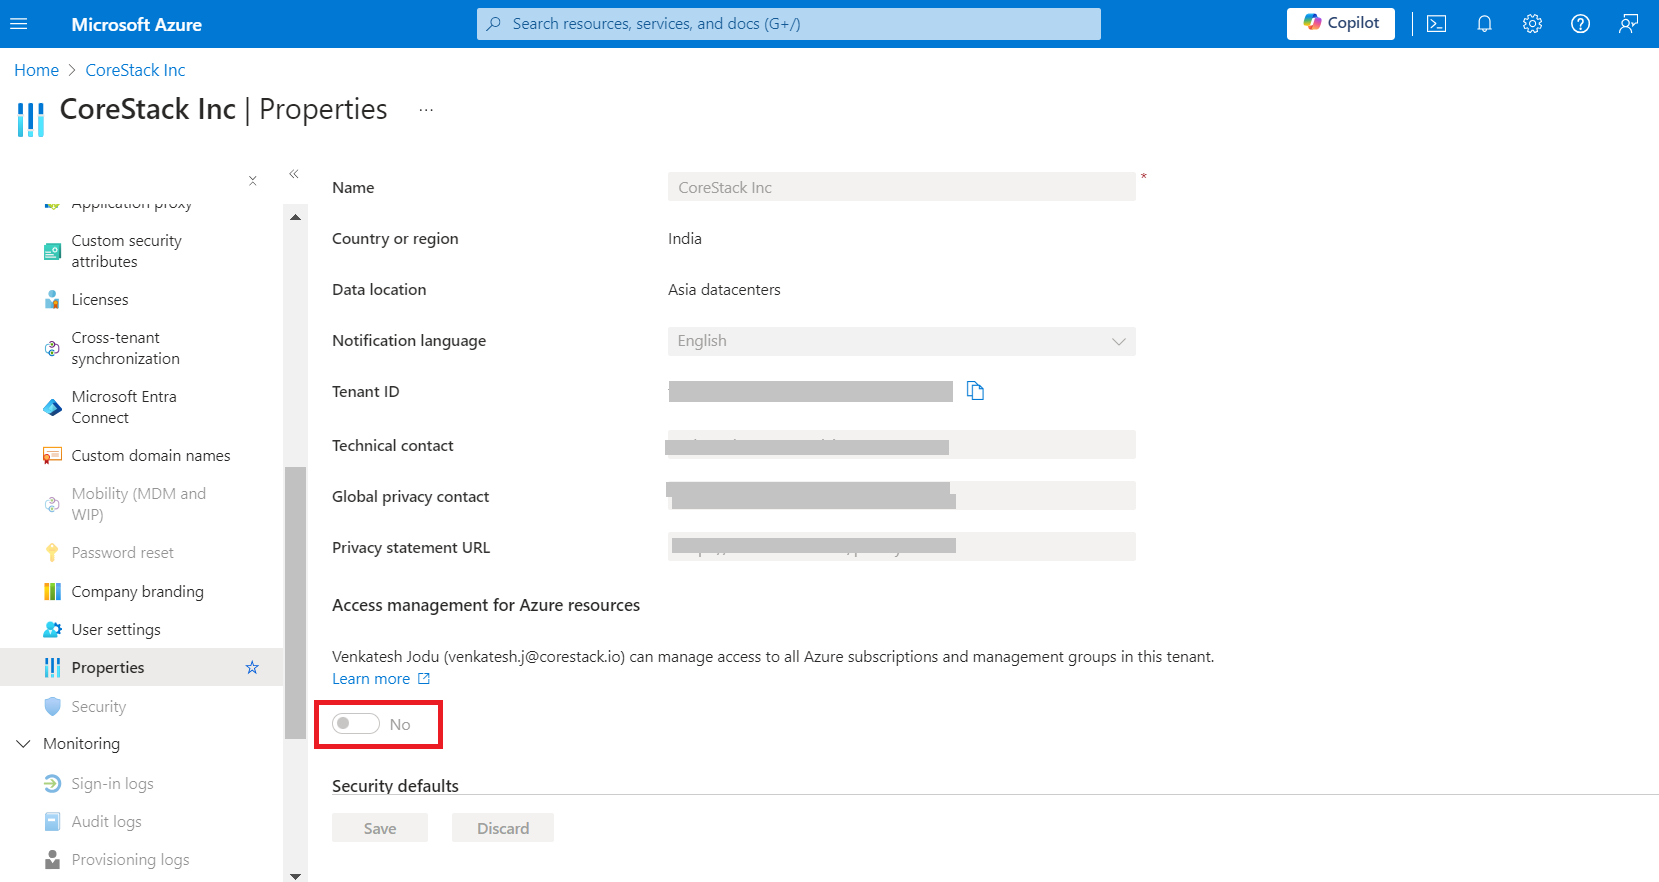
Navigate to Microsoft Enterprise ID > Properties in Azure.
In the Access Management for Azure resources field, toggle the button to enable it.
After enabling it, log out from the Azure portal and log back in to ensure that the changes are reflected.
The platform requires the Reservation Reader role for the CoreStack.App to fetch the reserved instances in the subscription.
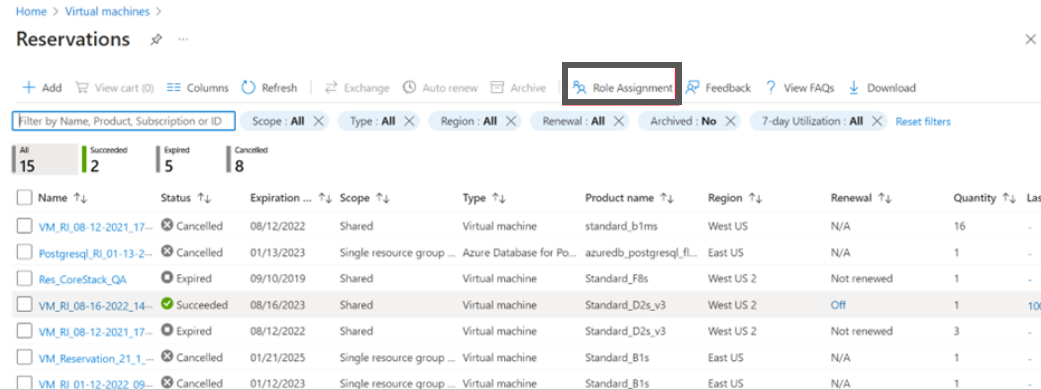
- Navigate to Virtual machines > Reservations > View.

You can now see all the reserved instances in your subscription.
- Click Role Assignment.
- Click +Add and then click Add role assignment.

- In the Assignment type field, select Job function roles.

- In the Search box, type Reservations Reader and select it from the search result and then click Next.

-
Ensure that the User, group, or service principal option is selected in the Assign access to field.
-
Search and select the app that was created earlier. In this example, select CoreStack.App in the Select field.
-
Click Save button to assign the role.
EA Scope for API Key Method
There are multiple scopes in the Azure EA level:
- Billing Account level: If you create an API key with EA administrator privileges, the platform can fetch all the departments, accounts, and subscriptions under the Azure Enrollment (EA) Parent Account.
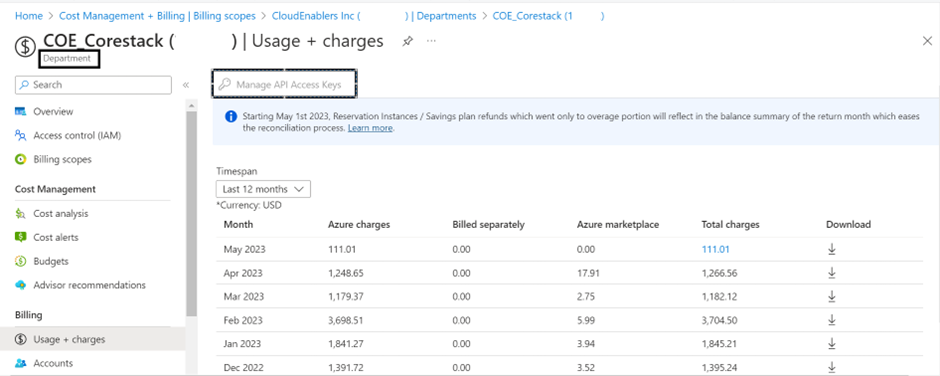
- Department level: If you create an API key with department level administrator privileges, the platform can fetch only the subscriptions under that specific department in the Azure Enrollment (EA) Parent Account.
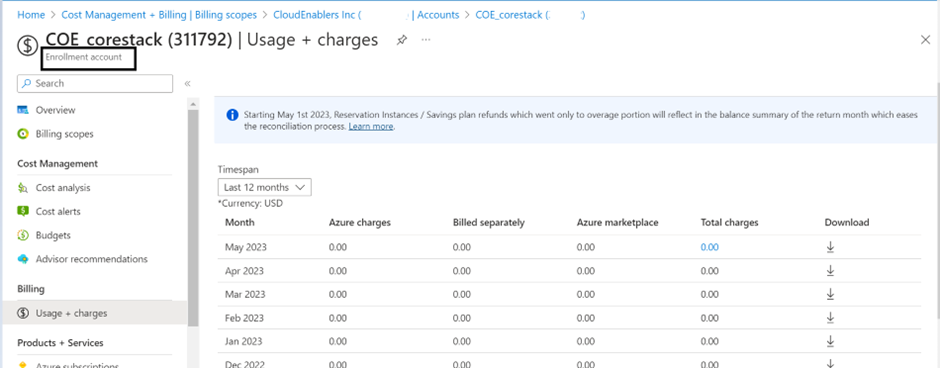
- Account level: If you create an API key with account administrator privileges, then the platform can fetch only the subscriptions under that specific account in the Azure Enrollment (EA) Parent Account.
API Key Method
For onboarding an Azure EA account into the platform, the following steps need to be performed:
Step 1: Fetch Enrollment ID
To retrieve the Enrollment ID of the subscription, perform the following steps:
- Login to the Azure EA portal: https://ea.azure.com/
- On the left-side menu, click Manage.
- Select the Enrollment tab at the top of the page. The Enrollment screen appears.
- Copy the Enrollment Number from the Enrollment screen.
Step 2: Fetch API Key
To generate and retrieve the API Key from the subscription, perform the following steps:
Note:Azure EA is read-only and all operations are moved to the Azure portal.
- Login to the Azure portal: https://portal.azure.com/
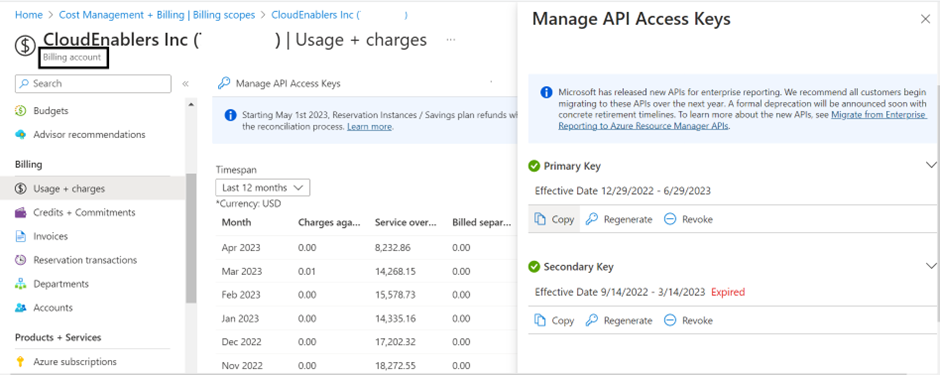
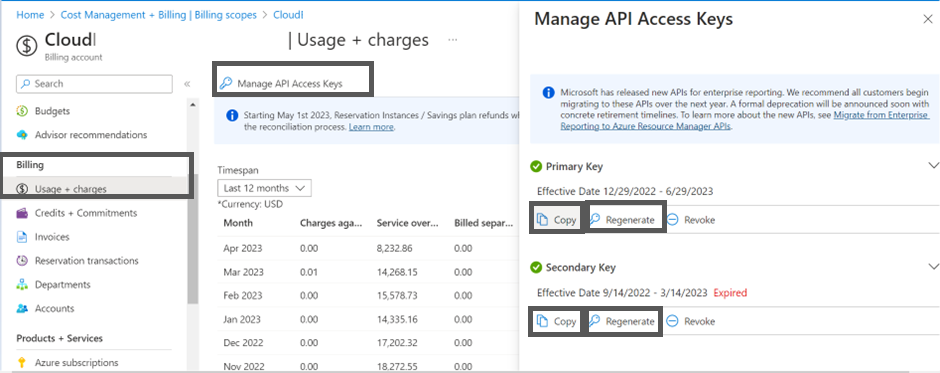
- Navigate to Cost Management + Billing > select Billing Scope > Billing > select the Usage + charges > select Manage API Access Keys on the top > perform the appropriate action:
- To copy the existing primary or secondary key, click Copy in the Primary Key or Secondary Key section.
- To regenerate a new key, click Regenerate in the Primary Key or Secondary Key section.
Why are these Permissions Required?
The platform requires Contributor access to the following Service Providers. However, the account owner can restrict access to specific services that will only be managed through the platform.
Following table explains the need for access to the service with the rationale:
Azure Provider | Product/Category | Reader Access (For Discovery) | Contributor Access (For Actions) |
|---|---|---|---|
Microsoft.Compute | Virtual Machines Virtual Machines Scale Sets Virtual Machines Sizes Availability Sets Image Publishers Images Disks | Mandatory | Mandatory |
Microsoft.ContainerInstance | Container Groups | Preferred | Optional |
Microsoft.ContainerRegistry | Container Registry | Preferred | Optional |
Microsoft.ContainerService | Container Service Kubernetes | Preferred | Optional |
Microsoft.Storage | Storage accounts Storage Snapshots | Mandatory | Mandatory |
Microsoft.RecoveryServices | Recovery Vault | Preferred | Optional |
Microsoft.Network | Route Tables Network Security Group Virtual Networks Public IP Address Traffic Manager Profiles Load Balancer Express Routes Application Gateway Application Gateway Available SSL Policy | Mandatory | Mandatory |
Microsoft.Sql | SQL | Preferred | Optional |
Microsoft.DBforPostgreSQL | PGSQL | Preferred | Optional |
Microsoft.DBforMySQL | Mysql | Preferred | Optional |
- Preferable: Access is not mandatory. However, some of the automation features will be not functional without the required access. You can exclude them for “Assessment-Only”.
- Optional: Not mandatory, similar to that of Preferable. Core features will continue to work. Some low-level actions will have an Impact. You can exclude them for “Assessment-Only”.
- Mandatory: Non-negotiable. Even to onboard account with read-only permissions (“Assessment-Only”), these access details would be needed.
Impact on the Azure Subscription
If you intend to use the platform for remediation and automation, it creates resources and applies some configurations in Azure while configuring these capabilities in the platform.
Alert Rules and Alert Actions:
Alert rules will be created when monitoring thresholds are configured as part of the Operations – Alerts module.
A new alert action will be added to the created rules to invoke the platform notification webhook when threshold alert is triggered.
Azure Policy
The platform will create the Policy Definitions and Assignments based on the GuardRails you prefer to set-up for your Azure Subscription.
Security Center
The platform will enable the Free-tier or Standard Tier for the resources based on the security configurations.
Note: (Enabling Standard Tier has cost implications, please exercise caution during configuration).
Billing Impact Due to Onboarding
There is no billing impact as such in configuring your account with the platform until certain services are consumed through it.
The following table shows a few areas where there might be cost implications:
Feature | Free Units Included | Price | CS Remarks |
|---|---|---|---|
Alert Notifications | 100,000 web hooks per month | $0.60/1,000,000 web hooks | None |
Dynamic Thresholds | None | $0.10 per dynamic threshold per month | The platform does not create Dynamic Thresholds as part of account onboarding. However, you can configure through an Operations template, if required. |
Azure Security Center | Free Tier | Pricing varies per resource type. | Standard Tier, if opted into, will have higher cost impact. |
Monitoring Metrics | 10 monitored metric time-series per month | $0.10 per metric time-series monitored per month | None |
Enrollment Reader Permission for MACC
For an Azure EA account, to get the Microsoft Azure Consumption Commitment (MACC) data in the Azure MACC widget, the Enrollment Reader permission is required. You need to provide the permissions through the following APIs:
- Assign Role Assignment
PUT /providers/Microsoft.Billing/billingAccounts/(Enrollment ID)/billingRoleAssignments/2c5e615e-86da-46f2-86e9-da4075bed88b?api-version=2019-10-01-preview
Request Body: {
  "properties": {
    "principalId": "Your servicePrincipalId",
    "principalTenantId": "your tenantId where you have your ServicePrincipal",
    "roleDefinitionId": "/providers/Microsoft.Billing/billingAccounts/(EnrollmentID)/billingRoleDefinitions/24f8edb6-1668-4659-b5e2-40bb5f3a7d7e"
  }
}
- Verify Role Assignment
GET /providers/Microsoft.Billing/billingAccounts/(EnrollmentID)/billingRoleAssignments?api-version=2019-10-01-preview
Updated 3 months ago