

Onboarding for OCI Tenancies
Please read first:Before proceeding with onboarding for this type of cloud account, you must ensure the required pre-onboarding steps have been completed first.
For more information on what these prerequisites are and how to address them, please refer to the Pre-Onboarding for OCI Tenancies user guide.
Overview
OCI Account Onboarding is the process within CoreStack's Platform module that connects an Oracle Cloud Infrastructure tenancy to CoreStack for cloud governance, cost management, and security monitoring. It applies when you are adding a new OCI cloud account to CoreStack for the first time, or re-establishing access after a credential or policy change. This guide is intended for Cloud Administrators and Platform Administrators who manage connected cloud accounts in CoreStack. It does not configure CoreStack policies, budgets, or governance rules — it only establishes the authenticated connection between CoreStack and your OCI tenancy.
Note: You must have administrator access to your OCI tenancy console to complete this guide. CoreStack recommends creating a dedicated user, group, and policy rather than reusing existing ones, to simplify access control and future credential rotation.
OCI Access Setup & Policy Configuration
CoreStack connects to OCI using a dedicated OCI user's API key credentials to authenticate with the OCI API. You create that user in OCI, assign them to a group, and attach a policy to that group granting the permissions CoreStack requires. The access level you choose — Read Only or Read-Write — determines which CoreStack features are available for the account. Once you enter the credentials (User ID, Fingerprint ID, Region, Tenancy ID, and Private Key) in CoreStack, the platform begins discovering and monitoring your OCI resources.
Prerequisites
Before you begin, ensure the following:
- Tenancy details on hand: You know your OCI Tenancy ID and home Region identifier.
- Domain type: You know whether your OCI identity domain is the Default Free Domain or a non-default domain (e.g.,
OracleIdentityCloudService) — this affects how group names are written in policy statements (see Step 7). - Access level decision: You have decided whether CoreStack needs Read Only or Read-Write access (see the policy tables in Step 7 for module-level guidance).
Creating an OCI User, Group, and Policy
Follow the steps below to create the required OCI user, group, and policy, then connect the account in CoreStack:
Step 1: Create a new OCI user
In your OCI console, navigate to Identity & Security > Users and click Create User.
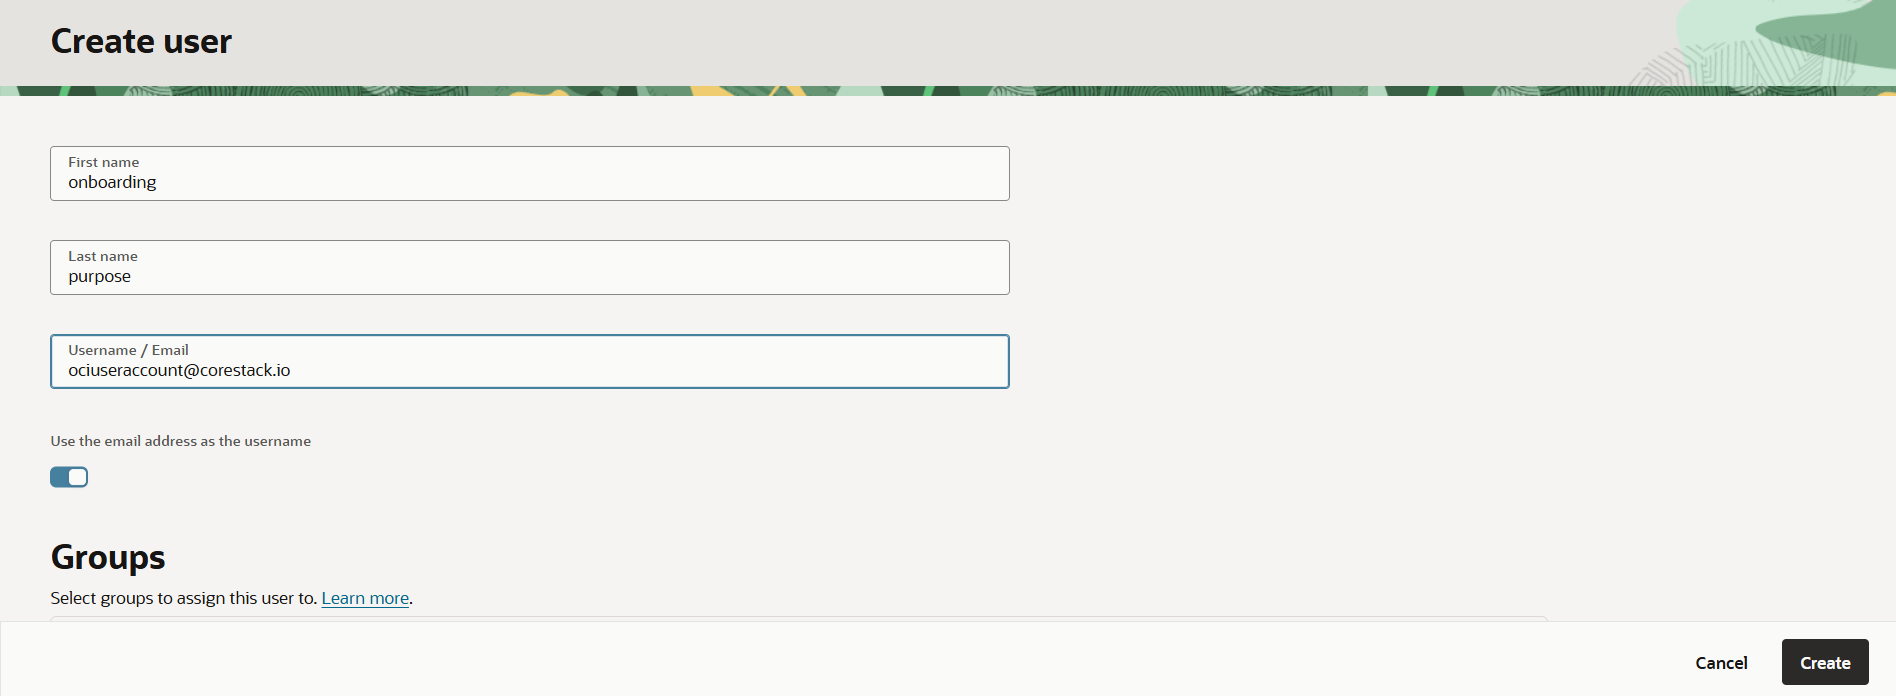
Step 2: Enter the user details
Fill in the user creation form:
- First name: A name that identifies this as a CoreStack service account (e.g.,
oci-user). - Last name:
corestack(or your organization's naming convention) - Username / Email: A dedicated service account email (e.g.,
[email protected]) - Use email as username: Enable this option.
Click Create.
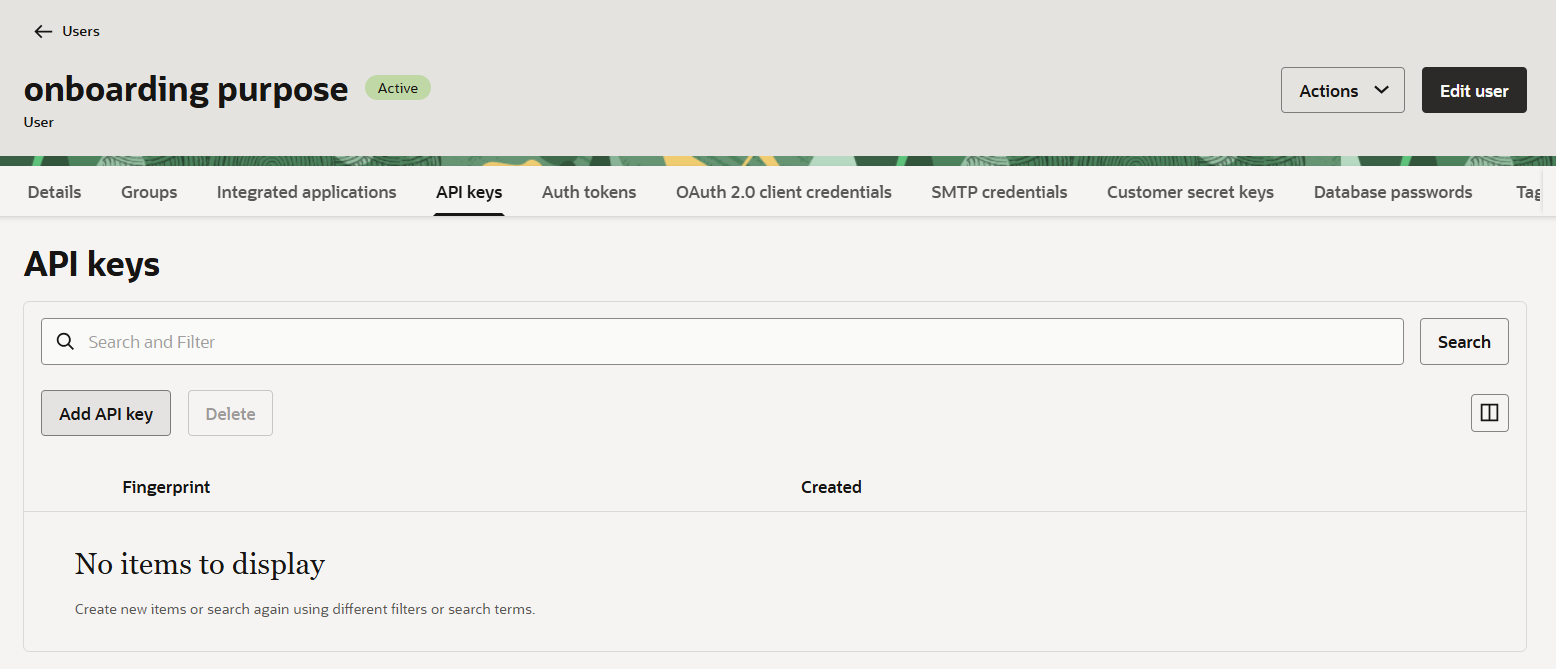
Step 3: Generate API keys and copy the required parameters
After the user is created, in the API keys tab, open the user's detail, and click Add API key to generate API keys.
Copy and save the following values — you will need them when adding the account in CoreStack.
- User ID (OCID of the newly created user)
- Fingerprint ID (generated when you create the API key)
- Region (your OCI home region identifier, e.g.,
ap-mumbai-1) - Tenancy ID (OCID of your OCI tenancy)
Download both the Public Key and Private Key files and store them securely.
Step 4: Create a new group
In your OCI console, navigate to Identity & Security > Groups and click Create Group.
Enter the following details:
- Name:
corestackgroup(or your organization's naming convention — note this name exactly, you will use it in Step 7). - Description: Enter a description for the user group.

Step 5: Assign the new user to the group
In the Users section of the Create group form, search for the user created in Step 2 and select them. Click Create to assign the user to a group..
Note: The user must belong to a group that has the required Identity permissions —
inspect users,inspect groups, andinspect compartments. These can be granted through this group or through any other group the user belongs to.
Step 6: Create a new policy
In your OCI console, navigate to Identity & Security > Policies and click Create Policy.
Fill details in the following fields:
- Name: Enter the policy name.
- Description: Enter description about the policy.
- Compartment: Select your root compartment (e.g.,
corestackoci (root))
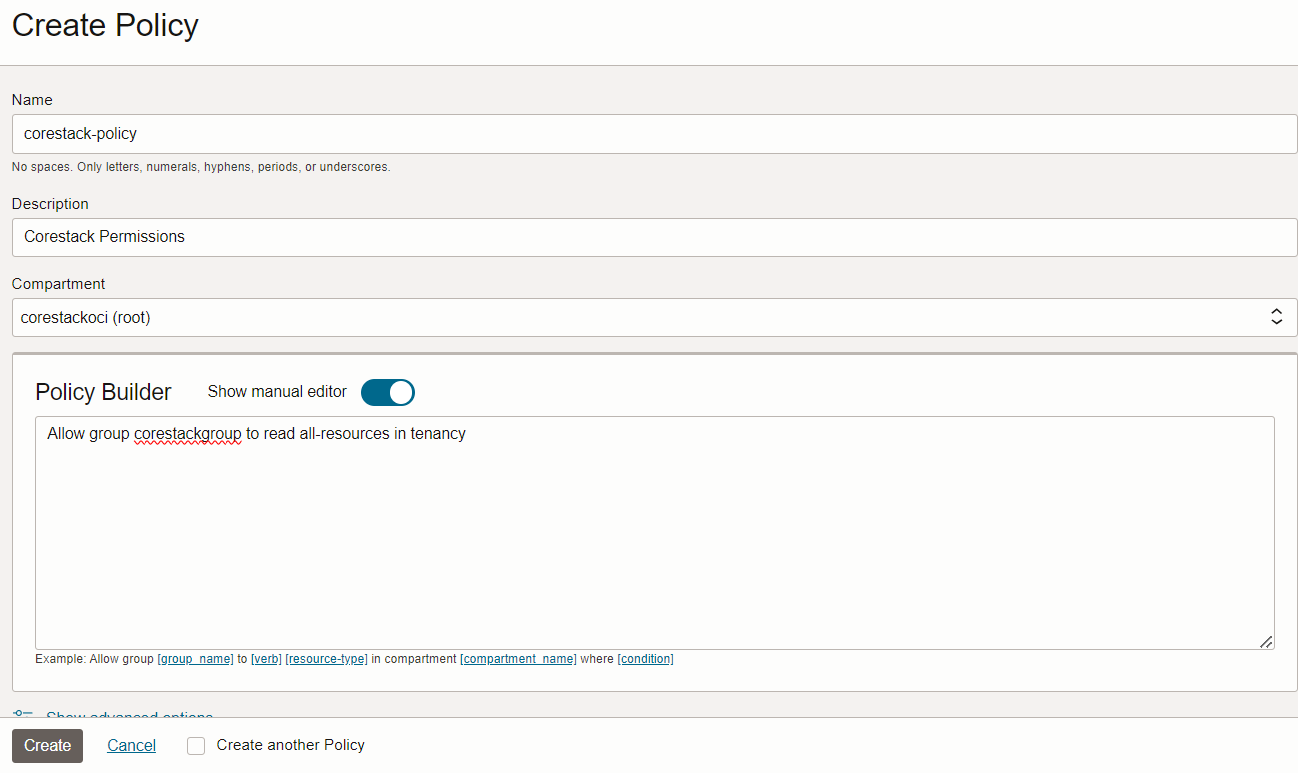
Step 7: Add the required policy statements
In the Policy Builder field, enable Show manual editor and enter the policy statements for the selected access level from the tables below.
Before you enter the statements, check your domain type:
Default Free Domain — Replace
<group-name>with your group name only.Allow group corestackgroup to read all-resources in tenancyNon-default domain (e.g.,
OracleIdentityCloudService) — Replace<group-name>with the domain-qualified format'<domain-name>'/'<group-name>':Allow group 'OracleIdentityCloudService'/'corestackgroup' to read all-resources in tenancy
Click Create once all required statements are entered.
Read Only Access
| Module | Policy Statement |
|---|---|
| All resources (mandatory) | Allow group <group-name> to read all-resources in tenancy |
| FinOps | Allow group <group-name> to read usage-reports in tenancy |
Allow group <group-name> to read usage-budgets in tenancy | |
Allow group <group-name> to inspect usage-budgets in tenancy | |
Allow group <group-name> to read optimizer-api-family in tenancy | |
Allow group <group-name> to read optimizer-category in tenancy | |
Allow group <group-name> to read optimizer-recommendation in tenancy | |
Allow group <group-name> to read optimizer-recommendation-strategy in tenancy | |
| CloudOps | Allow group <group-name> to read ons-subscriptions in tenancy |
Allow group <group-name> to read ons-topics in tenancy | |
Allow group <group-name> to read serviceconnectors in tenancy | |
Allow group <group-name> to read alarms in tenancy | |
Allow group <group-name> to read metrics in tenancy | |
| SecOps | Allow group <group-name> to read cloud-guard-family in tenancy |
Allow group <group-name> to read vss-family in tenancy | |
| Non-default domain only | Allow group <group-name> to read identity-providers in tenancy |
Allow group <group-name> to read policies in tenancy | |
Allow group <group-name> to read users in tenancy |
Note: The three Non-default domain only statements at the bottom are required only if your OCI identity domain is not the Default Free Domain. Skip them if you are using the Default Free Domain.
Read-Write Access
| Module | Policy Statement |
|---|---|
| All resources (mandatory) | Allow group <group-name> to manage all-resources in tenancy |
| FinOps | Allow group <group-name> to manage usage-reports in tenancy |
Allow group <group-name> to manage optimizer-api-family in tenancy | |
Allow group <group-name> to manage optimizer-recommendation in tenancy | |
Allow group <group-name> to manage usage-budgets in tenancy | |
Allow group <group-name> to manage optimizer-category in tenancy | |
Allow group <group-name> to manage optimizer-recommendation-strategy in tenancy | |
| CloudOps | Allow group <group-name> to manage ons-topics in tenancy |
Allow group <group-name> to manage ons-subscriptions in tenancy | |
Allow group <group-name> to manage serviceconnectors in tenancy | |
Allow group <group-name> to manage alarms in tenancy | |
| SecOps | Allow group <group-name> to manage cloud-guard-family in tenancy |
Allow group <group-name> to manage vss-family in tenancy |
Tip: Start with Read Only access for initial onboarding. You can edit the policy later to upgrade to Read-Write once CoreStack is connected and validated.
Step 8: Add the OCI account in CoreStack
Return to the CoreStack platform and complete the OCI account onboarding form using the parameters you copied in Step 3.
- User ID
- Fingerprint ID
- Region
- Tenancy ID
- Private Key (upload the
.pemfile downloaded in Step 3)
OCI Tenancies Onboarding Steps
An OCI Tenancy is a user account that provides access to Oracle's cloud services and resources. It enables users to create and manage cloud resources such as compute instances, storage, databases, and networking within Oracle's cloud environment.
The account onboarding process follows a step-by-step flow with four steps, described in the list below. Users must complete every step by filling in the appropriate details so that they can proceed to the next step.
The onboarding flow for OCI cloud accounts covers the following main steps:
- Prerequisites: Select the cloud account scope, access type, and product(s).
- Add & Validate Credentials: Select the authentication type and provide the required OCI account credentials.
- Basic Settings: Select and/or input the basic settings for the cloud account.
- Advanced Settings (optional): This optional step allows users to add tags and set up any required governance configurations. Account governance configurations can also be done after the onboarding steps.
As users add all necessary details for each step in the onboarding flow, it will be marked as completed and no longer appears greyed out in the left sidebar.
Detailed onboarding steps are explained in the sections below.
Note:Before starting the onboarding process on the platform, make sure that you have followed and completed all the prerequisite steps in the OCI cloud portal. Refer to the PRE-ONBOARDING user guides for more information on how to complete these steps.
Perform the following steps to onboard an OCI Account:
Navigating to the Onboard Accounts Page
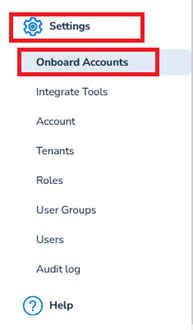
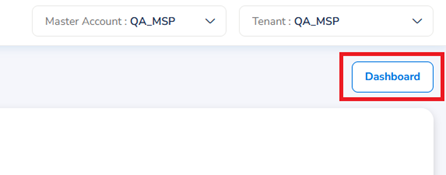
Log in to the platform and on the left menu bar, go to Settings > Onboard Accounts.
The Onboard Cloud Accounts starting page will appear. Here, users can select which cloud provider to onboard a new account for based on the available options.

Note:Users can also use the Dashboard button in the upper right corner of the page to go directly to the Account Governance Dashboard (Cloud Accounts) as a shortcut.
Select Onboarding Option
To start the onboarding process, hover over the OCI option under Public Cloud Providers, and an Onboard button should appear. Select Onboard to proceed.

Prerequesites
In the Select Cloud Account Scope field, select one of the following options:
- Tenant: This scope allows the cloud account to be available only in the tenant it is onboarded to. This option is selected by default.
- Account: This scope allows the cloud account to be available in all tenants.
In the Select Access Type field, select one of the following options:
-
Read-Only: This option provides viewing access without the ability to make changes.
-
Read-Write: This option allows the users to view, modify, and manage resources.
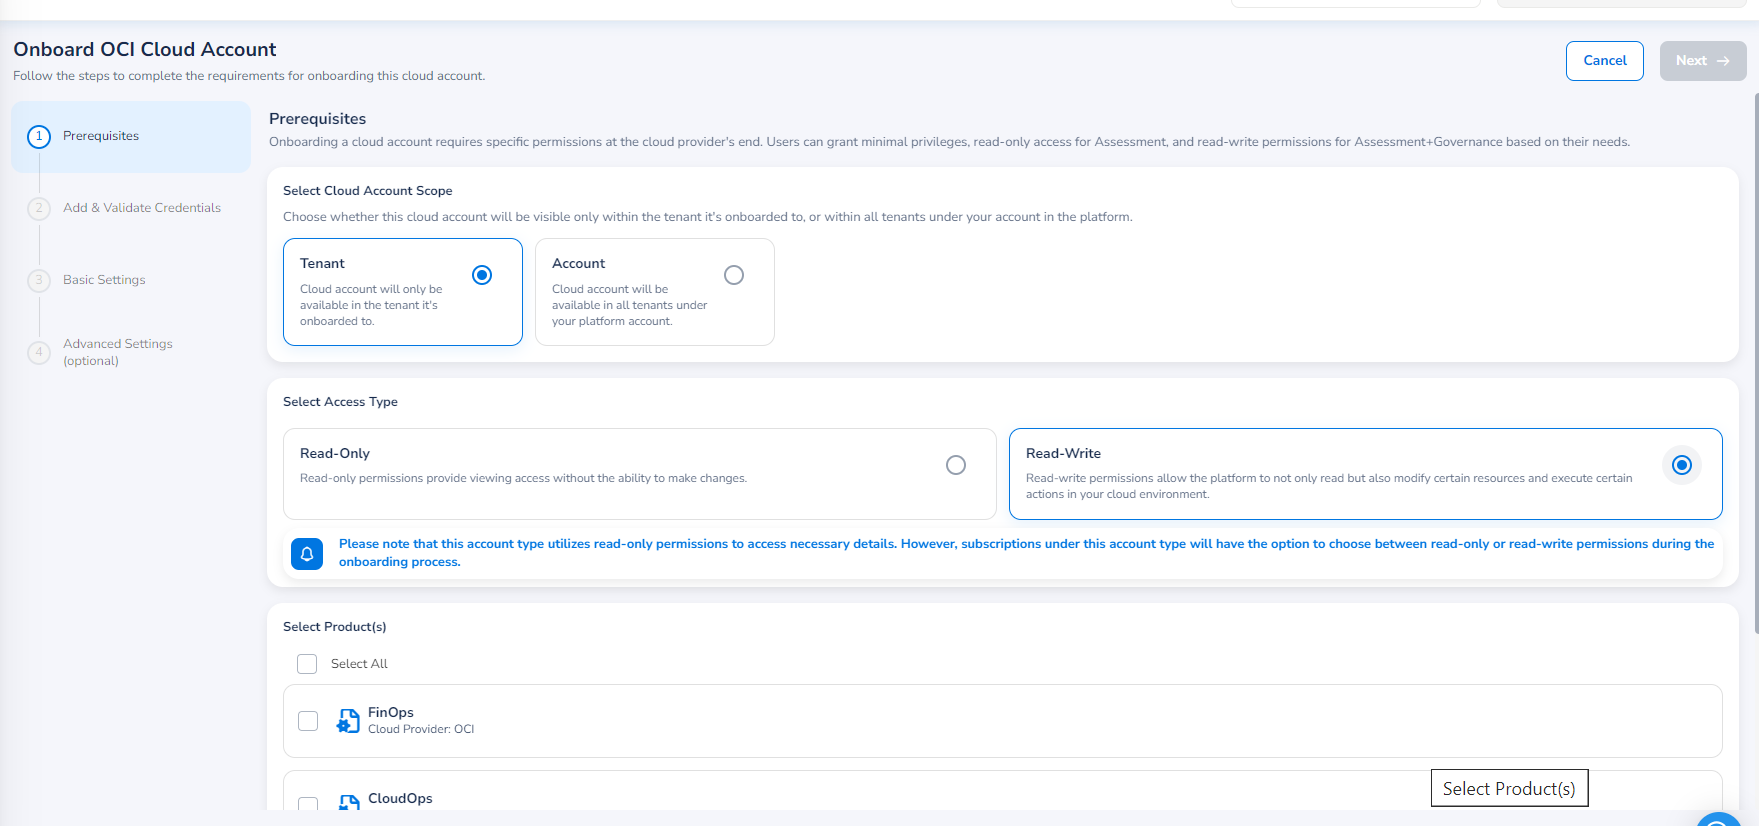
In the Select Product(s) field, select the products that will be accessible through this account. The available products are shown based on the product bundle that was chosen during the account master creation. For example, the Governance product bundle includes: FinOps, SecOps, and CloudOps.
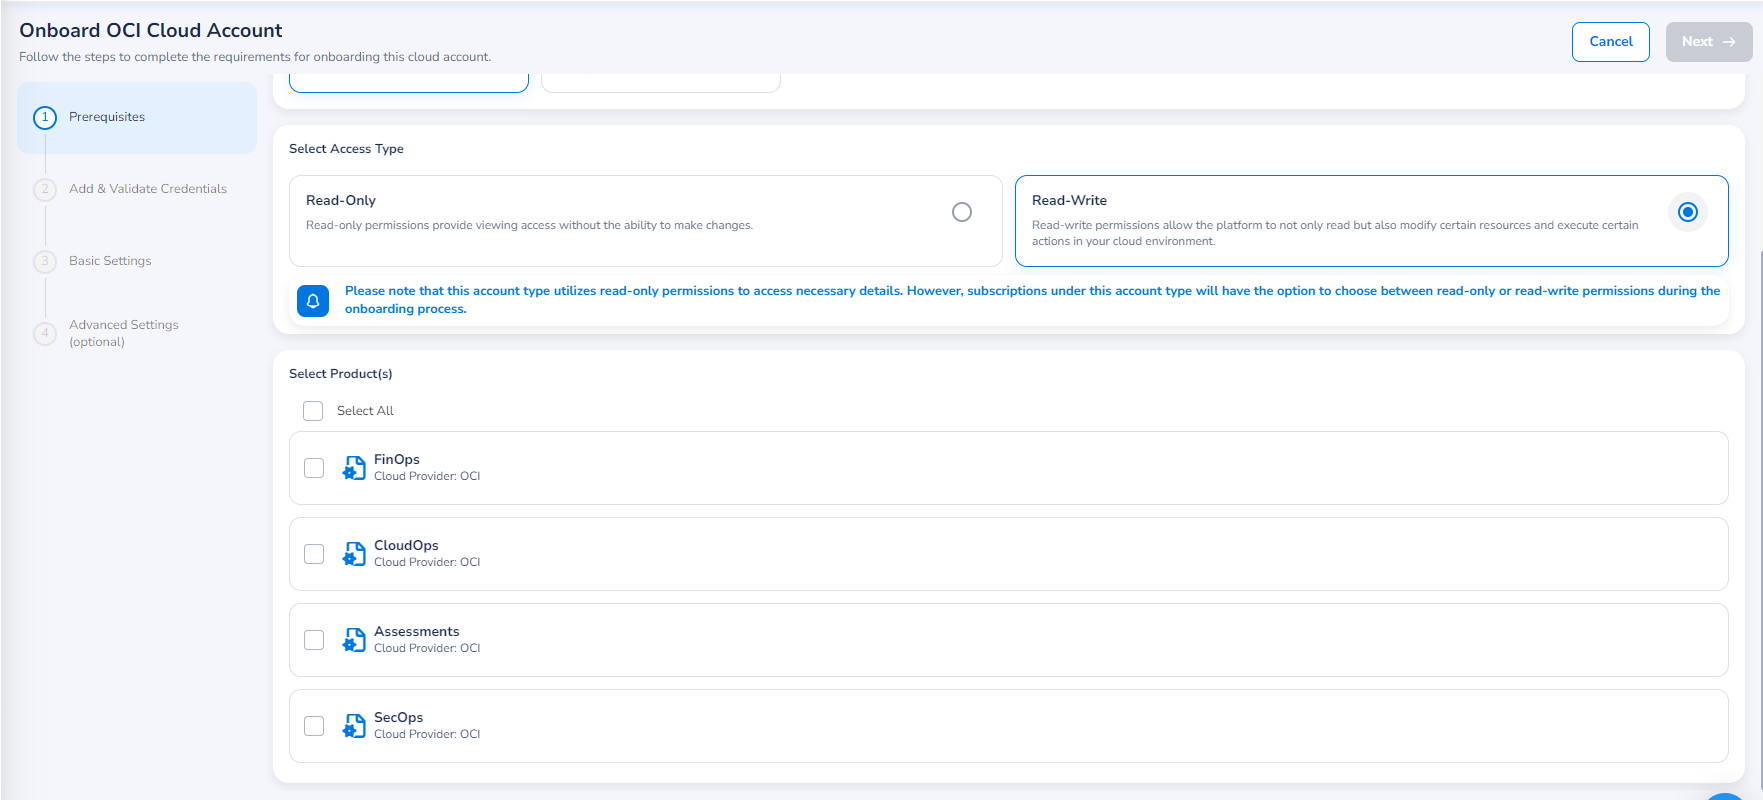
Click Next. The Add & Validate Credentials section appears.
Add & Validate Credentials
Fill in the following fields and then click Save & Validate.
-
User ID
-
Fingerprint ID
-
Tenancy ID
-
Default Region
-
In the Upload Credentials File (PEM) field, click Select File, and select the file to be uploaded.
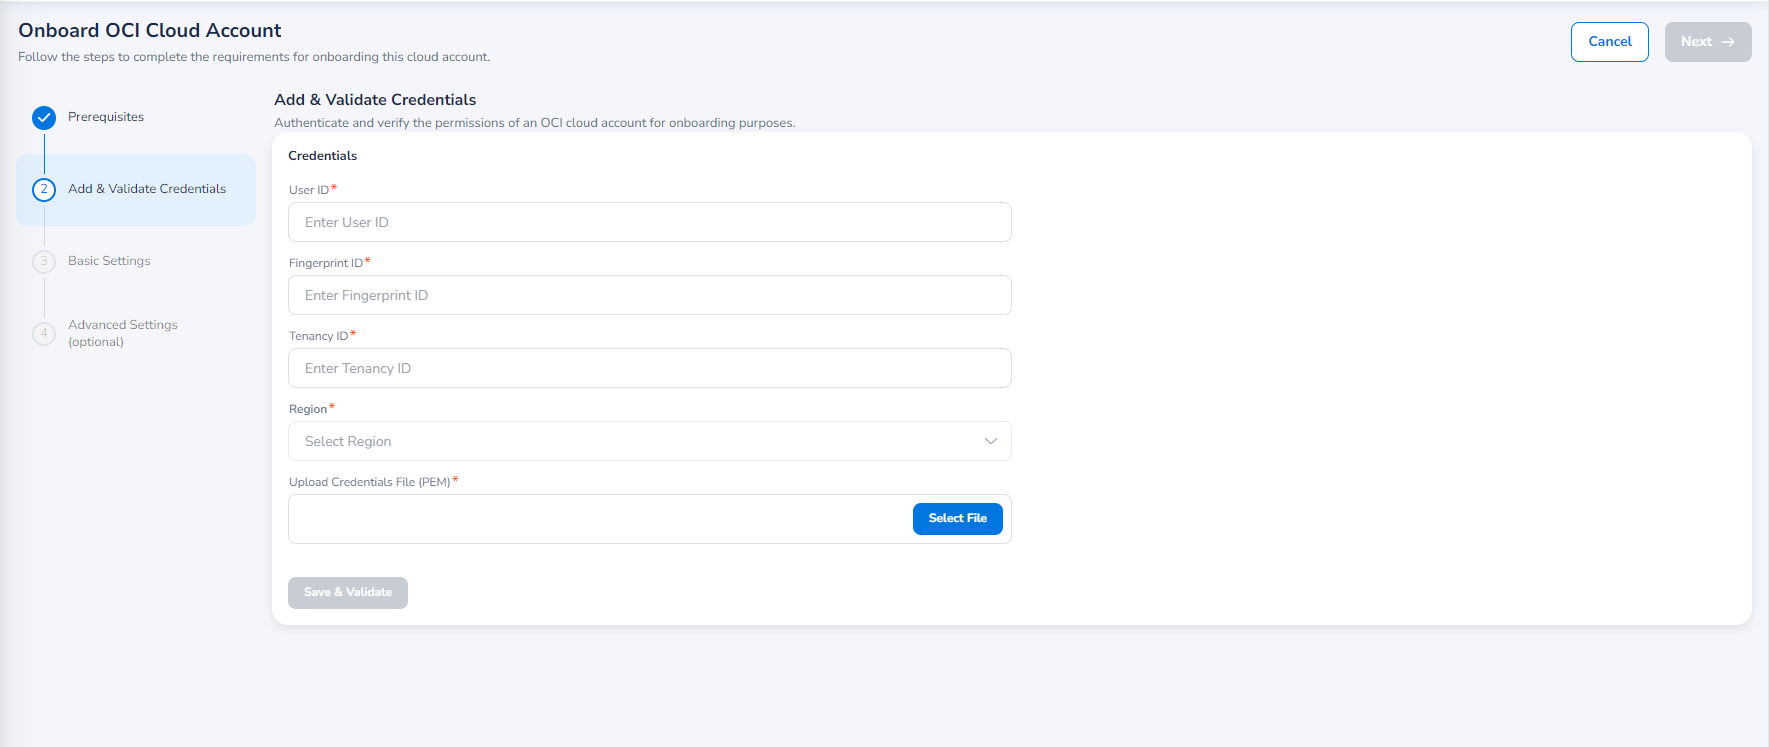
Validation
If the validation is successful, then a success message will be displayed.
If the validation fails, then an error message will be displayed along with an option for View Log. You can click View Log to view the error details and then click Re-Validate to retry the validation.
Note:After the completion of successful validation, the Save & Validate button turns to Re-Validate. You can click Re-Validate to validate the account again.
Click Next. The Basic Settings section appears.
Basic Settings
In the Currency list, click to select a currency in which the billing data will be downloaded from the cloud provider.
Note:
- The Account Name field will be filled by default, but if needed, you can update this field here.
- The Account Name field should not exceed the maximum character limit of 50 characters including special characters.
Select the Privacy Policy checkbox to continue with the onboarding process.
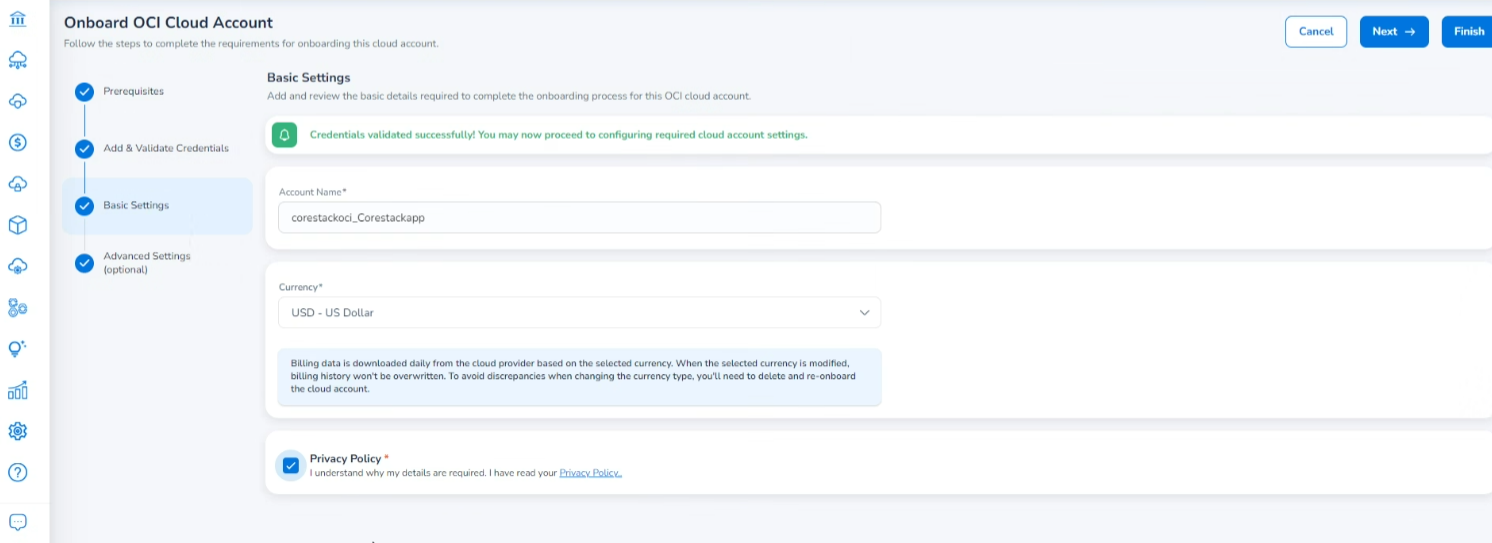
You can click Next to set up advanced settings or click Finish to complete the account onboarding. Please note that the step for configuring advanced settings is not mandatory and can be skipped.
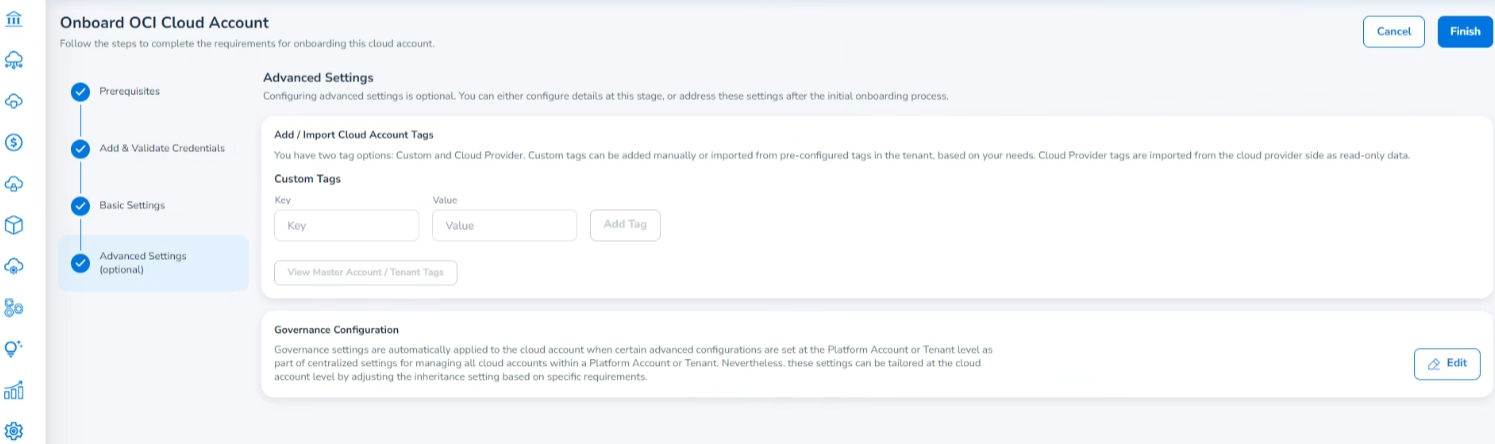
Advanced Settings (Optional)
If you click Next, then the Advanced Settings section will be displayed.
The Advanced Settings page is where users can make additional configurations of the cloud account being onboarded, like tags and governance settings. Again, this section is optional and can be completed later, if desired.
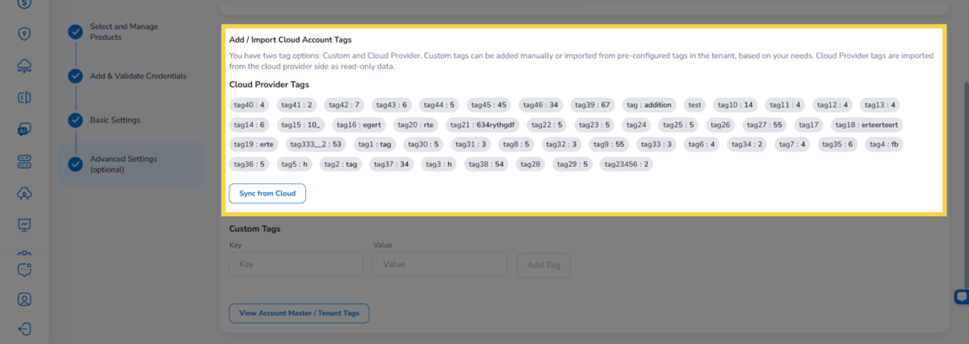
Add/Import Cloud Account Tags
The Add / Import Cloud Account Tags section offers two tag options:
- Cloud Provider Tags: Imported from the cloud provider side as read-only data.
- Custom Tags: Added manually or imported from pre-configured tags in the tenant.
Cloud Provider Tags
The Cloud Provider Tags section displays all account-level tags retrieved directly from your cloud account as read-only key:value pairs. These tags are imported from the cloud provider side and cannot be edited or deleted within CoreStack.
Note: Cloud Provider Tags are only available for OCI Management Accounts. This feature is not available for member accounts.
To pull the latest tags from your cloud account, click Sync from Cloud. The tag list refreshes to reflect any new, updated, or removed tags from the cloud provider.
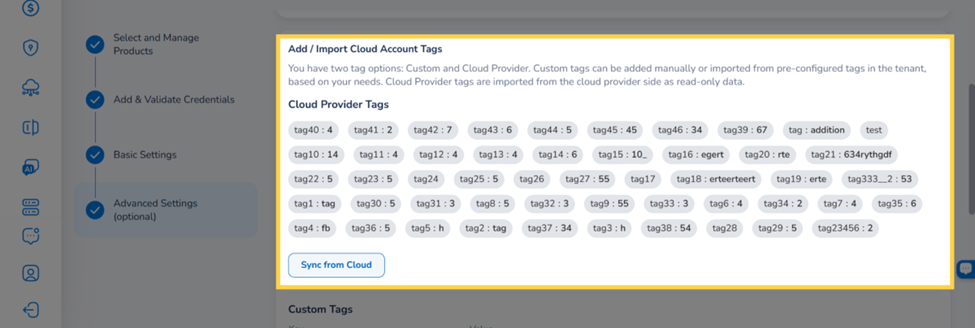
Note: Tags synced from the cloud provider are read-only in CoreStack. To modify or remove a Cloud Provider Tag, update it at the cloud account level.
Tags removed from the cloud provider are automatically removed from CoreStack after the next sync.
Using Cloud Provider Tags in FinOps Dashboards
Once Cloud Provider Tags are configured on an account, they are available as filter criteria in FinOps dashboards, including the Cost Posture dashboard.
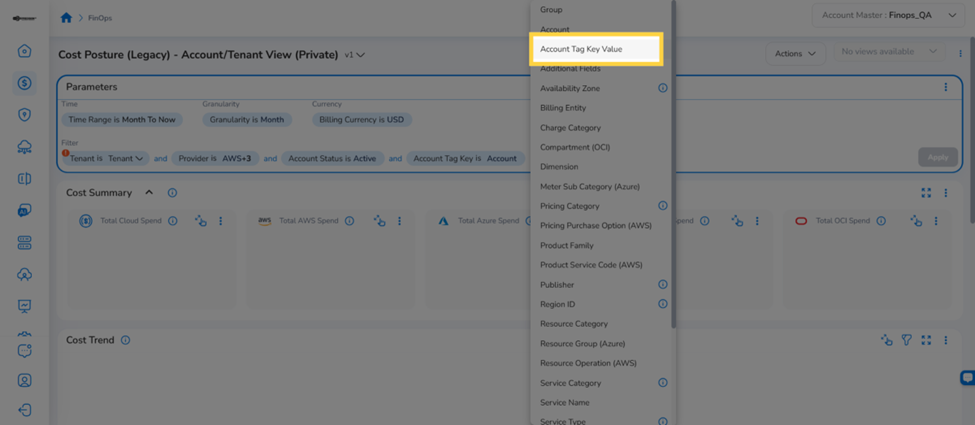
To filter by Account Tag Key:
- Navigate to FinOps and open the Cost Posture dashboard.
- In the Filter bar, click ADD+ to add a new filter condition.
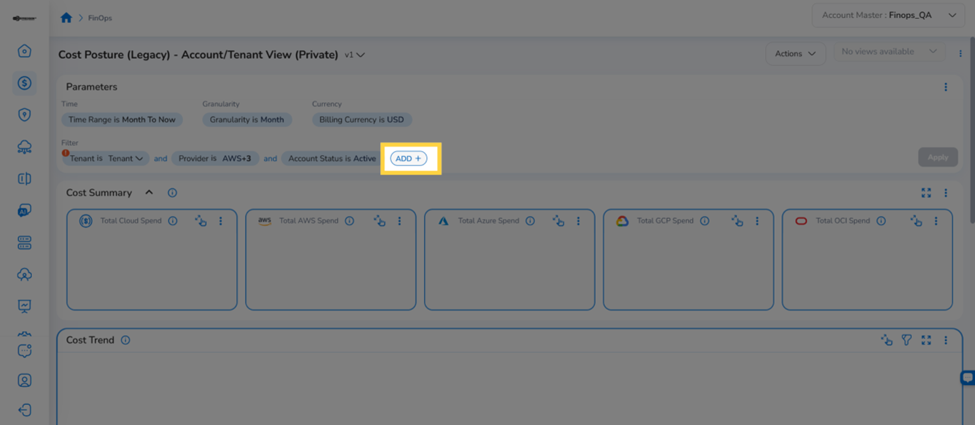
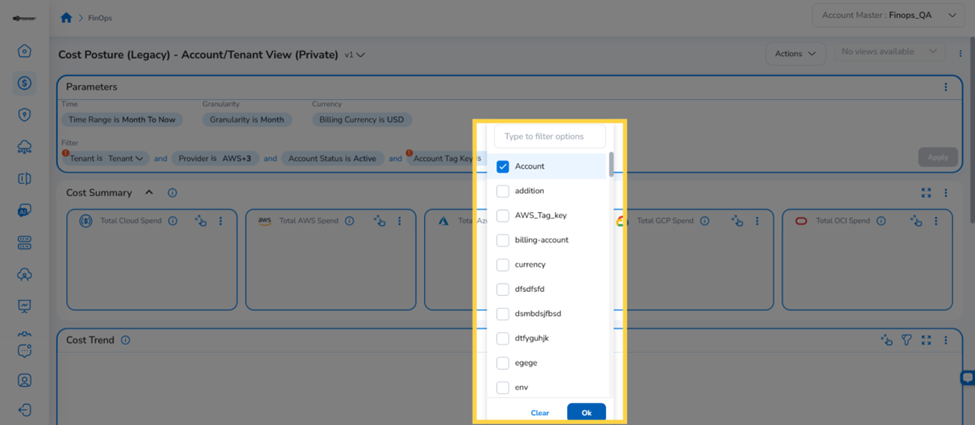
- Select Account Tag Key from the filter field dropdown. A filter chip appears in the filter bar.
- Click the Account Tag Key dropdown on the filter chip to view all available tag keys synced from your cloud accounts.
- Select the desired tag key and click Ok. The filter bar updates to reflect the active key.
To further narrow results by a specific tag value:
- Click ADD+ again in the Filter bar and select Account Tag Key Value from the dropdown.
- Click Select Key on the filter chip and select the desired tag key from the list.
- Click Select Values to open the list of available values for the selected key.
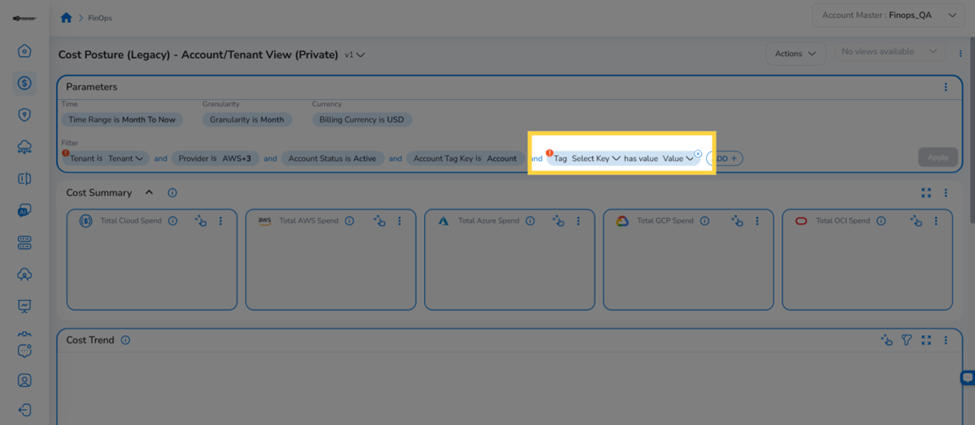
- Select the desired values and click Ok. The Cost Posture dashboard refreshes to display cost data for accounts matching the selected key-value combination.
Editing Cloud Provider Tags
To edit Cloud Provider Tags on an already-onboarded account:
-
Navigate to Governance > Account Governance > Cloud Accounts.
-
Click the Actions icon (⋮) on the account row and select Edit.
-
In the account configuration wizard, click Advanced Settings (optional) in the left navigation.
-
In the Add / Import Cloud Account Tags section, click Sync from Cloud to fetch the latest tags from your cloud provider.
Click Finish to save the updated configuration
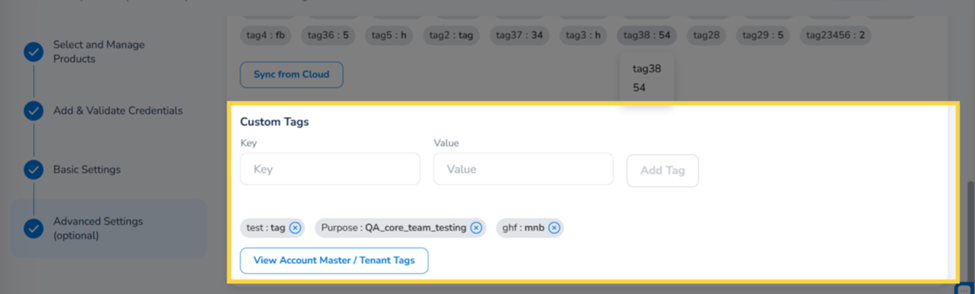
Custom Tags
The Custom Tags section allows you to manually add tags specific to this cloud account.
- Enter a Key and Value in the input fields, then click Add Tag. The tag appears as a badge below.
- Click View Account Master / Tenant Tags to import pre-configured tags from the tenant. Select the required tags and click Insert Selected Tags.
Governance Configuration
In the Governance Configuration field, click Edit to configure the required settings. Refer to Governance Configuration for detailed steps.
Click Finish.
The Onboarding Status dialog box appears that shows the progress of account onboarding. You can click Go to the Dashboard to return to the Account Governance Dashboard.
Governance Configuration
The Governance Configuration page includes many sections where configurations can be made. You need to select the configuration you want to apply to your onboarded account. All the available configuration sections are explained below. Refer to the relevant configuration and follow the steps. These governance configurations can be made while onboarding the account or can be done post onboarding.
FinOps
The configurations that can be done for FinOps are explained below.
Cost Anomaly
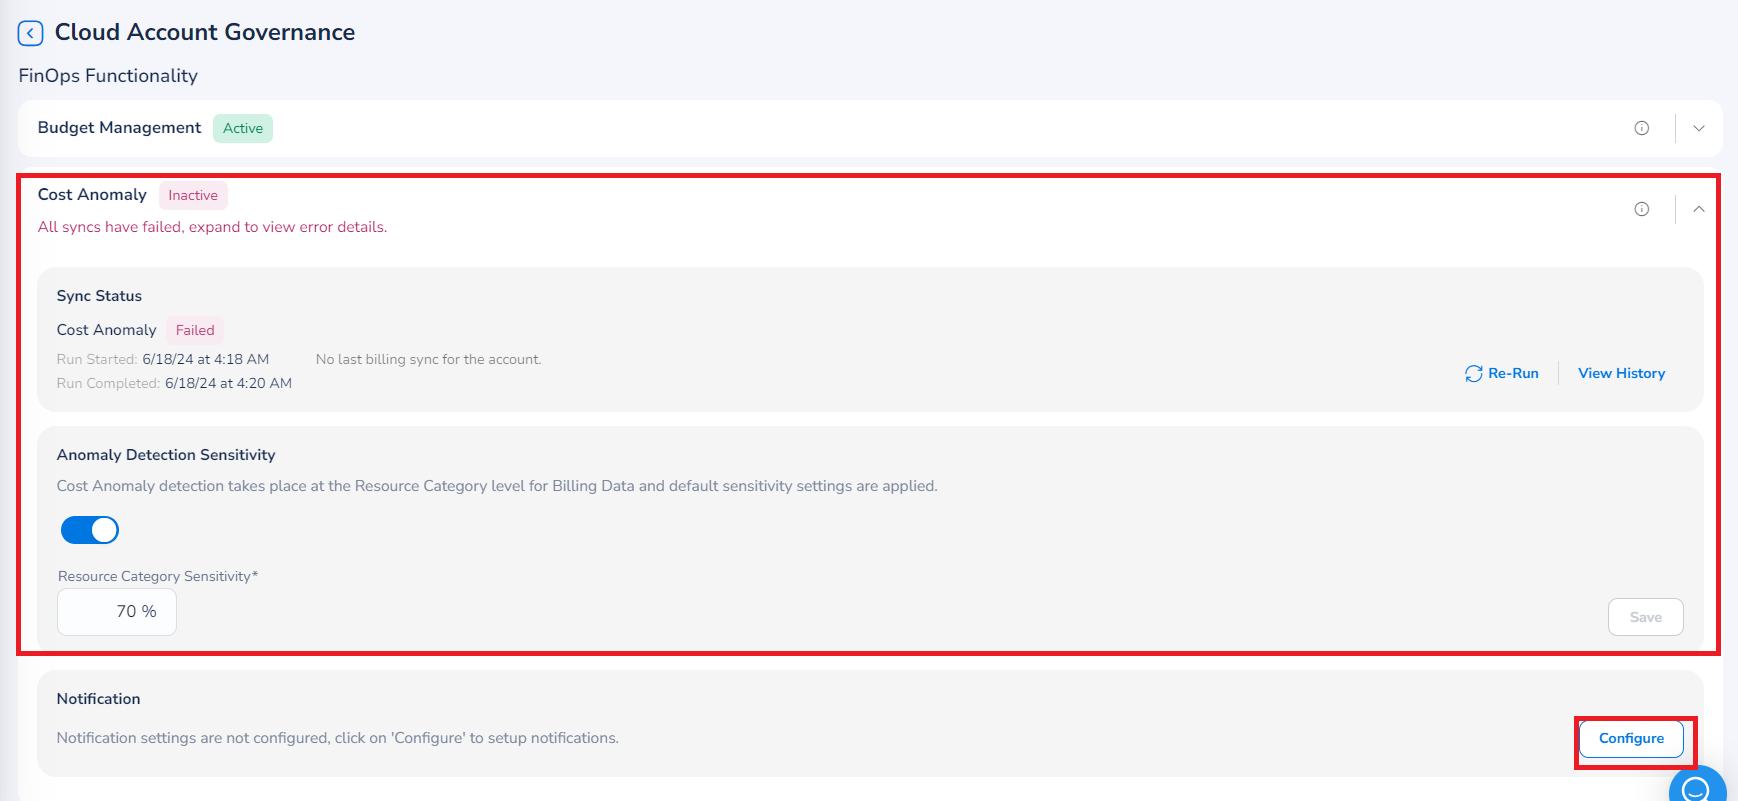
Perform the following steps to configure cost anomaly:
- Expand the Cost Anomaly section.
- Ensure that Anomaly Detection Sensitivity field is enabled (the slider is on the right side).
- In the Resource Category Sensitivity box, the settings are applied by default. If you want to edit the default setting, add the sensitivity based on which anomaly would be detected.
- In the Notification section, click Configure. The Notifications Settings dialog box appears.
a. Select the Enable Notification checkbox. The Email Address, Webhook, and Microsoft Teams Webhook fields are displayed.
b. In the Email Address box, type the email address of the user(s) and click Add.
c. In the Webhook box, type the webhook link(s) and click Add.
d. In the Microsoft Teams Webhook box, type the URL(s) for Microsoft Teams Webhook and click Add.
e. Click Save & Apply.
SecOps
The configurations that can be done for SecOps are explained below.
Threat Management
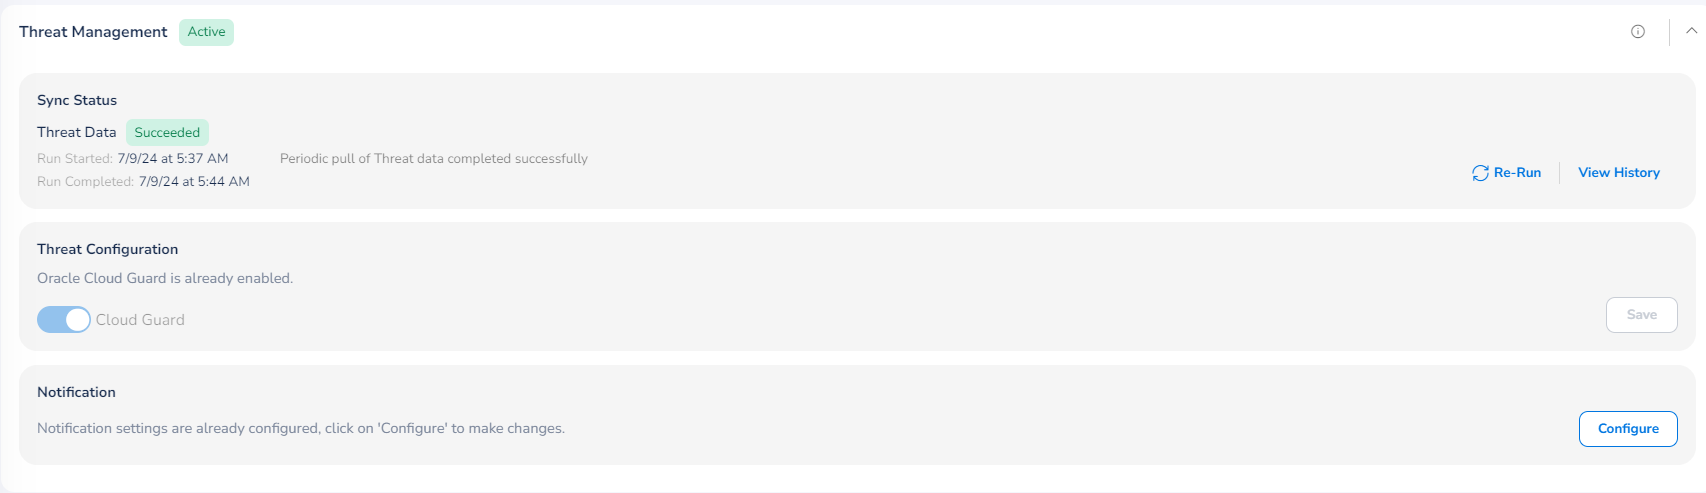
To make configuration for threat detection, perform the following steps:
- Click to expand the Threat Management section.
- In the Cloud Guard field, move slider towards right to enable this field.
- Click Save.
If configuration is already made for Threat Management, then you can click View to see the existing configuration or you can click Delete to remove the configuration.
To configure notifications related to threat management, perform the following steps:
- In the Notification section, click Configure. The Notifications Settings dialog box appears.
- Select the Enable Notification checkbox. The Email Address, Webhook, and Microsoft Teams Webhook fields are displayed.
- In the Email Address box, type the email address of the user(s) and click Add.
- In the Webhook box, type the webhook link(s) and click Add.
- In the Microsoft Teams Webhook box, type the URL(s) for Microsoft Teams Webhook and click Add.
- Click Save & Apply.
Vulnerability Assessments
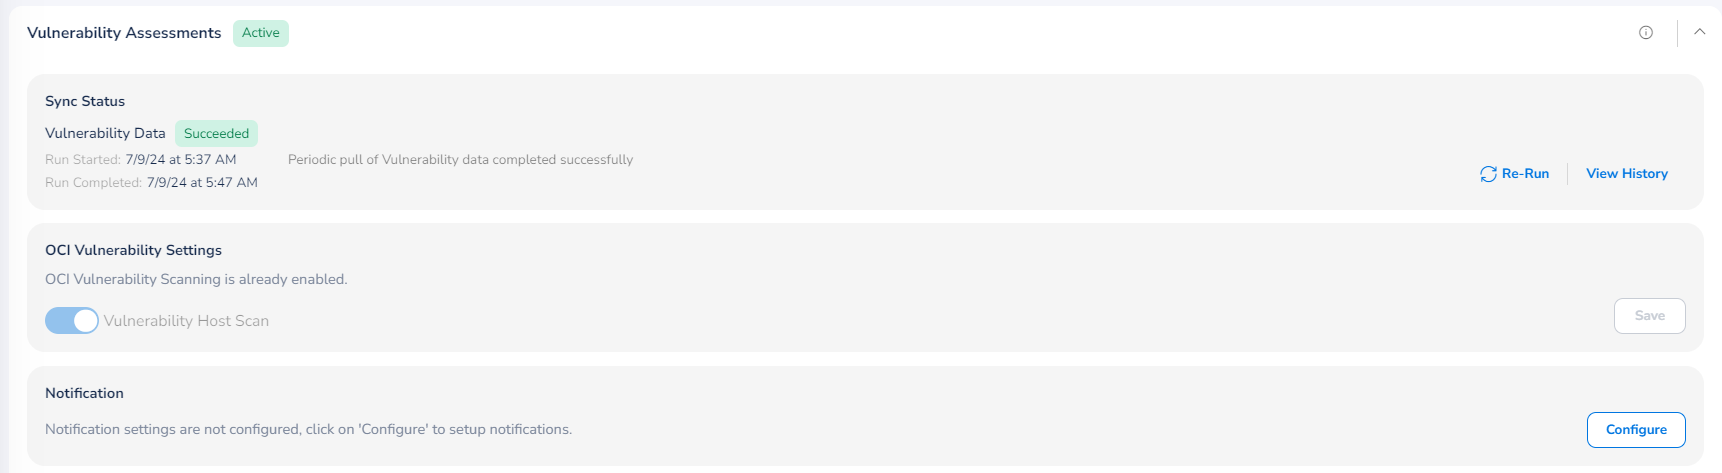
To make configuration for vulnerability assessments, perform the following steps:
- Click to expand the Vulnerability Assessments section.
- In the Vulnerability Host Scan field, move slider towards right to enable this field.
- Click Save.
If configuration is already made for Vulnerability Assessments, then you can click View to see the existing configuration or you can click Delete to remove the configuration.
To configure notifications for Vulnerability Assessments, perform the following:
- Click to expand the section, and then click Configure. The Notifications Settings dialog box appears.
- Select the Enable Notification checkbox. The Email Address, Webhook, and Microsoft Teams Webhook fields are displayed.
- In the Email Address box, type the email address of the user(s) and click Add.
- In the Webhook box, type the webhook link(s) and click Add.
- In the Microsoft Teams Webhook box, type the URL(s) for Microsoft Teams Webhook and click Add.
- Click Save & Apply.
CloudOps
The configurations that can be done for CloudOps are explained below.
Activity

To configure activity alerts, perform the following:
- Expand the Activity section.
- In the Activity Log Configuration section, click Configure. A dialog box appears.
- In the Select Regions drop-down list, select one or more relevant option(s) and click Ok.
- Enter an appropriate value for the Service Connector Name.
- Enter an appropriate value for the Topic Name.
- If you want to apply default template for activities to monitor your OCI notifications setup, then select the Apply Default Template checkbox.
- Click Validate.
- Click Save & Exit.
If configuration is already made for activities, then you can click View to see the existing configuration or you can click Delete to remove the configuration.
To configure notifications for activity:
- In the Notification section, click Configure. The Notifications Settings dialog box appears.
- Select the Enable Notification checkbox. The Email Address, Webhook, and Microsoft Teams Webhook fields are displayed.
- In the Email Address box, type the email address of the user(s) and click Add.
- In the Webhook box, type the webhook link(s) and click Add.
- In the Microsoft Teams Webhook box, type the URL(s) for Microsoft Teams Webhook and click Add.
- Click Save & Apply.
Shared Functionality and Integrated Tools
The configurations that can be done for Shared Functionality and Integrated Tools (common across all products) are explained below.
Policy Engine
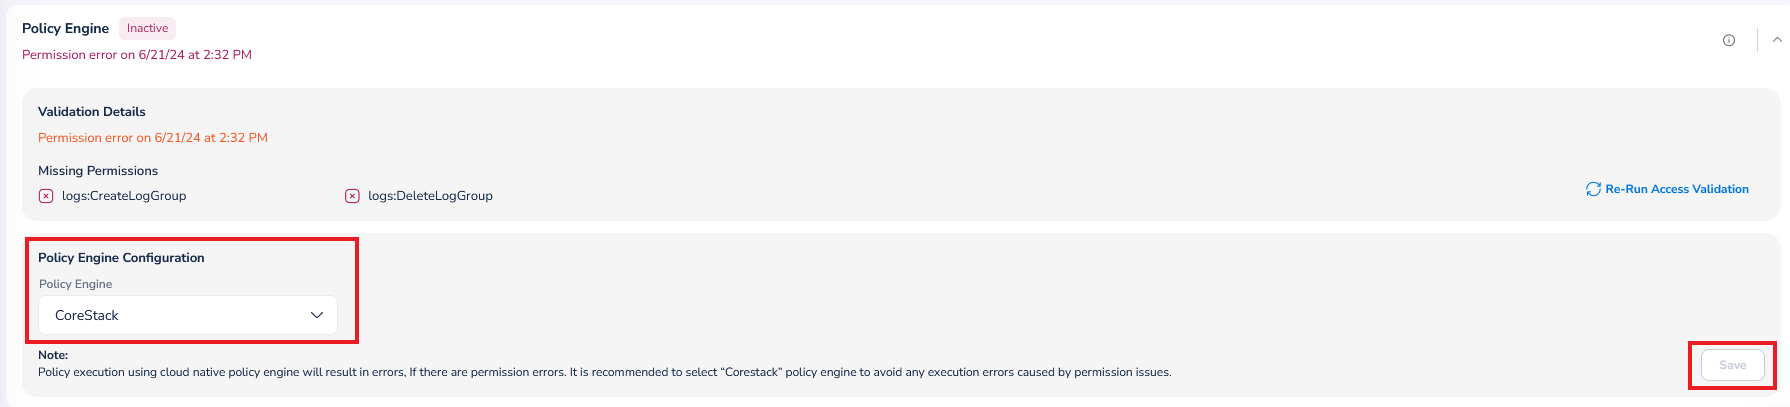
To configure the policy engine for an account, perform the following steps:
- Expand the Policy Engine section.
- In the Policy Engine list, click to select the policy engine for the account and click Ok.
- Click Save.
Monitoring

To configure monitoring of accounts, perform the following:
- Expand the Monitoring section.
- In the Metric Data Collection Interval field, select the frequency in which the metric data needs to be collected and click Save. The available options are 24 Hours (Daily), 8 Hours Once, and 4 Hours Once.
- Click Save.
To enable alerts:
- In the Alert section, click Configure. A dialog box appears.
- In the Select Regions list, select the relevant option(s) and then click Ok.
- In the Topic Name box, type the name of the topic.
- If you want to apply default template for alerts to monitor your OCI Monitoring setup, then select the Apply Default Template checkbox.
- Click Validate.
- Click Save & Exit.
If configuration is already made for alerts, then you can click View to see the existing configuration or you can click Delete to remove the configuration.
To configure notifications for monitoring alerts, perform the following:
- Click to expand the section, and then click Configure. The Notifications Settings dialog box appears.
- Select the Enable Notification checkbox. The Email Address, Webhook, and Microsoft Teams Webhook fields are displayed.
- In the Email Address box, type the email address of the user(s) and click Add.
- In the Webhook box, type the webhook link(s) and click Add.
- In the Microsoft Teams Webhook box, type the URL(s) for Microsoft Teams Webhook and click Add.
- Click Save & Apply.
Updated about 1 month ago