Locks
Restricting the access to your cloud resources is important in preventing accidental deletion or modification of your resources. You can define specific lock rules for your resources in CoreStack so that they can protected from adverse scenarios while still serving their purpose. These rules will enforce restrictions on your resources by utilizing the cloud-native features such as Azure Locks, AWS Termination Protection, GCP Deletion Protection.
This topic guides you to configure lock rules and restrict access to your resources on cloud as per your needs.
Navigation
Click on Resource in the Left navigation menu and select Locks option to land in Locks Management screen.
The lock rules can be viewed in 2 ways: Tenant and Cloud.
These tabs list the lock rules that are created either tenant-based or cloud account based respectively.
Creating a New Lock Rule
The following steps need to be performed to create a new lock rule.
- Click on "Create Lock Rule" button.
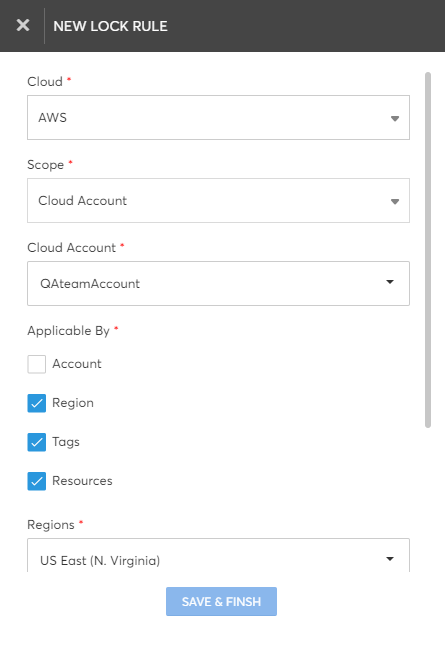
- Provide the following details to create the rule.

| Field | Description |
|---|---|
| Cloud | Select required cloud provider from the Cloud dropdown list. |
| Lock Type | Select the level of permission to be applied for the resources based on the rule: CanNotDelete or ReadOnly. It is applicable only for Azure. |
| Scope | Select the required boundary to define the area of influence for the rule: Tenant or Cloud Account. |
| Tenant OR Cloud Account | Select required tenant or cloud account from the dropdown list. |
| Applicable By | Use this option to define if specific resource groups / regions must adhere to this rule or all resource groups / regions in the cloud account. It is an optional field and available only if Cloud Account is selected as Scope. |
| Tags& Tag Value | Select the tag keys and specify the tag values that are already configured in your cloud account so that the resources associated with the tag keys must be applied with this rule. Click 'Add' link to add the tag and its value for the lock rule. You can add multiple tag keys to a rule. |
| Resources | Resource types that are currently being used in the cloud account will be listed in the Resources dropdown. Select only the required resource types that must adhere to this lock rule strictly. |
- Click on Save& Finish button to create the lock rule.
A new rule will be created and listed in the Locks Management screen.
Managing Existing Lock Rules
You can manage the lock rules by using the below explained options provided.
- The lock rule can be enabled or disabled by toggling the On/Off button in the Status column of the list.
- Select the hamburger button (three horizontal bars) and enable or disable the columns to display or hide them for viewing in the table.
- By clicking on the Edit icon available in the Action column of a lock rule, you can update the details configured in the rule.
- By clicking on the Delete icon available in the Action column of a lock rule, you can delete the rule.
- Click on the 'View' link in Applicability By column of a lock rule to view the details configured in the Applicable By section of the rule.
Using Lock Rules
Once the required lock rules are configured, CoreStack will generate relevant information in the following sections.
- In the Resource – Posture section, the lock-related violations and statistics can be viewed. Refer thissection for more details.
- In the Reports – Resource section, the generated reports will be utilizing the lock information to deliver relevant insights about your resources. Refer thissection for more details.
Updated 3 months ago