

Markups and Discounts
Overview
CoreStack customers such as Managed Service Providers (MSPs) can use the Markup & Discounts feature in the platform to add discounts, markups, or both to their customers’ cloud invoices.
Adding markups (e.g. management fees) to cloud cost is a common practice for MSPs as they manage their customers’ cloud accounts using the platform. For example, in a $1,000 billing statement, an MSP can add a markup of plus x% depending upon their business needs, and the markup is added to the report.
Similarly, it’s also common practice for MSPs to apply discounts to their customer’s cloud costs as part of promotions or rate negotiations (esp. for government customers).
Note:
- In cases where users want to add both a markup and a discount rule to the same tenant/cloud account (this includes accounts without onboarding child subscriptions), priority is given to the discount first and then the markup is applied to the discounted amount.
- Users will be unable to view any data related to the rules set up by them on the dashboard even though the rules configured are active.
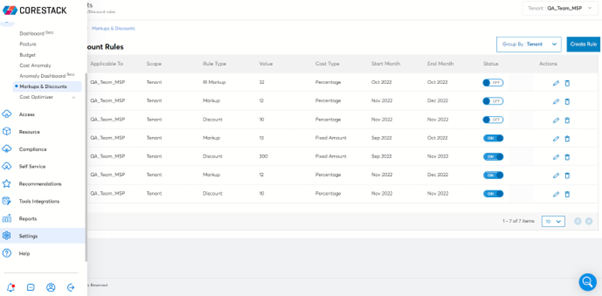
Create Markup and Discount Rules
-
On the left menu bar, click Cost > Markups & Discounts.
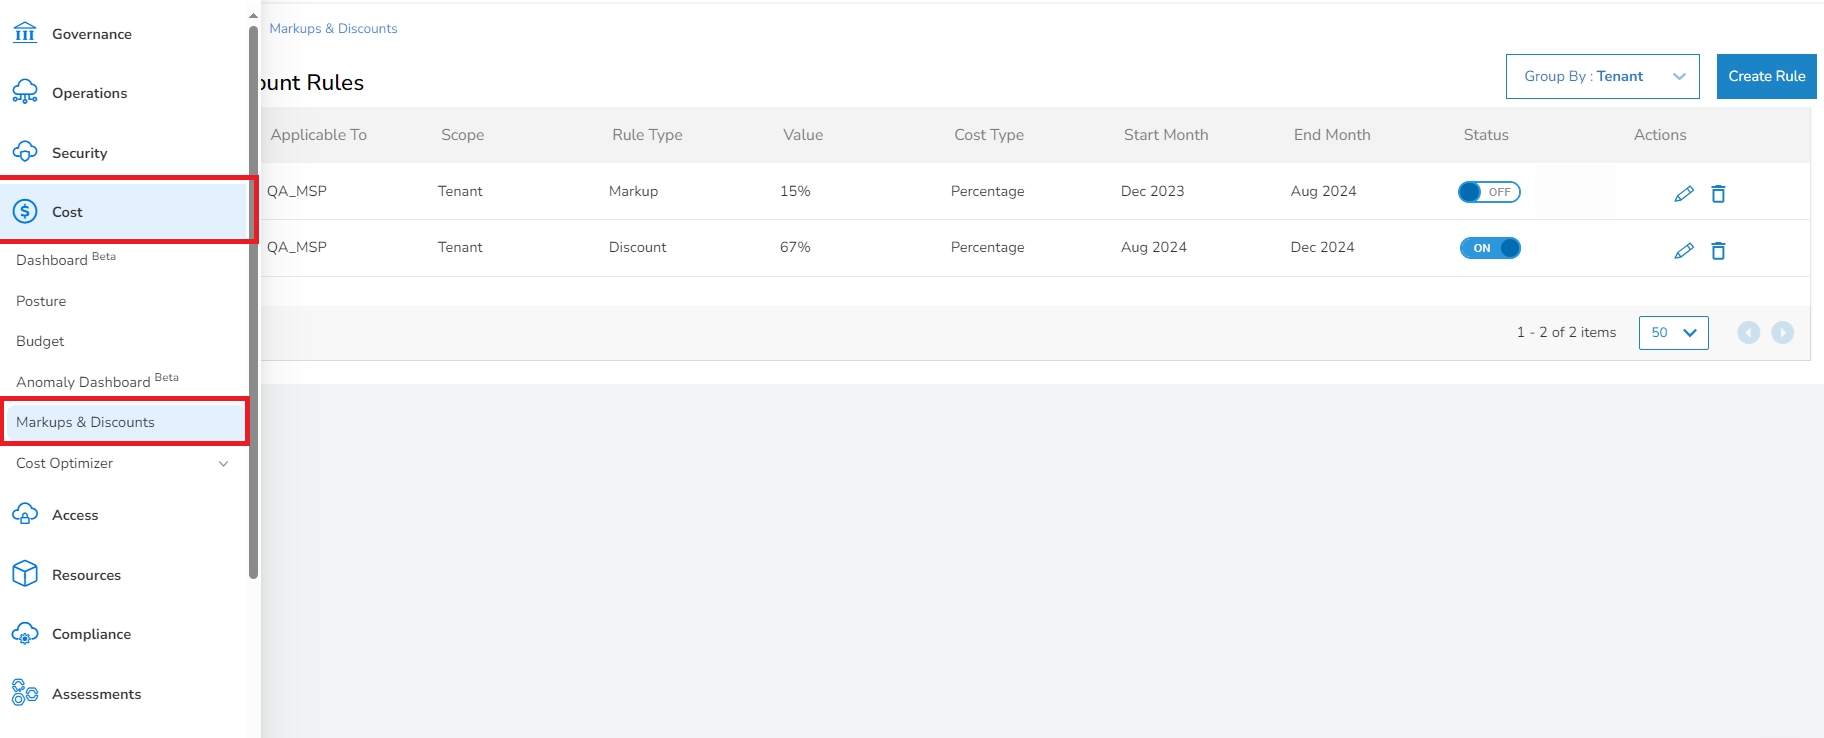
The markup configuration rules appear.
-
To create a new markup, click Create Rule.
-
In the Rule Name box, type the name of the rule. It is recommended to enter the account name.
Note:Special characters are not allowed.
-
In the Rule Scope list, select either Tenant or Cloud Account. You can choose scope at the tenant level or cloud account level. If you select Tenant, then rules will be applied to multiple subscriptions under tenant level.
Note that rules will be applied to onboarded accounts and not onboarded accounts. Users will be unable to view any data related to the rules set up by them on the dashboard even though the rules configured are active.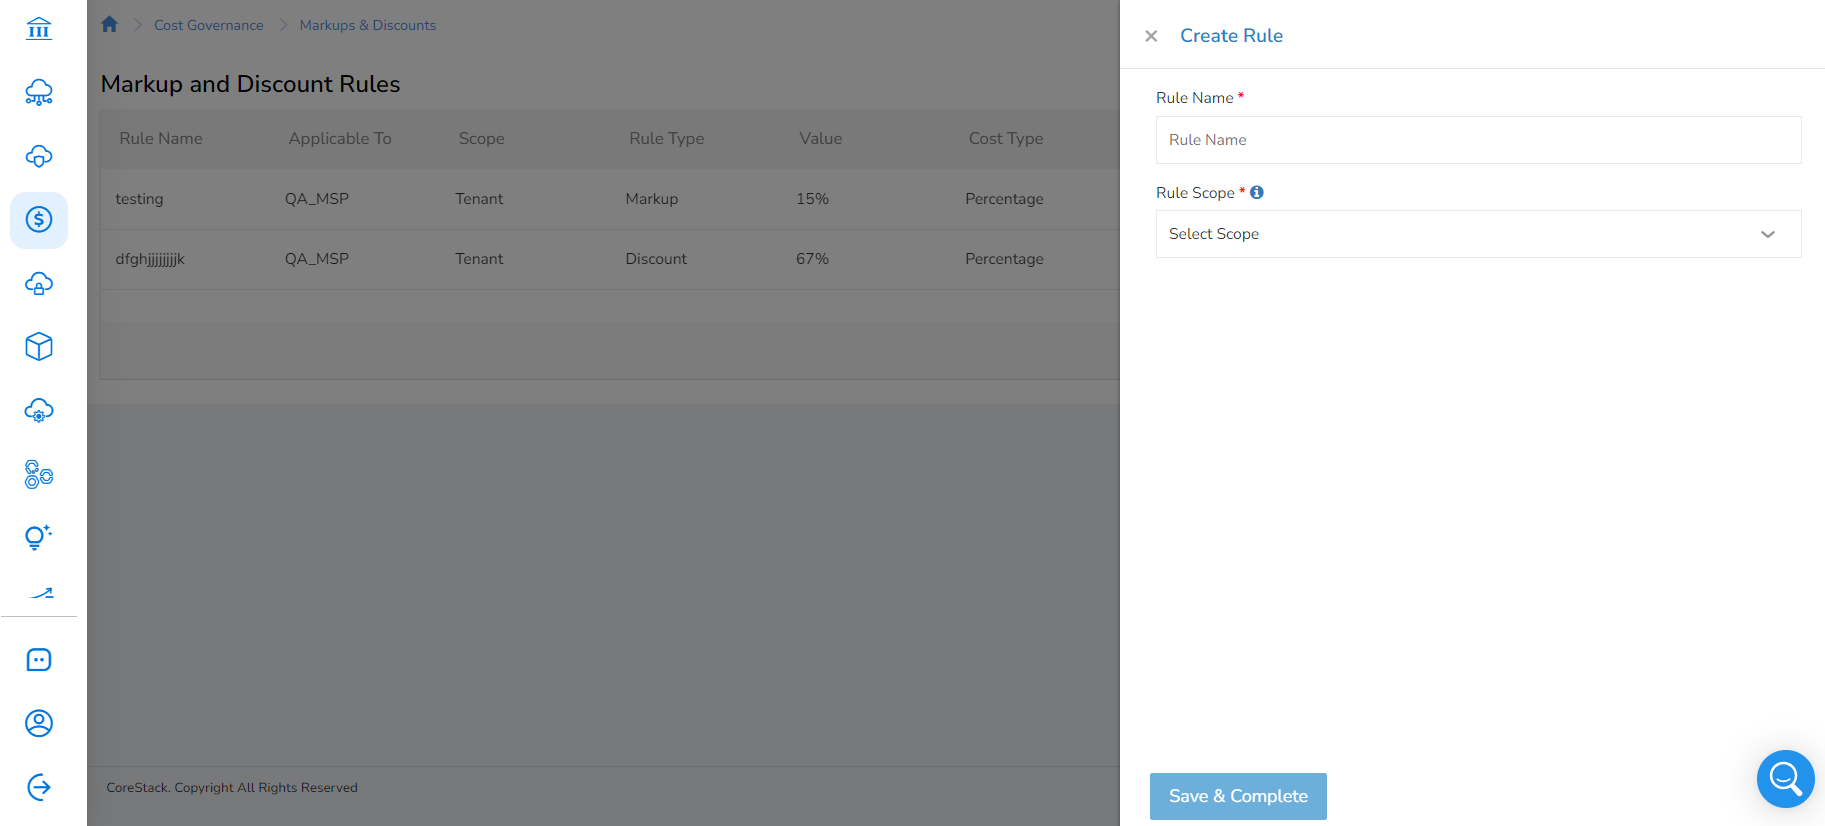
-
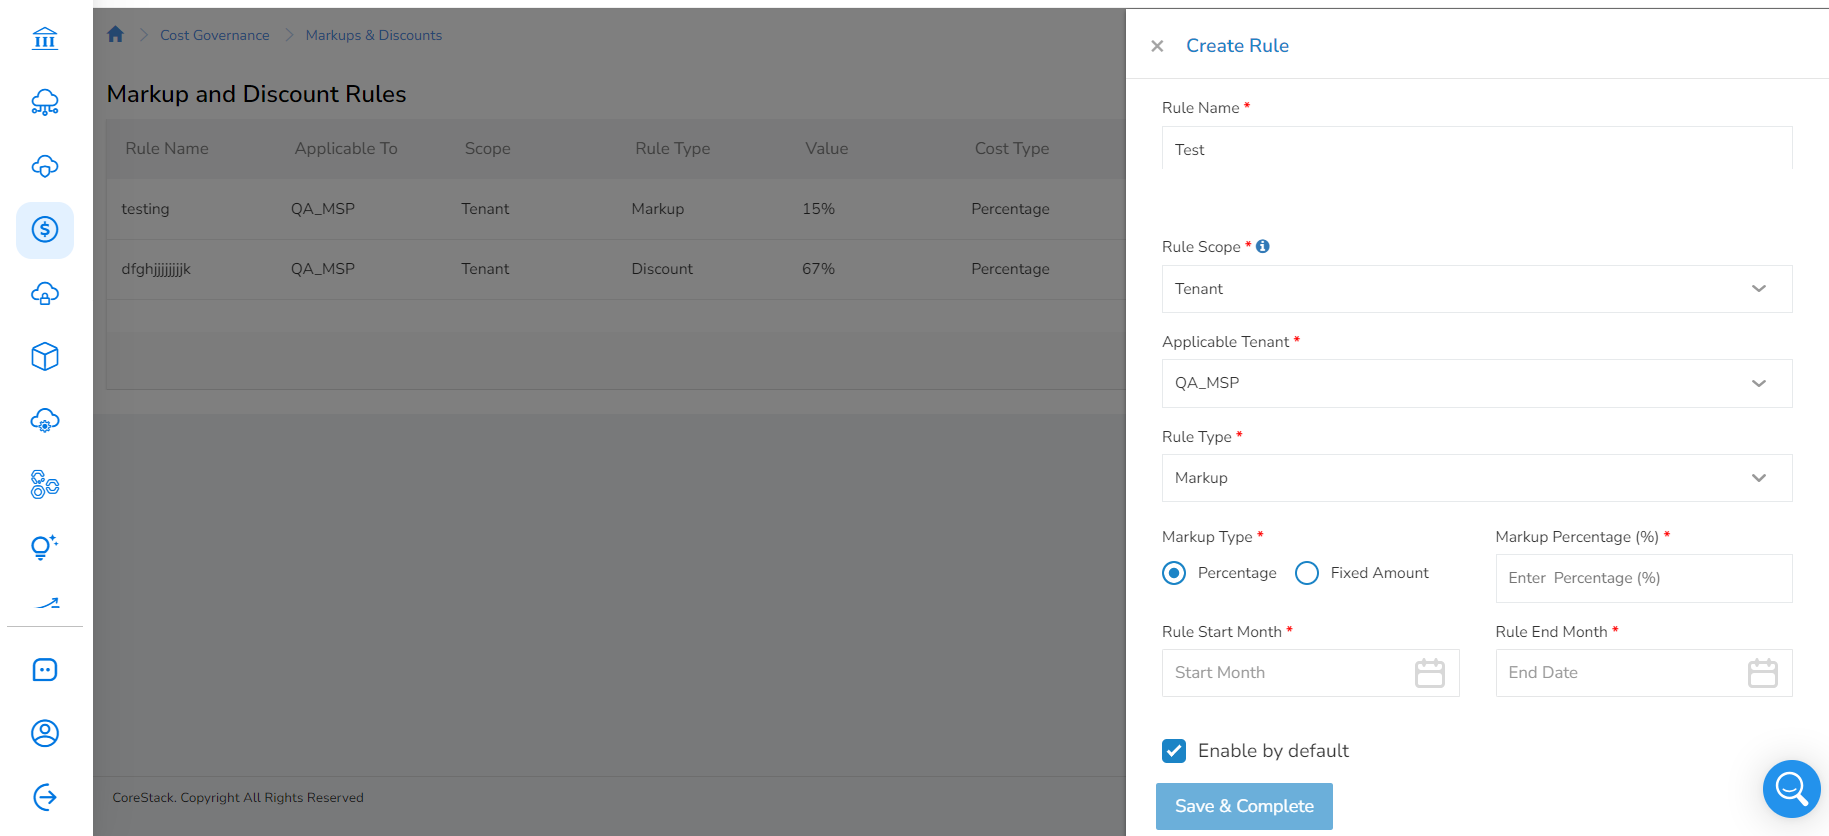
If you had selected Tenant in the Rule Scope field, then fill the following fields:
-
In the Applicable Tenant list, select an appropriate option.
-
In the Rule Type list, select one option from: Markup, Discount, RI Markup, and Third Party License.
- Markup: A markup will be applied for all the resources except the reserved instances of the account/tenant. MSPs generally might use this to apply a management fee.
- Discount: Discounts are applied on the overall invoice of the account/tenant. Generally, sales teams might use this to apply a discount on the management fee.
- RI Markup: This option can also be used by MSPs to apply management fees, but it is only applied for Reserved Instances of the tenant.
- Third Party License : This option can be used only for CSP Direct accounts to apply markup rules.
Based on the option selected in this step, the field names that appears in the next step will vary.
-
For example, if Rule Type is selected as Markup, then:
-
In the Markup Type field, select either Percentage or Fixed Amount. Based on the option selected, either Markup Percentage (%) or Markup Fixed Amount box appears.
-
In the Markup Percentage (%) box, type the markup percentage or in the Markup Fixed Amount box, type the markup amount.
-
In the Rule Start Month field, click the calendar icon and select the month from which you want to apply the markup rule.
-
In the Rule End Month field, click the calendar icon and select the month when you want the markup rule to end.
-
-
-
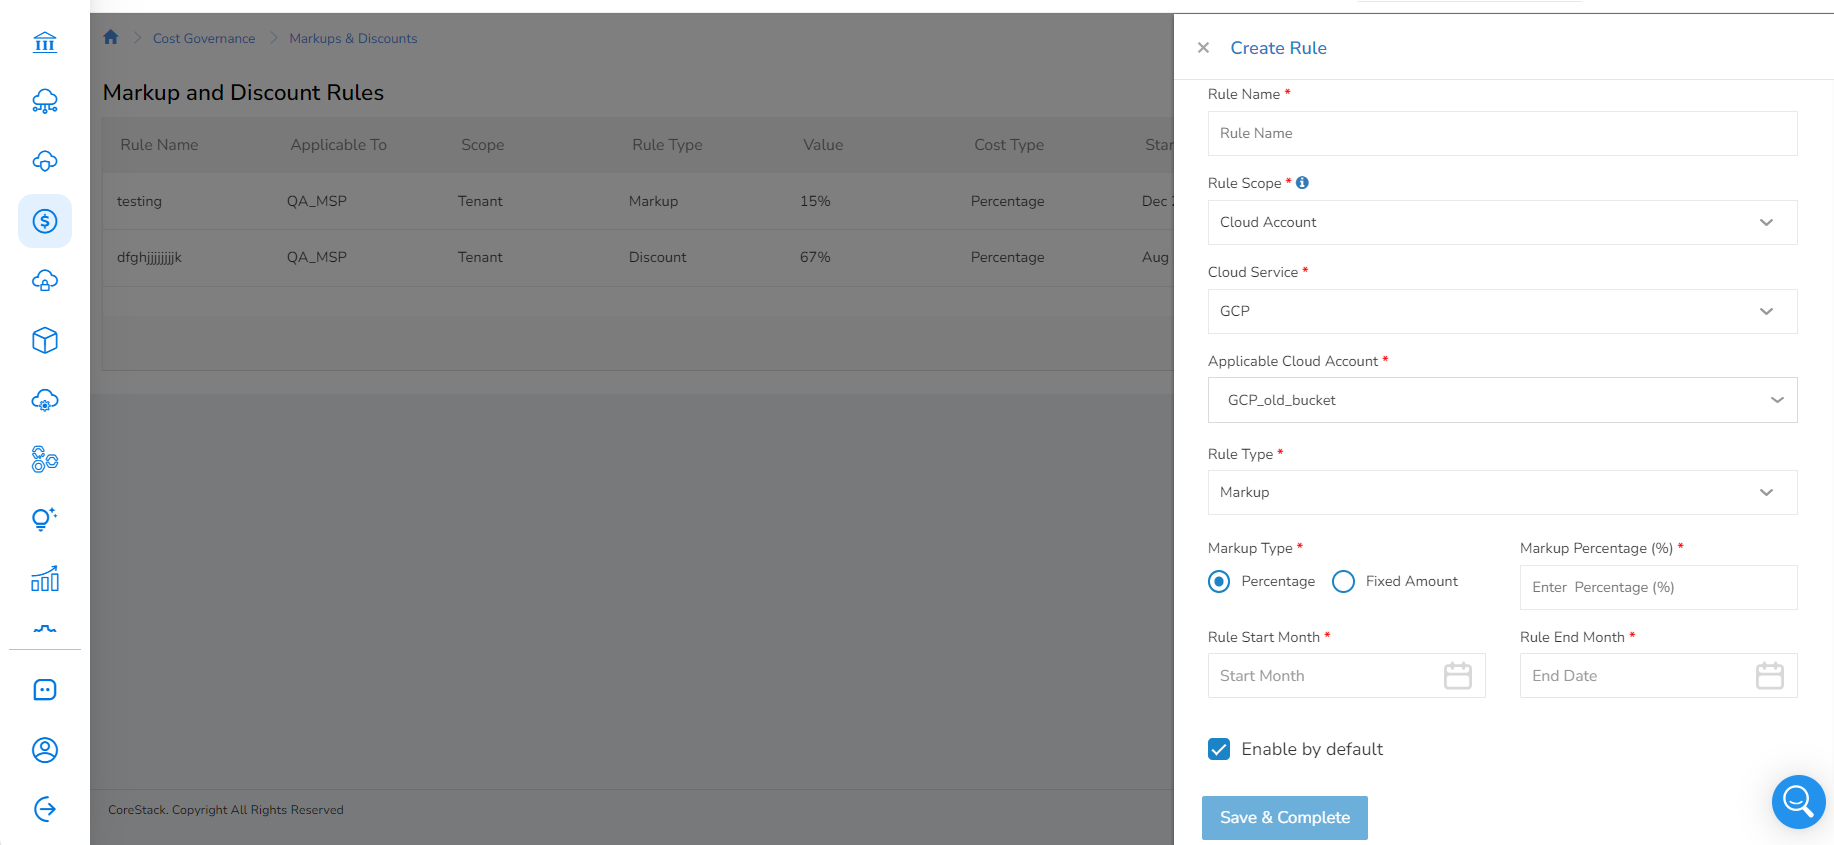
If you had selected Cloud Account in the Rule Scope list, then fill the following fields:
- In the Cloud Service list, select the cloud account type.
- In the Applicable Cloud Account list, select an appropriate option.
- In the Rule Type list, select one option from: Markup, and Discount.
Based on the option selected in this step, the field names that appear in the next step will vary. - For example, if Rule Type is selected as Markup, then:
- In the Markup Type field, select either Percentage or Fixed Amount. Based on the option selected, either Markup Percentage (%) or Markup Fixed Amount box appears.
- In the Markup Percentage (%) box, type the markup percentage or in the Markup Fixed Amount box, type the markup amount.
- Markup Fixed Percentage: The MSP can apply this markup management fee. If applied with percentage, this will be applied either for Reserved Instance or for other charges. If there is a requirement to apply markup for both, then two different rules need to be created.
- Markup Fixed Amount: The MSP can apply this management fee to the overall invoice.
- In the Rule Start Month field, click the calendar icon and select the month from which you want to apply the markup rule.
- In the Rule End Month field, click the calendar icon and select the month when you want the markup rule to end.
-
Click the Enable by default checkbox to enable this rule by default.
-
Click Save and Complete. The new rule is added and appears on the dashboard.
Note:Markups or Discounts configured for an account will not reflect in the current month's report. Instead, the changes will reflect in the next month's report. For instance, if there is a configuration change done in the month of January the changes would be reflected in the report for February.
Note:Markup and discount rules are created in the following order of priority:
- Cloud account (takes highest priority)
- Tenant of the cloud account
- Parent account
- Tenant of the parent account
Roles and Permissions to Create, Modify, Delete, and View Markup and Discounts
You can assign various roles to a user to control their level of access to markup and discount rules.
-
Click Settings > Users.

The user list appears.
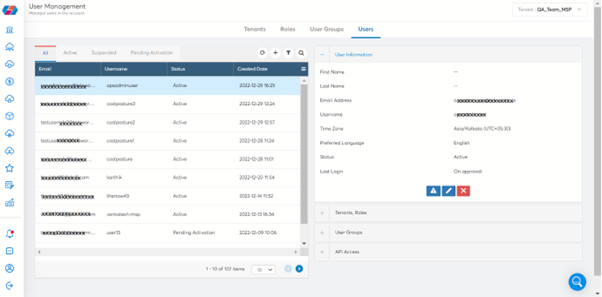
You can see list of users that are active, suspended, and pending for activation.
- Click Roles tab.
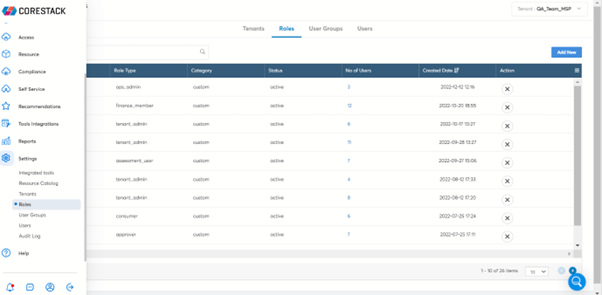
The cost pillar has two roles.
- Finance: The user has Administrator rights and can create rules for markup and discounts, budgets, and cost anomalies.
- Finance Member: The user has read-only rights and can view the details of markup and discount rules, but not edit or create them.
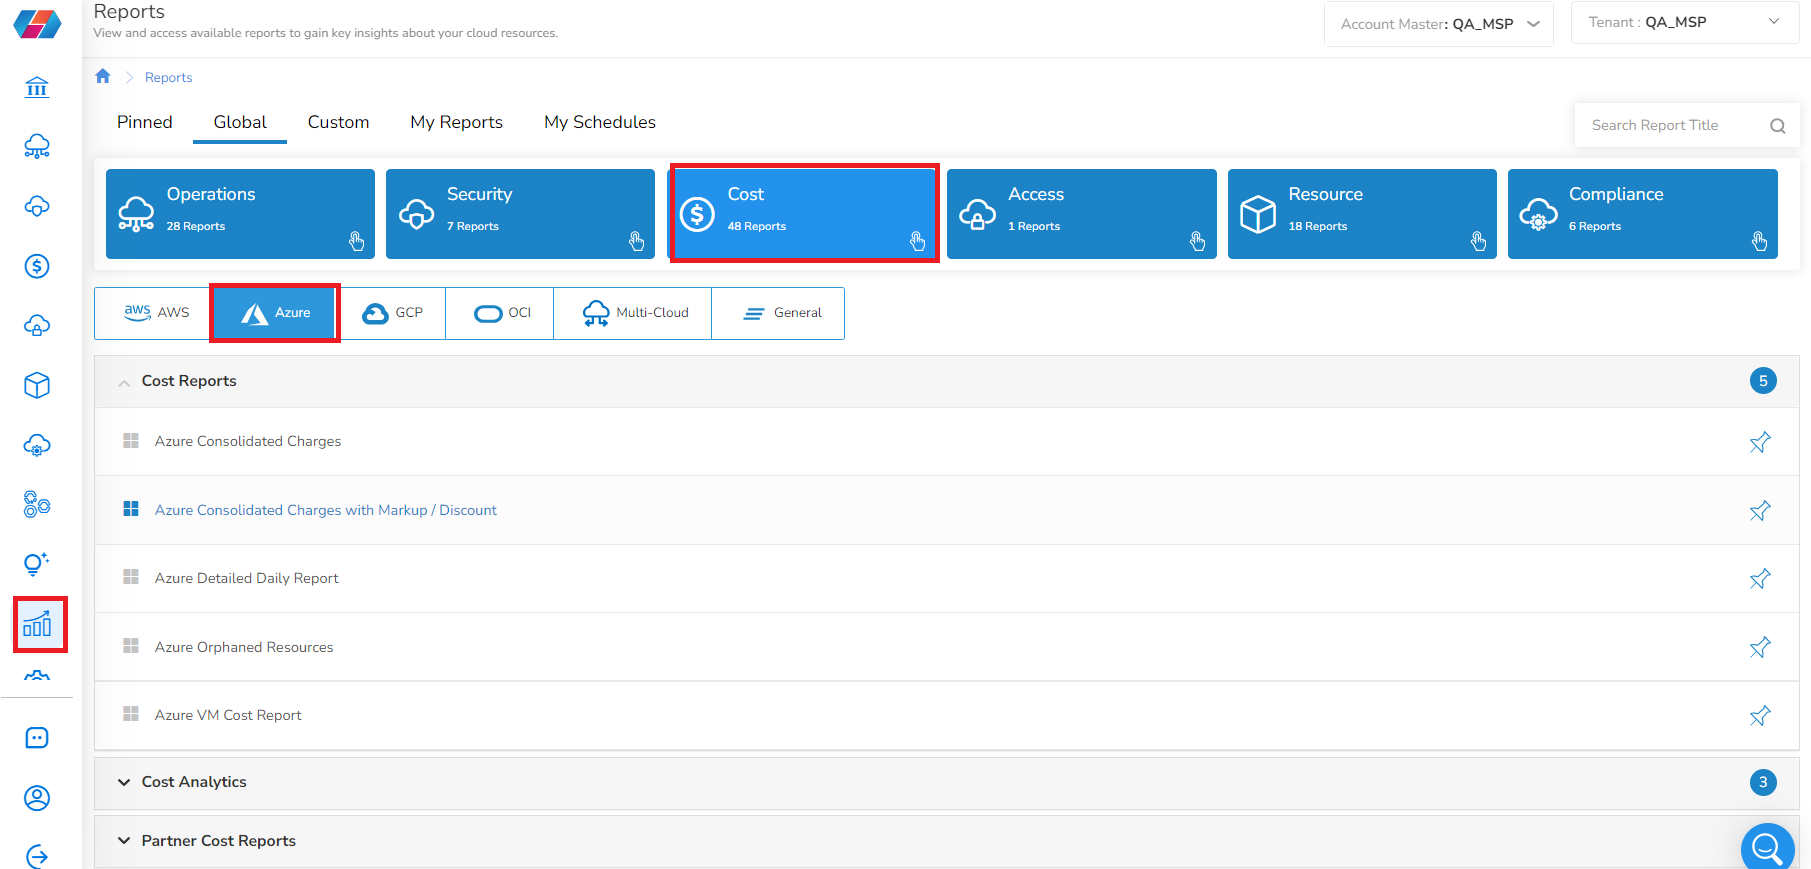
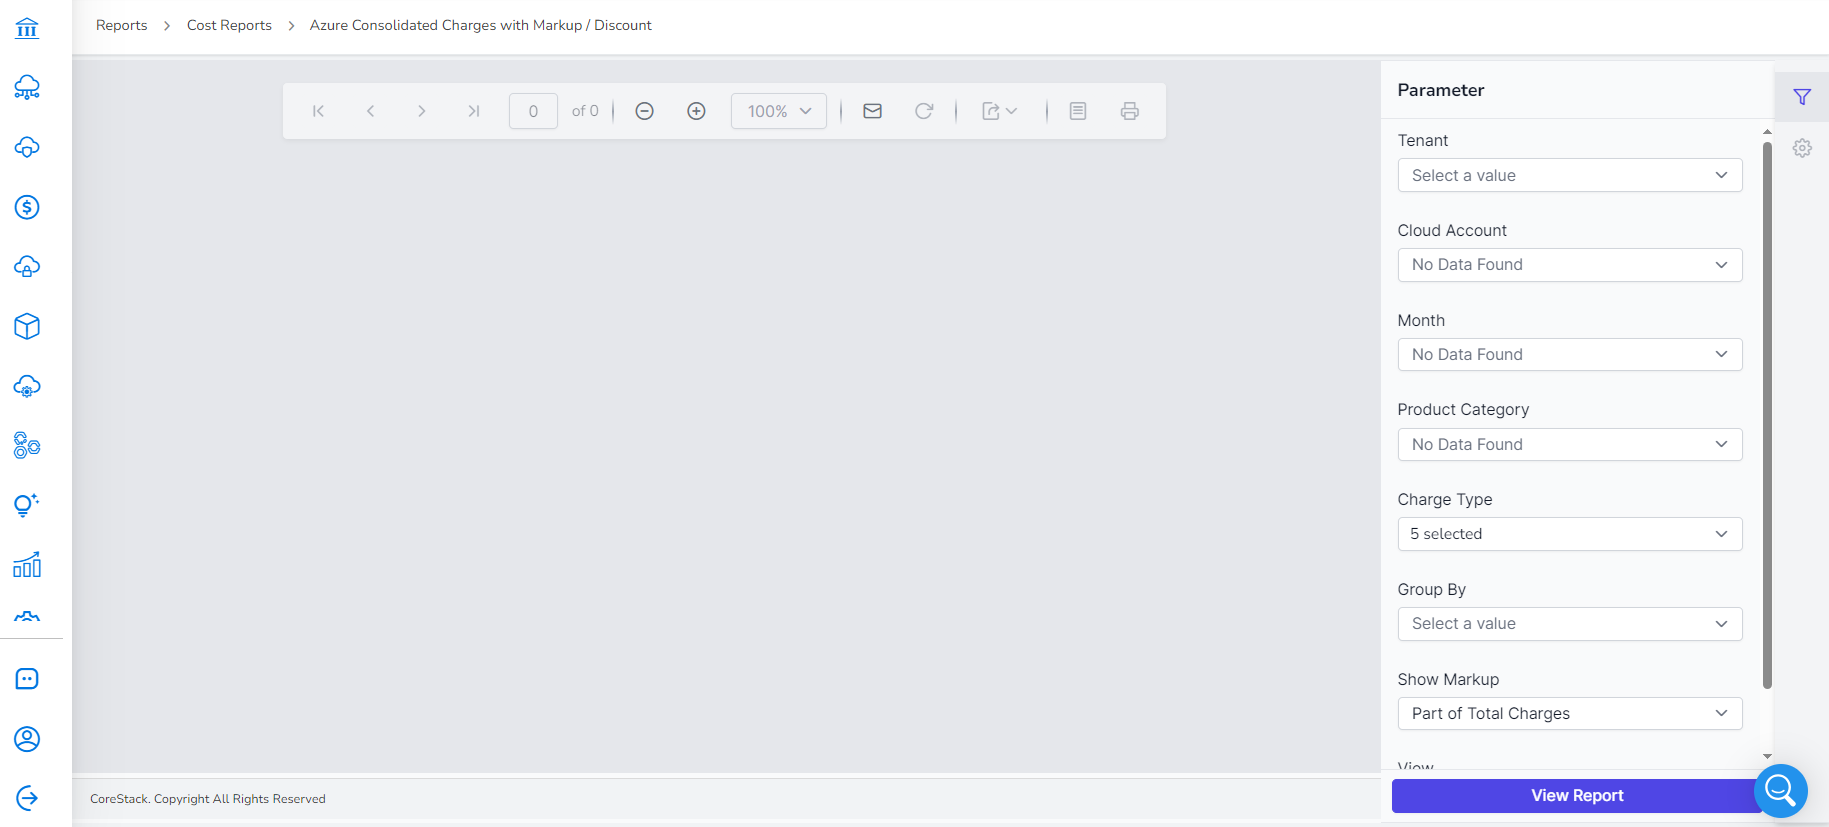
Reports
You can view charges based on various parameters in the reports section.
-
On the left menu bar, click Reports > Cost > Azure.
-
Under Cost Reports, click Azure Consolidated Charges with Markup/Discount Report.
-
In the Parameter pane, fill the following fields:
- In Tenant list, select a tenant account.
- In the Cloud Account list, select a cloud account.
- In the Month list, select a month for which you would like to view the report.
- In the Product Category list, select the relevant product categories.
- In the Charge Type list, select the relevant options.
- In the Group By list, select one option from Product Category, Resource, and None.
- In the Show Markup list, select either Part of Total Charges or Separate Line Item.
-
In the View list, select either All or Virtual Machines.
-
Click View Report. If the Show Markup field is set as Part of Total Charges, then a report appears where markup charges are hidden.
If the Show Markup field is set as Separate Line Item, then a report appears with markup charges. The report includes cloud service provider name, Tenant, Cloud Account, Subscription, Billing Start and End Date, Currency, Charges Summary, and Charges Detail.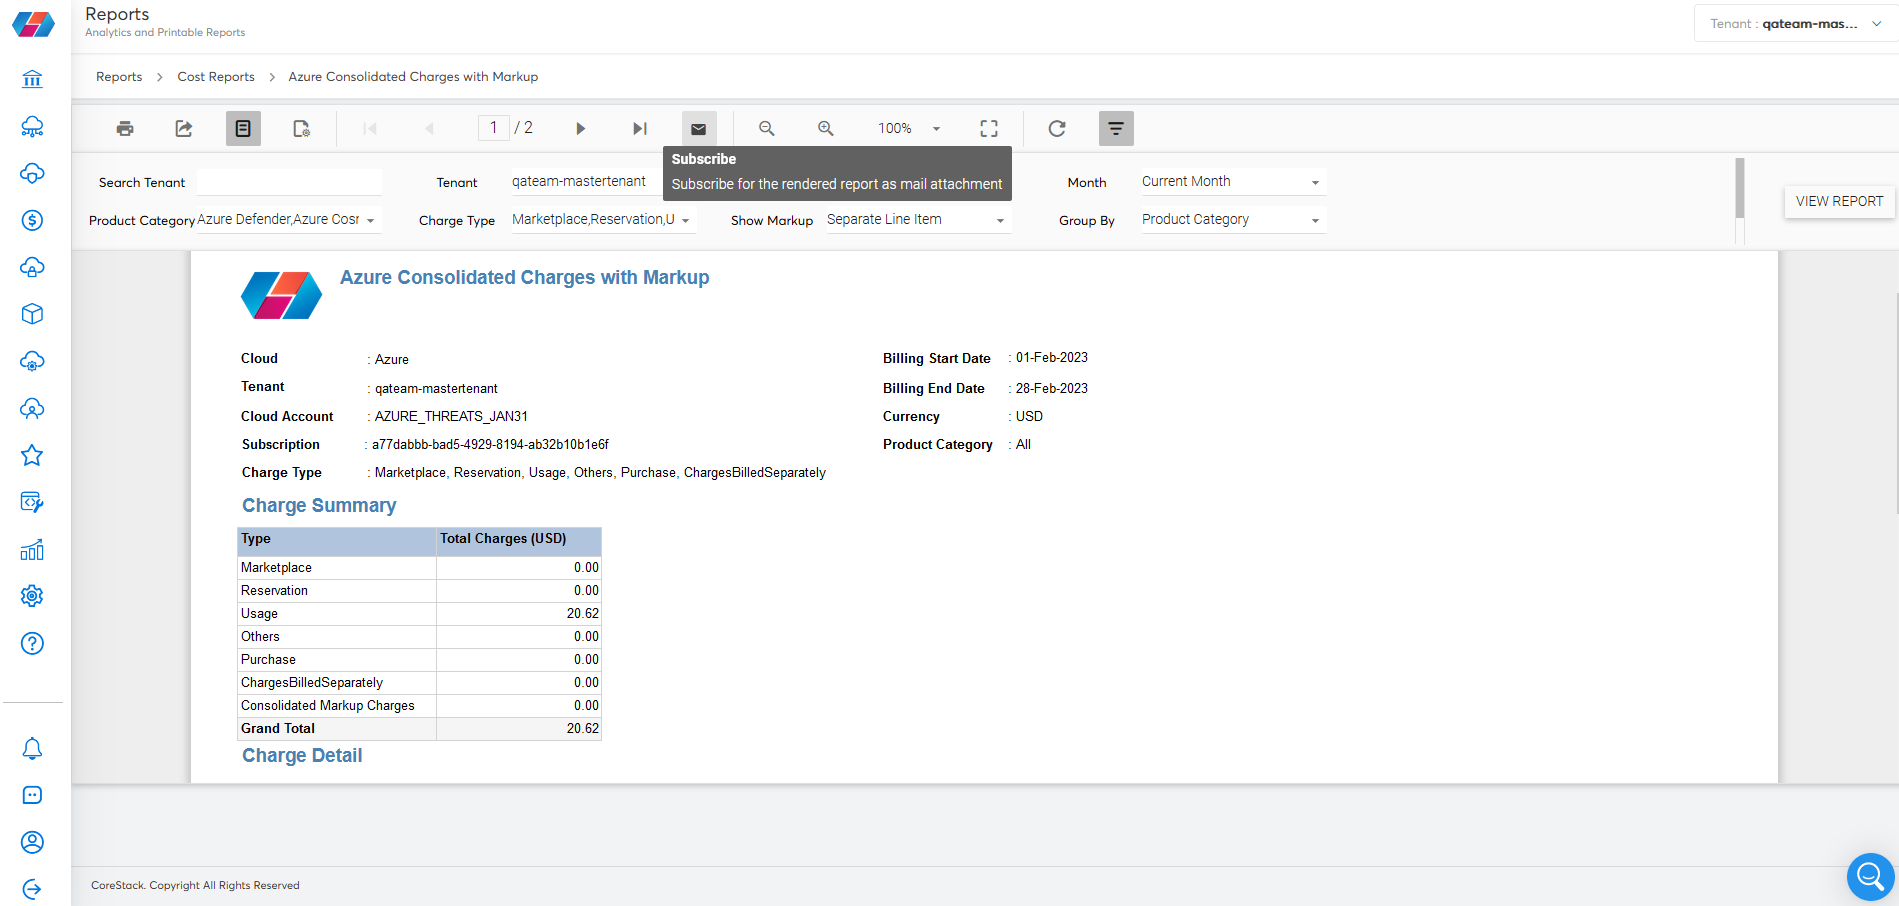
Note:
- To export a report, click the Export icon and choose the report format as PDF or Excel.
- To schedule a report, refer to Schedule/Subscribe Reports.
- To pin/unpin a report, click Reports > pin icon. The pinned reports appear in the Pinned tab and in the Global tab, the pin symbol appears as complete blue.

Updated 8 months ago