

Billing Inventory
Use CoreStack Billing Inventory to analyze resource-level cloud costs across AWS, Azure, GCP, and OCI with advanced filtering, cost drilldown, and resource tag visibility.
Feature Overview
Billing Inventory is a cost visibility and analysis feature within CoreStack's FinOps module that provides detailed, resource-level cost insights across AWS, Azure, GCP, and OCI. It is most applicable when organizations need to analyze cloud expenses across multiple dimensions — including discounts, reservations, marketplace charges, and support fees — in a single centralized view.
This feature is most valuable to FinOps practitioners and finance teams who need granular cost visibility for billing reconciliation and cloud spend optimization. It can also be used by Finance users for billing reconciliation, enabling a central view that supports multiple cloud providers and cloud account types. Billing Inventory is a read-only analysis tool; it does not support editing resources or modifying cloud configurations.
Note: The Cloud Account filter has been renamed to Account, and the Cloud Provider filter has been renamed to Provider. If your view shows the older labels, refer to the note in the Applying Filters section.
Inventory Summary
The Inventory Summary sub-feature provides aggregated cost insights, allowing users to group, filter, and analyse cloud costs at a high level before diving into granular details. Key capabilities include:
-
Flexible Grouping & Aggregation by provider, region, charge type, and custom tags.
-
Advanced Filtering by time range, service type, and resource.
-
Cost Trend & Change Analysis with percentage and absolute cost.
-
Exporting & Custom Views for seamless reporting and analysis.
Inventory Details
For power users and finance teams, the Inventory Details view provides:
-
Line-item cost breakdowns across individual resources, credits, discounts, and other charges.
-
Multi-dimensional filtering to get to the specific details required.
-
Charge type and discount analysis, helping businesses understand true cloud costs.
-
Cross-cloud reconciliation tools, ensuring consistency across different billing models.
How It Works
Billing Inventory aggregates cost and usage data from all connected cloud accounts and surfaces it across two views: the Inventory Summary tab and the Inventory Details tab. The Inventory Summary groups costs by service product code, giving users a high-level view of spending by service. Clicking into a product code or a specific cost value opens the Inventory Details tab, which shows line-item breakdowns at the individual resource level, identified by Resource ID. From the Inventory Details view, users can click any resource to open the Resource Details panel — which displays key resource attributes and any cloud-assigned tags — or click a cost value to launch the Cost Breakdown Drilldown and subscribe to scheduled reports.
Prerequisites
Before you begin, ensure the following:
-
Role: You have the appropriate role assigned in CoreStack.
-
Cloud accounts: At least one cloud account (AWS, Azure, GCP, or OCI) has been onboarded and is actively reporting billing data to CoreStack.
-
Access: You can navigate to
FinOps > Billing Inventoryin the CoreStack left navigation panel.
Using Billing Inventory
Navigate to FinOps > Billing Inventory. Click FinOps in the left navigation panel to expand the module, then click Billing Inventory in the sub-menu. The Billing Inventory page opens, displaying cost and usage data for your connected cloud accounts.
Inventory Summary
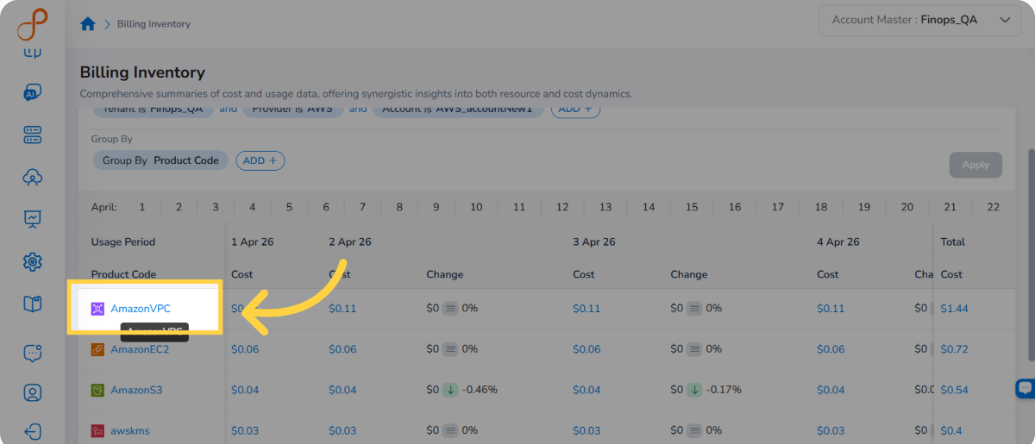
The Inventory Summary tab is displayed by default when you open Billing Inventory. It shows cost and charge details for a particular usage period, grouped by product code.
The columns available are: Product Code (based on your Group By filter selection), Change, Cost, and Total Cost.
To view detailed billing information, click a cost value in the Cost column for a specific day, or click a Product Code to see all cost records for that service. The detailed information opens in the Inventory Details tab.
Applying Filters
The Filter section lets you narrow cost data by account, charge type, billing entity, and other dimensions. The Group By section lets you aggregate results by attributes such as product family. The filters are grouped under three sections: Time, Filter, and Group By.
Step 1: Set the Account Filter
In the Filter section, click the Account drop-down and select a cloud account. Click Ok. The cost details update to reflect the selected account.
Step 2: Set the Charge Type Filter
Click the Charge Type drop-down and select the applicable value(s). Click Ok to confirm. The cost details update according to the selected charge type.
Step 3: Add a Custom Filter
To add an additional filter, click Add and select a filter attribute. For example, select Billing Entity, then choose the relevant values from the drop-down. Click Ok to confirm. The cost details update to reflect the selected values.
Step 4: Expand or Collapse the Filter Panel
Click the filter icon on the top-right side of the screen to expand or collapse the filter sections.
Step 5: Add a Group By Filter
In the Group By section, click Add. Select a grouping option — for example, Product Family. The cost details are grouped and displayed according to the selected option.
Step 6: Add Additional Group By Filters
Click ADD+ to add more Group By filters. You can add up to five Group By filters at a time.
Note: Filter Label Changes
The Cloud Account filter has been renamed to Account, and the Cloud Provider filter has been renamed to Provider. To add the Account filter, click ADD+ and select Account. In every dashboard widget, click the Filter icon on the top-right of the widget to view pre-defined filters. The Provider filter appears as a pre-defined filter. Use the ADD+ option to add the Account filter as a custom filter from any widget.
Inventory Details
Click a cost value or product code in the Inventory Summary to open the Inventory Details tab. The Inventory Details page shows line-item cost information broken down by individual resource.
The main columns on the Inventory Details page are: Resource ID, Resource Name, Cloud Account, Cost, Change, and Total Cost.
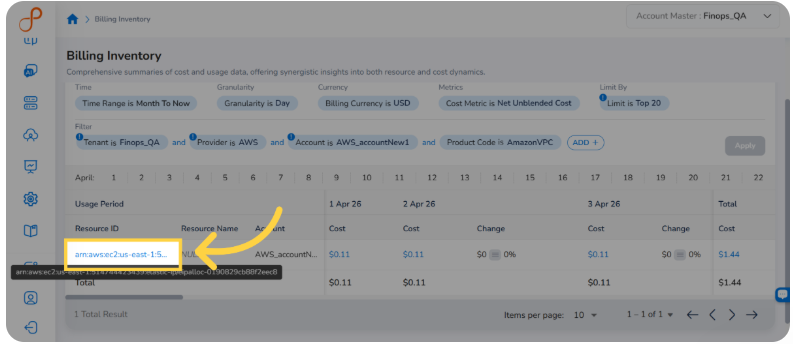
From the Inventory Details tab, users can take the following actions:
-
Click a Resource ID to open the Resource Details panel on the right side of the screen and view all resource-related attributes and tags.
-
-
Click a cost value for a resource to open the Cost Breakdown Drilldown panel, which shows a detailed cost drilldown for that resource. The drilldown panel also lets you add custom filters and subscribe to scheduled reports.
Resource Details
In the Inventory Details tab, click a resource in the Resource ID column. The Resource Details panel opens on the right side of the screen, displaying the full Resource ID at the top followed by a table of key attributes.
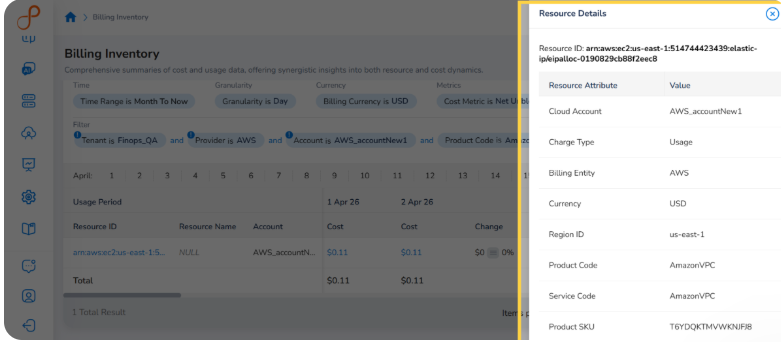
The following attributes are shown in the Resource Details panel:
| Resource Attribute | Description |
|---|---|
| Cloud Account | The cloud account the resource belongs to |
| Charge Type | The type of charge associated with the resource (for example, Usage) |
| Billing Entity | The cloud provider billing entity |
| Currency | The currency in which costs are displayed |
| Region ID | The region where the resource is deployed |
| Product Code | The service product code associated with the resource |
| Service Code | The service identifier used by the cloud provider |
| Product SKU | The unique product SKU for this resource |
| Legal Entity | The legal entity of the cloud provider (for example, Amazon Web Services, Inc.) |
| Usage Type | The usage type descriptor for the resource charge |
| Operation | The specific operation associated with the resource usage |
If resource tags have been assigned to the resource in your cloud provider account, they appear in the Tags section of the panel as key-value pairs. If no tags are assigned, the panel displays "No tags available."
Note: Resource tags in the Resource Detailspanel reflect the tags assigned in your cloud provider account (AWS, Azure, GCP, or OCI). Tags cannot be edited or used as filters from this panel.
Cost Breakdown Drilldown
In the Inventory Details tab, click a cost value for a specific resource. The Cost Breakdown Drilldown panel opens on the right side of the screen, showing detailed drilldown information for the selected cost. In the bar chart, click on a data point to get further drilldown details.
Subscribing to a Drilldown
To subscribe to cost drilldown details and receive scheduled reports, follow these steps:
Step 1: In the Cost Breakdown Drilldown panel, click Subscribe. The Subscribe Drilldown pop-up screen appears.
Step 2: In the Subscription Name field, enter a name for the subscription.
Step 3: In the Email Address field, enter the email address of the recipient.
Step 4: In the Tenant list, select a tenant.
Step 5: In the Report Export Format field, PDF is selected by default.
Step 6: In the Start Date field, click the calendar and select the date from which the subscription should start.
Step 7: In the Start Time field, select the time from which the subscription should start.
Step 8: In the Recurrence list, select one of the following options and configure the corresponding settings:
-
Once — Delivers the drilldown report one time only.
-
Daily — In the End Date field, select the date until which the daily report should be sent.
-
Weekly — Select the days of the week (Monday through Sunday) on which to receive the report, then set an End Date.
-
Monthly — Select either On Week of the Month or On Days of the Month:
-
On Week of the Month: Select the week number and the specific days of the week.
-
On Days of the Month: Select the specific dates within the month.
-
Optionally, enable Do you want to exclude any months? and select the months to exclude.
-
Set an End Date.
-
Step 9: Click Create to confirm the subscription. Reports will be sent according to the configured schedule.
Frequently Asked Questions
Q: What is the difference between the Inventory Summary and Inventory Details tabs?
The Inventory Summary tab shows costs aggregated by service product code, giving a high-level view of spending by service. The Inventory Details tab shows line-item cost breakdowns at the resource level, identified by Resource ID. Use Inventory Summary to identify which services cost the most, then click through to Inventory Details to investigate individual resources.
Q: Can I view resource attributes for any cloud provider, not just AWS?
Yes. The Resource Details panel is available for resources across all supported providers — AWS, Azure, GCP, and OCI. The attributes displayed (Cloud Account, Charge Type, Billing Entity, Region ID, Product Code, and others) appear in a consistent format regardless of the cloud provider.
Q: Why are no tags showing in the Resource Details panel?
If the Tags section shows "No tags available," the resource has no tags assigned in your cloud provider account. Tags must be created and assigned at the cloud provider level — they cannot be added from within CoreStack's Billing Inventory.
Q: Can I add more than five Group By filters?
No. The Group By section supports a maximum of five filters at a time. If you need to analyze data grouped by more than five dimensions, export the data and perform additional grouping externally.
Q: What happens when I click a cost value versus clicking a Product Code in the Inventory Summary?
Clicking a cost value in the Cost column for a specific day opens the Inventory Details tab filtered to that day's records. Clicking a Product Code opens the Inventory Details tab showing all cost records for that service across the full selected time range.
Troubleshooting
Cost data is not appearing after applying filters
Cause: The selected filter combination may have no matching records in the current time range, or the cloud account's billing data may not have been ingested yet.
Solution:
-
Check the Time filter and widen the date range.
-
Verify that the selected Account and Provider values correspond to accounts that have been successfully onboarded and are actively reporting cost data.
-
Clear all custom filters and reset to defaults, then reapply filters one at a time to identify which filter is excluding all results.
If the issue persists, contact CoreStack support with your Account ID, the filter values applied, and the selected time range.
The Resource Details panel is not showing all expected attributes
Cause: Some attributes may not be available for resources from certain cloud providers, or the resource data may be incomplete in the current billing ingestion cycle.
Solution:
-
Verify that the resource belongs to a fully onboarded and active cloud account.
-
Check that the account's billing data has been successfully ingested by reviewing the cloud account's ingestion status.
-
If attributes are consistently missing for a specific provider, this may reflect a limitation in that provider's billing data export.
If the issue persists, contact CoreStack support with the Resource ID, cloud provider name, and the attribute names that are missing.
Resource tags are not visible in the Resource Details panel
Cause: Tags must be assigned to the resource in the cloud provider account. If no tags are assigned, or if tag data has not been ingested in the current billing cycle, the Tags section displays "No tags available."
Solution:
-
Confirm that tags have been assigned to the resource directly in your cloud provider console (AWS, Azure, GCP, or OCI).
-
If tags were recently added in the cloud provider, wait for the next billing data ingestion cycle to complete before checking again in CoreStack.
-
If tags are present in the cloud provider but are still not appearing in CoreStack, contact CoreStack support with the Resource ID, cloud provider, and the expected tag keys.
Updated 2 months ago