

Azure Onboarding for Assessments
Learn how to onboard your Azure cloud accounts to be compatible with Assessments.
Introduction
Once you've finished configuring all the necessary prerequisites in your Azure environment, you're ready to onboard your Azure cloud account(s) into CoreStack.
Onboarding in done from within the platform. While the specific onboarding steps may differ slightly depending on which type of cloud account(s) you want to onboard, in general the process is the same for Azure cloud accounts.
In this user guide, we'll walk you through the onboarding steps for different Azure cloud account types and explain what specific actions must be taken in order to properly enable CoreStack Assessments.
Before you start:If you haven't yet completed the required prerequisite configurations in your Azure cloud environment, please refer to our Azure Prerequisites for Assessments user guide, complete the necessary steps, then return to this user guide.
Onboard an Azure Subscription (Pay as You Go)
The following steps need to be performed to onboard an Azure Subscription.
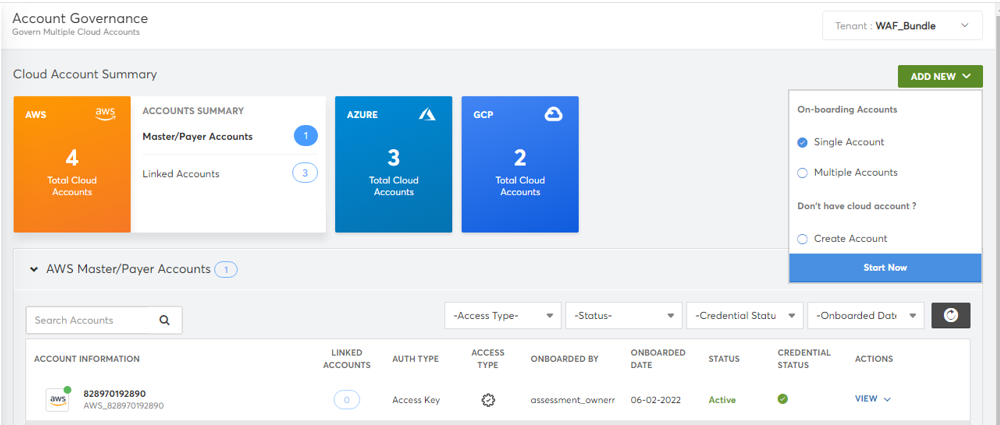
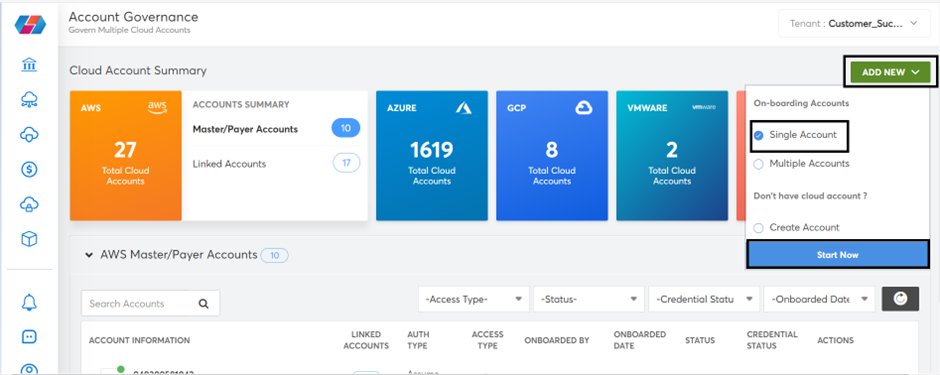
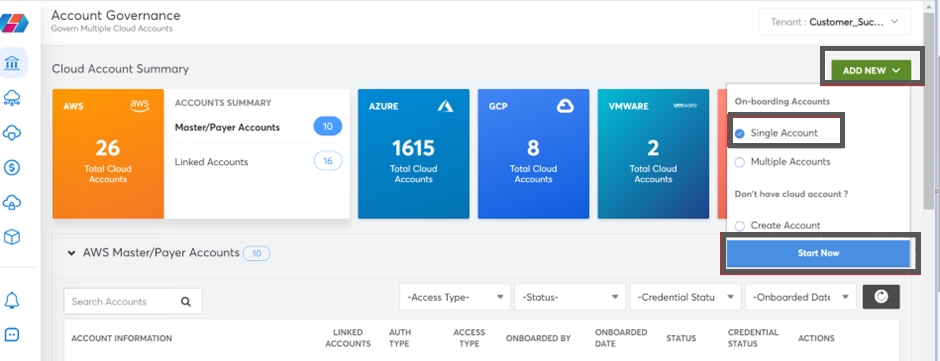
- Click Add New button in the Account Governance dashboard and select Single Account.

- Click Start Now. The onboarding screen appears.

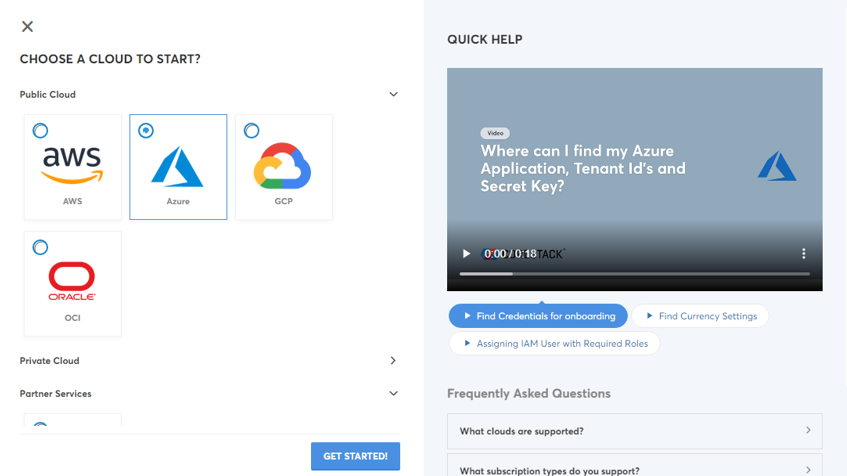
- Select Azure option in the Public Cloud field.
- Click Get Started button.

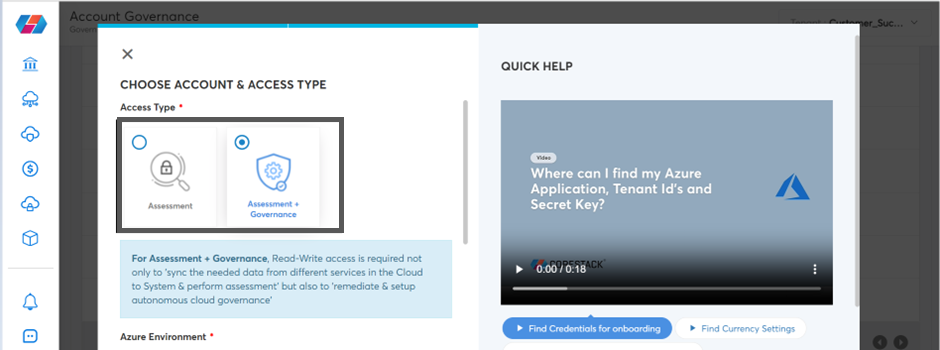
- Under Access type, you can select Assessment or Assessment + Governance. We recommend selecting Assessment, since it will allow you to run CoreStack Assessments while only providing the platform with the minimum levels of access. Selecting Assessment + Governance will provide the same experience and functionality as Assessment.
Note:As of August 2023, the above statement is true -- however, in future updates, there will be notable differences between the Assessment and Assessment + Governance options relating to CoreStack Assessments. This user guide will be updated accordingly at that time.
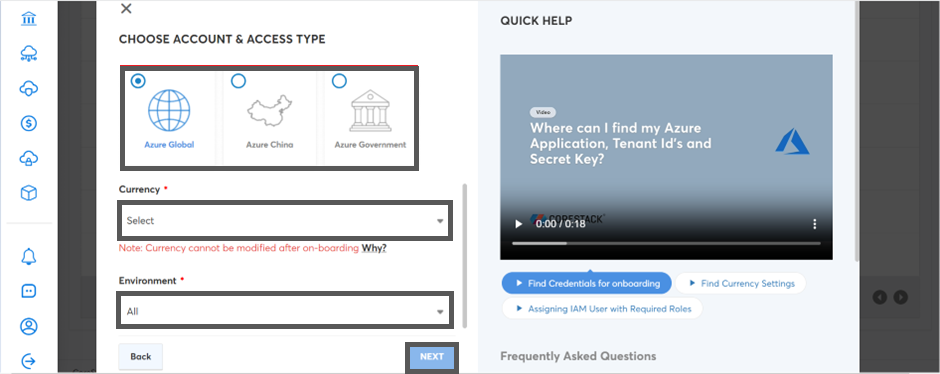
- Select the required option in the Azure Environment field. The options are: Azure Global, Azure China, and Azure Government.
- Select the required currency in the Currency drop-down list.
- Click Next.

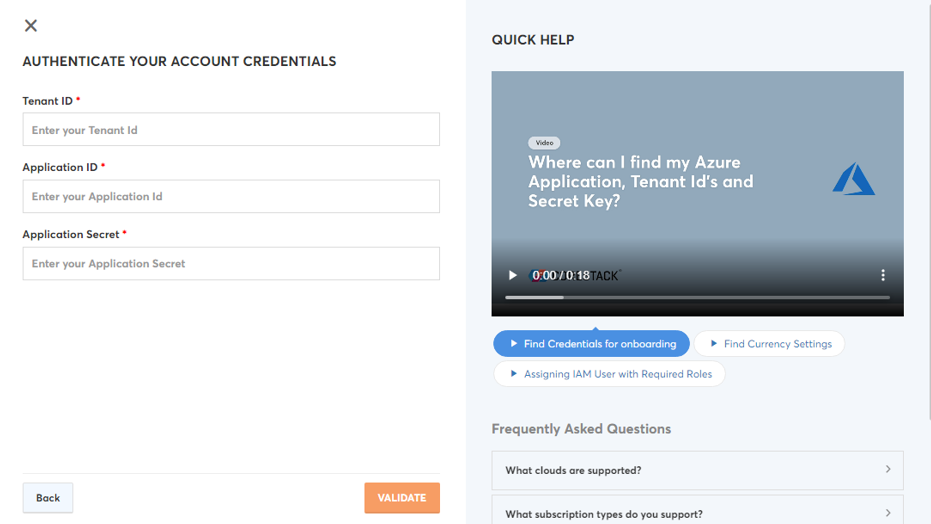
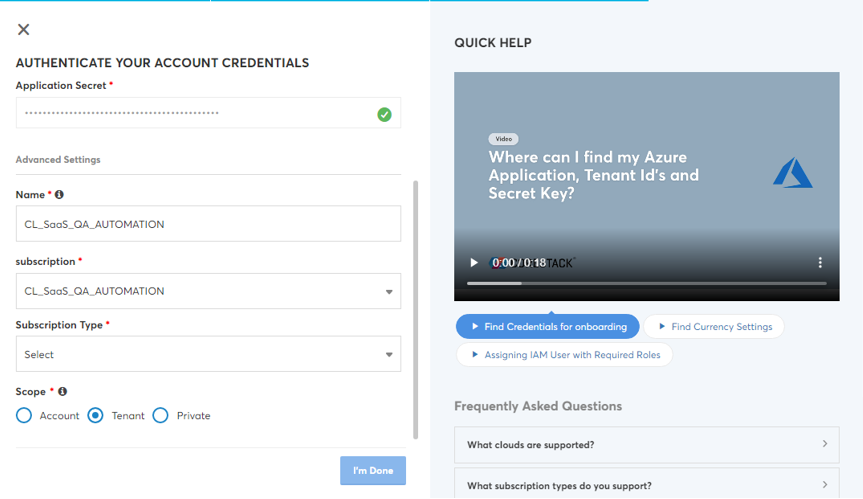
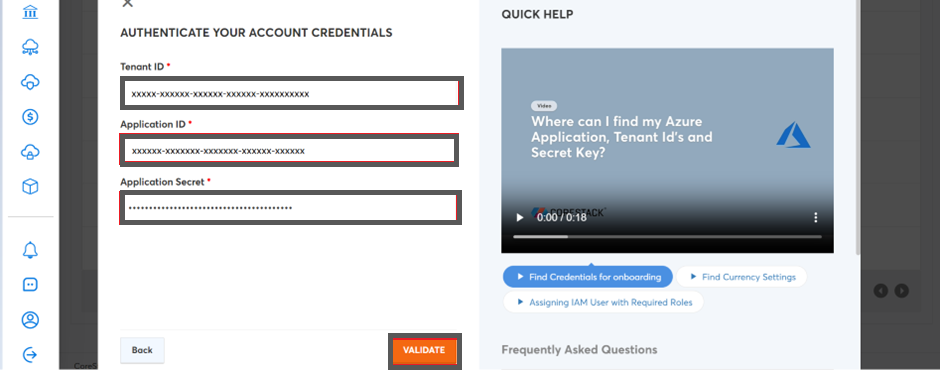
- Provide the details for other fields (Tenant ID, Application ID, Application Secret) as explained in the Pre-onboarding section.
- Click Validate button.
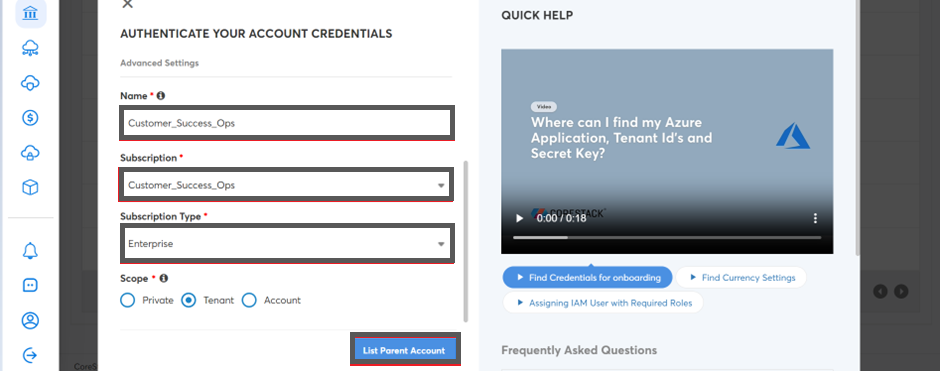
- The Advanced Settings section will be displayed with additional fields (Name, Subscription, Subscription Type, Parent Account, and Scope).
- Modify the pre-populated name of the account in the Name field, if required.
- Select the required subscription in the Subscription drop-down list.
- Select the Pay As You Go option in the Subscription Type field.
- Select the required option in the Scope field. The options are: Account, Private, and Tenant.
- Click I’m Done button.

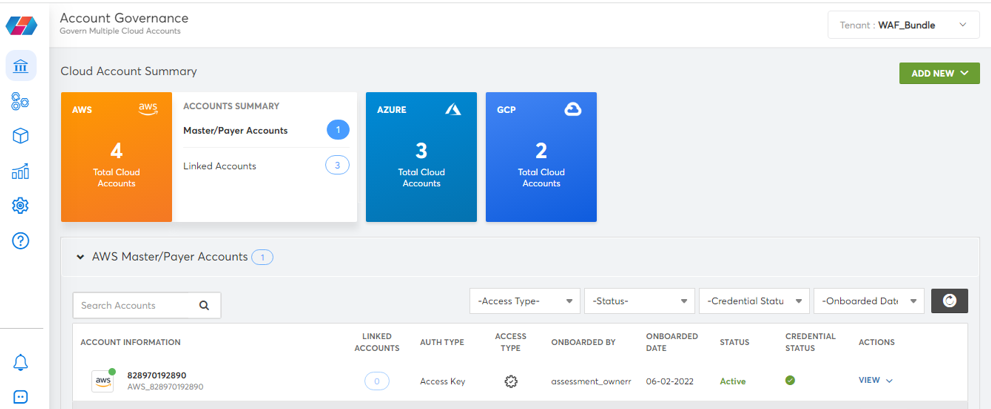
The Azure Subscription will now be onboarded successfully into the platform. Relevant insights and information about the resources available in the account will be populated under each cloud governance pillars in the platform.
Onboard an Azure CSP Direct Account
The following steps need to be performed to onboard an Azure CSP Direct account.
- Click Add New button in the Account Governance dashboard and select Single Account.
- Click Start Now.

- Select Azure CSP Direct option in the Partner Services field.
- Click Get Started button.
- Under Access type, you can select Assessment or Assessment + Governance. We recommend selecting Assessment, since it will allow you to run CoreStack Assessments while only providing the platform with the minimum levels of access. Selecting Assessment + Governance will provide the same experience and functionality as Assessment.
Note:As of August 2023, the above statement is true -- however, in future updates there will be notable differences between the Assessment and Assessment + Governance options relating to CoreStack Assessments. This user guide will be updated accordingly at that time.
- Select the required option in the Azure Environment field. The options are: Azure Global, Azure China, and Azure Government.
- Select the currency configured in your CSP account from the Currency drop-down list.
- Click Next.

- Provide the details explained (Tenant ID, Application ID, Application Secret) in the Pre-onboarding section.

- Select the required option in the Authentication Type field. The options are: App and Authorization Code.
- Provide additional details (Redirect URI, Authorization Code) explained in the Pre-onboarding section, if Authorization Code option is selected in the Authentication Type field.
- Click Validate button.
- If the App option is selected in the Authentication Type field, the Advanced Settings section will be displayed with additional fields (Name and Scope) after you click Validate button.
- Modify the pre-populated name of the account in the Name field, if required.
- Select the required option in the Scope field. The options are: Account, Private, and Tenant.
- Click I’m Done button.

The Azure CSP Direct account will now be onboarded successfully into the platform. Relevant insights and information about the resources available in the account will be populated under each cloud governance pillars in the platform.
Onboard an Azure CSP Subscription
The following steps need to be performed to onboard an Azure CSP Subscription.
- Navigate to the Account Governance Dashboard.
-
Mouse-over the Azure tile in the Cloud Account Summary section and click CSP-Direct. The list of onboarded Azure CSP Direct accounts appears.
The associated subscriptions will be displayed as a table. (In the case of Partner to Partner onboardings, a discovered subscription may be associated with another managed service customer, and will require a new tenant to be created. Select Actions > Create Tenant, wait 15 minutes, log back in, then continue to next step.)
-
To onboard a subscription, click Onboard Now button next to the required subscription in the list.
The onboarding screen appears. -
Under Access type, you can select Assessment or Assessment + Governance. We recommend selecting Assessment, since it will allow you to run CoreStack Assessments while only providing the platform with the minimum levels of access. Selecting Assessment + Governance will provide the same experience and functionality as Assessment.
Note:As of August 2023, the above statement is true -- however, in future updates, there will be notable differences between the Assessment and Assessment + Governance options relating to CoreStack Assessments. This user guide will be updated accordingly at that time.
- Select the required option in the Azure Environment field. The options are: Azure Global, Azure China, and Azure Government.
- The value in the Currency drop-down list will be auto-selected and disabled. It is dependent on the currency configured in your Azure CSP Direct account.
- Click Next.

- The value in the Tenant ID field will be auto-populated.
- Provide the details for other fields (Application ID, Application Secret) as explained in the Pre-onboarding section.
- Click Validate button.

- The Advanced Settings section will be displayed with additional fields (Name, Subscription, Subscription Type, Parent Account, and Scope).
- Modify the pre-populated name of the account in the Name field, if required.
- The value in the Subscription field will be auto-populated.
- The value in the Subscription Type field will be auto-populated.
- The corresponding Azure CSP Direct account will be auto-selected in the Parent Account field.
- Select the required option in the Scope field. The options are: Account, Private, and Tenant.
- Click I’m Done button.
The Azure CSP Subscription will be onboarded successfully into the platform. Relevant insights and information about the resources available in the account will be populated under each cloud governance pillars in the platform.
Onboard an Azure Enrollment (EA) Parent Account
There are two authentication options available to onboard an Azure EA Parent account to the platform, with two options to choose from:
- Application Method
- API Key Method
Onboarding steps for Application Method
The following steps need to be performed to onboard an Azure EA Parent subscription account using the Application Method:
-
Login to the platform.
-
Click ADD NEW > Single Account > Start Now. The onboarding screen displays.
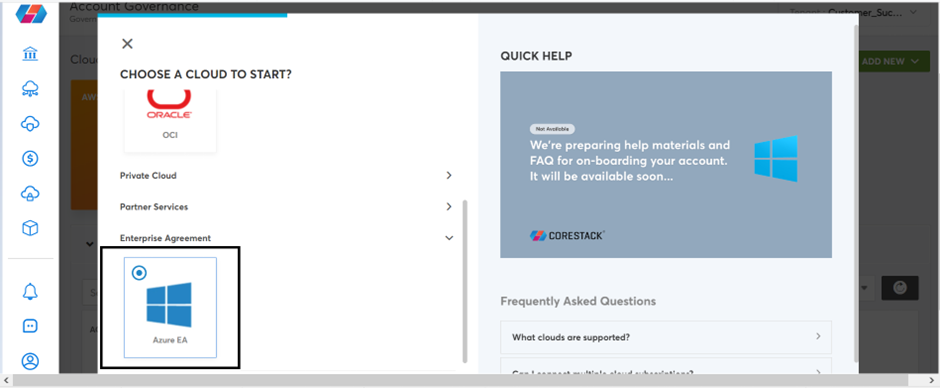
- In the Enterprise Agreement field, click to select Azure EA.
-
Click Get Started.
-
Under Access type, you can select Assessment or Assessment + Governance. We recommend selecting Assessment, since it will allow you to run CoreStack Assessments while only providing the platform with the minimum levels of access. Selecting Assessment + Governance will provide the same experience and functionality as Assessment.
Note:As of August 2023, the above statement is true -- however, in future updates, there will be notable differences between the Assessment and Assessment + Governance options relating to CoreStack Assessments. This user guide will be updated accordingly at that time.
-
In the Azure Environment field, click to select one option among Azure Global, Azure China, and Azure Government.
-
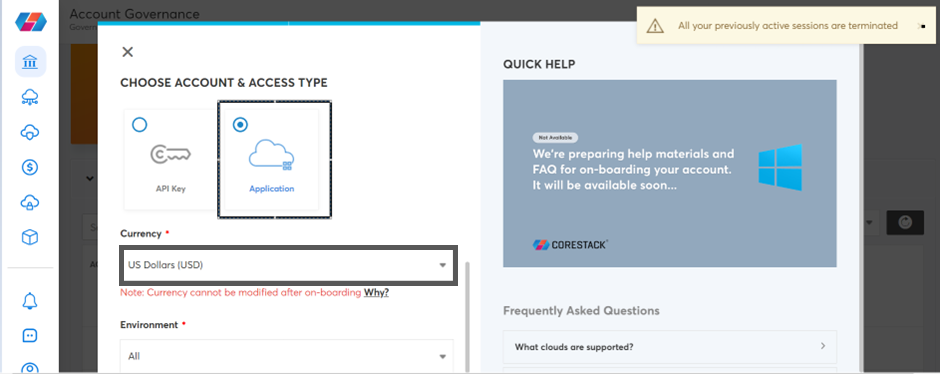
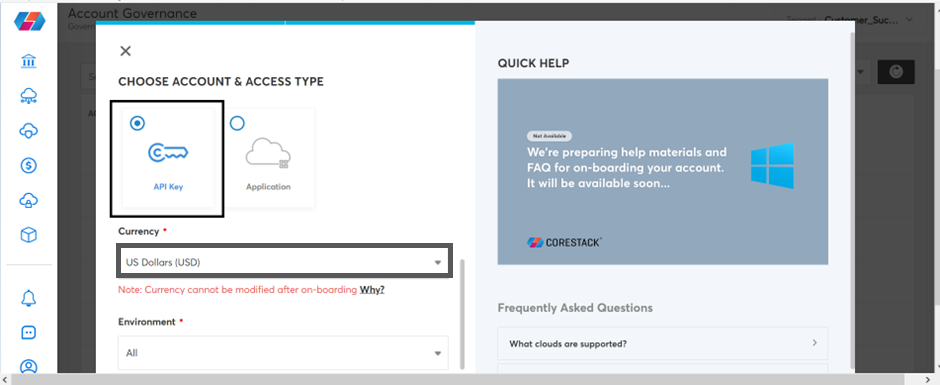
In the Authentication Protocol field, click to select Application.
-
In the Currency list, click to select an appropriate currency.
-
Click Next.
-
If the account is going to be onboarded using the application authentication method, type the appropriate details in the Enrollment ID, Tenant ID, Application ID, and Application Secret boxes. These values can be retrieved as explained in the Pre-Onboarding section.
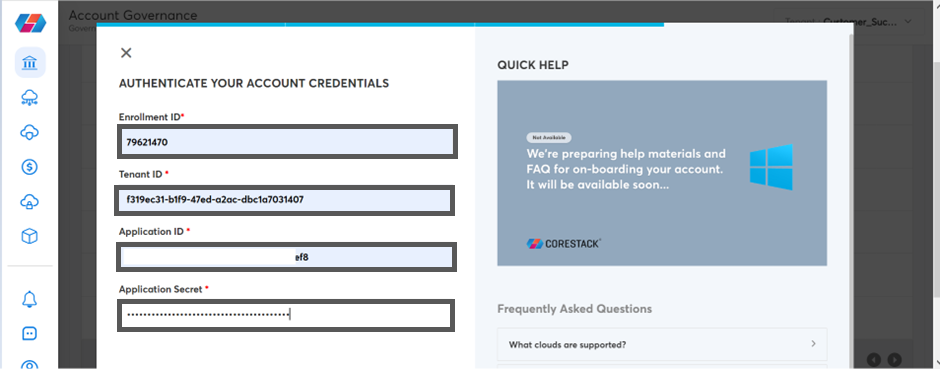
-
Click Validate.
The Advanced Settings section will be displayed with Name, Subscription, Storage Account, and Report Path fields.
-
Modify the pre-populated name of the account in the Name field, if required.
-
In the Subscription list, select the required subscription that will be used for onboarding the account in the platform.
-
In the Storage Account box, type the storage account name where costexport was created.
-
In the Report Path field, enter the correct value in the following format:
<container name>/<directory path>/<export name>

- Click I’m Done.
The Azure subscription account should now be onboarded successfully in the platform. Any relevant insights and information about the resources available in the account will be populated under each of the cloud governance pillars in the platform.
Onboarding Steps for API Key Method
The following steps need to be performed to onboard an Azure EA Parent account using the API Key Method:
-
Access the platform.
-
Click ADD NEW > Single Account > Start Now. The onboarding screen displays.

- In the Enterprise Agreement field, select Azure EA.

-
Click Get Started.
-
Under Access type, you can select Assessment or Assessment + Governance. We recommend selecting Assessment, since it will allow you to run CoreStack Assessments while only providing the platform with the minimum levels of access. Selecting Assessment + Governance will provide the same experience and functionality as Assessment.
Note:As of August 2023, the above statement is true -- however, in future updates, there will be notable differences between the Assessment and Assessment + Governance options relating to CoreStack Assessments. This user guide will be updated accordingly at that time.
-
In the Azure Environment field, click to select one option among Azure Global, Azure China, and Azure Government.
-
In the Authentication Protocol field, click to select API Key.
-
In the Currency list, click to select an appropriate currency.
-
Click Next.
-
If the account is going to be onboarded using the API key method, enter appropriate details in Enrollment ID and API Key boxes.
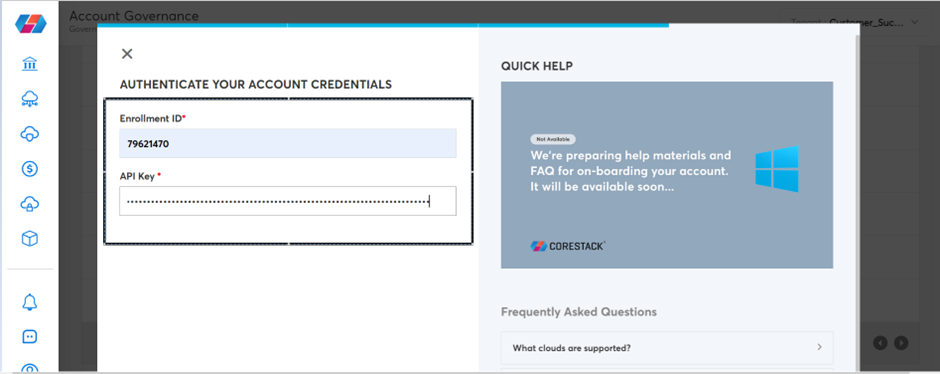
-
Click Validate. The Advanced Settings section will be displayed.
-
In the Name field, modify the pre-populated name of the account, if required.
-
Click I’m Done.
The Azure subscription account is now onboarded successfully in the platform. Relevant insights and information about the resources available in the account will be populated under each cloud governance pillars in the platform.
Onboard an Azure Enrollment (EA) Subscription
Note:Before onboarding the Azure Enrollment (EA) subscription, it is mandatory to onboard the Azure Enrollment (EA) Parent account in the platform.
The following steps need to be performed to onboard an Azure Enrollment (EA) Subscription:
- Log in to the platform.
- On the dashboard, click Add New, select Single Account, and then click Start Now. The onboarding screen appears.
- In the Public Cloud field, select Azure and click Get Started.

- Under Access type, you can select Assessment or Assessment + Governance. We recommend selecting Assessment, since it will allow you to run CoreStack Assessments while only providing the platform with the minimum levels of access. Selecting Assessment + Governance will provide the same experience and functionality as Assessment.
Note:As of August 2023, the above statement is true -- however, in future updates, there will be notable differences between the Assessment and Assessment + Governance options relating to CoreStack Assessments. This user guide will be updated accordingly at that time.
- In the Azure Environment field, select the required option. The options are: Azure Global, Azure China, and Azure Government.
- In the Currency drop-down list, click to select the required currency.
- In the Environment drop-down list, click to select the appropriate option. The options are: Production, Staging, QA, and Development.
- Click Next.
- Provide the details for other fields (Tenant ID, Application ID, Application Secret) as explained in the Pre-onboarding section.
- Click Validate.
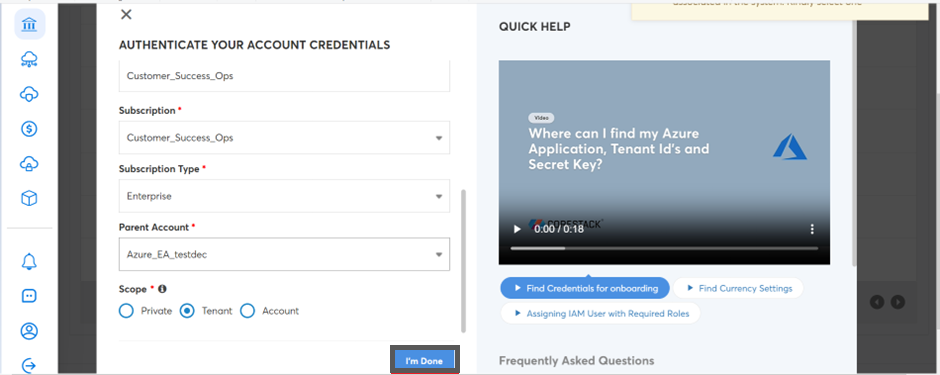
The Advanced Settings section will be displayed with additional fields ( **Name, Subscription, Subscription Type, Parent Account,**and Scope).
- In the Name field, modify the pre-populated name of the account, if required.
- In the Subscription drop-down list, select the required subscription.
- In the Subscription Type field, select the Enterprise option.
- In the Scope field, select the required option. The options are: Account, Private, and Tenant.
- Click List Parent Account and select the parent account.
- Click I’m Done.
The Azure Subscription will now be onboarded successfully into the platform. Relevant insights and information about the resources available in the account will be populated under each cloud governance pillars in the platform.
Updated 5 months ago