

Workloads
Learn how to create and manage workloads for Assessments.
Introduction
Once you've onboarded at least one cloud account configured for Assessments, you're ready to create your first workload.
A workload in the platform is a group of related cloud resources and is created for the purpose of aiding in governance and yielding insights about their performance.
When you create a workload, the platform discovers all the resources available in your cloud account and allows you to filter and select which resources you want to associate with particular workloads.
Create a workload
Follow the steps outlined below to create a new workload:
-
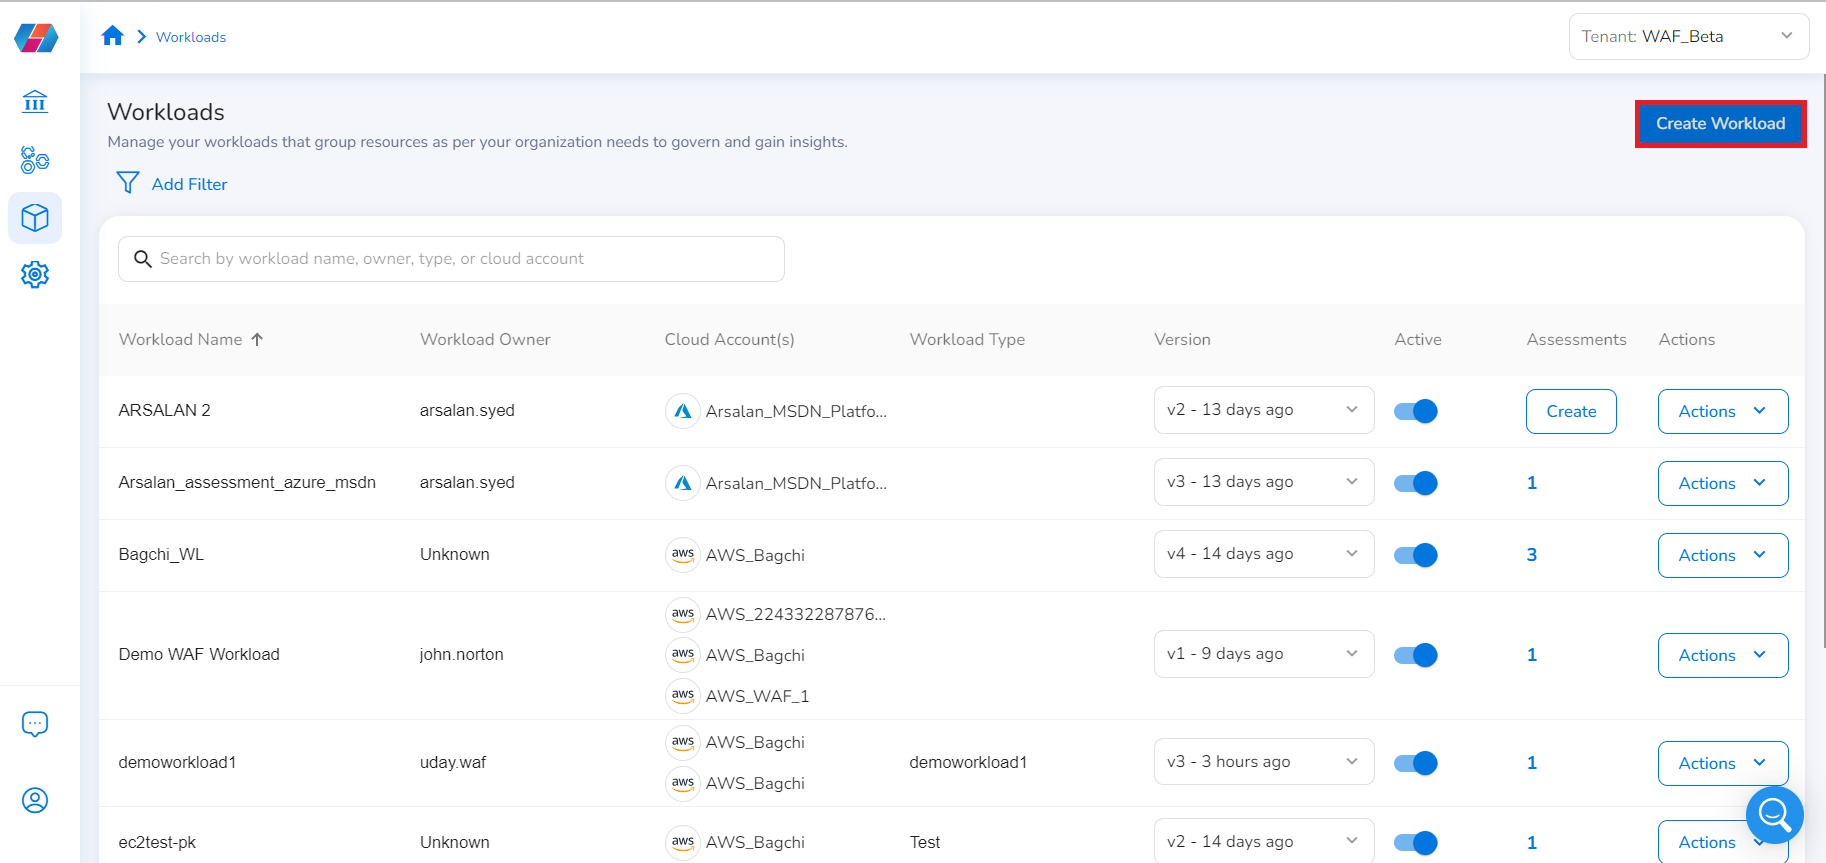
On the left-hand navigation bar, select CloudOps > Cloud Inventory > Workloads. All the available cloud workloads are listed on this screen.
-
To create a new workload, click the Create Workload button on the top-right corner. This will open a new screen with multiple fields to be filled.
-
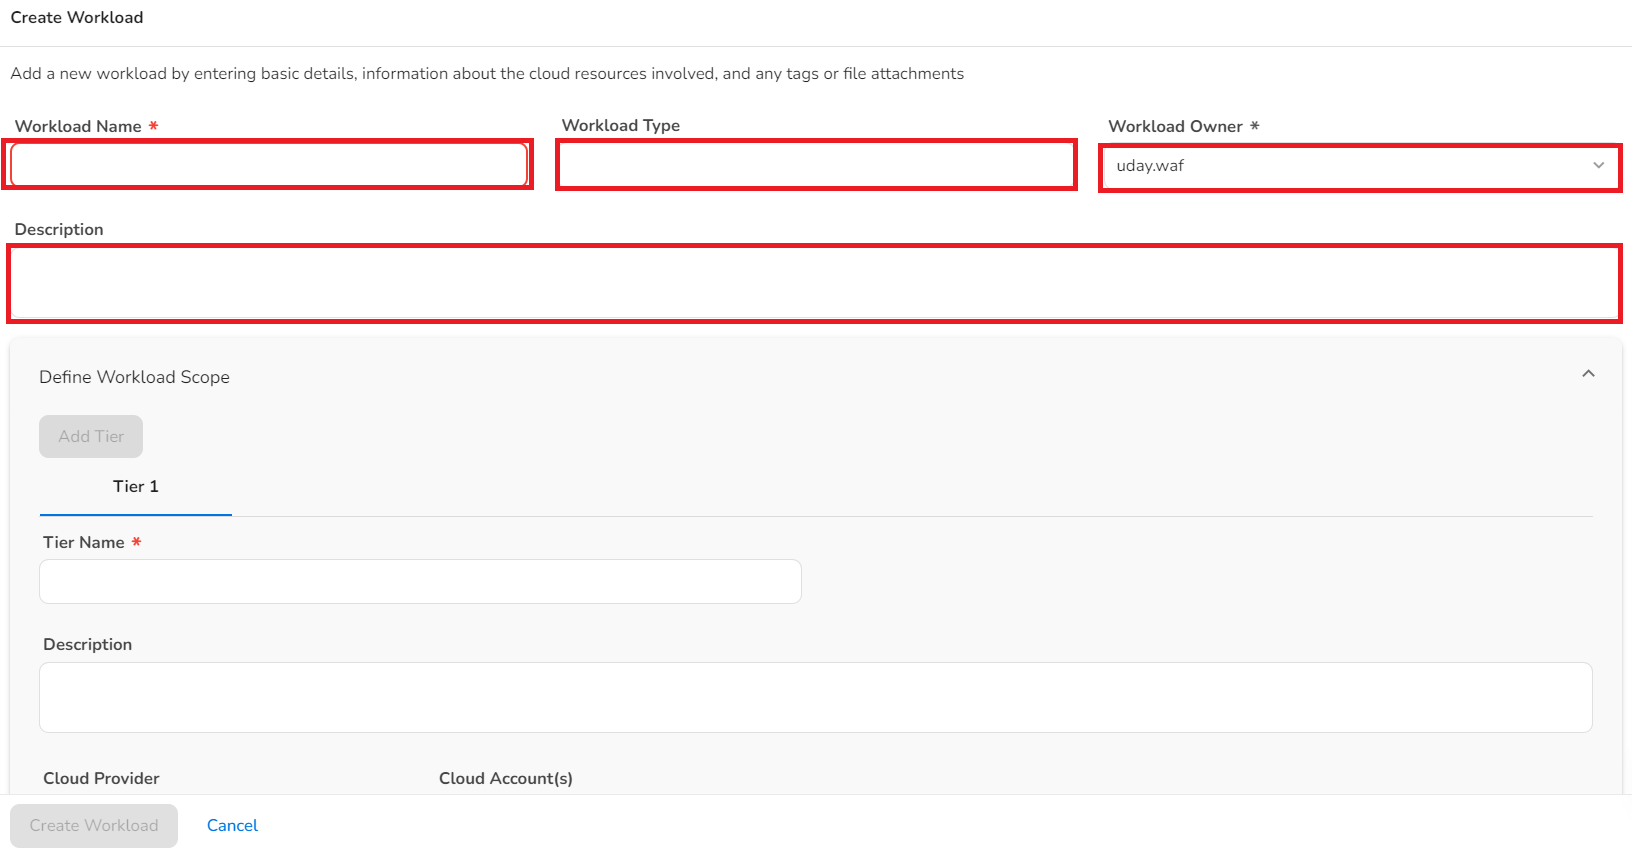
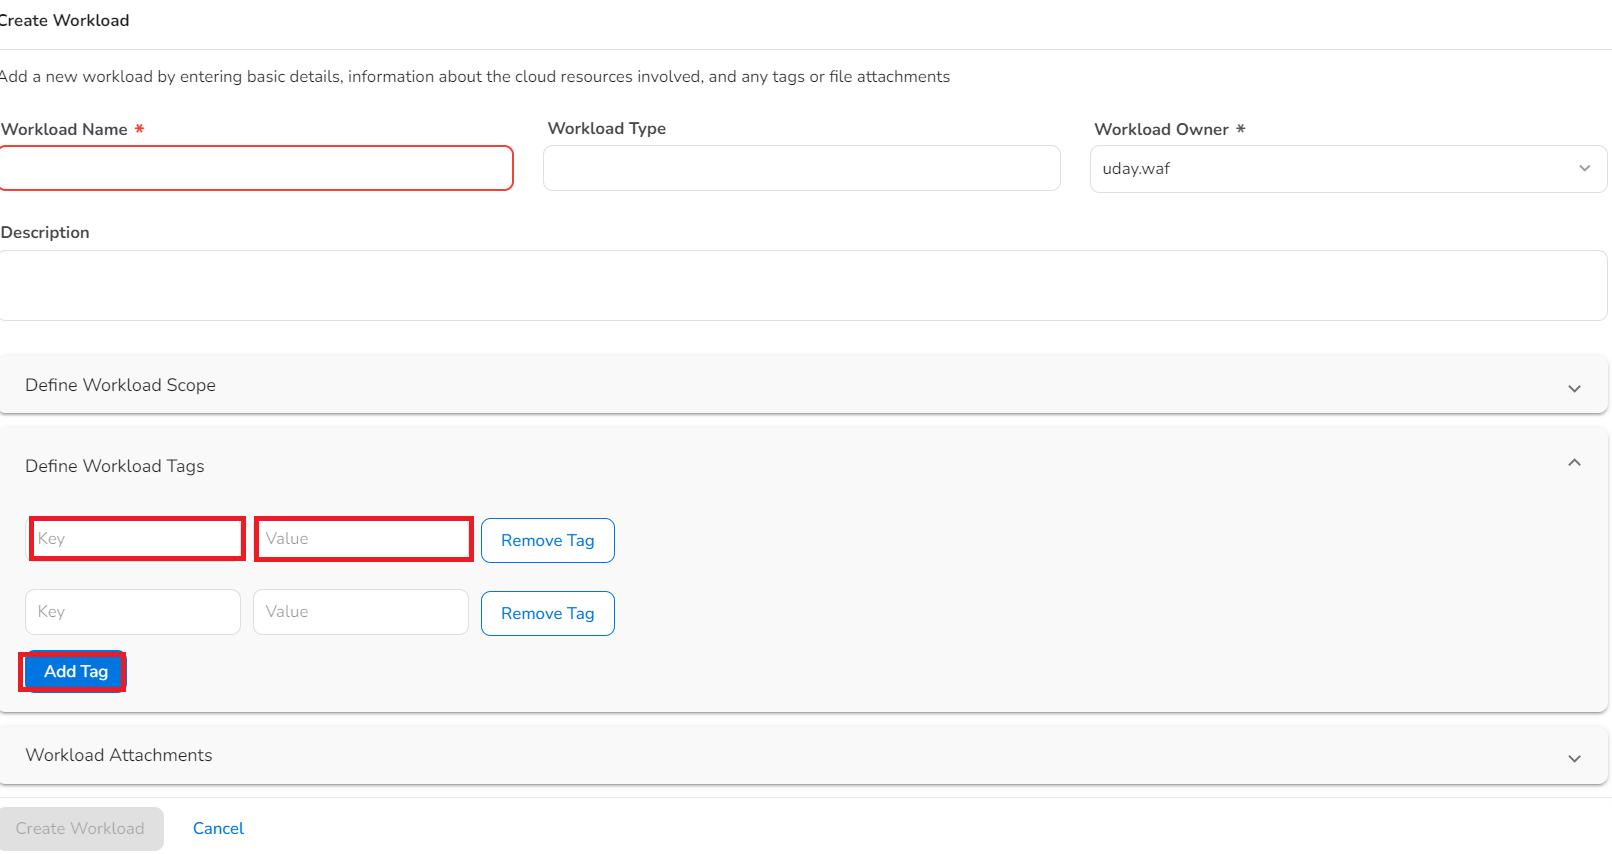
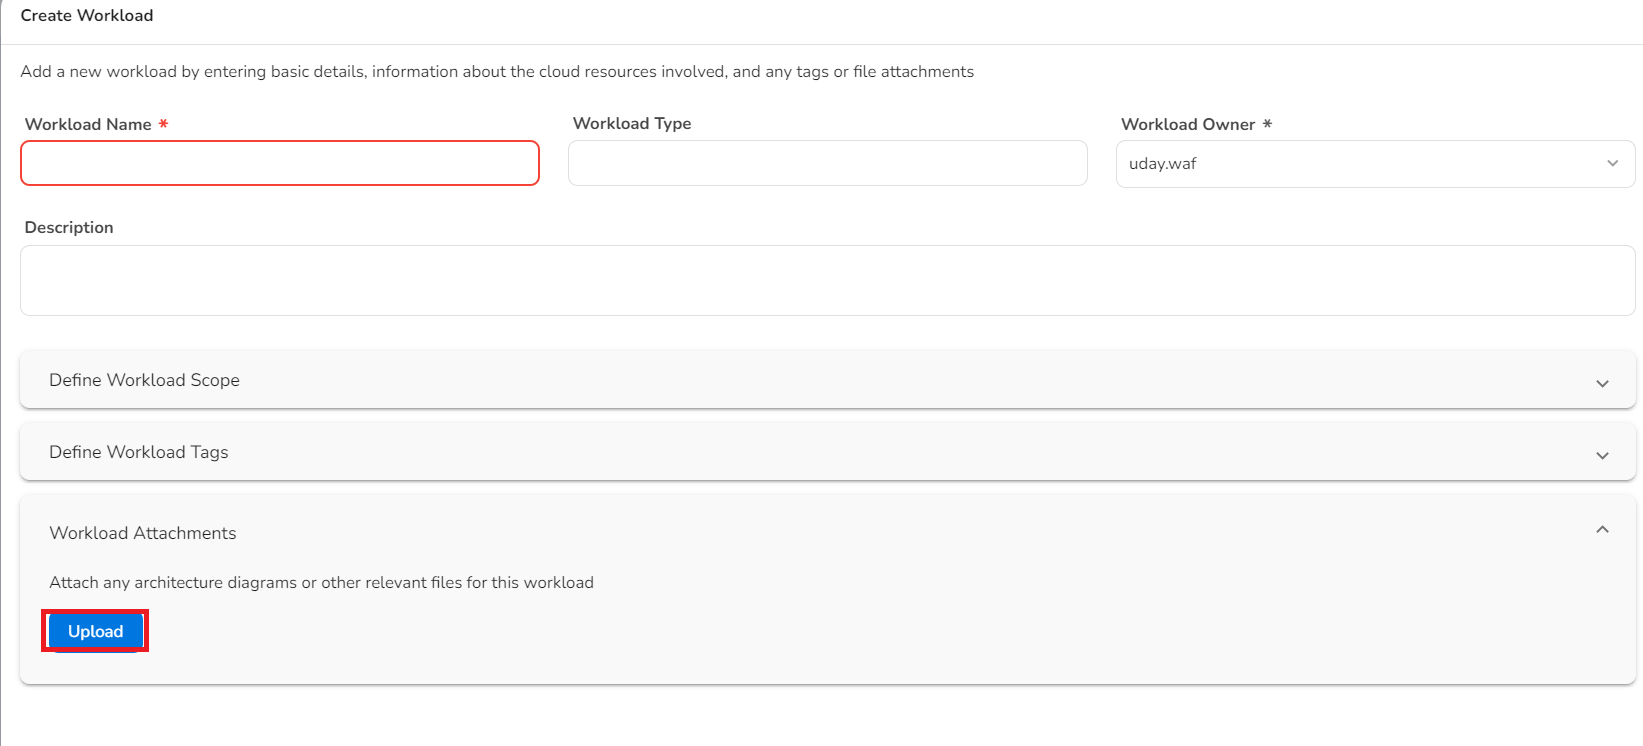
In Workload Name box, type the name for the workload (this field is mandatory).
-
In the Workload Type box, type the workload type.
-
In the Workload Owner list, click to select an owner for this workload (this field is mandatory).
-
In the Description text box, type a description for this workload. For example, if this workload is mainly going to consist of virtual machines, noting here would be helpful for other users to know what types of assets this workload pertains to.
-
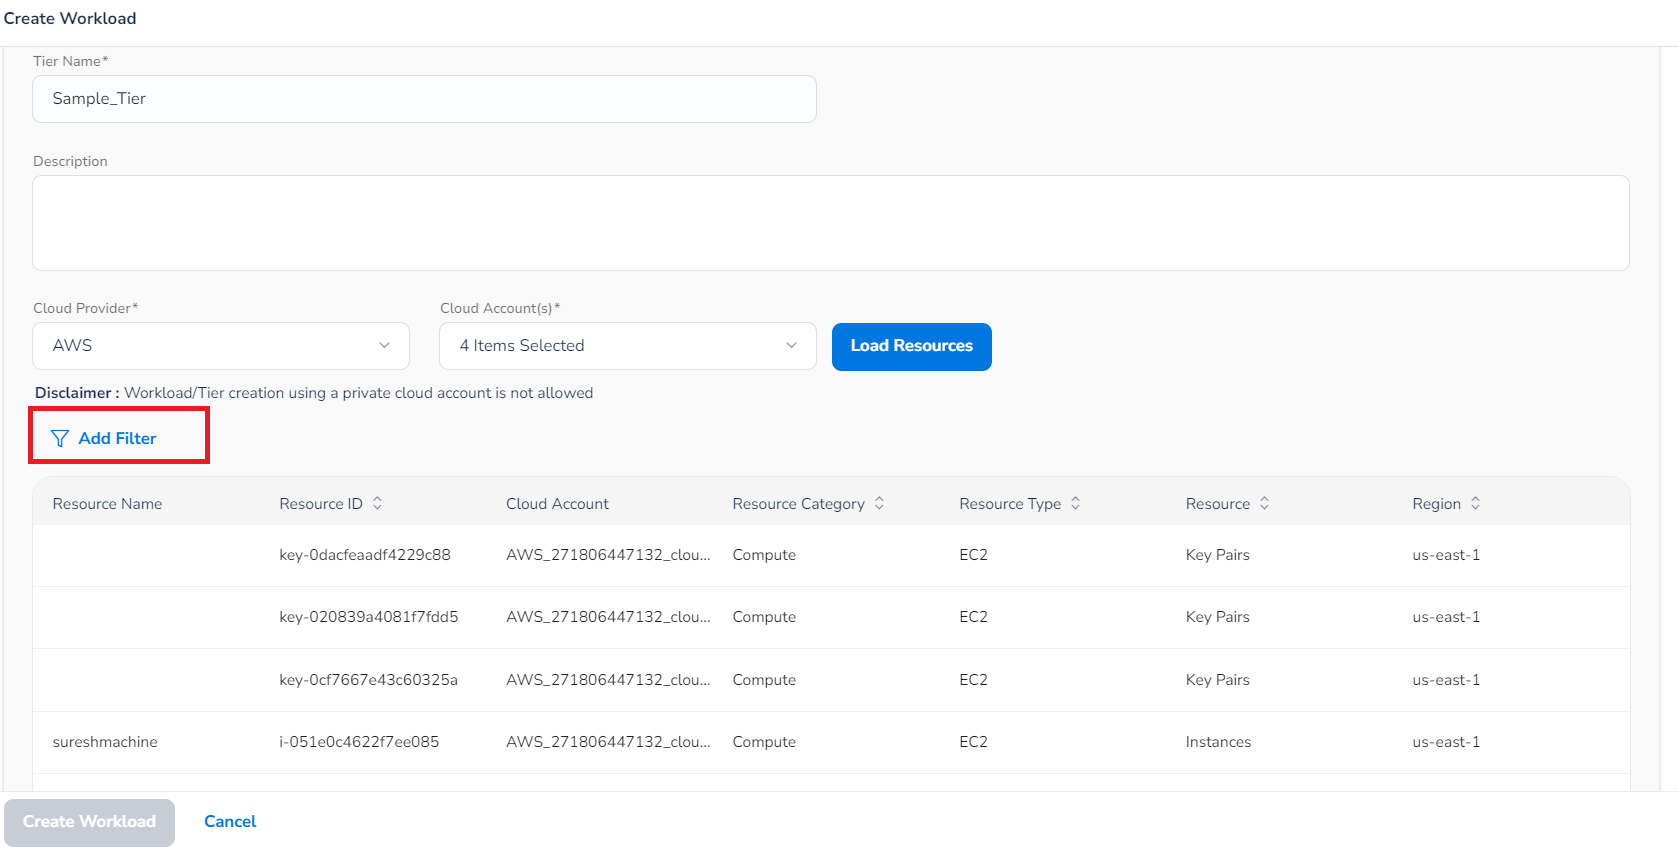
Click Define Workload Scope to expand the section and perform the following:
-
In the Tier Name box, type the name of the tier.
Note on tiers:Workloads can be made of different logical/architectural tiers, each of which can be defined by what kinds of cloud resources are involved. Each tier can contain definitions for one or more cloud accounts under a specific cloud provider.
Altogether, eight (8) tiers can be created for a workload.
-
In the Description box, type a description for the workload scope.
-
In the Cloud Provider list, click to select a cloud provider.
-
In the Cloud Account(s) list box, select the relevant cloud accounts and then click Ok. You can select multiple options.
-
Click Load Resources.
All the resources appear as per the tier and workload options selected above.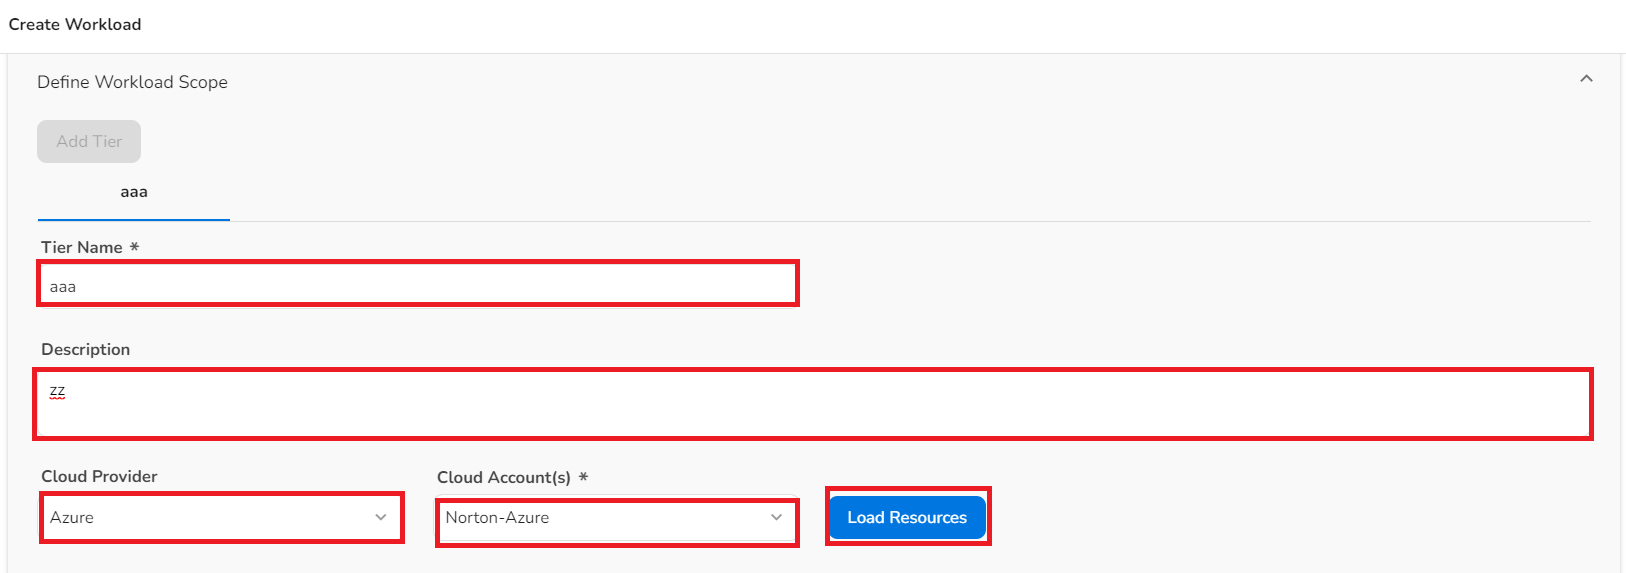
-
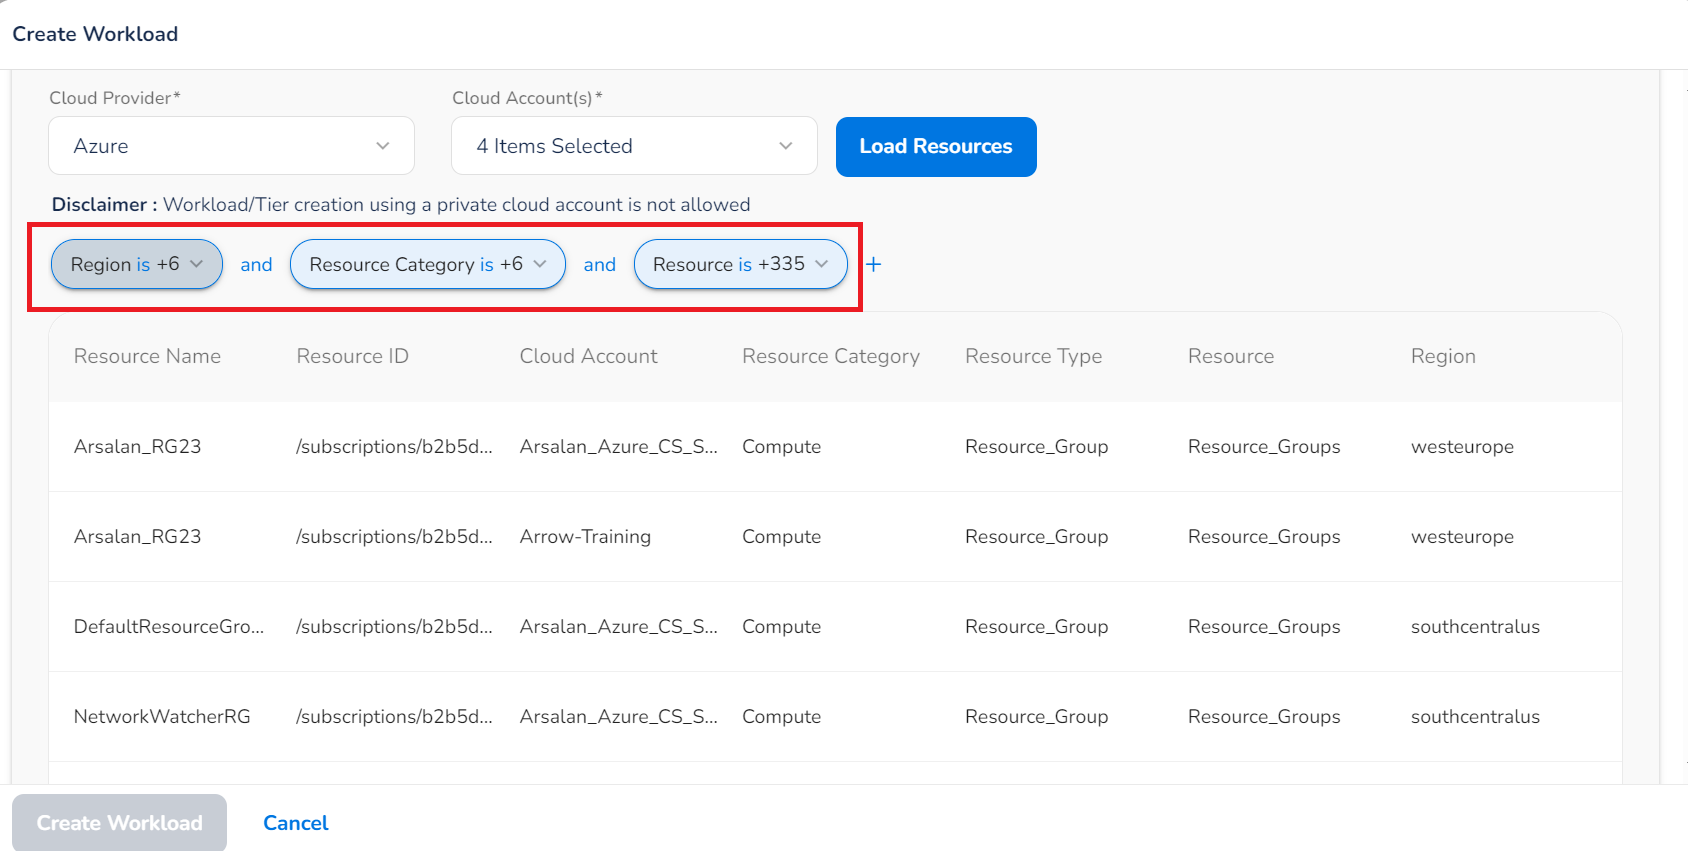
You can also use the Add Filter option and specify the options to view a list of filtered resources.
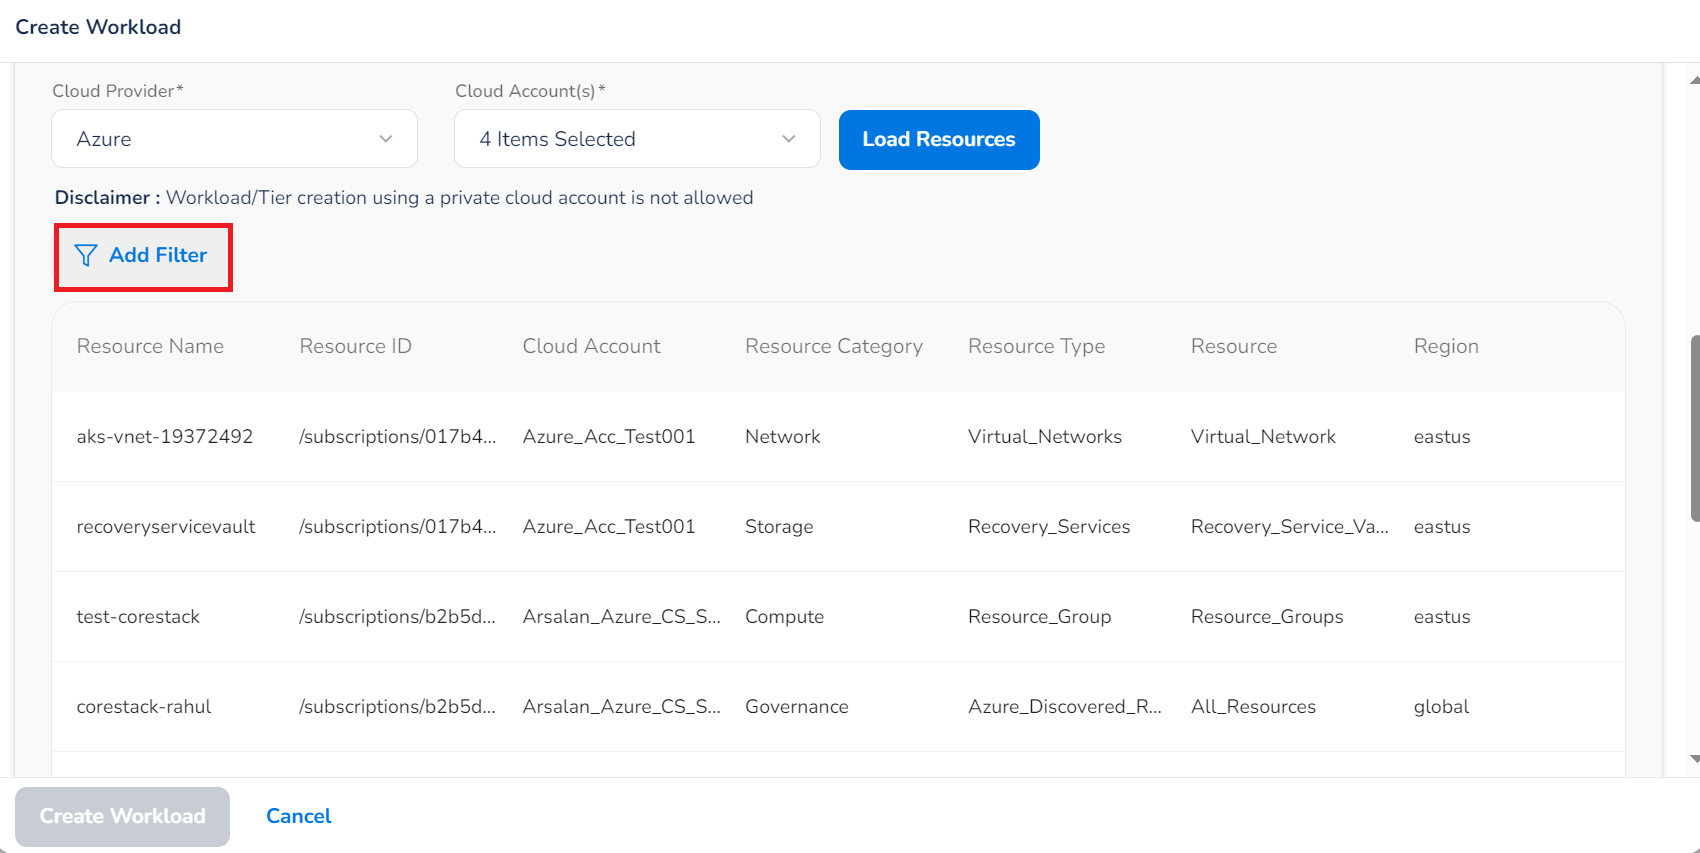
The resources will be filtered as per the conditions applied, and you can view filtered resources for a particular workload (as per the tier(s) defined for a workload).
In the example shown in the image below, the resources are filtered by region (six selected), resource category (six selected), and resources (all selected). Resources that meet those conditions are displayed below:
 Note:
Note:Refer to Using workload filters to learn more about how to use filters.
-
-
Click Define Workload Tags to expand section and perform the following:
- Click Add Tag.
- In the Key box, type the tag key and in the Value box, type the tag value.
- To add another tag, click Add Tag.
- To remove a tag added earlier, click Remove Tag.
- Click Workload Attachments to expand the section, and then click Upload and upload the relevant file for this workload (e.g. diagrams, product guides, etc.).
- Click Create Workload at the bottom of the screen.
You will return to the Workloads page view where you can now see your new workload listed below.
Understanding tiers:A tier describes a hierarchy level for workloads. You can organize similar types of cloud resources by tiers in order to bundle different resource types together while keeping them separated for easier governance.
For example, you can add virtual machine applications into Tier 1, then create Tier 2 and add only database applications.
Both sets of resources may be related to the same processes, so including them both in the same workload would make sense, but adding this level of separation makes it much easier to monitor and track performance.
Additional actions for workloads
Apart from creating a workload, users can perform the following actions on the workloads screen:
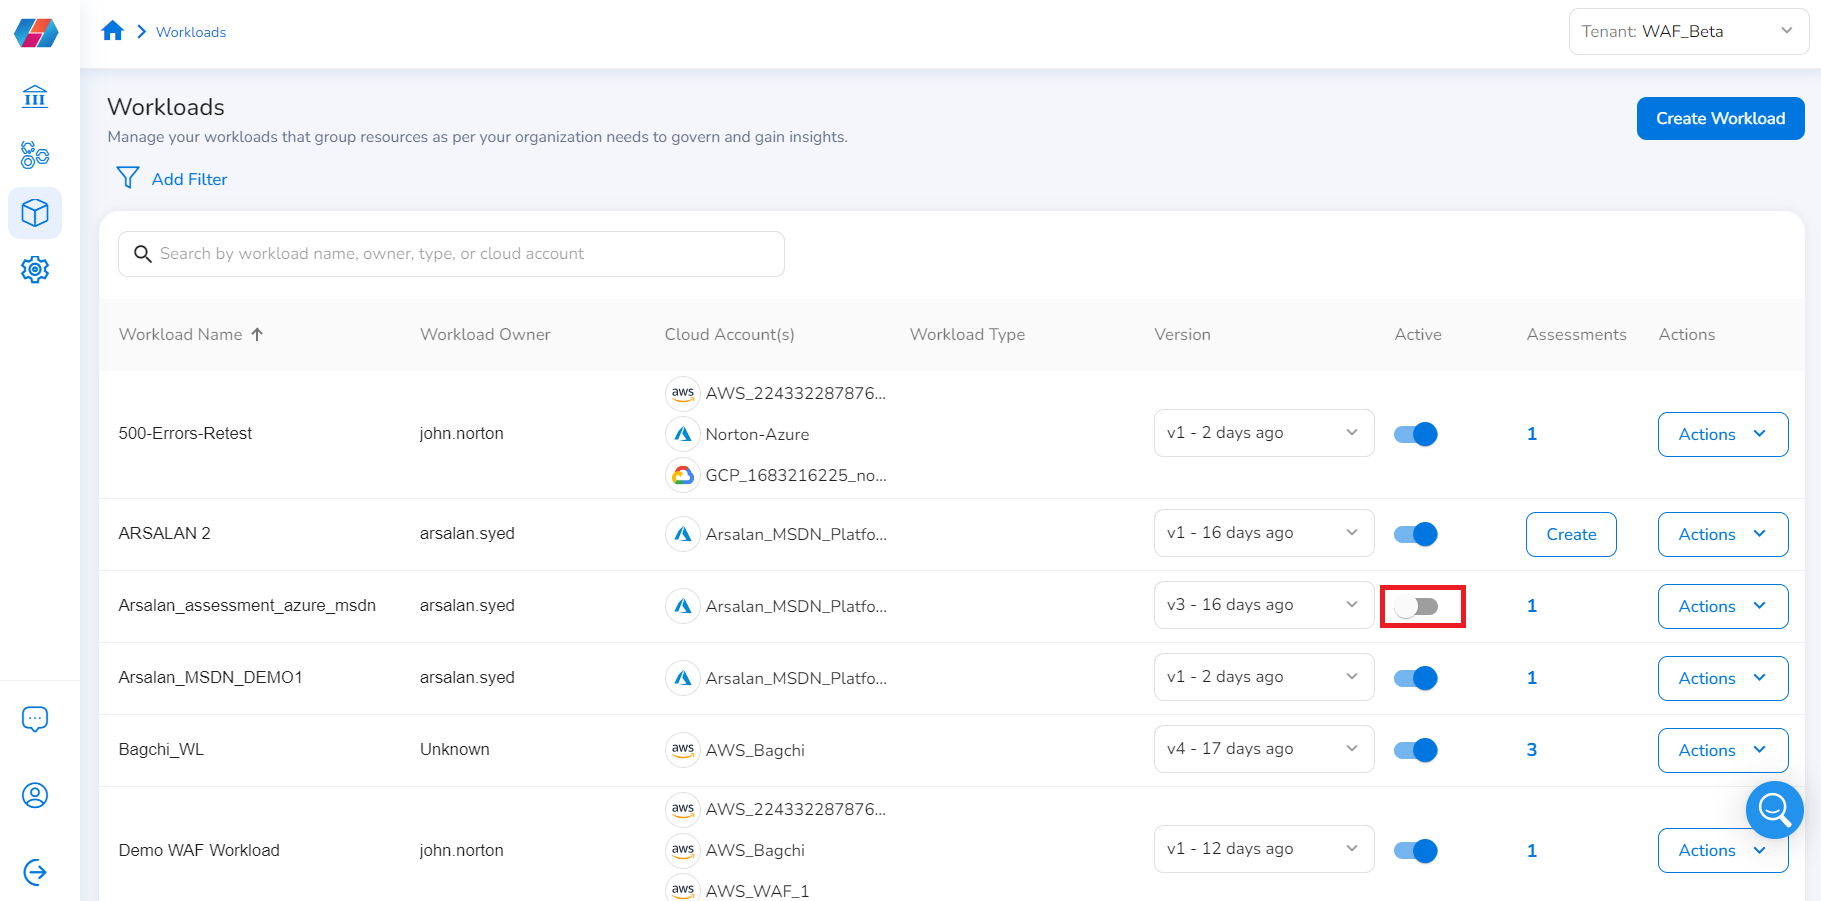
Change a workload's state (Active/Inactive): In the Active column, you can move the slider to right to activate a particular workload or slide it to left to disable it. By default, when a workload is created, it is in the 'Active' state.
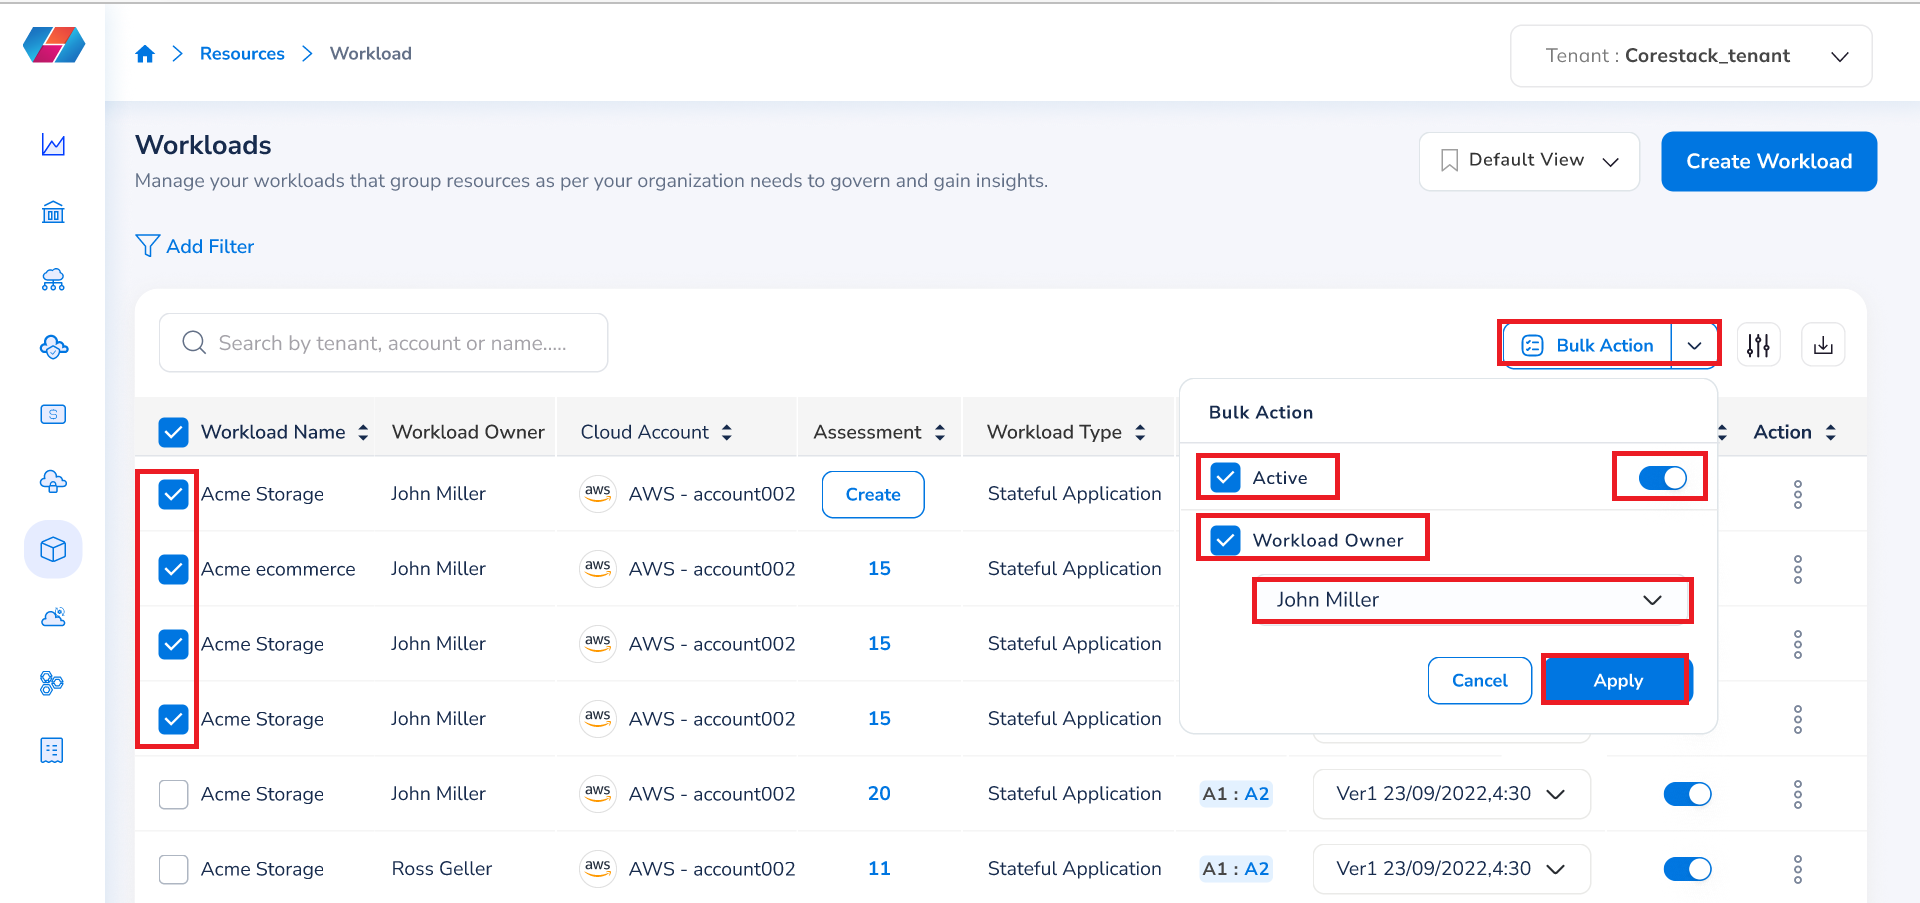
Bulk action to change workload state (Active/Inactive) and owner: You can select multiple checkboxes and take bulk action on the selected workloads to change the state and owner name. For example:
- Select the check boxes for workloads that need to be changed.
- Click Bulk Action.
- Select the Active checkbox to change the status of selected workloads and then move the slider to the left to make the workloads inactive, or move the slider to the right to make the workloads active.
- Select the Workload Owner checkbox to change the owner of selected workloads and in the drop-down list, click to select an owner.
- Click Apply.
Note:If a workload is in an Inactive state, you cannot create an assessment for it.
You also cannot set a workload to Inactive if an assessment has been created for it (you will need to delete any assessments before changing the workload to an Inactive state).
This changes the status and owner of the selected workloads without having to change them individually. You can view these updates on the Workloads main page view.
Note:
- Users can select both Active and Workload Owner checkboxes, or they can select any one checkbox to take bulk actions.
- Use the Search Owner box below the Select Workload Owner list to type and search for the workload owner.
Create an assessment: Click Create or Actions > Create Assessment corresponding to a workload to create a new assessment.
Edit a workload: For a particular workload, click Actions > Edit Workload to edit an existing workload.
Clone workload: Click Actions > Duplicate Workload corresponding to a workload to create a clone of that workload.
View assessment details: In the Assessments column, click the number corresponding to a workload to view the assessment details. The number indicates the number of assessments created for a particular workload.
Versioning for workloads
Workloads follow versioning rules, which are as follows:
- Every edit made to a workload results in a new version.
- Any previous versions can be edited to create a new version.
- A single version will be marked as the release version. This version will be the one visible to other Assessments objects (i.e. frameworks, assessments).
Select a version: When a workload is created and saved, the version 'v1' is created and saved with the date and time. The initial version v1 becomes the active workload version by default.
- To select another version, in the Version column, from the drop-down list corresponding to a particular workload, you can select a different version and click Save.
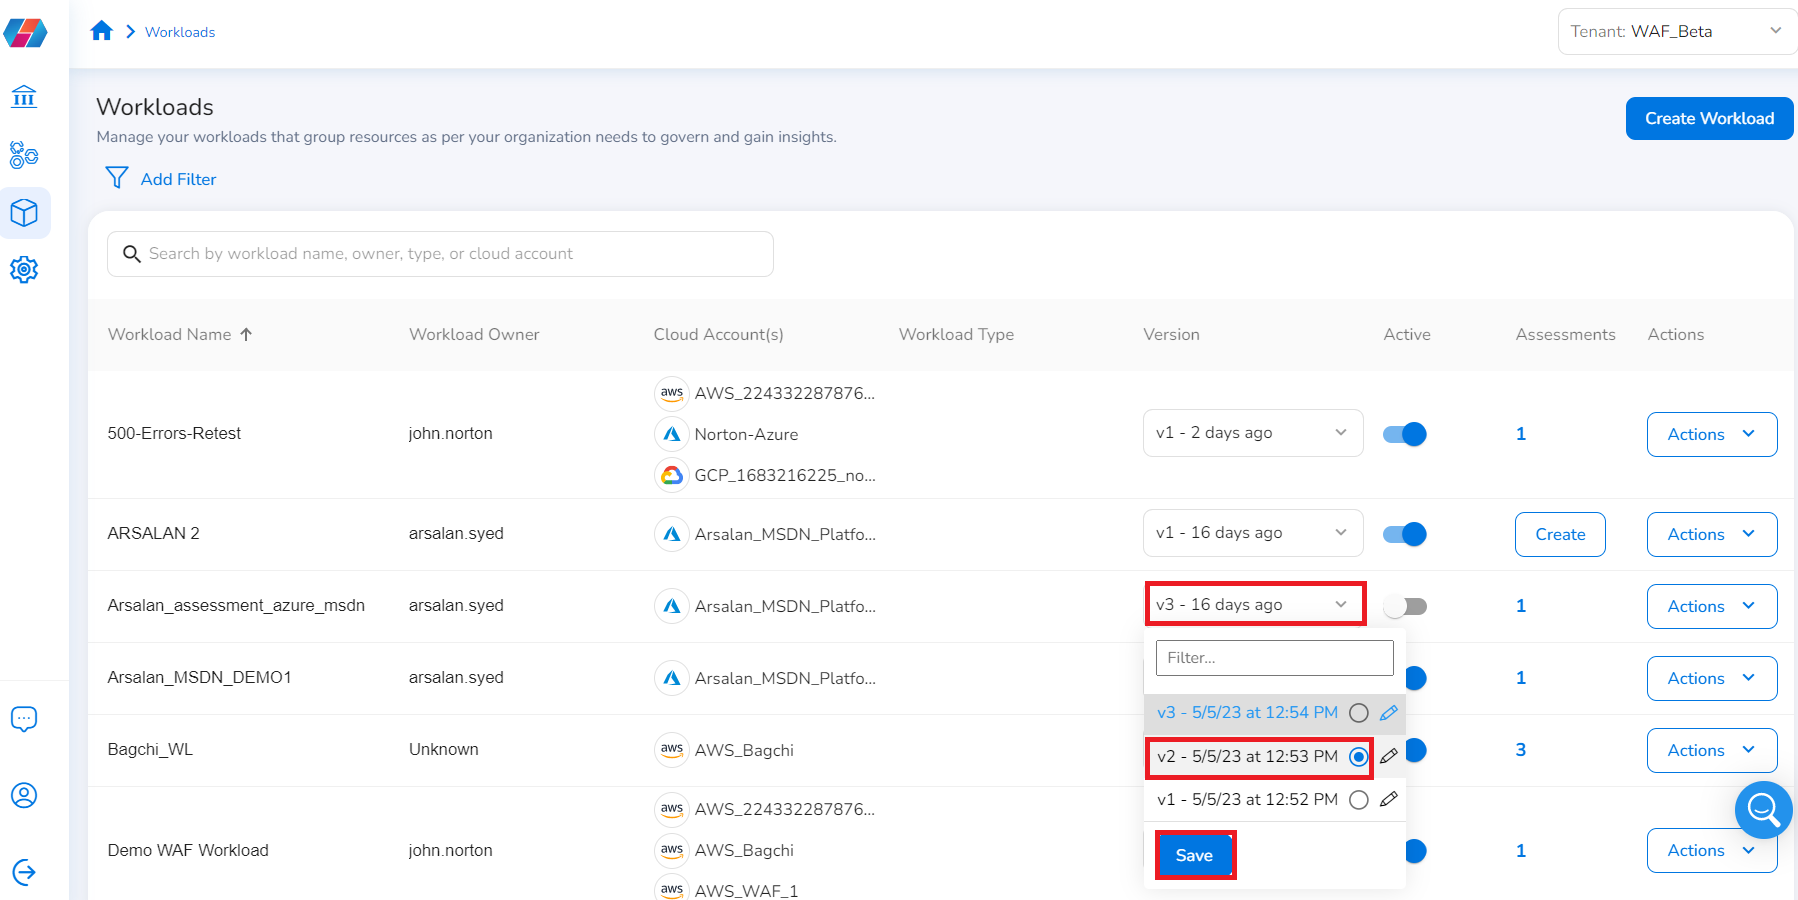
Update workload details: You can click the pen icon from the drop-down list and update the workload details in that selected version. Saving that version creates an updated version. That is, after v1 the updated version will be v2, and so on.
Using workload filters
Using filters makes it much easier to find the right resources for your workload. The workload filter is available only in the Create Workload screen. For example, if you are looking for specific virtual machine workloads, you can add a filter to search by resource type and select all the relevant options much faster.
Users can use the Add Filter option and filter workload details as per the available categories. To narrow down your search results, perform the following:
-
Click Add Filter.
-
Select one of the categories from the drop-down menu:
-
Group: This option is used to group filtering options or add nested filtering options.
-
Region: This option is used to select regions.
-
Resource Type: This option is used to select resource types.
-
Resource Category: This option is used to select resource categories.
-
Resource: This option is used to select the resources.
-
Resource Name: This option is used to apply the filter as per the resource name.
-
Tag Key: This option can be used to filter resources as per the selected tag keys.
-
Tag Value: This option can be used to filter resources as per the selected tag keys and values.

-
-
Click Select Filter and select the required options, and then click Ok. Or you can click Select All to select all the options.
You can change the options selected for a particular category anytime.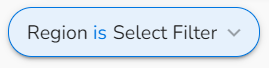
Note:If you select the Resource Name category, you cannot select any option. Instead, you have to type a value.
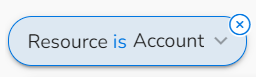
-
To change the condition is to is not, just click the condition is once and select is not to change the condition.

- Similarly, you can change any of the following conditions by clicking on the condition once:
- starts with >> does not start with, and vice versa.
- has any of the keys >> has none of the keys, and vice versa.
- has value >> doesn’t have value, and vice versa.
- Similarly, you can change any of the following conditions by clicking on the condition once:
-
Click + to add another filtering condition.
- Between two filtering conditions/blocks, the condition and appears by default. To change the condition and to or, click and and vice versa.
-
Click X to delete a filtering condition/block. The X symbol appears when you move the mouse pointer over any filtering condition.
-
The Group category can be used for grouping filtering conditions.
For example, click Add Filter > Group > + > select a category and select options from this category > + > select a category and select options from this category.
You can add another group filter within an existing group.

-
Using no filters will select all resources within the specified scope.
Alternatively, users can use the Search box to search for the information they are looking for.
Page View
Users can apply assessment filters and save that view as a page view for Workload Assessments and Workloads pages. After you have saved a page view, you can access that page view anytime and there will be no need to apply filters again.
The filters you applied earlier on the Workload Assessments/Workloads page while saving that view will appear by default. Every user can save their own view so that they can access it anytime.
Save a New Page View
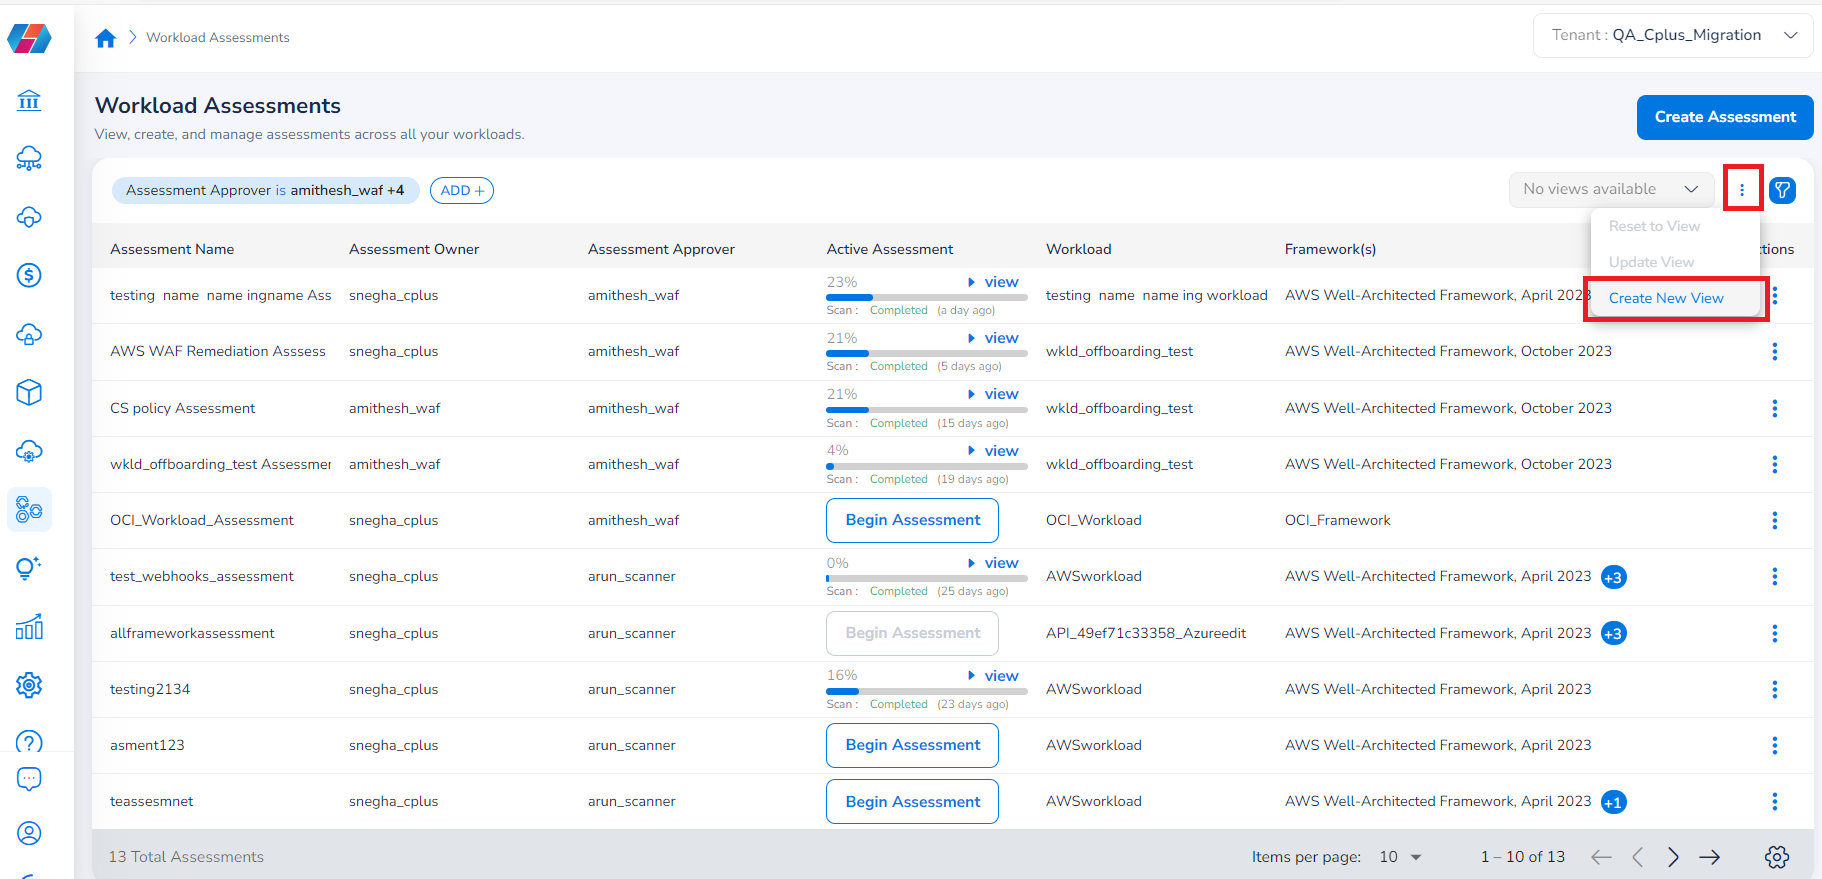
Perform the following steps to save a new page view:
-
Go to the Workload Assessments/Workloads page and apply the relevant filters.
-
Click the three vertical dots > Create New View.
-
In the Create New View dialog box, in the Name box, type the name of the new view that you would like to save, and then click Save.
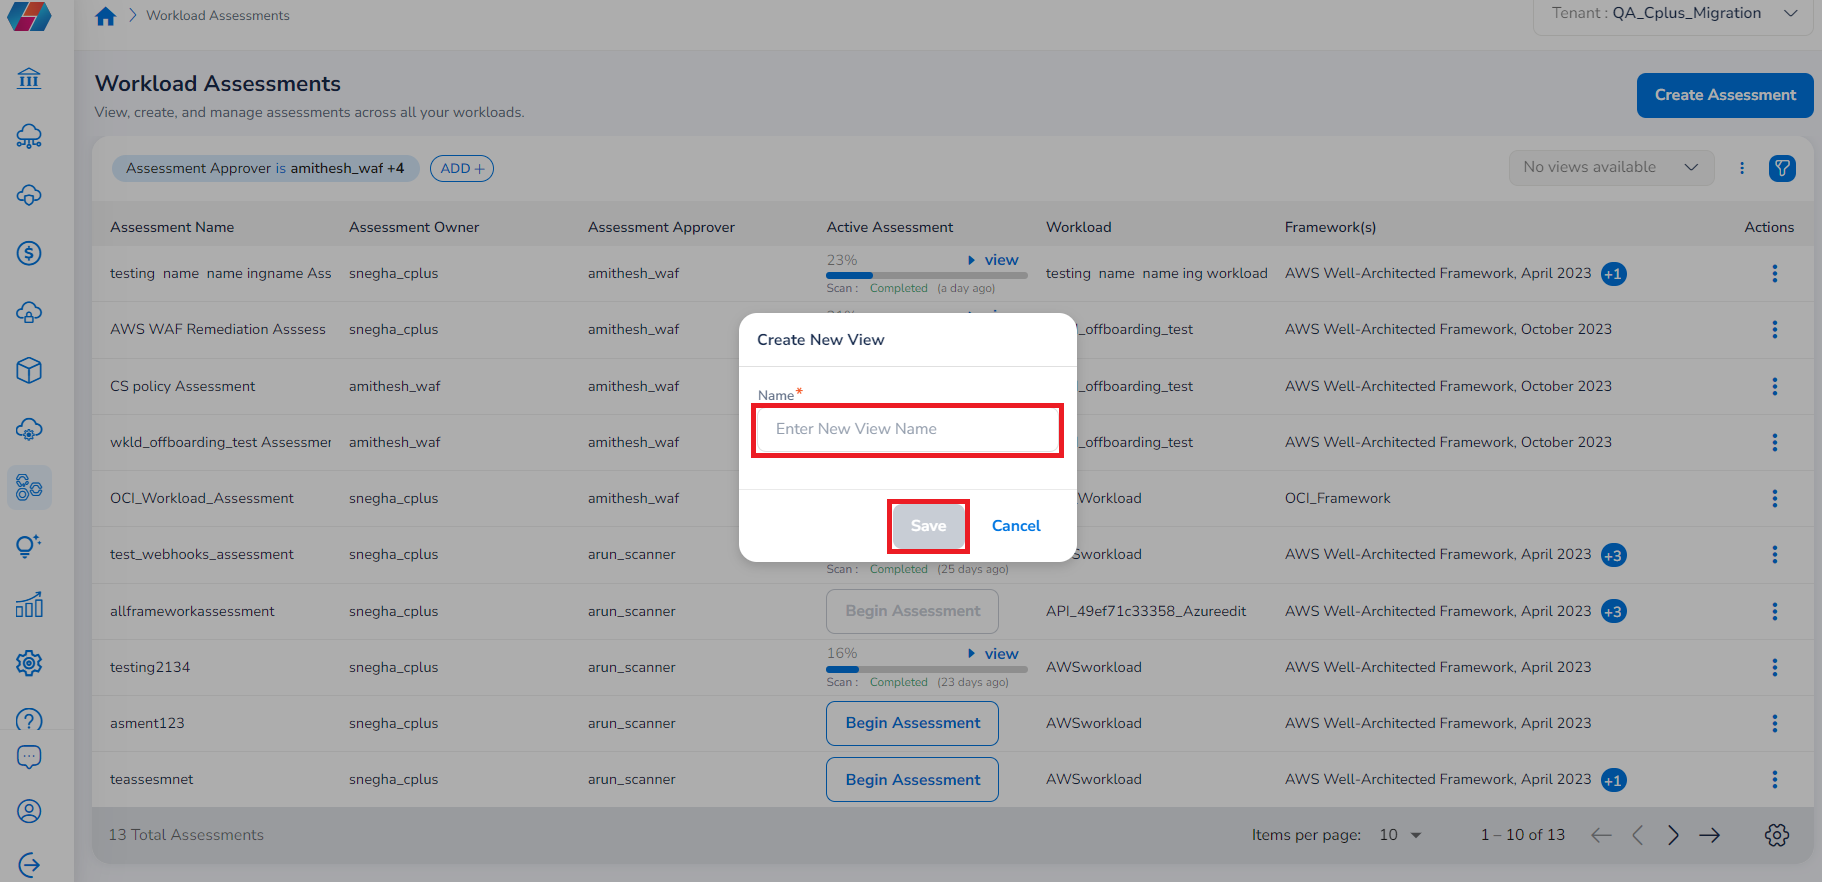
A new page view is saved now.
Update Page View
Perform the following steps to update an existing view:
-
To update an existing view, apply the required filters.
-
Click the three vertical dots > Update View.
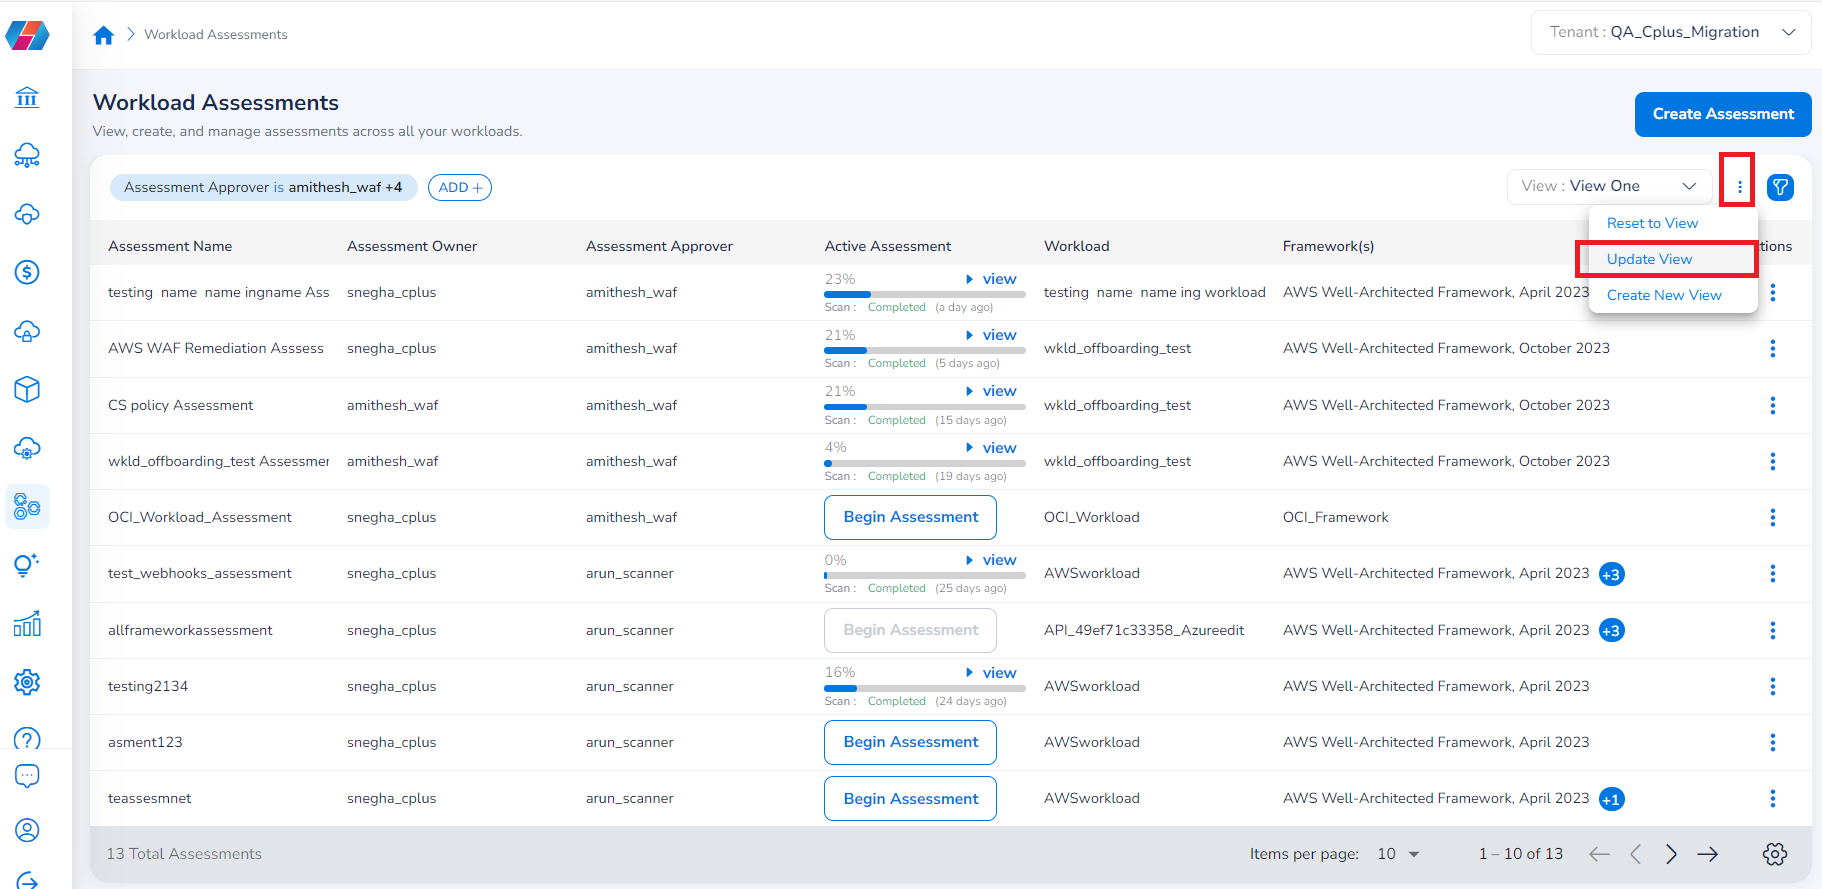
A confirmation message is displayed, and the updated view is saved as per the filters applied by you.
Note:
- If you have multiple views saved and would like to switch to another view, then on the top of the page, click the View list, and then choose the view name that you would like to see.
- You can click the three vertical dots > Reset to View to reset the existing view.
- To delete a view, in the View list, click the delete icon next to the view name that needs to be deleted.
- Ensure that the view name is unique.
Updated 8 months ago