

Pre-Onboarding for Azure Microsoft Customer Agreement (MCA)
Introduction
Before onboarding an Azure Microsoft Customer Agreement (MCA) billing account into CoreStack, you must complete several setup tasks in the Azure portal. These steps ensure CoreStack has the correct credentials, permissions, and billing data export configuration needed to successfully connect and manage your MCA account.
This guide is for Azure administrators responsible for setting up the service principal and billing access required by CoreStack. Complete all steps in this guide before starting the MCA onboarding workflow in CoreStack.
Note: Azure MCA accounts support Read-Only access in CoreStack and are used primarily for FinOps capabilities. Ensure your Azure subscription includes MCA billing before proceeding.
Prerequisites
Before you begin, ensure the following:
- Azure Role: You have Global Administrator or Billing Account Owner access in the Azure portal.
- Azure Subscription: Your organization has an active Microsoft Customer Agreement (MCA) with Microsoft.
- CoreStack Access: You have Provider Admin or Account Admin role in CoreStack to perform the onboarding.
- Azure Portal Access: You can access portal.azure.com and the Cost Management + Billing section.
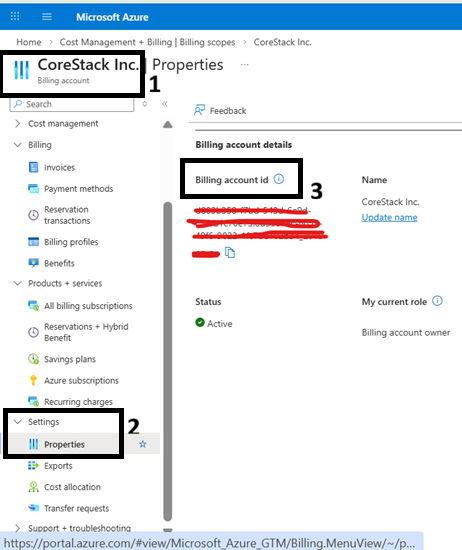
Step 1: Gather Your Billing Account ID
You will need the Billing Account ID to authenticate CoreStack with your MCA account.
- Sign in to the Azure portal.
- In the search bar, type Cost Management + Billing and select it from the results.
- In the left navigation pane, click Billing scopes.
- Select your MCA billing account from the list.
- Click Properties in the left menu.
- Copy the value in the Billing account ID field and save it for later.
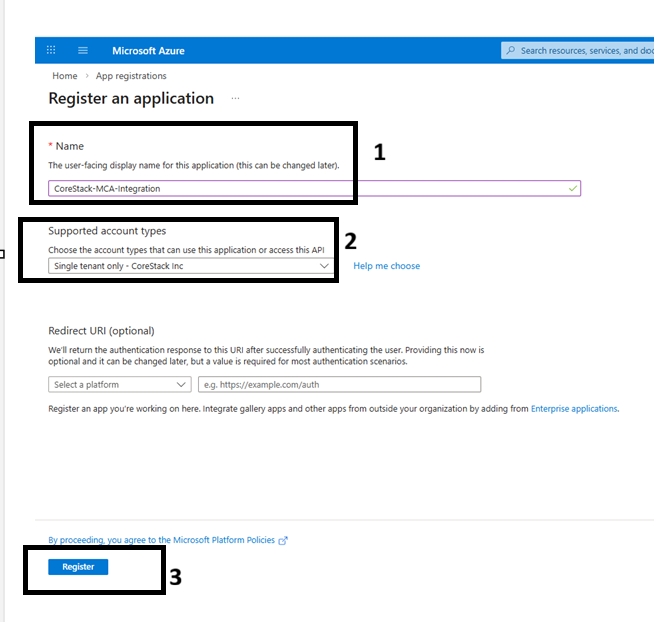
Step 2: Register an Azure Active Directory (Azure AD) Application
CoreStack uses an Azure AD App Registration (Service Principal) to authenticate with your Azure environment.
- In the Azure portal, search for Azure Active Directory and open it.
- In the left navigation pane, click App registrations.
- Click + New registration.
- Enter a meaningful name for the application (for example,
CoreStack-MCA-Integration). - Under Supported account types, select Accounts in this organizational directory only.
- Leave the Redirect URI blank.
- Click Register.
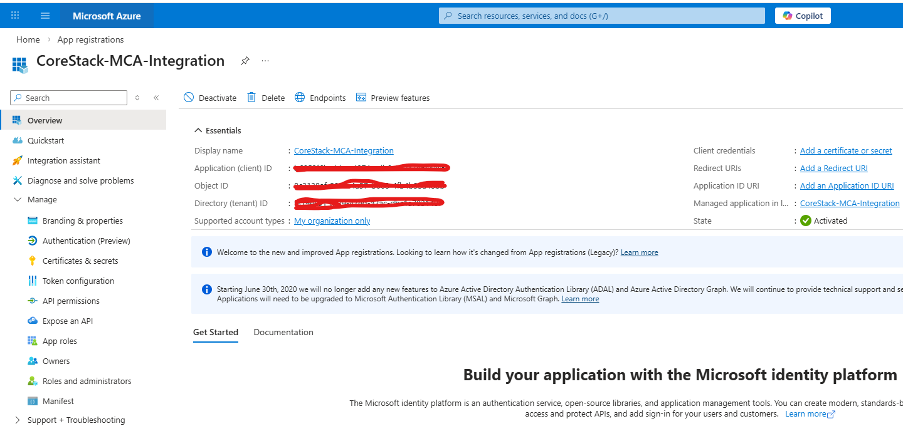
Step 3: Copy the Application (Client) ID and Tenant ID
On the app registration Overview page, copy and save the following values:
- Application (client) ID — this is the Application ID required by CoreStack.
- Directory (tenant) ID — this is the Tenant ID required by CoreStack.
Step 4: Create a Client Secret
CoreStack requires a client secret to authenticate using the service principal.
-
In the app registration, click Certificates & secrets in the left navigation pane.
-
Under the Client secrets tab, click + New client secret.
-
Enter a description (for example,
CoreStack MCA Secret) and select an expiration period.Important: Note the expiration date. You must rotate the secret in both Azure and CoreStack before it expires to avoid authentication failures.
-
Click Add.
-
Immediately copy the Value of the newly created secret. This value is only visible once.
Warning: Once you navigate away from this page, the secret value is no longer visible. Store it securely before proceeding.

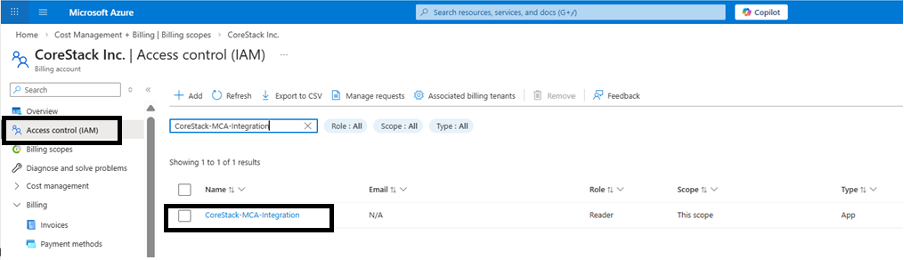
Step 5: Assign Billing Account Reader Permission to the Service Principal
CoreStack requires the service principal to have Billing Account Reader access at the MCA billing account scope. This allows CoreStack to read billing profiles, invoice sections, and subscription data.
Note: For billing profiles that sync through hierarchy sync, the service principal must also have Billing Admin Reader permissions at the billing account scope. Without this, zero-cost billing profiles may fail to sync, leading to incomplete billing data in CoreStack.
- In the Azure portal, go to Cost Management + Billing.
- Select your MCA Billing account from the Billing scopes list.
- In the left navigation pane, click Access control (IAM).
- Click + Add and select Add role assignment.
- In the Role dropdown, select Billing account reader.
- Under Select members, search for the name of the app registration you created in Step 2 (for example,
CoreStack-MCA-Integration) and select it. - Click Save.
Step 6: Set Up Cost Export to Azure Blob Storage
CoreStack requires billing cost data to be exported to an Azure Blob Storage container. You must configure exports for both Actual Cost and Amortized Cost.
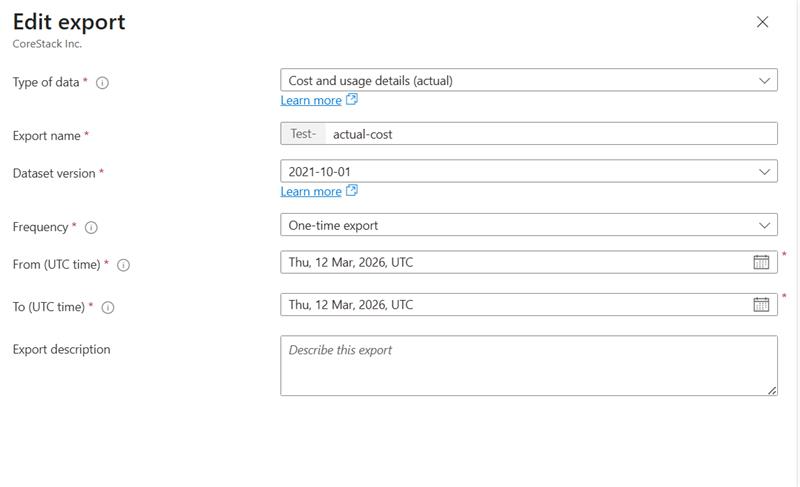
Note: To export cost data for previous months, the export must be configured with the “One-time export” frequency at the time of creation. This export is required to run for a minimum duration of three months and can be extended beyond this period if necessary.
Step 6a: Create or Identify a Storage Account
- In the Azure portal, search for Storage accounts and open it.
- Either select an existing storage account or create a new one in the same region as your billing data.
- Note the Storage account name and Subscription it belongs to — these are required during CoreStack onboarding.
Step 6b: Create a Blob Container
- Open your storage account.
- In the left navigation pane, click Containers.
- Click + Container and provide a name (for example,
corestack-mca-exports). - Set the Public access level to Private (no anonymous access).
- Click Create.
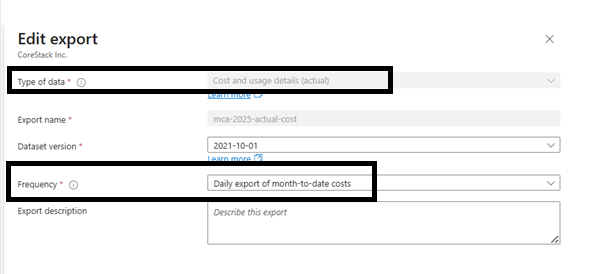
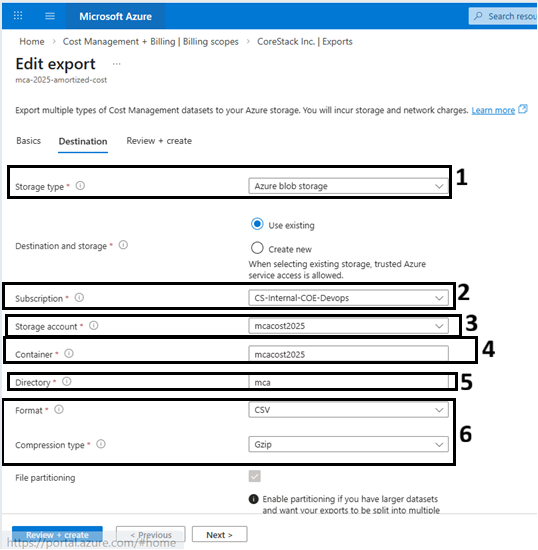
Step 6c: Configure the Actual Cost Export
- In the Azure portal, go to Cost Management + Billing.
- Select your MCA billing account.
- In the left navigation pane, click Cost Management > Exports.
- Click + Add.
- Fill in the following fields:
| Field | Value |
|---|---|
| Export type | Daily export of month-to-date costs |
| Metric | Actual cost (Usage and Purchases) |
| Export name | CoreStack-Actual-Cost (or similar) |
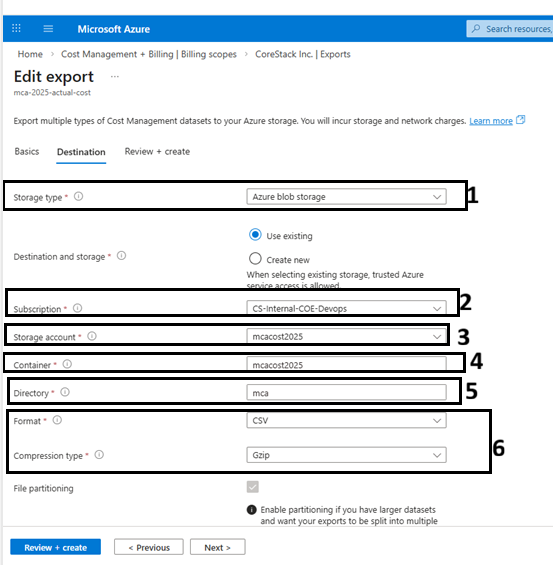
| Storage subscription | Select the subscription with your storage account |
| Storage account | Select the storage account from Step 6a |
| Container | Select the container from Step 6b |
| Directory | Enter a path (for example, actual) |
- Click Create.
- Note the full container path (for example,
corestack-mca-exports/actual) — this is the Actual Cost Path required during CoreStack onboarding.
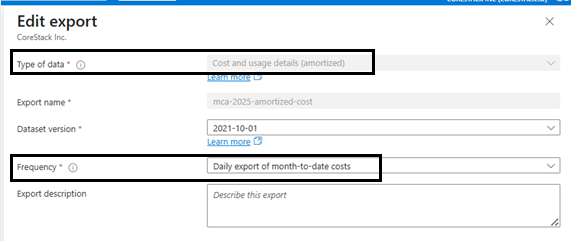
Step 6d: Configure the Amortized Cost Export
- Repeat the export creation steps above.
- This time, set Metric to Amortized cost (Usage and Purchases).
- Use a different directory path (for example,
amortized). - Click Create.
- Note the full container path (for example,
corestack-mca-exports/amortized) — this is the Amortized Cost Path required during CoreStack onboarding.
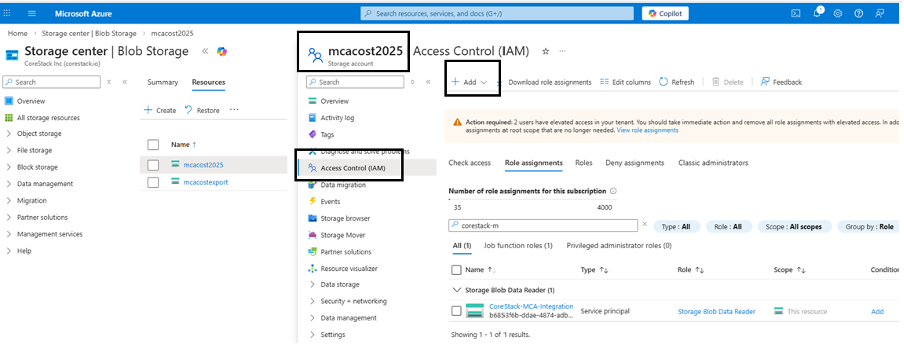
Step 7: Grant Storage Blob Data Reader Access to the Service Principal
CoreStack's service principal must be able to read the exported cost files from the Blob Storage container.
- In the Azure portal, open your Storage account.
- In the left navigation pane, click Access control (IAM).
- Click + Add > Add role assignment.
- Select the role Storage Blob Data Reader.
- Under Select members, search for your app registration (for example,
CoreStack-MCA-Integration) and select it. - Click Save.
Summary: Values to Collect for CoreStack Onboarding
Before starting the MCA onboarding workflow in CoreStack, confirm you have collected all of the following values:
| Field Required in CoreStack | Where to Find It |
|---|---|
| Billing Account ID | Azure portal > Cost Management + Billing > Properties |
| Tenant ID | Azure AD > App registrations > Overview |
| Application ID | Azure AD > App registrations > Overview |
| Application Secret | Azure AD > App registrations > Certificates & secrets (copy on creation) |
| Subscription | Azure portal > Subscriptions |
| Storage Account | Azure portal > Storage accounts |
| Actual Cost Path | Container path used when creating the Actual Cost export |
| Amortized Cost Path | Container path used when creating the Amortized Cost export |
Note: Use the following script to execute cost exports for both Actual Cost and Amortized Cost, covering the required number of previous months. Additionally, ensure that daily cost exports for the current month are scheduled to run automatically.
Function intVariables(){

    #Initialize variables
    $variables = @{
        NoOfMonths = '12'                                        #mention the Number months for which export has to be executed.
        costtype = 'ActualCost'                                  #change type of dataset for cost export 'ActualCost' or 'AmortizedCost'
        billingNum = 'xxxxxxxx'                                  #enter the billing ID of the MCA parent subscription
        subsId = 'xxxxxxxx-xxxx-xxxx-xxxx-xxxxxxxxxxxx'          #enter the subscription Id where storage account is created
        rgName = 'xxxxxxxxxxxxxxxx'                              #enter the resource group name for/of the storage account
        saName = 'xxxxxxxxxxxxxxxxx'                            #enter the name for/of the storage account
        containerName = 'cscostcontainer'                        #enter the name of the blob or container
    }
    return $variables
}

Function registerAndInstall(){

    #Register the resource provider
    $i=1;
    $RegPro = Register-AzResourceProvider -ProviderNamespace Microsoft.CostManagementExports -ErrorAction Stop
    while($i -ge 1){
        $Reg = Get-AzResourceProvider -ProviderNamespace Microsoft.CostManagementExports
        if($Reg.RegistrationState -eq 'Registered'){
            $i = 0;
            Write-Output $Reg.RegistrationState
        }elseif($Reg.RegistrationState -eq 'Registering'){
            $i++
        }else{
            $i = 0;
            Write-Output $Reg.RegistrationState
            Exit
        }
    }
}

Function exportCost(){

    param(
        [Parameter(Mandatory=$true)]
        $month,
        [Parameter(Mandatory=$true)]
        [String]$expName,
        [Parameter(Mandatory=$true)]
        [String]$RecSchedule
        )
    $exValues = intVariables

    $date = (Get-Date).AddMonths(-$month)
    $dates = @{}
    $dates.firstDay = Get-Date -Year $date.Year -Month $date.Month -Day 1 -Hour 0 -Minute 0 -Second 0 -Format "yyyy-MM-ddTHH:mm:ssZ"
    $dates.lastDay = (Get-Date -Year $date.Year -Month $date.Month -Day 1 -Hour 0 -Minute 0 -Second 0).AddMonths(1).AddDays(-1).ToString("yyyy-MM-ddTHH:mm:ssZ")
    $dates.fiveYears = (Get-Date).AddYears(5).ToString("yyyy-MM-ddT00:00:00Z")
    $dates.today = (Get-Date).AddMonths(-$month).ToString("yyyy-MM-ddT00:00:00Z")

    $e = 1
    if($RecSchedule -eq 'Daily'){
        $details = @{
          Name = $expName
          DefinitionType = $exValues.costtype
          Scope = 'providers/Microsoft.Billing/billingAccounts/' + $exValues.billingNum
          DestinationResourceId = '/subscriptions/' + $exValues.subsId + '/resourceGroups/' + $exValues.rgName + '/providers/Microsoft.Storage/storageAccounts/' + $exValues.saName
          DestinationContainer = $exValues.containerName
          DefinitionTimeframe = 'MonthTodate'
          ScheduleRecurrence = $RecSchedule
          RecurrencePeriodFrom = $dates.today
          RecurrencePeriodTo = $dates.fiveYears
          ScheduleStatus = 'Active'
          DestinationRootFolderPath = 'csdirectory'
          Format = 'Csv'
        }
    }elseif($RecSchedule -eq 'Custom'){
        $details = @{
          Name = $expName
          DefinitionType = $exValues.costtype
          Scope = 'providers/Microsoft.Billing/billingAccounts/' + $exValues.billingNum
          DestinationResourceId = '/subscriptions/' + $exValues.subsId + '/resourceGroups/' + $exValues.rgName + '/providers/Microsoft.Storage/storageAccounts/' + $exValues.saName
          DestinationContainer = $exValues.containerName
          DefinitionTimeframe = $RecSchedule
          TimePeriodFrom = $dates.firstDay
          TimePeriodTo = $dates.lastDay
          DestinationRootFolderPath = 'csdirectory'
          Format = 'Csv'
        }
    }
    $createExport = New-AzCostManagementExport @details
    $invokeExport = Invoke-AzCostManagementExecuteExport -ExportName $details.Name -Scope $details.Scope
}

Function checkCost(){
    param(
        [Parameter(Mandatory=$true)]
        [String]$expName
        )
    $ckValues = intVariables
    $details = @{
        Name = $expName
        Scope = 'providers/Microsoft.Billing/billingAccounts/' + $ckValues.billingNum
    }
    $j=1
    while($j -ge 1){
        $checkExportStatus = ''
        $checkExportStatus = Get-AzCostManagementExportExecutionHistory -ExportName $details.Name -Scope $details.Scope
        if($checkExportStatus[0].Status -eq 'Completed'){
            $j = 0;
            Write-Output $checkExportStatus[0].Status
        }elseif($checkExportStatus[0].Status -eq 'InProgress'){
            $j++
        }else{
            $j = 0;
            Write-Output $checkExportStatus[0].Status
            Exit
        }
    }
}

Function copyFiles(){
    param(
        [Parameter(Mandatory=$true)]
        [String]$source,
        [Parameter(Mandatory=$true)]
        [String]$destination

        )

    $cpValues = intVariables
    $details = @{
        Name = $source
        Scope = 'providers/Microsoft.Billing/billingAccounts/' + $cpValues.billingNum
    }
    $remove = Remove-AzCostManagementExport -Name $details.Name -Scope $details.Scope

    #copy directory in storage accounts
    $cpkey = Get-AzStorageAccountKey -ResourceGroupName $cpValues.rgName -Name $cpValues.saName | Where-Object {$_.KeyName -eq "key1"}
    $cpctx = New-AzStorageContext -StorageAccountName $cpValues.saName -StorageAccountKey $cpkey.Value
    $sourceDirectory = "csdirectory/" + $source +"/"
    $blobs = Get-AzStorageBlob -Container $cpValues.containerName -Context $cpctx | Where-Object { $_.Name -like "$sourceDirectory*" }
    $destinationDirectory = "csdirectory/" + $destination +"/"

    foreach ($blob in $blobs) {
        $newBlobName = $blob.Name -replace "^$sourceDirectory", $destinationDirectory
        $copy = Start-AzStorageBlobCopy -SrcBlob $blob.Name -SrcContainer $cpValues.containerName -Context $cpctx -DestBlob $newBlobName -DestContainer $cpValues.containerName -DestContext $cpctx -ErrorAction Stop
        $remove = Remove-AzStorageBlob -Blob $blob.Name -Container $cpValues.containerName -Context $cpctx
    }
}

Function Main(){

    $log = @()
    $expnames = @()
    $mValues = intVariables
    [int]$j = $mValues.NoOfMonths

    $Ins = Install-Module Az.CostManagement -Force
    Start-Sleep -Seconds 90
    $Inp = Import-Module Az.CostManagement -Force
    Start-Sleep -Seconds 30

    Select-AzSubscription -Subscription $mValues.subsId

    $RegOut = registerAndInstall
    $date = Get-date -Format dd-MM-yy:hh:mm:ss
    $log += $date + " : Register opertation has been completed"
    $log | Select-Object -Last 1

    if($RegOut -eq 'Registered'){
        for($i=1;$i -le $j;$i++){
            if($mValues.costtype -eq "AmortizedCost"){
                $exp = "cscostexportAmortized"+$i
            }elseif($mValues.costtype -eq "ActualCost"){
                $exp = "cscostexportActual"+$i
            }
            $expnames += $exp
            $expCost = exportCost -expName $exp -month $i -RecSchedule "Custom"
            $date = Get-date -Format dd-MM-yy:hh:mm:ss
            $log += $date + " : Export has been started for " + $exp + " " + $expCost
            $log | Select-Object -Last 1
            Start-Sleep -Seconds 10
        }

        if($mValues.costtype -eq "AmortizedCost"){
            $curexp = "cscostexportAmortized"
        }elseif($mValues.costtype -eq "ActualCost"){
            $curexp = "cscostexportActual"
        }
        $expCost = exportCost -expName $curexp -month '0' -RecSchedule "Daily"
        $date = Get-date -Format dd-MM-yy:hh:mm:ss
        $log += $date + " : Export has been started for " + $curexp + " " + $expCost
        $log | Select-Object -Last 1
    }else{
        $date = Get-date -Format dd-MM-yy:hh:mm:ss
        $log += $date + " : please check the registration of resource provider"
        $log | Select-Object -Last 1
    }
    foreach($expname in $expnames){
        $check = checkCost -expName $expname
        if($check -eq 'Completed'){
            $date = Get-date -Format dd-MM-yy:hh:mm:ss
            $log += $date + " : Export opertation has been completed for " + $expname
            $log | Select-Object -Last 1
            copyFiles -source $expname -destination $curexp
            $date = Get-date -Format dd-MM-yy:hh:mm:ss
            $log += $date + " : Copy opertation has been completed and export has been deleted for " + $expname
            $log | Select-Object -Last 1
        }elseif($check1 -eq 'Failed'){
            $date = Get-date -Format dd-MM-yy:hh:mm:ss
            $log += $date + " : Export opertation has been Failed for " + $expname
            $log | Select-Object -Last 1
        }
    }
    $log | Out-File -FilePath .\log.txt
}
Main
References:
Once account discovery is complete, please follow the steps outlined in the link below to proceed with onboarding child accounts: https://docs.corestack.io/docs/pre-onboarding-for-azure-subscriptions
Updated 3 months ago