

Tag Governance
Overview
Users with cloud accounts often use metadata to manage various resources. Resources can be managed in the platform with the help of tags. Tags are added to metadata in key-value pair format. The tag keys and tag values are defined by users. It’s important to standardize tag keys and tag values for organizing resources. A group of these standardized tags is known as baseline tags.
Some of the advantages of using tags are operation support, cost allocation, security, access control, resource consistency, and accountability. Tag Governance is important to ensure that any tags defined in your baseline are applied properly to cloud resources.
Applying Tags to a Resource
To apply a tag to resource, there are three steps that need to be followed:
- Add baseline for a scope.
- Select the tag and add value.
- Review tags.
Adding a Baseline
The first step in Tag Governance is to define the baseline for a scope. The baseline is group of standard tags that can be applied to resources within a scope.
To add a baseline, perform the following steps :
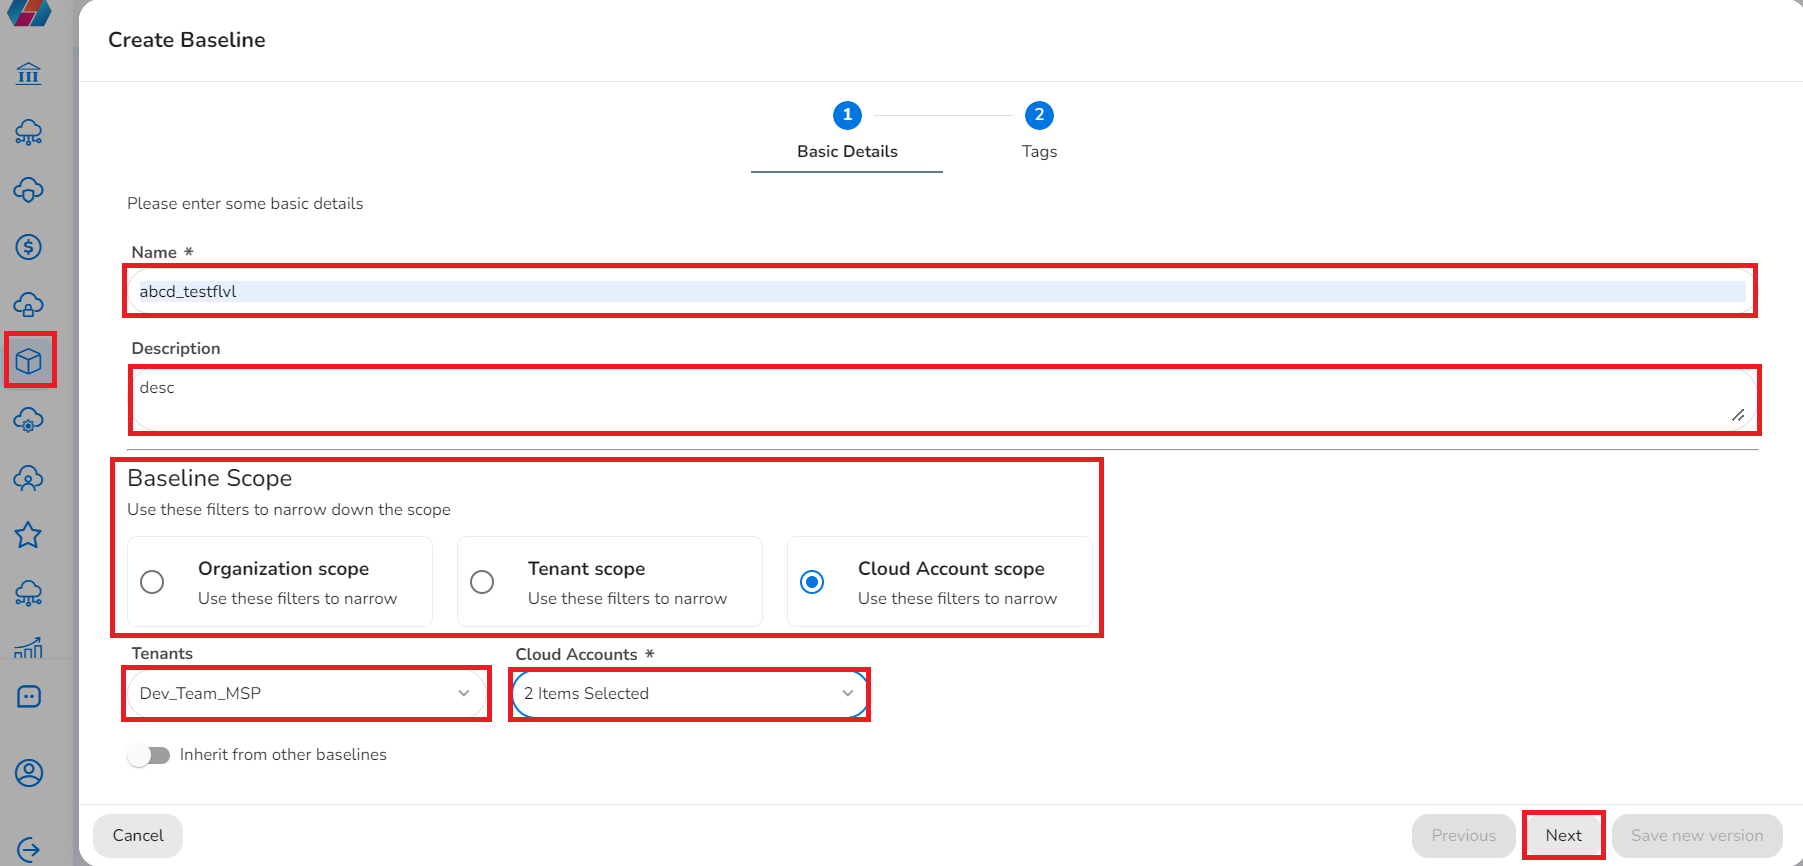
- In the platform, click CloudOps > Cloud Inventory > Tag Governance > Baselines > Create Baseline.
- In the Name box, type the name of the baseline tag and in the Description box, type the baseline tag description.
- In the Baseline Scope field, click to select one option among Organization Scope, Tenant Scope, and Cloud Account Scope.
- Select Organization Scope to set the scope to all cloud accounts within your organization. For this option, nothing else needs to be selected.
- Select Tenant Scope to set the scope to one or more tenants, then select your desired Tenants from the drop-down list that appears and click Ok.
- Select Cloud Account Scope to set the scope to one or more cloud accounts, then select your desired Tenant(s) and Cloud Account(s) from the drop-down lists that appear. After selecting the details, click Ok to confirm your selection.
- To inherit tags from other baselines, click to move the slider to right. This option is only available for Tenant scope and Cloud Account scope.
- Click Next.
Note:
- On the Baselines tab, the list of baselines can be viewed.
- For a particular baseline, in the Actions column, a user can select one option from Edit, View More, and Delete and take appropriate action.
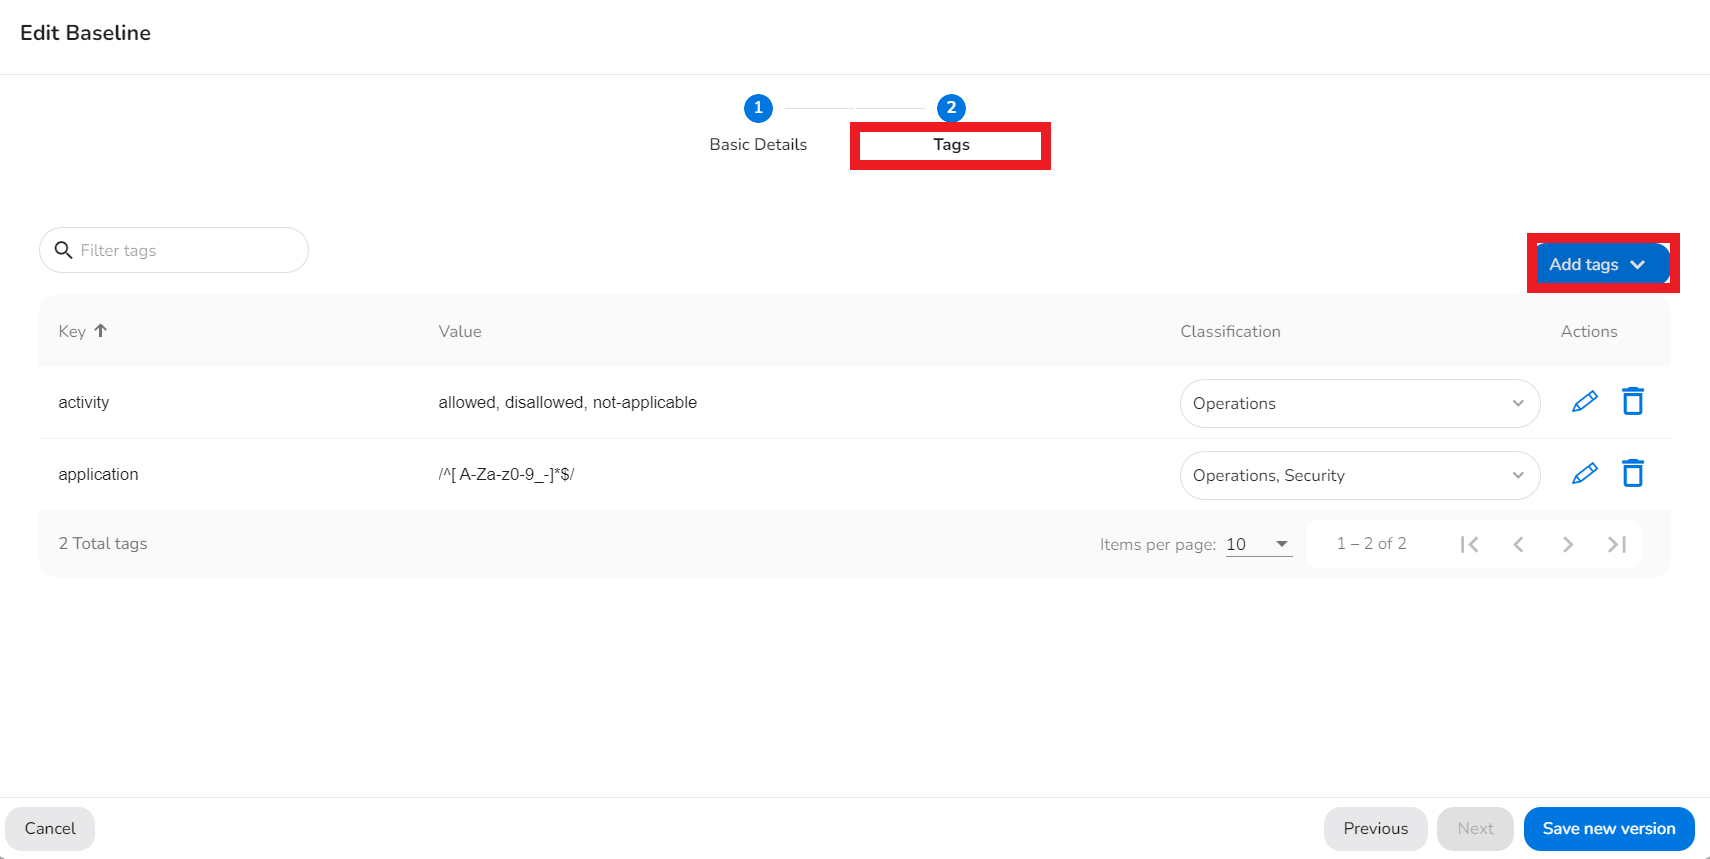
- In the Classification column, users can click the drop-down corresponding to each Key, select all applicable classifications, and click Ok.
Selecting Tag and Adding Values
After a baseline scope is defined for tags, the next step is to select tags and set their values.
There are five sources of tags:
- Available Tags -- Tags that have already been applied to the cloud resources.
- CS Baseline Tags -- Baseline tags recommended by the platform.
- Custom Tags -- Additional tags that can be added by a user (supports OCI Defined Tags).
- Inherited Tags -- Tags that are part of the baseline if there is a baseline defined at higher level (Inherited tags are applied by default and a user cannot select or change these tags).
- AI Generated Tags – These are AI based baseline tags that are generated based on user prompt. Users can also edit the baseline, and they can use/revert the tags generated through AI.
Perform the following steps to apply tags to resources for the scope defined above:
- In the Tags tab, in the Add Tags list, click to select one of the following:
- Add Custom Tag
- Add Existing Tag
- Add CS Baseline Tags
- Add AI Generated Tags
Detailed procedure to add tags is explained in the below topics.
- After adding tags, click Save new version.
Add a Custom Tag
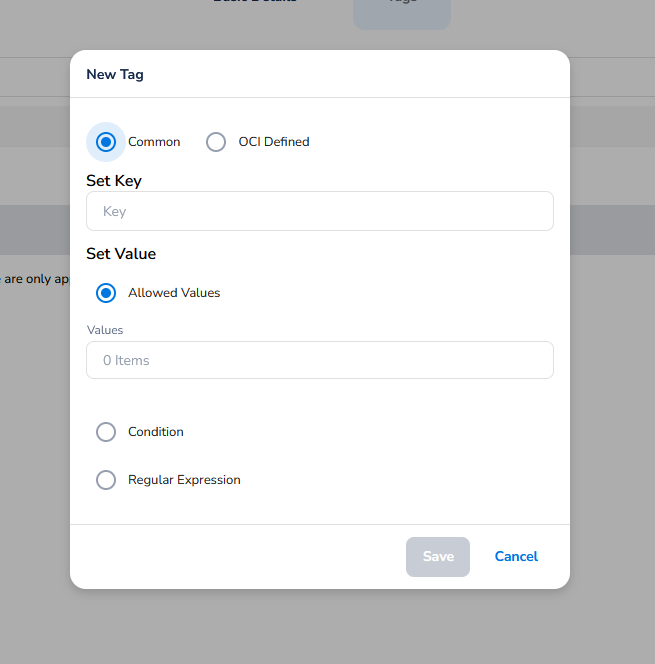
If the user selects Add Custom Tag, the New Tag dialog box will appear, and the user will be presented with two tag options to choose from: Common and OCI Defined.
- Common – Select this option to add a custom tag that is common across most cloud providers (AWS, Azure, OCI, GCP).
- OCI Defined – Select this option to add an OCI Defined tag (this only applies to OCI resources).
When selecting the Common option for a custom tag, you will see the below fields in the New Tag dialogue box.
These same fields will appear for the OCI Defined option as well, with the addition of a field labeled Namespace.
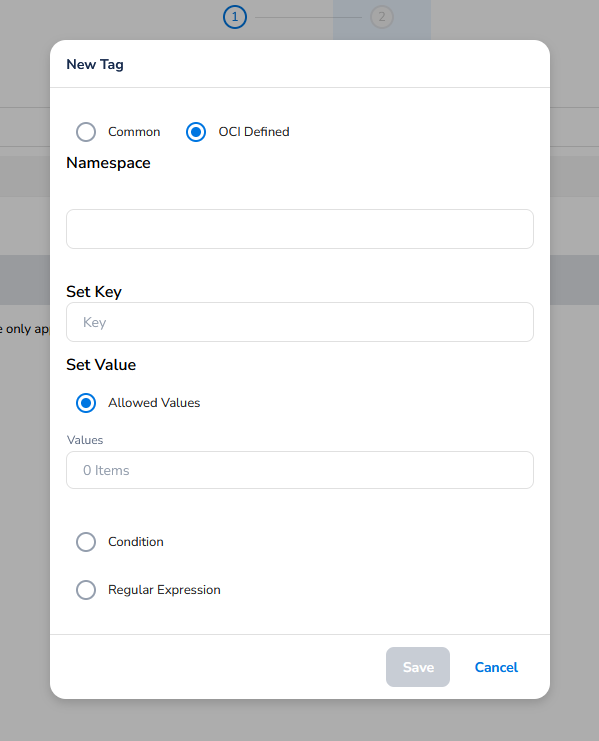
With the exception of the Namespace field, the steps to add a custom tag for either option are the same.
Follow the below steps to add a custom tag:
Namespace
In the Namespace box, type in the name of the OCI namespace you want to use for adding OCI Defined Tags.
Note:The Tag Key and Tag Value for an OCI Defined Tag can be the same as long as they are in different namespaces.
Set Key
In the Set Key box, type the key. Then select one of the following options to add a value, then select Save.
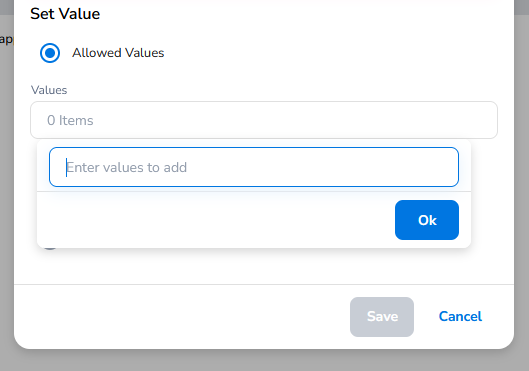
Set Value - Allowed Values
If you select the Allowed Values option, then in the Values box you can type a value and selectOK. Alternatively, you can select an existing value if it appears in the drop-down list.
Set Value - Condition
If you select the Condition option, then you can type values in any of the following boxes to set the conditions for what values will be included for the set tag key:
- Start With
- End With
- Contains

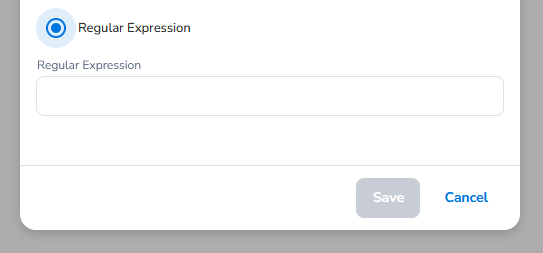
Set Value - Regular Expression
If you select the Regular Expression option, then you can simply type the required expression for the tag value in the Regular Expression box.
Note:Click the pencil icon to edit an existing value and click the search icon to search for a tag.
Add an Existing Tag
If the user selects Add Existing Tag, then the Add Existing Tag dialog box displays. Select the appropriate values in the following fields then click Submit.
- In the Tenant list, click to select a tenant.
- In the Cloud Accounts list, select all applicable cloud accounts and click Ok.
- In the T ag Keylist, click to select an appropriate option.
- In the Tag Valueslist, select all appropriate options and click Ok.
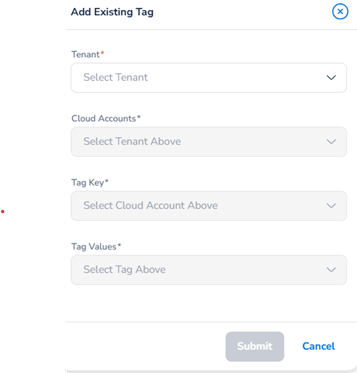
Note:The Add Existing Tag option does not support OCI Defined Tags.
Add CS Baseline Tags
If the user selects Add CS Baseline Tags, then select the appropriate checkboxes and click Submit.
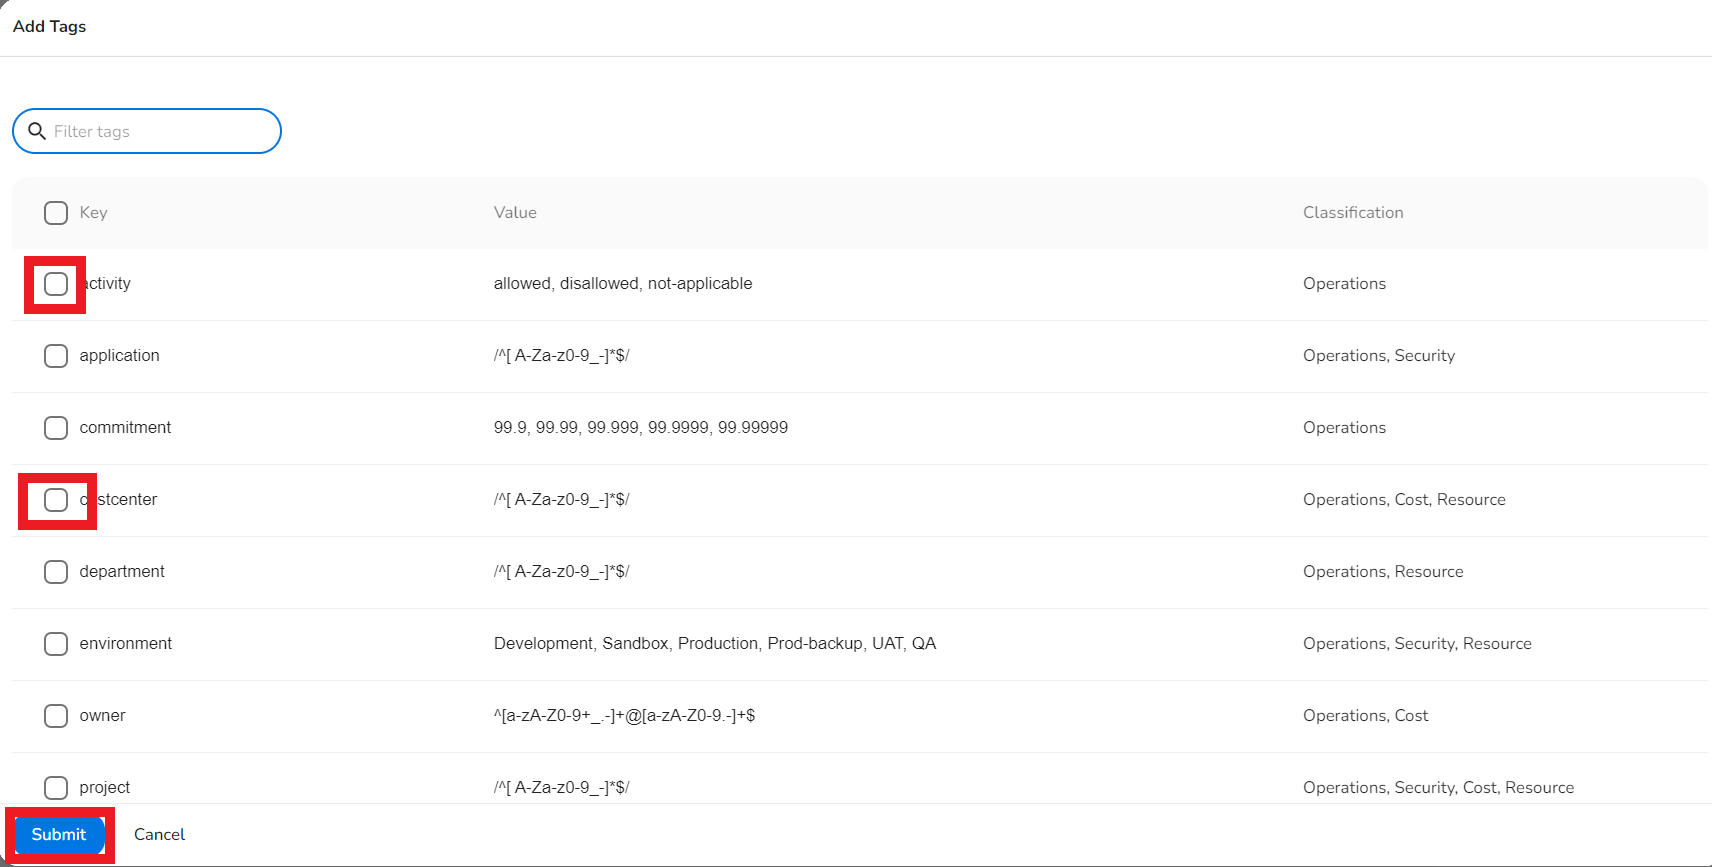
All the keys selected in this procedure are now part of the baseline tags.
Note:The Add CS Baseline Tag option does not support OCI Defined Tags.
Add AI Generated Tags
To add AI generated tags:
-
In the Tags tab, click Add Tags > Add AI Generated Tags. The Generate Tags Using AI dialog box is displayed.
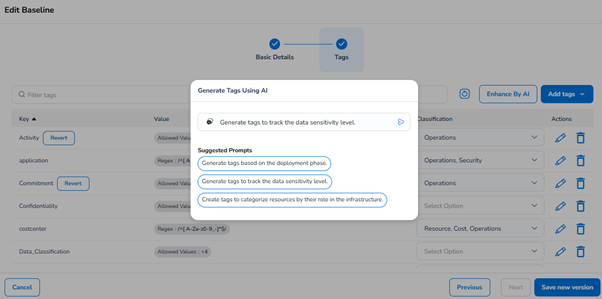
-
From the suggested prompts that are displayed, select a prompt, and click the Add Tags button.
This action adds the tags to the baseline. -
You can edit an existing baseline and then click the Enhance By AI button to enhance the existing tags using AI.
-
If you do not wish to use the AI generated tag for any key, then click Revert to get back the earlier key.
-
If you do not want to use any of the AI generated tags for the baseline and want to get back all the tags that were existing earlier, then click the Revert AI Generated Tags.
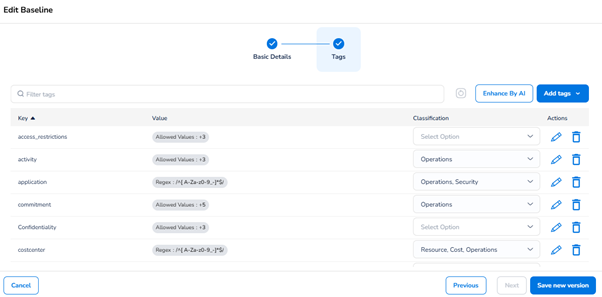
Note:Users can click the edit icon to make updates to an existing tag and key value. The Update dialog box opens where the users can select appropriate options and after adding details, they can click Save.
-
Reviewing Tags
On the Tag Governance screen, users can view two tabs: the Baselines tab and the Tag Posture tab.
Baselines
The Baselines tab shows the available baselines. That is, the list of baselines created, when it was last updated, whether it is active or not, version of the baseline, actions that can be taken on the baseline, etc.
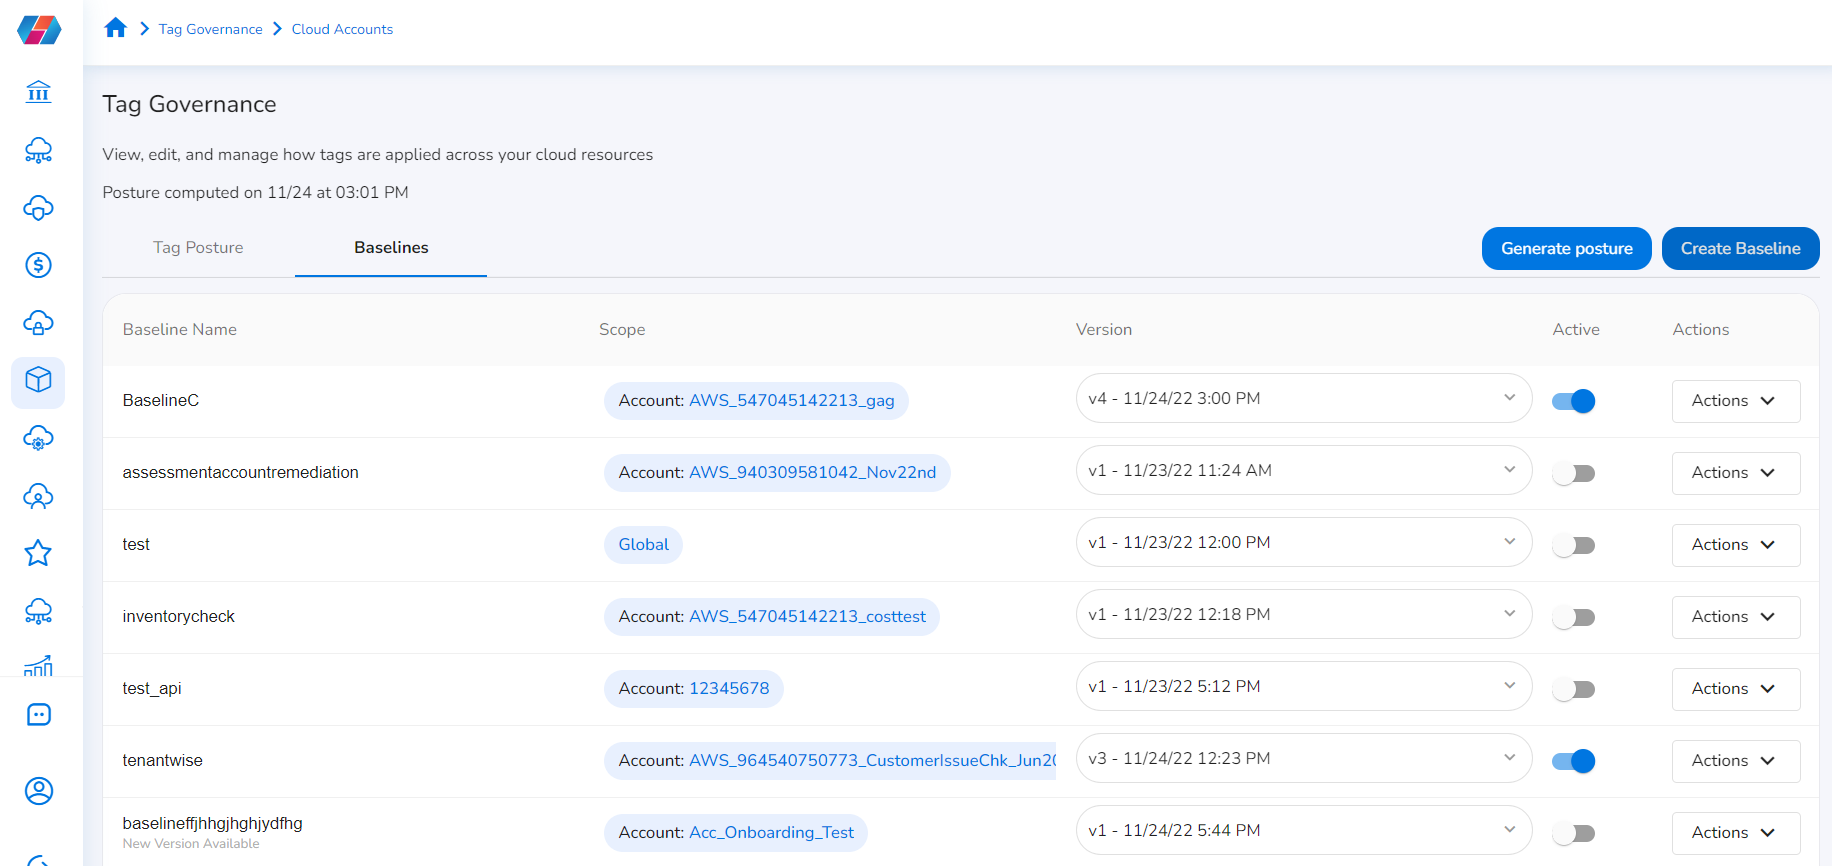
To take an action on a baseline, in the Baselines tab, under the Actions column, click the ellipses corresponding to a baseline name. The actions that can be taken on a baseline are:
- View More: This action can be used to view the Scope and Tags for a baseline.
- Edit: This action can be used to edit and update baseline details. While updating details, users can update details in Basic Details and Tag tabs, and finally click Save new version.
- Delete: This option enables to delete a baseline. After selecting the Delete action, a dialog box appears, and users can select Yes to delete the baseline, else click No.
- View Json: This action opens the View JSON dialog box where users can view the JSON code for a baseline. Users can click the Download icon to download the JSON codes and they can click the Copy icon to copy the JSON code to the clipboard.
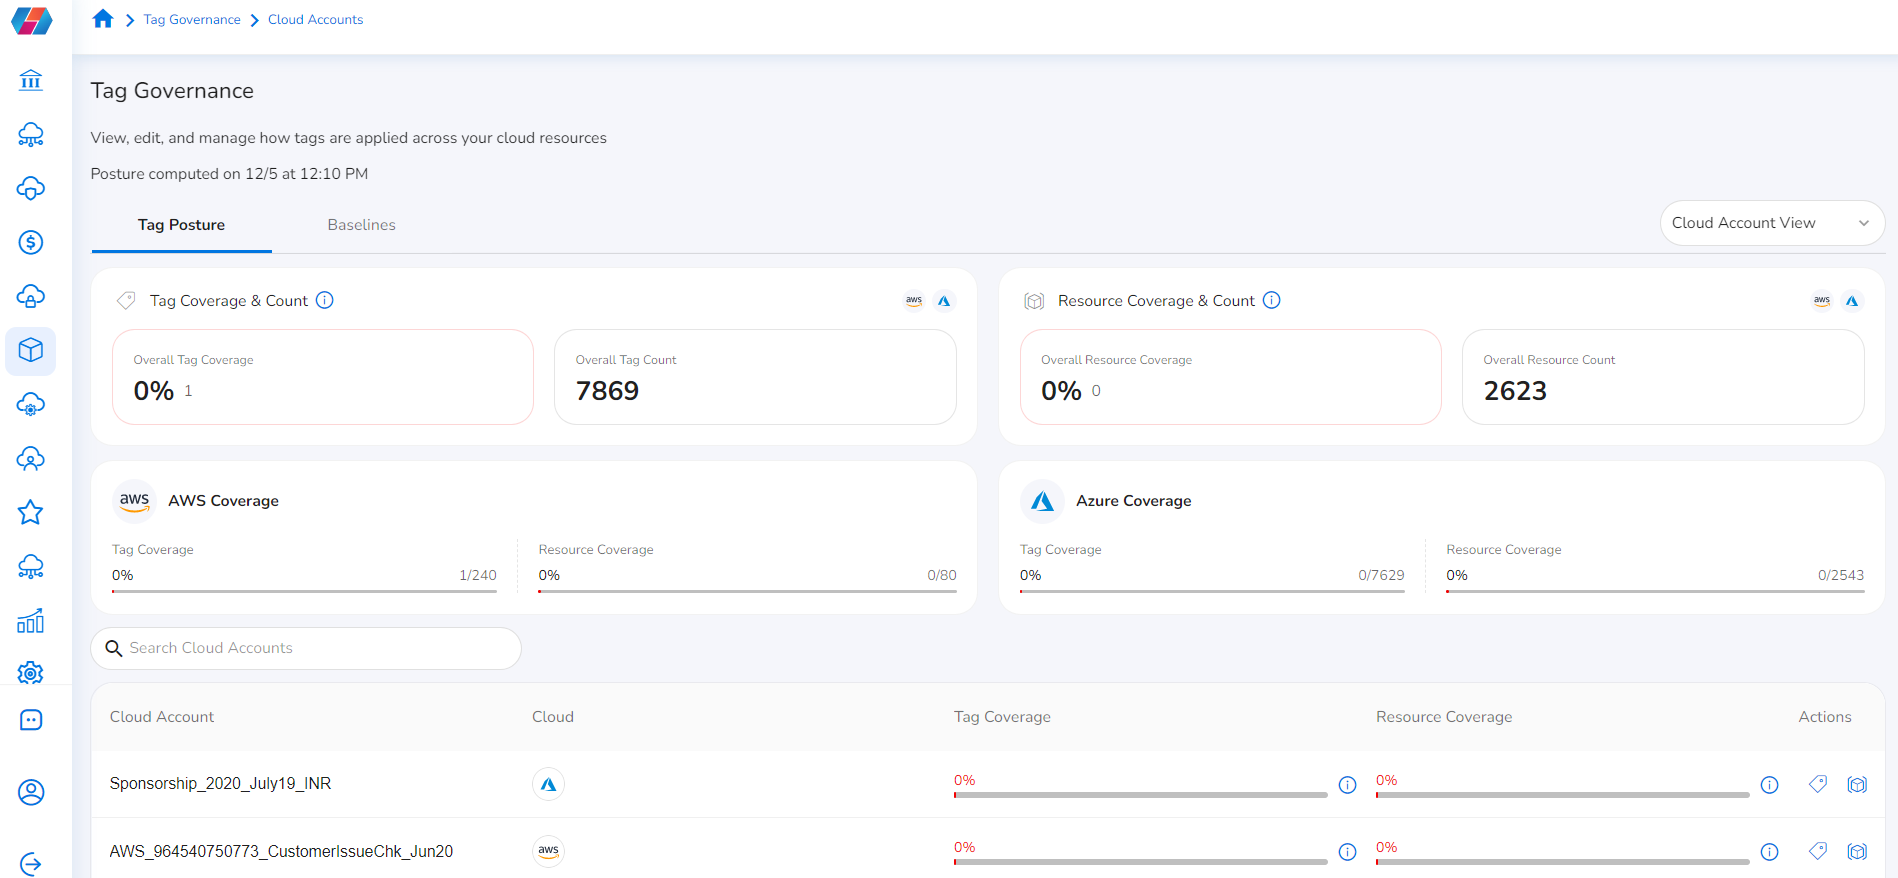
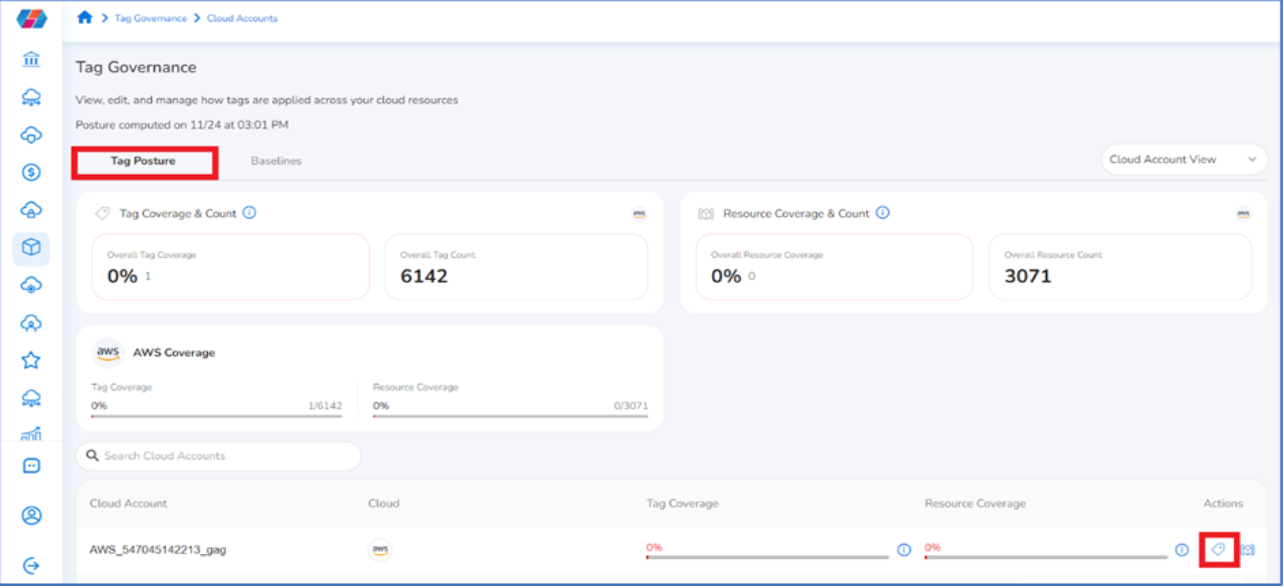
Tag Posture
The Tag Posture tab displays the details about tag coverage, resource coverage, and their respective counts – organized by cloud provider.
Users can click Generate Posture to generate or update tag posture. Users need to refer to this screen to find out about gaps in tag coverage and resource coverage.
After the gaps are identified, users can add the missing tag keys or values to improve coverage. This screen also shows the percentage of tag coverage and resource coverage.
View Tag Coverage Details
Perform the following steps to view coverage details:
- On the Tag Governance screen, select the Tag Posture tab.
Users can view Tag Coverage & Count as well as Resource Coverage & Count, and they can also view account-specific Tag Coverage and Resource Coverage. - For a particular cloud account, below Actions, select the tag icon to open the Tag View or select the resource icon to open the Resource View.
Users can then view the following details:
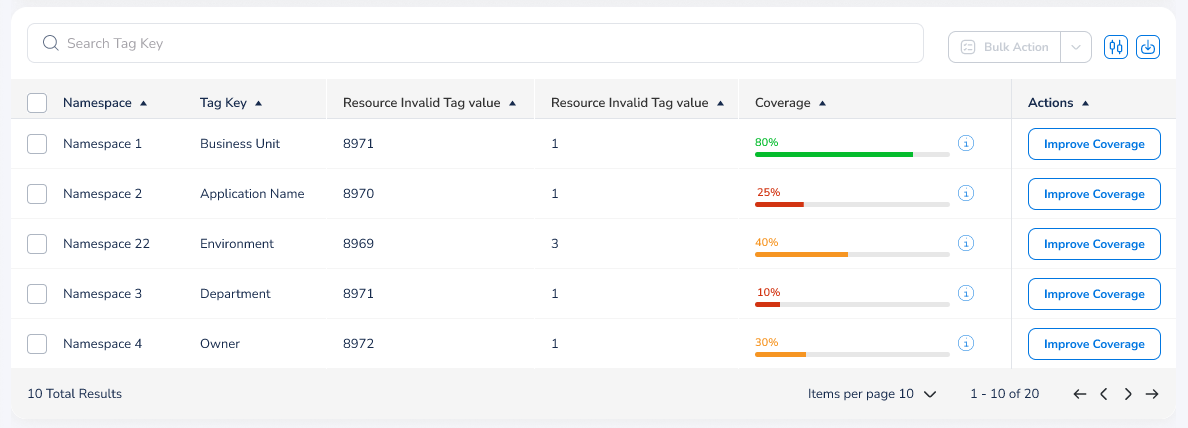
Tag View
The Tag Viewtab shows Tag Coverage, Missing Tag Keys, and Invalid Tag Values. Users can also see details in tabular format.
- Namespace: This column shows the name of the OCI namespace, if relevant (only applies OCI Defined Tags).
- Tag Key: This column shows the tag keys defined for a baseline.
- Resources Missing Tag Key: This column lists the number of resources that have missing tag keys.
- Resources Invalid Tag Value: This column lists the number of resources that have incorrect tag values.
- Coverage: This shows the coverage percentage.
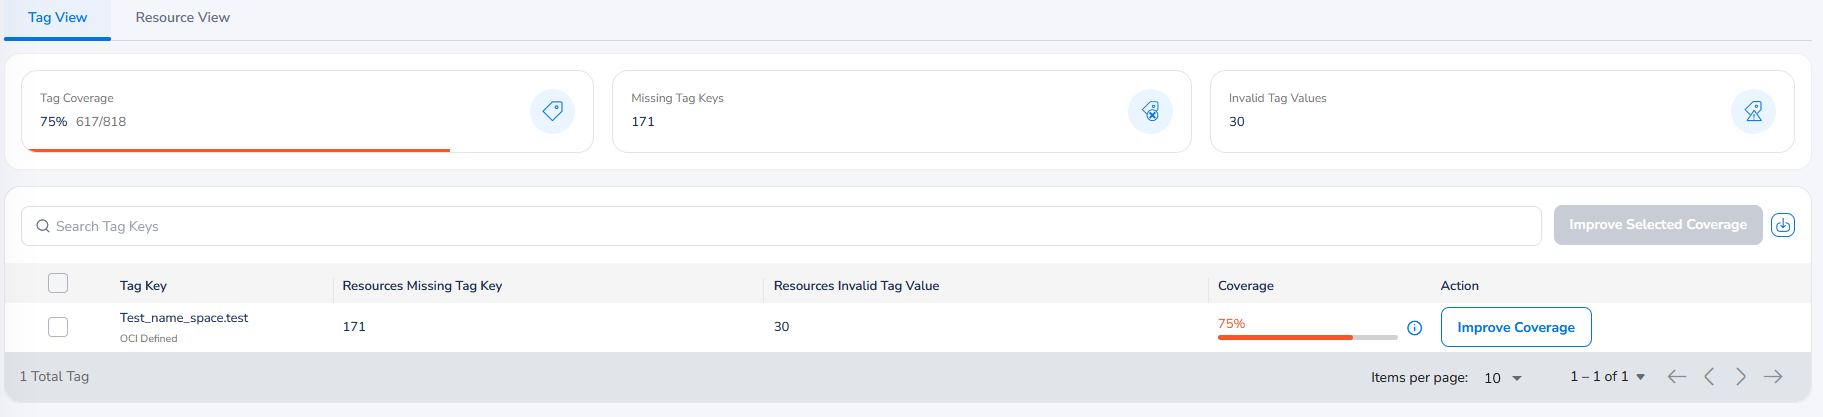
Pictured: Same view featuring the 'Namespace' column for OCI Defined Tags.
Resource View
The Resource View tab shows Resource Coverage, Missing Tag Keys, and Invalid Tag Values.
- This tab displays details in tabular format and users can click View Coverage to see the coverage details.
- As of release 5.0, the Resource View includes a tooltip that provides details on the specific missing keys and invalid values. Additionally, these details are incorporated into CSV exports for better accessibility.
Resource View Filters
You can use filters on the Resource View page to sort the table of resources by various parameters and view specific resources based on your needs.
Filters can be applied by selecting ADD+ above the table view on the Tag Governance > Resource View page.
Currently the following filters are available as part of the Tag Governance > Resource View page:
- Billable: Sorts resources by whether they are considered part of cloud billing, or not considered part of cloud billing.
- Category: Sorts resources by the selected resource category/categories (e.g. Networking, Compute).
- Region: Sorts resources by the selected region(s) (e.g. global, east-us-1).
- Resource: Sorts resources by the selected object-level type it is (e.g. Alarm, Container)
- Resource Type: Sorts resources by the selected product-level type it is (e.g. CloudFront, EC2)
- Supports Remediation: Sorts resources by whether remediation support is available.
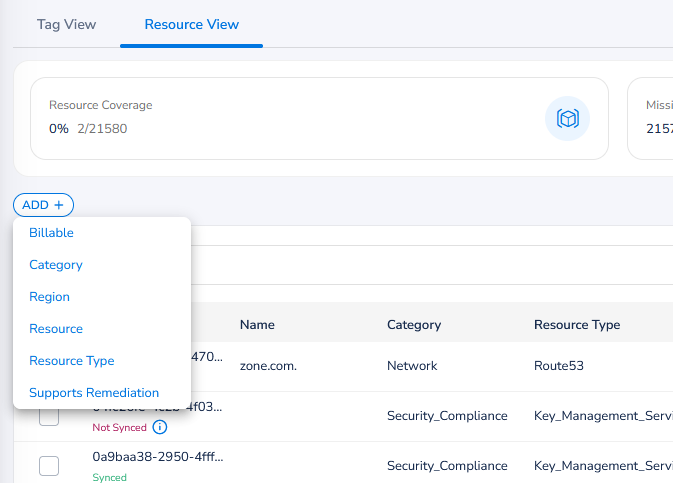
Once you've selected a filter, it will appear above the table view. Select the filter again to choose which value you want to filter for.
For example, in the image below, the Billable filter has been applied, for which the available values are True or False. By selecting True, this filtered view will now show the available resources with tags that are considered part of cloud billing.
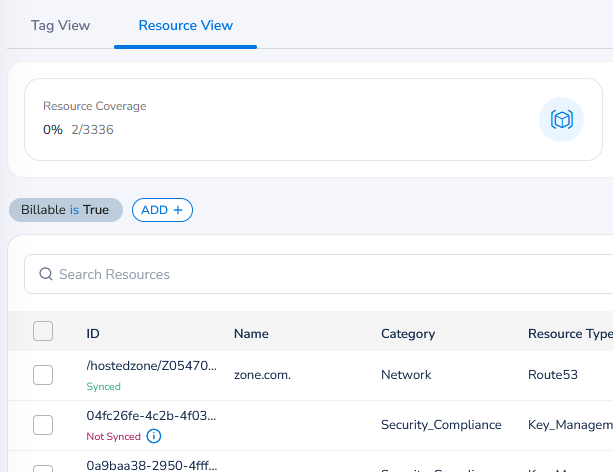
You can select the small 'X' icon that appears in the top-right corner of an active filter to remove it.
Tag Remediation
To remediate issues with your tag coverage, select the Tag View tab and select a tag key from the table view, then select Improve Coverage under the Actions column.
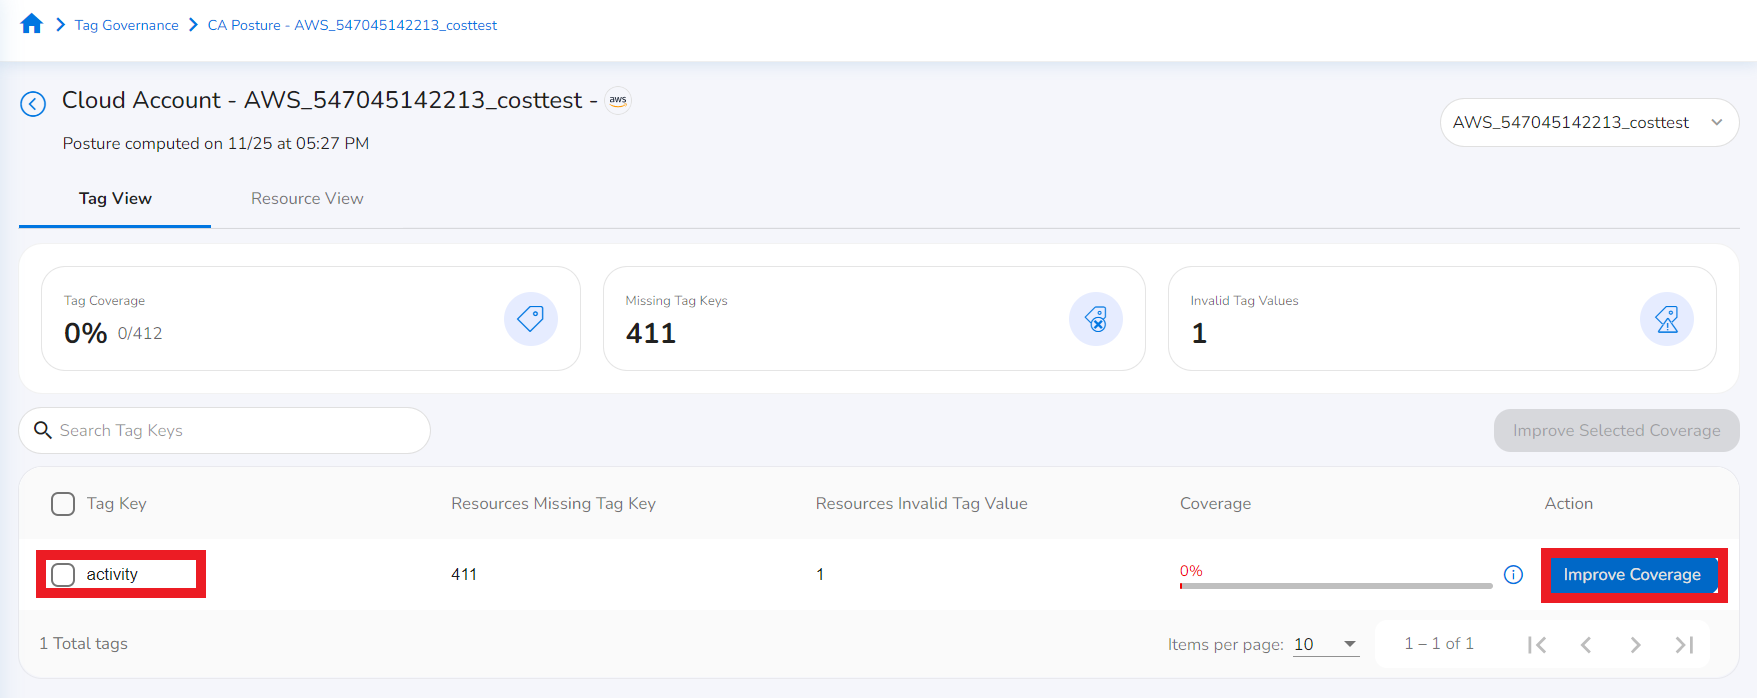
The Tag Remediation screen will be displayed.
The resource name, resource type, coverage status, and key values, etc., for a baseline are displayed. Users can view the Resource Coverage status bar that shows the dynamic progress in percentage of the resource coverage.
Note:Alternatively, on the Resource View tab, users can select a resource and click View Coverage to view the coverage details. On the Resource Remediation screen, if the Improve Coverage button is active, then users can add a value for the tag and improve the coverage.
Users can view the Tag Coverage status bar that shows the dynamic progress in percentage of the resource coverage.
On the Tag Remediation screen, select Improve Coverage corresponding to a resource.
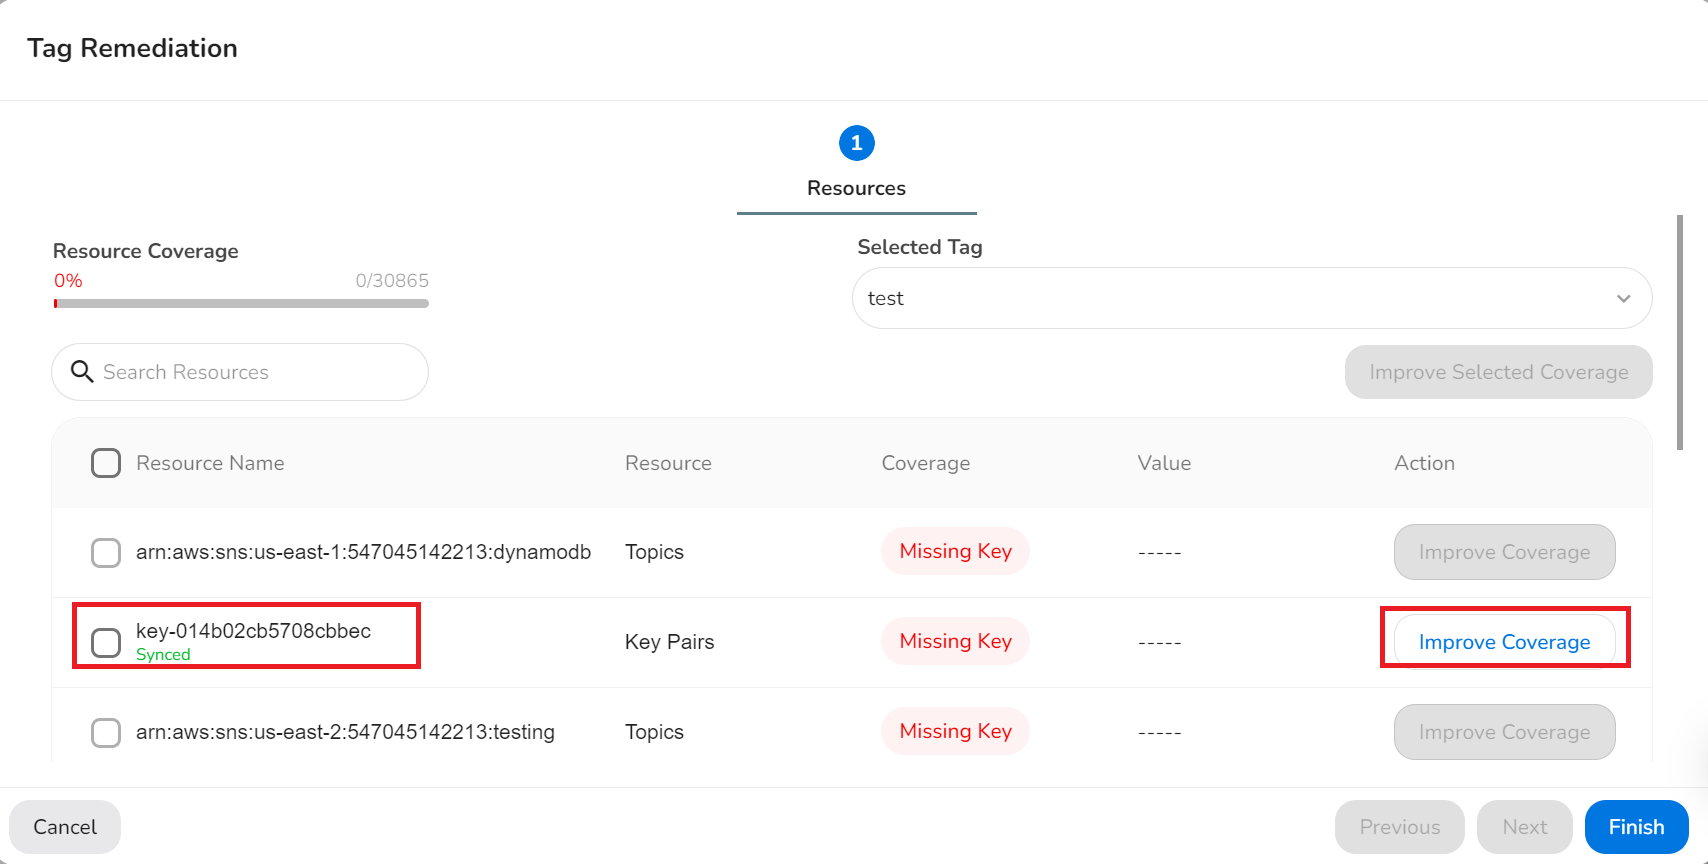
Note:If the Improve Coverage button is disabled or grayed out, then no action can be taken.
Users can click the Resource Name check box to select all the listed resources and then select Improve Selected Coverage to improve coverage. The resources for which Improve Coverage button is greyed out are not considered for improving coverage.
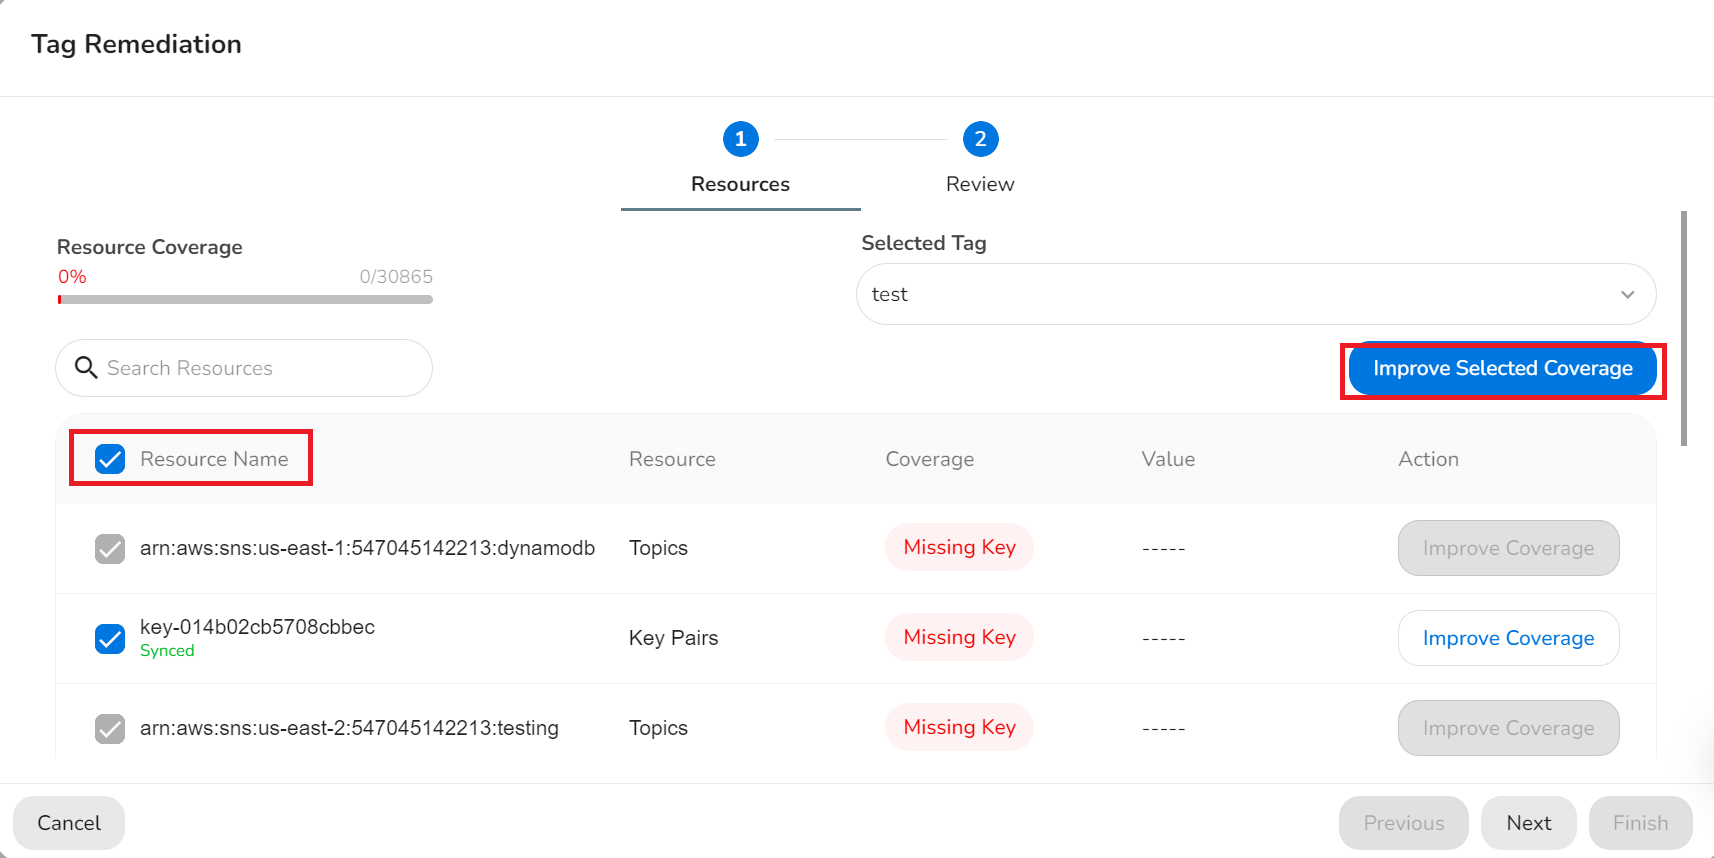
Users can also select check boxes corresponding to particular resources for which coverage needs to be improved and then select Improve Selected Coverage.
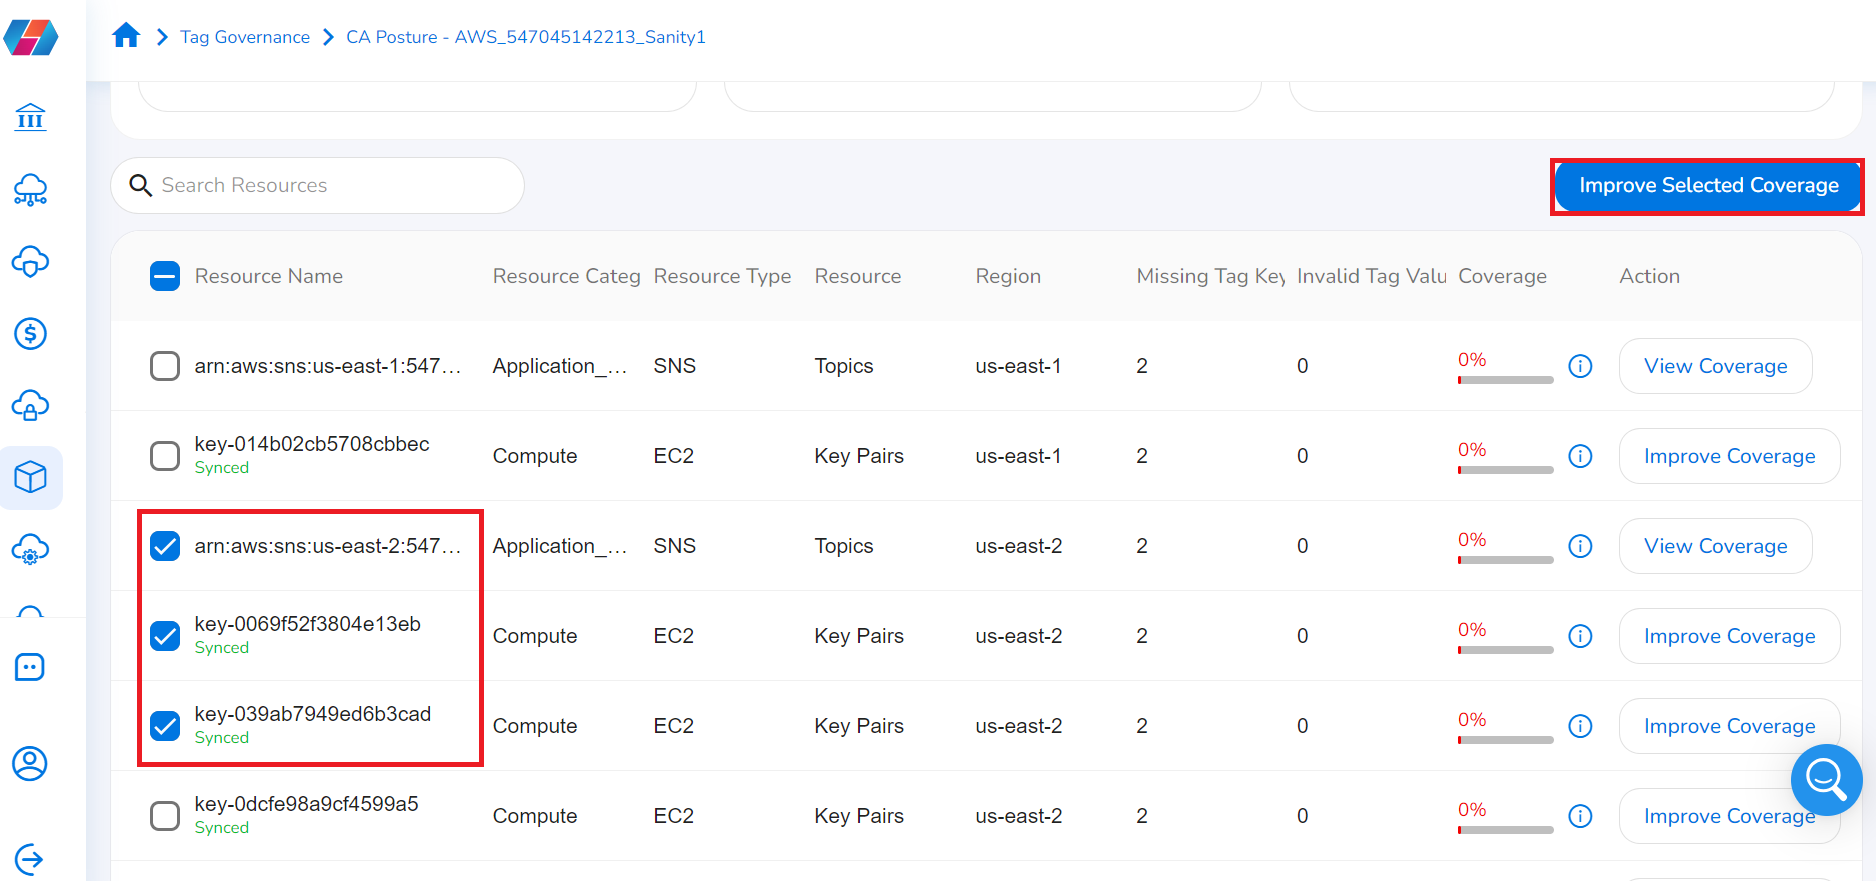
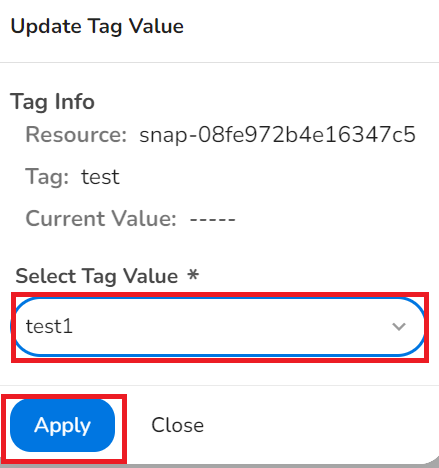
To take remediation steps, in the Update Tag Value dialog box, in the Select Tag Value list, select an appropriate value as per baseline, and click Apply.
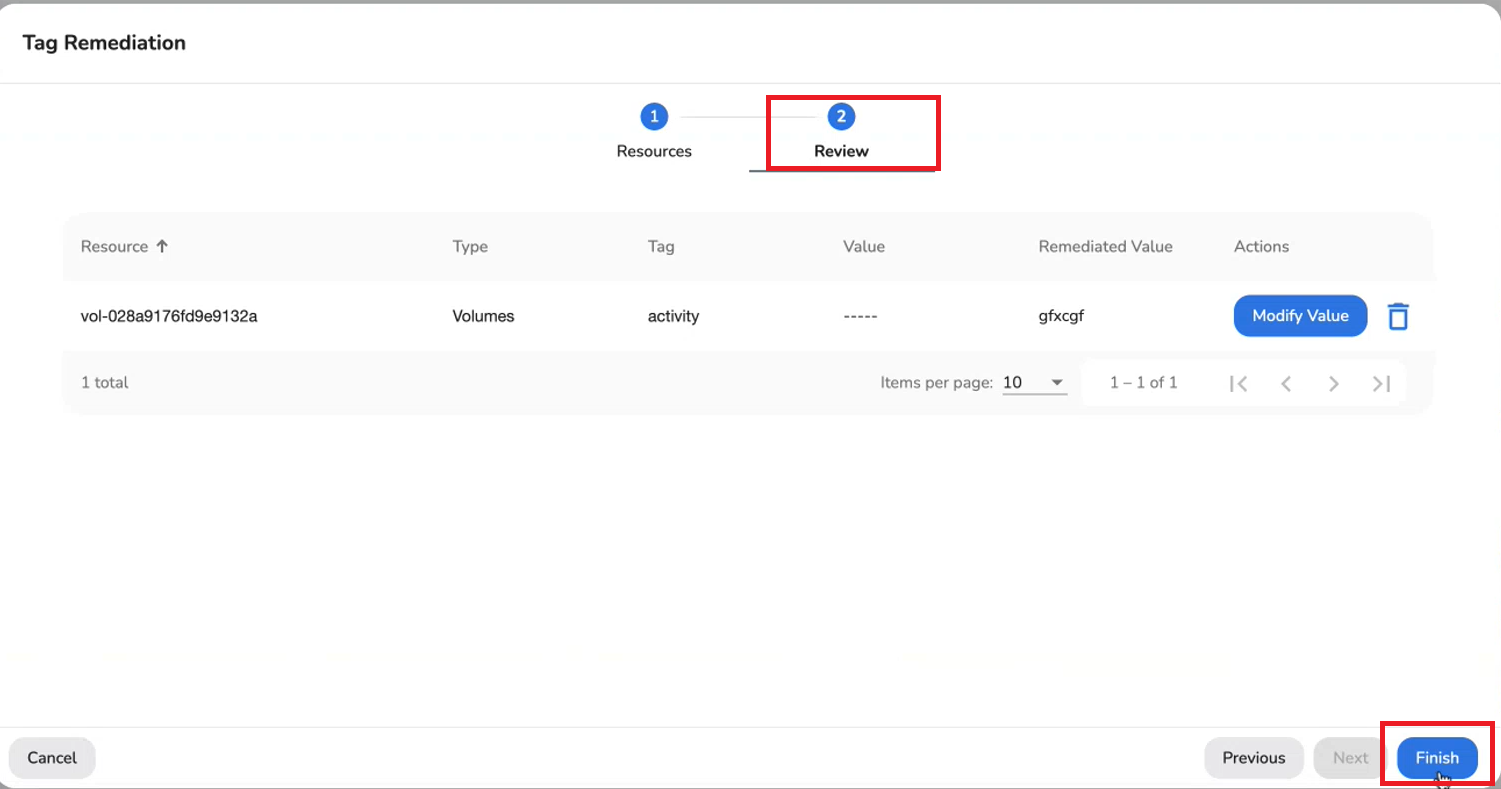
On the Tag Remediation screen, click Next.
In the Review tab, review the values that are added in the previous steps. If any tag value needs to be changed, then select Modify Value and make the change.
Click Finish.
After the key values are updated for a tag, the status Synced appears below the resource name (on the Tag Remediation screen). This means that the tag has been synced with the cloud provider and the coverage status will change to Complete. This will increase the coverage percentage.
If Not Synced appears below the resource name, then this means that the tag has issues syncing with the cloud provider and the status Missing Key shows for that resource. Users should take remediation steps to add a valid key value and increase the coverage in this scenario.
Repeat the above steps to fill valid tag keys and tag values.
After the key values are added successfully, the coverage percentage should increase and can be viewed on the Tag Posture, Tag View, and Resource View tabs.
Note:Refer to this link to view the list of resources that allows remediation of tags.
Refer to this link to view the list of Tag Governance support by Resource .
Roles for Posture Generation and Baseline Access
There are defined roles allocated to users, based on which they can generate posture and access baselines. Every role has different permissions, and based on the role type assigned to a user they will have certain action/access rights (e.g. create/read/update/delete).
Refer to the topics explained below to view lists of roles with access to baseline tags at the Organization scope and Tenant scope levels, and roles that can execute postures and view postures.
RBAC for Baseline Tags
The role types that can access baseline tags at Organization and Tenant scope are explained below.
Baseline Tags at Organization Scope
Only an Account Admin has the permission to create, read, update, and delete baseline tags at the Organization scope.
Users with the following roles only have read permissions for baseline tags at Organization scope:
- Tenant Admin
- CloudOps Admin
- CloudOps Member
- CloudOps Reader
- Compliance Admin
- Compliance Member
- Security Admin
- Security Member
- SecOps Admin
- SecOps Reader
- FinOps Admin
- FinOps Practitioner
- FinOps Reader
- Assessment Admin
- Assessment Member
- Assessment Reader
- Assessment Approver
- Workload Owner
Baseline Tags at Tenant and Account Scope
Users with the following roles have create, read, update, and delete permissions for baseline tags at Tenant scope:
- Account Admin
- Tenant Admin
- CloudOps Admin
- Compliance Admin
- Security Admin
- SecOps Admin
- FinOps Admin
- Workload Owner
Users with the following roles only have read permission for baseline tags at Tenant scope:
- CloudOps Member
- CloudOps Reader
- Compliance Member
- Security Member
- SecOps Reader
- FinOps Practitioner
- FinOps Reader
- Assessment Admin
- Assessment Member
- Assessment Reader
- Assessment Approver
RBAC for Generating Posture
Users can generate posture based on their access level. The roles that can generate postures and view postures are explained below.
Users with the following roles can execute posture:
- Account Admin
- Tenant Admin
- CloudOps Admin
- Compliance Admin
- Compliance Member
- Security Admin
- Security Member
- SecOps Admin
- FinOps Admin
- FinOps Practitioner
- Assessment Admin
- Assessment Member
- Assessment Reader
- Assessment Approver
- Workload Owner
Users with the following roles have read permission for Tag Posture - Tenant & Cloud Account View:
- Account Admin
- Tenant Admin
- CloudOps Admin
- CloudOps Member
- CloudOps Reader
- Compliance Admin
- Compliance Member
- Security Admin
- Security Member
- SecOps Admin
- SecOps Reader
- FinOps Admin
- FinOps Practitioner
- FinOps Reader
- Assessment Admin
- Assessment Member
- Assessment Reader
- Assessment Approver
- Workload Owner
Partial Posture Generation
For partial posture generation, users must note the following:
- Posture can be generated by users who have relevant RBAC permissions.
- Posture can be generated for the scope to which the user has access to.
- If the scope of a baseline is Organization, then users who have access to generate posture can execute it, but the posture will be generated for tenants -- wherein the user is part of the tenant.
Restrict Baseline Access
Users can create and view baselines based on their role. Global baselines can be viewed by all users. Refer to RBAC for Baseline Tags for more details.
Let us understand baseline access with the help of different scenarios explained below.
Case 1: If the baseline has scope for Tenant A and Tenant B, and if the user is a Tenant Admin for Tenant A but has no access for Tenant B, then the Tenant Admin can view the baseline (with the Tenant scope shown where they have access). They cannot edit the baseline as it is a shared baseline.
Case 2: If the baseline has scope for Tenant A and Tenant B, and if the user is a Tenant Admin for Tenant A and has read-only access for Tenant B, then the Tenant Admin can view the baseline (with the tenant scope shown where they have access to both). They cannot edit the baseline as it is a shared baseline but do have access to edit one tenant.
Case 3: If the baseline has scope for Tenant A and Tenant B, and if the user is a Tenant Admin for both Tenant A and Tenant B, then the Tenant Admin can view the baseline (with the tenant scope shown where they have access to both) and also edit the baseline as they have edit access for both tenants.
Note:If the scope is updated in one version of a baseline, it will be updated across all other versions of that baseline.
Updated 8 months ago