

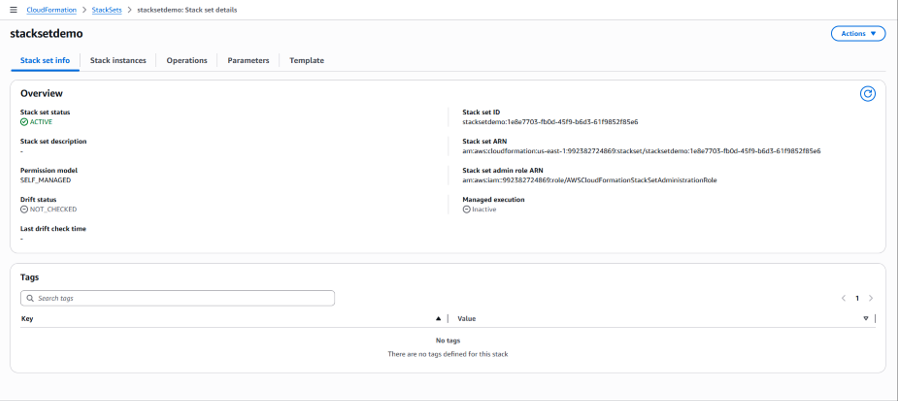
Onboarding Multiple AWS Member Accounts from a Management Account using AWS StackSets
Save time and streamline your onboarding process for multiple AWS cloud accounts by setting things up for bulk onboarding.
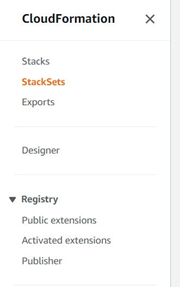
Introduction
When it comes to onboarding multiple AWS member accounts into the platform, it’s certainly possible to do it one at a time, but you can save a lot of time and streamline that process by following the procedure described in this document. This approach uses AWS CloudFormation templates and the AWS CloudFormation StackSets service to onboard multiple AWS member accounts through your AWS management account.
While this process is relatively straightforward, it does require users to do things in a particular order and create IAM access roles for the platform across both management and member accounts using automation services.
In this user guide we’ll walk you through the process of doing that, as well as explain the options you have for using automation templates and creating IAM roles for the platform in your AWS accounts so you can decide which approach is right for you.
Overview of the End-to-End Process for Onboarding Multiple AWS Accounts
Before you can start onboarding multiple member accounts into the platform, IAM roles need to be created in both the management account (by a user) and all member accounts (by automation). This will provide the platform with the access it needs to assume the necessary roles in your AWS accounts.
To do this, you can use the AWS Service known as AWS CloudFormation StackSets to create and manage this access at scale.
Once this is completed, you can use the bulk account onboarding feature/utility in the platform to onboard these accounts into it.
From that point onward, you can continue to manage the IAM access for the platform in your AWS accounts by updating and re-running StackSets. You can also add/revoke access to additional cloud accounts to enable continuous onboarding.
This process is summarized at a high-level in the below graphic, and in the following short summaries provided for each step:
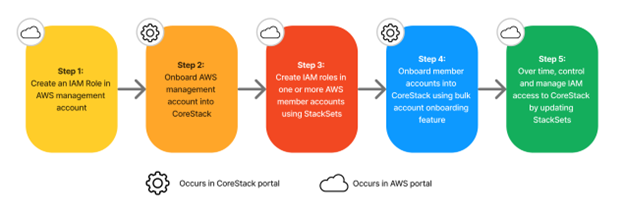
Step 1: Create an IAM role in your AWS management account
The first step in this process of onboarding multiple member accounts always begins with the AWS management account. First, ensure you have Administrator Access in your AWS management account – you’ll need it to create the necessary IAM role for the platform.
Note:You will not be required to provide Admin Access to the platform.
Using your Administrator access, you can create an IAM Role using the least privilege access CloudFormation template provided in the management account onboarding section of this user guide. This will allow the platform to assume a role in your AWS management account that only has the required access level specified in the aforementioned CloudFormation template. This least privilege access template limits the platform to Read-Only permissions in the AWS services it needs access to.
Additionally:
- If you plan to use FinOps and have a centralized billing CUR file in an S3 bucket, keep those bucket details on-hand.
- You will also need to create an additional role in your AWS management account for AWS StackSets (CloudFormation) to assume roles in your member accounts. This can be done in Step 3, based on level of control and flexibility you want to provide to AWS Stacksets.
Step 2: Onboard your AWS management account into the platform
Next, in the platform, you’ll onboard your AWS management account using the steps provided later in this user guide. This will start the onboarding process, which includes:
- Discovery of all your member accounts.
- Inventory in your management account.
- Running system policies.
- Processing cost data.
- More based on which products you have access to.
Once your management account is onboarded and this discovery is completed for your AWS member accounts, you should be able to see basic details (i.e. cost posture) about them in the platform. However, you cannot onboard the member accounts yet since the platform doesn’t have the necessary level of access to them. This will be done in Step 3.
Without onboarding member accounts, the platform will not have the required data to provide capabilities such as Inventory, Cost Optimizations, Budgets, policies etc. for the member accounts.
Step 3: Create IAM roles in your member accounts using StackSets
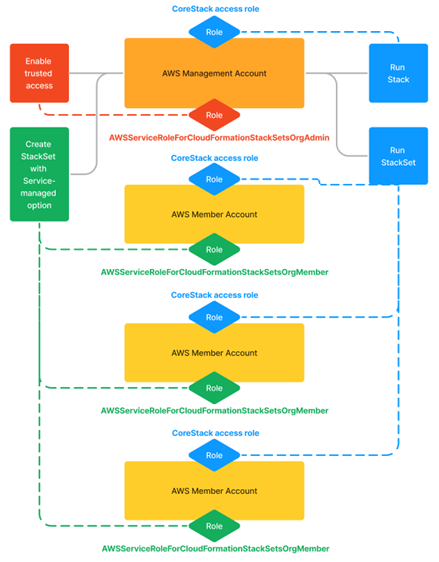
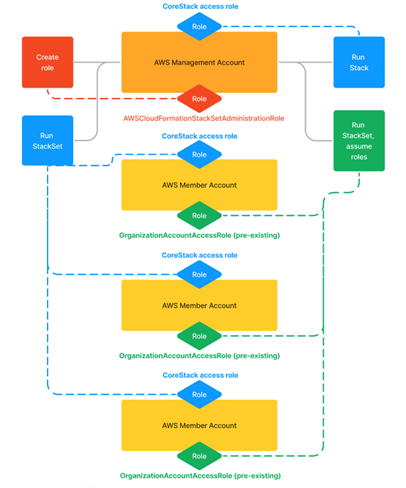
Using AWS StackSets, you can grant the platform access into multiple member accounts in your AWS Organization. Based on your organization policy and control needs, you can choose from the following options:
- Service-Managed option (Recommended): If you want to automatically provide access to the platform as new member accounts are added into your AWS Organization under your Organization Units (OUs), then this is the ideal option to choose when creating a StackSet.
The downside of this approach is that a new role will be created with admin access (for AWS CloudFormation service, not the platform) in each member account, which may cause security alerts based on your organization’s policy.
This is a well-documented approach from AWS for using StackSets. Also, for this option to work fully, you need to enable trusted access for AWS StackSets in your management account.
- Self-Managed option: If you want more control over when to provide access to the platform for new member accounts, or for specific member accounts, you can choose this option when creating a StackSet.
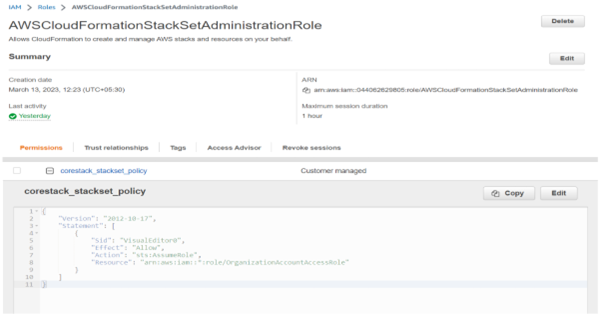
For this to work, you need to create an additional (service linked) role named “AWSCloudFormationStackSetAdministrationRole” in your AWS management account and allow the AWS CloudFormation service to assume the OrganizationAccountAccessRole role in the member accounts you want to provide access to. The OrganizationAccountAccessRole role is created by default as part of the AWS organization setup, so no new roles will be created in your member accounts.
With this approach, any time you want to give the platform access to more member accounts, you can manually update the StackSet and provide the additional member account IDs. You can also create new StackSets with a new set of member accounts IDs.
Note:Depending on what you prefer, you can create a StackSet that includes all member accounts to provide the platform with access to all or create multiple StackSets to grant it access to only a few accounts at a time.
You can even grant different levels of permissions for different sets of AWS accounts/OUs. For example, you could provide the platform with Read-Write access to your development OU but Least-Privilege Access to Production accounts.
The outcome of this third stage is that a role will be created in each of the member accounts that provides required access to the platform. Role ARNs and External IDs will be available for each of the member account as outputs of the StackSet deployment.
Step 4: Onboard member accounts into the platform using a bulk upload feature
Now that the necessary access permissions have been created, you can proceed with the process for onboarding your member accounts into the platform.
Currently, the platform provides a utility to accomplish this. You can contact your Customer Success Manager to learn more and get access to this utility.
Step 5: Manage IAM access over time by updating StackSets
On an ongoing basis, if you plan to update the access given to the platform in your AWS accounts, onboard a new set of accounts, or revoke access to a set of accounts, you can do so by updating the appropriate StackSet.
This provides a great amount of control and flexibility for you and your customers, and simplifies the process of onboarding multiple accounts to the platform for visibility and governance.
Configure an AWS Management Account for Onboarding
Before users can onboard an AWS management account, they must first create an IAM role for the platform to have the required access to their AWS accounts.
This role can be created manually in AWS, but it can be done more easily by running a CloudFormation template known as a Stack. Once this template is done executing, the information it outputs can be used to onboard the cloud account into the platform.
The platform provides CloudFormation templates that will take care of the process of creating the required IAM role and assigning the necessary permissions automatically. These templates use the native roles already available in your AWS account to create an access role for the platform to use – preserving your security and limiting its access to only certain kinds of data.
The required IAM role must be created with the following access permissions depending on which type of cloud account users want to onboard:
- Read-Only Access.
- Read-Write Access.
The previously mentioned CloudFormation templates can be downloaded by clicking the S3 URLs provided below, based on the type of access you wish to provide for the platform:
- S3 URL with Templates for Read-Only Access: Click Here
- S3 URL with Template for Read-Write Access: Click Here
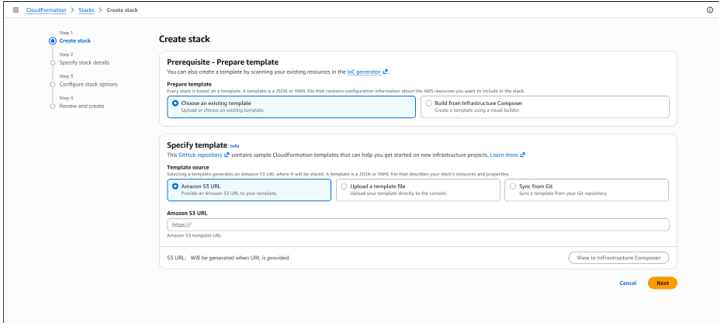
Setting Up the IAM Role:
-
Log in to the AWS account.
-
Navigate to CloudFormation.
-
Click Create Stack with new resources.
-
Select the Choose an existing template option in the Prepare template field.
-
Select the Amazon S3 URL option in the Template source field.
-
Copy the relevant S3 URL from the above section and paste it in the Amazon S3 URL text field.
-
Click Next.
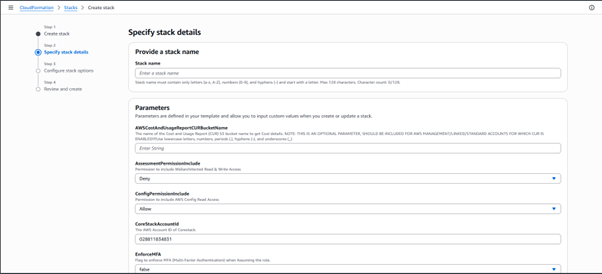
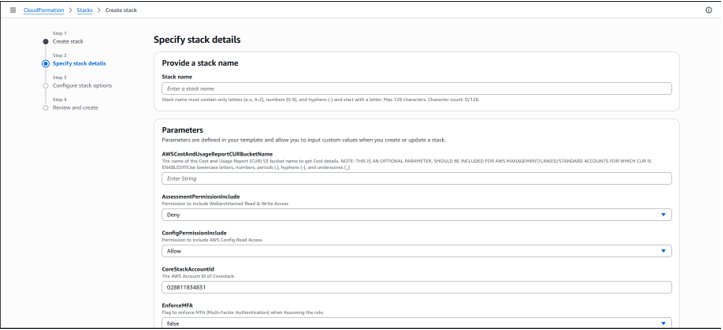
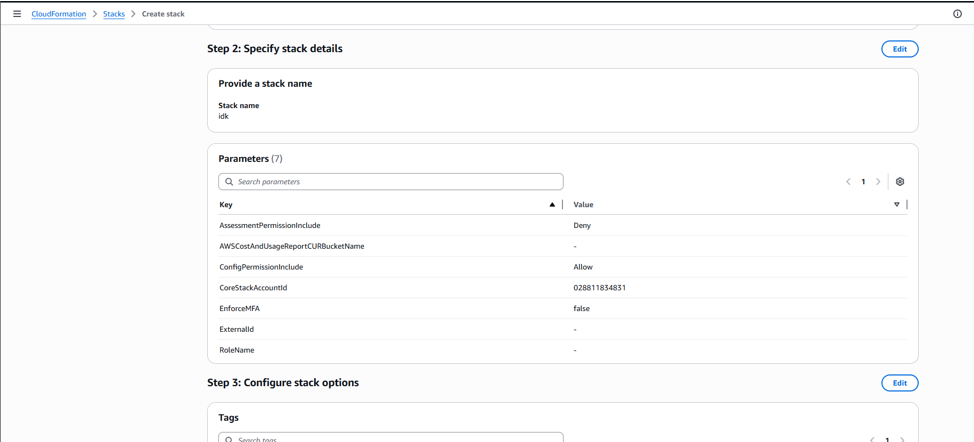
- Provide values for the Stack name and Role name fields. If you have used the Amazon S3 template URL for Read-Write Access, you can view additional fields that can keep their default values. However, if you do NOT want to configure CFN, GuardDuty, or Inspector for your AWS account, you can set them to “false”.

-
Click Next. The Step 3 screen appears.
-
You can leave the values for the fields in this screen as their defaults or make changes as necessary, including assigning Tags, providing notification options, etc.
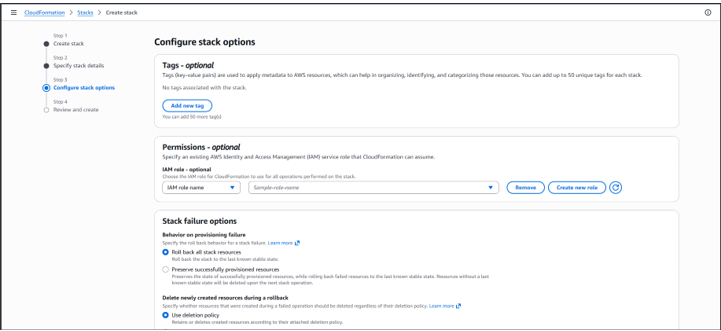
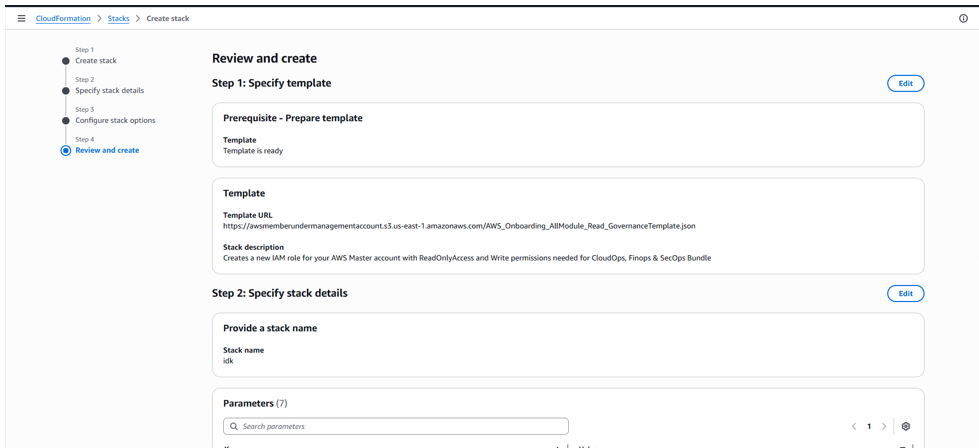
- Click Next. The Step 4 screen appears.
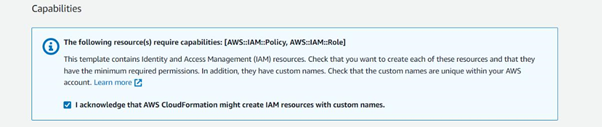
- The information provided in all the steps will be displayed. After reviewing the provided information for correctness, scroll down to the end of the screen and click on the acknowledge checkbox.
- Click Submit. The stack creation process will now be initiated, and the status should be visible.
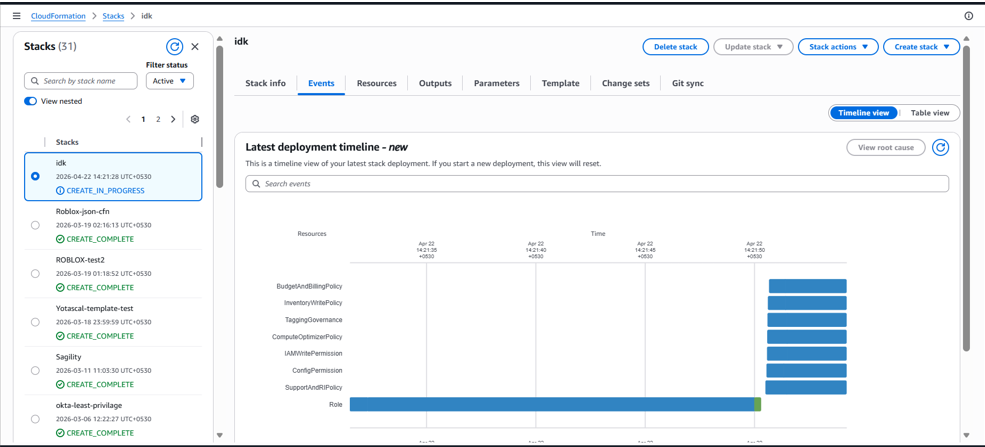
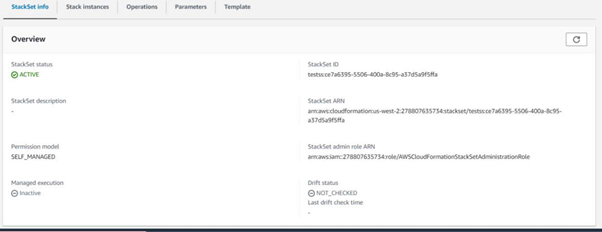
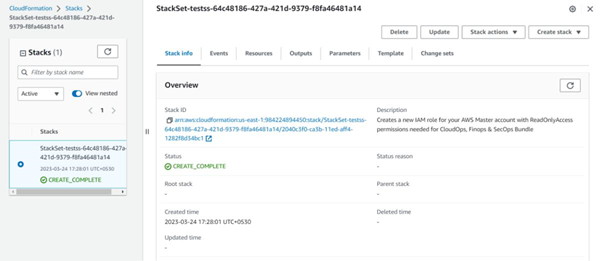
- Navigate to the Stack Info tab to see an overview of the stack as well as the final status.
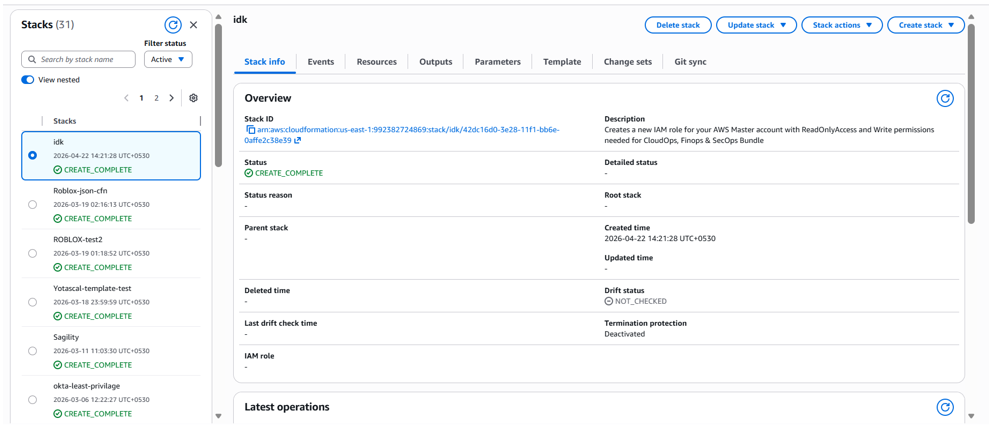
- Click the Refresh icon to retrieve the latest status. When it is successfully completed, you will see the status change to “CREATE_COMPLETE”.
- Navigate to the Outputs tab to view the access credentials (ARN).
These credentials contain the information required to onboard new cloud accounts into the platform. Copy this information and have it readily available so you’ll be able to easily copy and paste it into the platform UI while onboarding.
Configure Multiple AWS Member Accounts for Onboarding from a Management Account
As mentioned at the start of this user guide, onboarding individual AWS member accounts into the platform one at a time is possible, but it can save a lot of time and effort to onboard multiple AWS member accounts through your AWS management account.
Again, this requires creating IAM roles for the platform to use to access the required data across each of your AWS member accounts. This can be done manually, or in an automated way with CloudFormation templates called Stacks/StackSets.
Note:To create IAM roles across each of your AWS member accounts through your AWS management account, you need to first create an IAM role for the platform in the management account.
Please refer to the previous section Configure and onboard an AWS Management Account for instructions on how to do this.
It’s much more efficient and can help mitigate security concerns if you use AWS CloudFormation StackSets to create and run multiple stack templates with a single operation. This will use the native OrganizationOwnerAdmin role available by default in your AWS account to create the necessary IAM access roles for the platform – not create any new admin roles.
By taking this approach, then using a utility we provide to onboard multiple cloud accounts at once into the platform, you can streamline the process of onboarding AWS member accounts into it without needing to make any major changes to the roles and permissions in your AWS account.
Validate AWS Organization account enabled with all features
AWS has introduced a new setting to configure your organization's management account as an all features or Consolidated Billing account.
To follow the forthcoming steps, your organization's account must be configured as an all features account. To check if your account is configured as an all features account, you can navigate to your AWS Organization account and then click Settings. Under organization details, you can see a message as shown in the image below.

If your organization is only enabled with the Consolidated Billing feature, you can refer to the link provided below to enable all features: https://docs.aws.amazon.com/organizations/latest/userguide/orgs_manage_org_support-all-features.html
Enable trusted access using the AWS CloudFormation console
As a first step, users need to enable trusted access for StackSets in the relevant AWS Organization Unit(s). With trusted access between StackSets and Organizations enabled, the management account has permissions to create and manage stack sets for your organization (source).
-
Sign into AWS as an administrator in the related management account and open the AWS CloudFormation console at https://console.aws.amazon.com/.
-
From the navigation pane, choose StackSets. If trusted access is disabled, a banner displays that prompts you to enable trusted access.
- Choose to Enable trusted access.
You’ll know trusted access is successfully enabled when the following banner displays:

Side note:If you want to use a member account to run a StackSet, it should be set as a Delegated Administrator.
To register a member account as a delegated administrator (from the AWS console):
- Sign into AWS as an administrator of the selected member account and open the AWS CloudFormation console from the link below,
https://console.aws.amazon.com/cloudformation/.
From the navigation pane, choose StackSets.
Under Delegated administrators, choose Register delegated administrator.
In the Register delegated administrator dialog box, choose Register delegated administrator.
The success message indicates that the member account has successfully been registered as a delegated administrator.
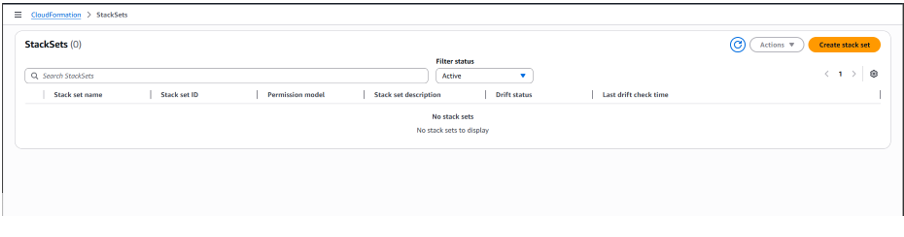
Run the StackSet in Member Accounts Using the Management Account
Now that trusted access is enabled between the StackSet service and the member accounts, users can proceed with running the StackSet to create the necessary IAM roles for in the member accounts and generate the outputs needed for onboarding.
Login to the management account and navigate to CloudFormation.
Select Create StackSet:
There are two ways to run StackSets, as referred to in the diagram included at the start of this user guide:
- Service-managed permissions approach
- Self-service permissions approach
Run a StackSet with service-managed approach
Creating the StackSet with this methodology will create an IAM role in each member account for the StackSet service (not the platform) to use that has administrator access. This allows the StackSet to deploy stacks in the member accounts.
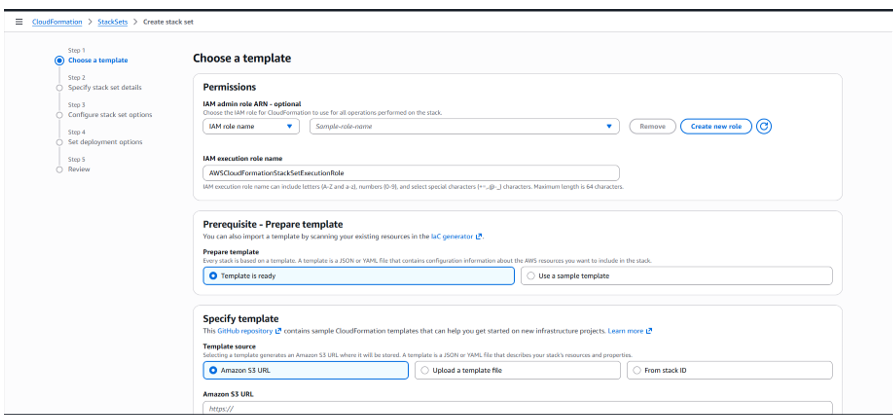
After selecting to Create StackSet, select the proper box to proceed with Service-managed permissions.
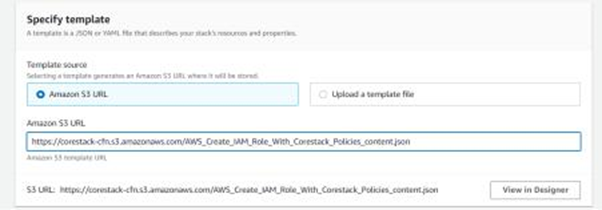
In the Amazon S3 URL field, input a CloudFormation template path, then click Next.
As mentioned earlier in this user guide, you can download a CloudFormation template or get the web address by clicking the S3 URLs provided below, based on the type of access you wish to provide for the platform:
- S3 URL with Template for Assessment Only (Read-Only Access): Download here
- S3 URL with Template for Assessment + Automation (Read-Write Access): Download here
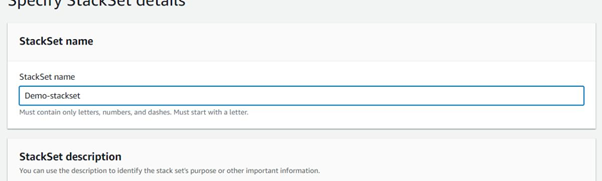
Next, enter a StackSet Name in the field with the same title:
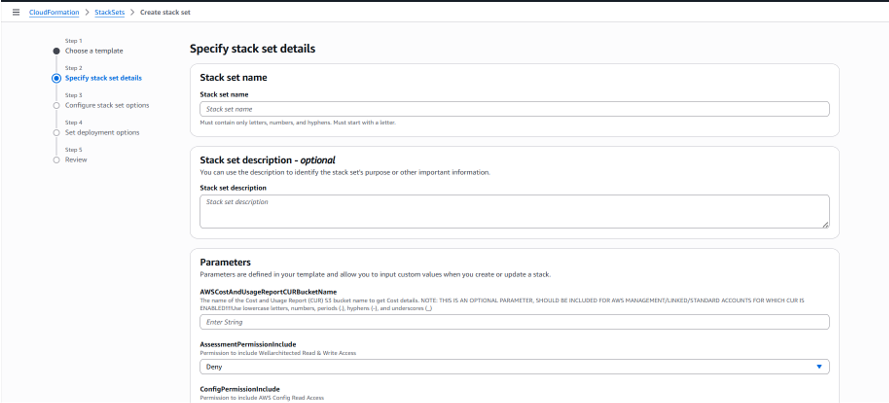
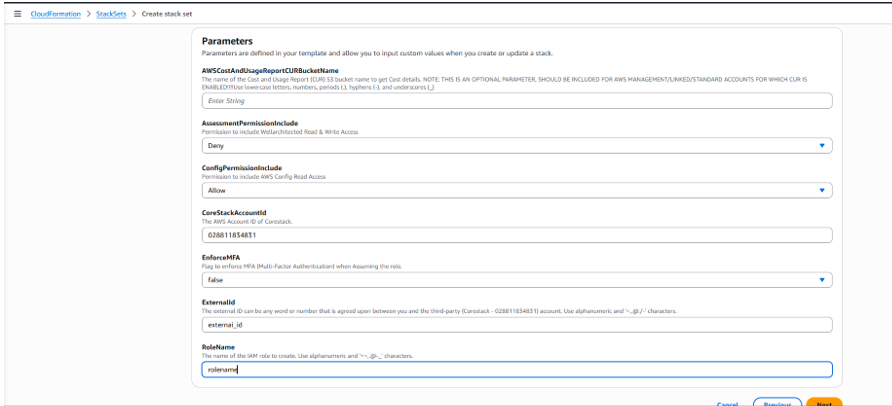
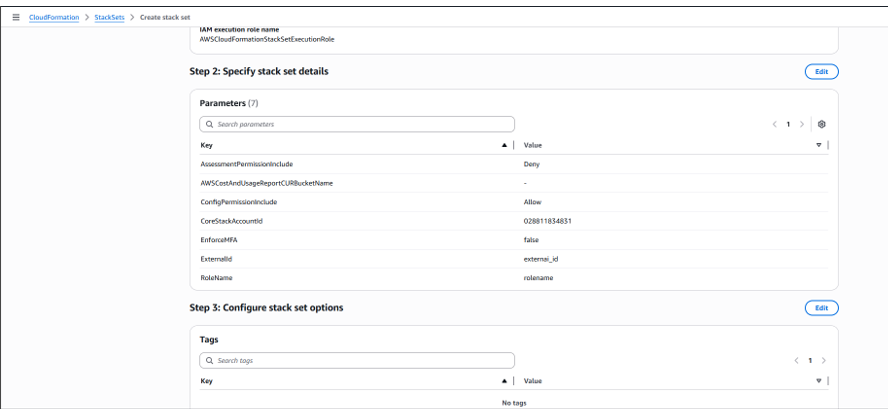
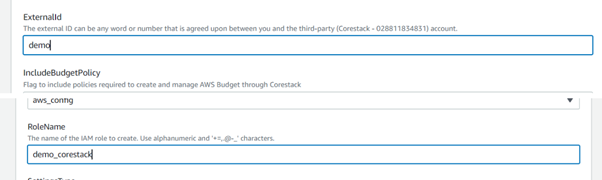
Enter values for the ExternalID and Role Name (ARN), which need to be created for the member accounts.
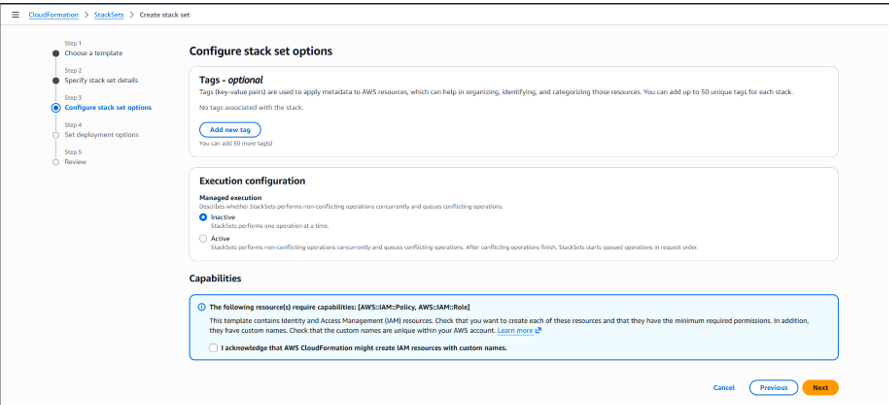
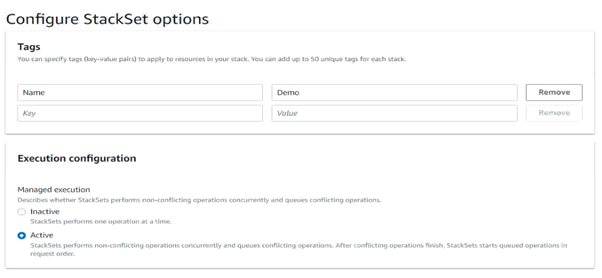
Enter any required tags, then select Execution Configuration.
- Inactive: Run this stack only one time.
- Active: Run this stack for an account and add it as a member account under this management account in the future.
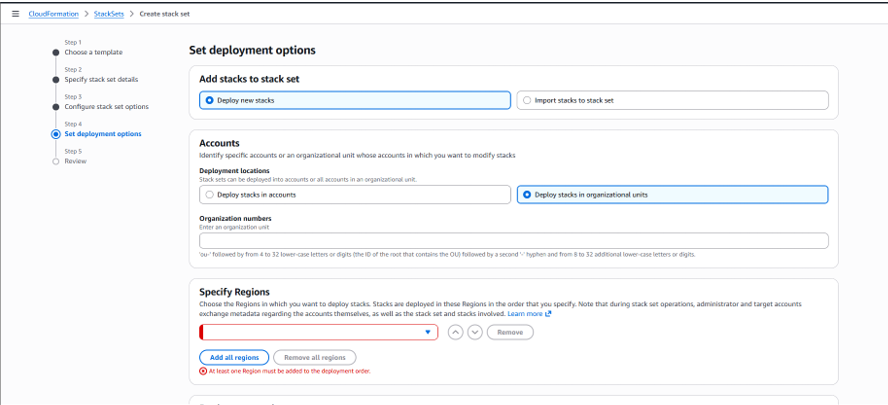
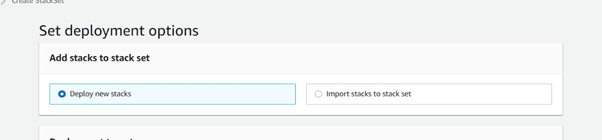
Select Deploy new stacks.
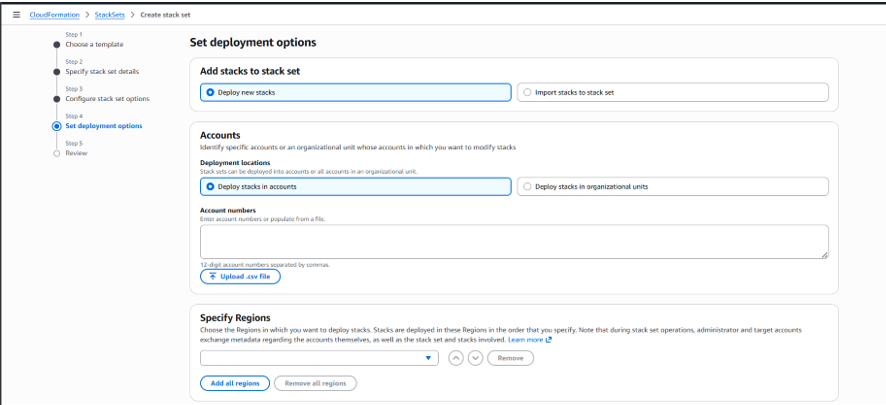
Select the Deployment Targets:
Deploy to Organization – Deploy the CloudFormation template for all the member accounts under the management account.
Deploy to Organizational Units (OUs) – Deploy the CloudFormation template for user-specified OU accounts.
The below screenshot shows an example for an account under an OU.
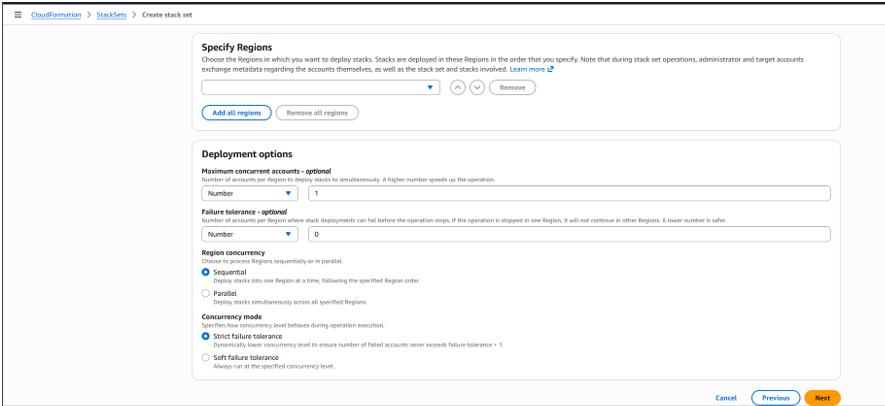
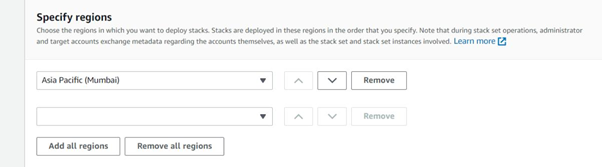
Next, select the region where the CloudFormation template must run.
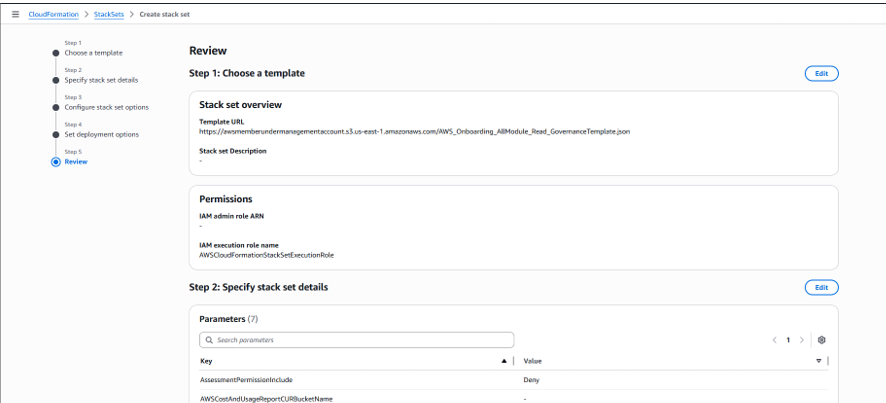
The information provided in all the steps will be displayed. After reviewing the provided information for correctness, scroll down to the end of the screen and click on the acknowledge checkbox.
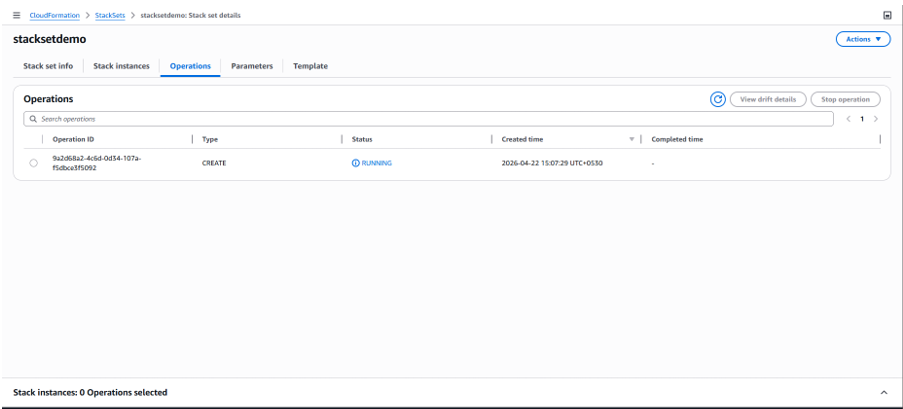
Now you should be able to see the stack set is Active, once the run is successful.
In the member accounts, you can see the stack under CloudFormation in the region you selected previously.
Run a StackSet with the self-service approach
Creating the StackSet with this methodology will not create any new IAM roles for the StackSet service in the member accounts. Instead, it proceeds by assuming an existing AWS role with administrator access in each member account. This allows the StackSet to deploy stacks in the member accounts without creating a new IAM role.
Prerequisites:
- There needs to be an assumed role created in the management account along with a custom policy enabled. And the policy with the role name “OrganizationAccountAccessRole” should be customizable.
- By default, in a member account, when creating an account an IAM role will get created named “OrganizationAccountAccessRole.” This name can be customized. The platform will use this role to run stack sets.
After selecting Create StackSet, select the proper box to proceed with Self-service permissions.
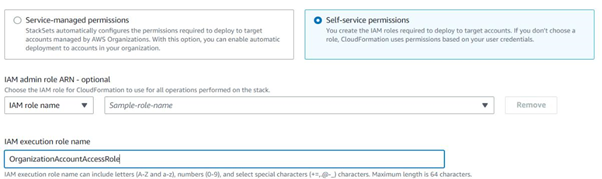
After selecting Self-service permissions, we need to provide the “IAM execution role name” as “OrganizationAccountAccessRole.”
In the Amazon S3 URL field, input a CloudFormation template path, then click Next.
As mentioned earlier in this user guide, you can download a CloudFormation template or get the web address by clicking the S3 URLs provided below, based on the type of access you wish to provide for the platform:
- S3 URL with Template for Assessment Only (Read-Only Access): Download here
- S3 URL with Template for Assessment + Automation (Read-Write Access): Download here
Next, enter a StackSet Name in the field with the same title:
Enter values for the ExternalID and Role Name (ARN), which need to be created for the member accounts.
Enter any required tags, then select Execution Configuration.
- Inactive: Run this stack only one time.
- Active: Run this stack for an account and add it as a member account under this management account in the future.
Select Deploy new stacks.
Select the Accounts:
Deploy stacks in accounts – Upload a CSV file with the relevant accounts listed by Account ID, or enter the account numbers in the text box separated by commas.
Deploy stacks to Organization Units (OUs) – Enter the desired OU ID. Please note that only one OU can be executed at a time.

Here is a sample OU:

Select the region where the CloudFormation template must run.
Click to acknowledge and finish the process in order to run the CloudFormation stack set on the member accounts.
Now you should be able to see the stack set is Active, once the run is successful.
In the member accounts, you can see the stack under CloudFormation in the region you selected previously.
Example:If you are using an ExternalID of “MyApp_demo” and a Role ARN of “MyApp_onboard” for account ids“111111111111” and “222222222222”, your template outputs will be “MyApp_demo” as the ExternalID for both member accounts.
The Role ARNs will be:
arn:aws:iam::111111111111:role/MyApp_onboard
arn:aws:iam::222222222222:role/MyApp_onboard
Onboarding Multiple AWS Member Accounts
Once the initial configurations are done and the IAM roles created, users can proceed to onboard their member accounts in bulk in the platform.
Currently, bulk onboarding for AWS member accounts is available through a utility provided by the platform.
To learn more about this utility and how you can get access to it, please contact your Customer Success Manager.
Updated 3 months ago