Optimize Rate - Savings Plan
Introduction
With the integration of the AWS Savings Plan and Azure Savings Plan into our platform, users can optimize their AWS/Azure cloud costs. The integration aims to provide users with a seamless way to visualize and optimize their cloud costs through our platform by taking advantage of Azure Savings Plans/AWS Savings Plans.
Savings Plans can be used to save money by committing to a consistent amount of usage (measured in dollars) for a one or three-year period. As the cloud spend continues to grow, there is a need for tools that can help manage and optimize cloud costs. By integrating savings plans into our cost management platform, we provide users with a comprehensive tool to manage their AWS/Azure cloud costs more effectively.
Some of the AWS services that are supported by the savings plans are:
- Amazon EC2
- AWS Fargate
- AWS Lambda
Some of the Azure services that are supported by the savings plans are:
- Azure Virtual Machines
- Azure App Service
- Azure Functions premium plan
- Azure Container Instances
- Azure Dedicated Host
- Azure Container Apps
- Azure Spring Apps Enterprise
Accessing Savings Plans
To access Savings Plans in the platform, on the left navigation pane, go to Cost > Cost Optimizer > Optimize Rate > Savings Plans tab.
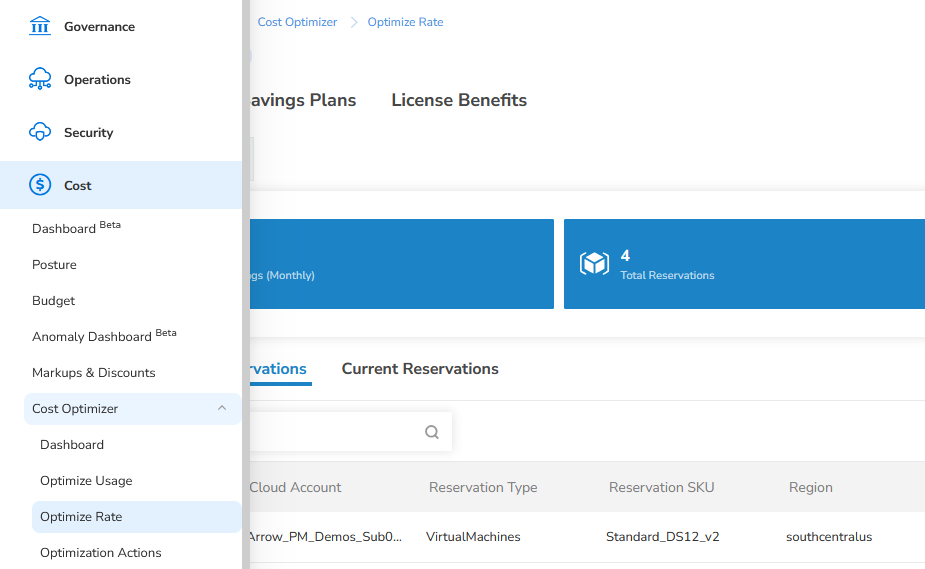
The savings details are shown in two tabs – Current Savings Plans and Recommended Savings Plans.
Current Savings Plans
The Current Savings Plans tab shows the existing savings plans. Users can see two cards on the top the screen showing Total Active Plans (count of active plans) and Expiring in 30 days (count of plans expiring in 30 days).
The tabular grid for savings plans shows columns such as:
- Cloud Account Name
- Savings Plan Name
- Savings Plan ID
- Account ID
- Scope
- Plan Type
- Payment Option
- Commitment/Hour
- Term
- Status
- Start Date
- End Date
- Upfront Cost
- Utilization
- Currency
- Actions
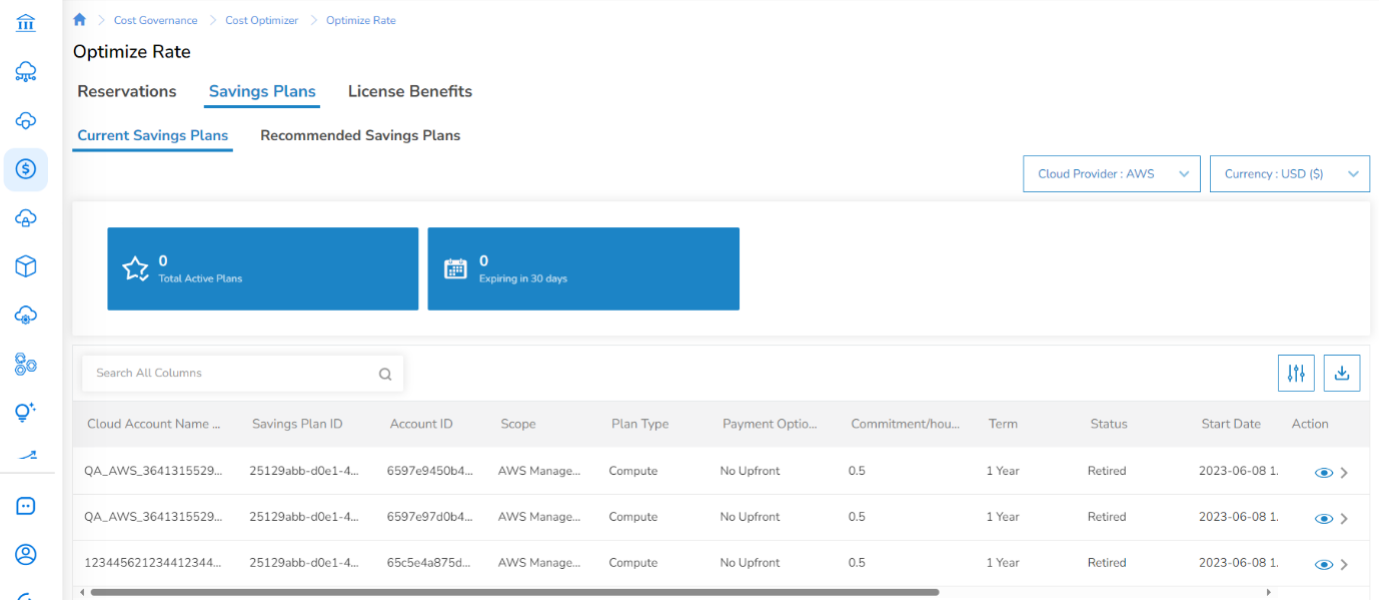
Users can select the required options in the Cloud Provider and Currency drop-down lists to view specific details in the grid that is shown below.
In the Action column corresponding to a cloud provider, when the user clicks View Utilization (eye icon), they can view utilization metrics for the last 30 days in a chart – Utilization Metrics (Last 30 Days).
You can also click and drag inside the plot area to zoom in.
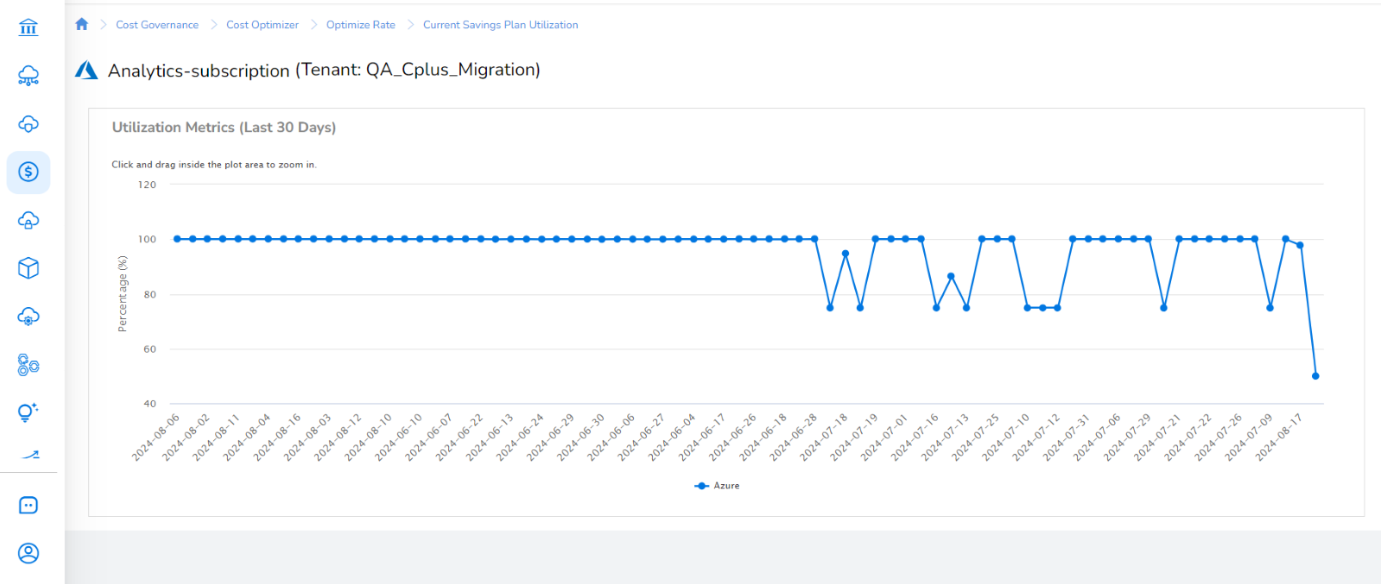
Users can click the Download Data as CSV icon to download the plan details and they can click the Edit Column icon to view specific columns in the tabular grid.
When you click the Edit Column icon, a pop-up screen appears. In this screen, in the Select Columns section, select/clear the required checkboxes and in the Rearrange Columns section, drag and drop the column names to arrange them as per need. After making the changes, ensure to click Apply or to apply the default settings, you can click Reset Default.
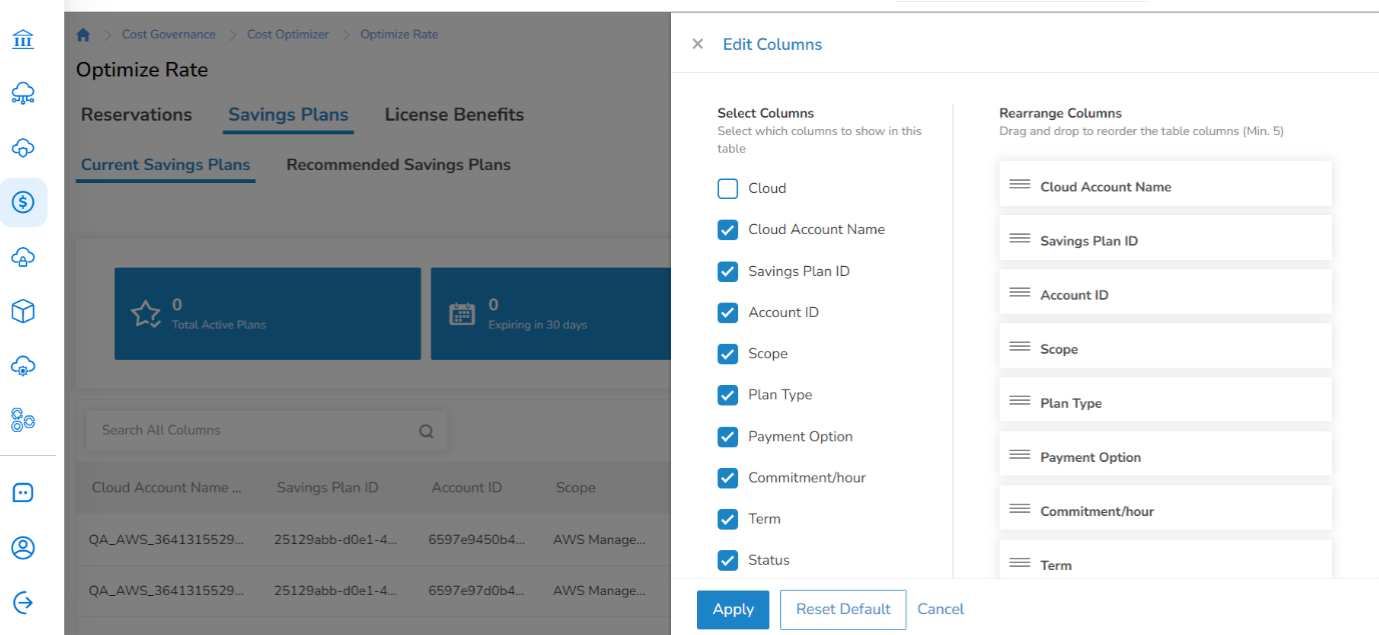
Note:You can use the Search box to find the required information.
Recommended Savings Plans
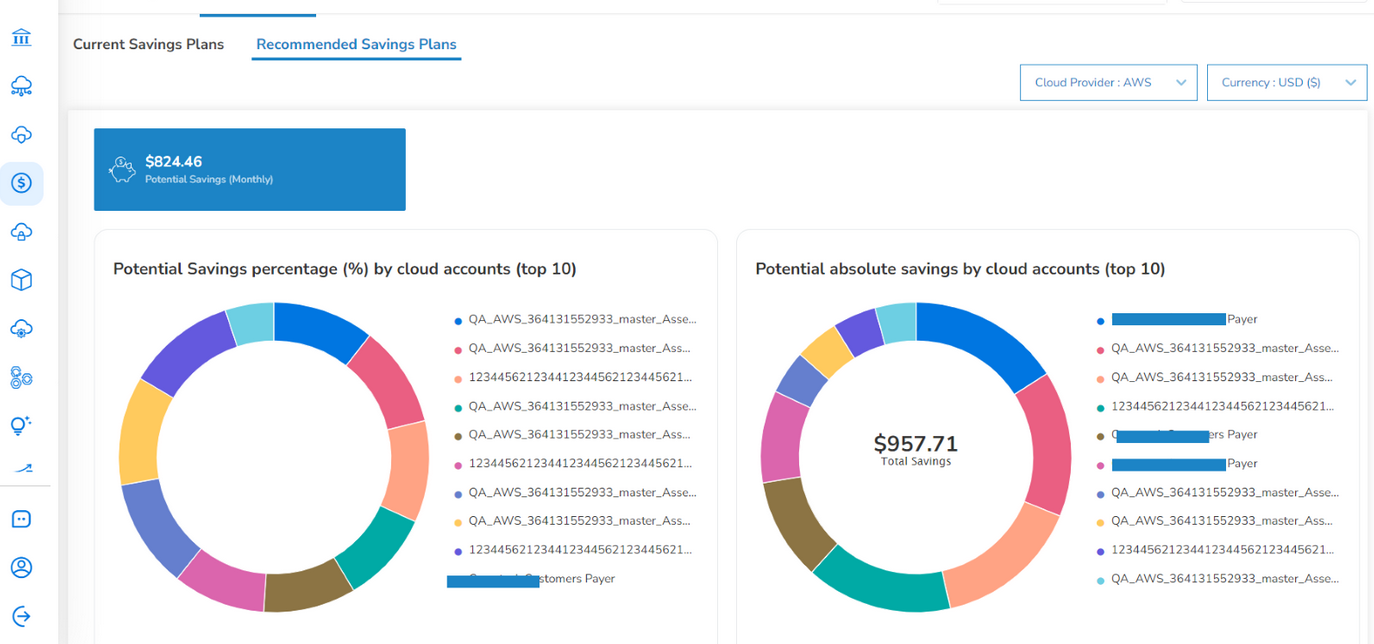
The Recommended Savings Plans tab shows details about savings plan recommendations. Users can see one card on the top the screen that shows Potential Savings (Monthly).
Users can select the required options in the Cloud Provider and Currency drop-down lists to view specific details in the grid that is shown below.
The Recommended Savings Plans tab shows two charts – Potential Savings Percentage (%) by Cloud Accounts (Top 10) and Potential Absolute Savings by Cloud Accounts (Top 10). The Potential Savings Percentage (%) by Cloud Accounts (Top 10) chart shows the potential savings percentage to the list price for top 10 cloud accounts and the Potential Absolute Savings by Cloud Accounts (Top 10) chart shows the amount value for top 10 cloud accounts.
The tabular grid for the recommended savings plans shows columns such as:
- Cloud Account Name
- Recommendation ID
- Plan Type
- Scope
- Look Back Period
- Term
- Commitment/Hour
- Estimated Savings (%)
- Potential Savings (MTD)
- Utilization
- Before Recommendation Purchase
- After Recommendation Purchase
- Currency
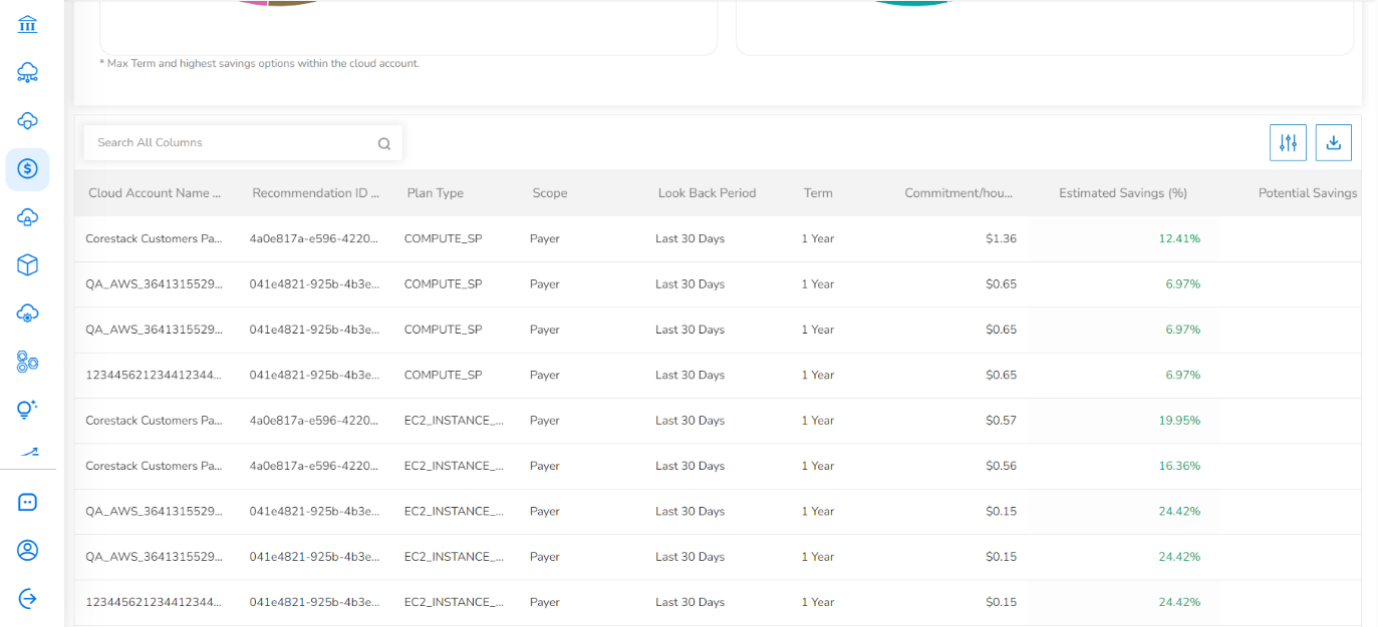
Users can click the Download Data as CSV icon to download the plan details and they can click the Edit Column icon to view specific columns in the tabular grid.
When you click the Edit Column icon, a pop-up screen appears. In this screen, in the Select Columns section, select/clear the required checkboxes and in the Rearrange Columns section, drag and drop the column names to arrange them as per need. After making the changes, ensure to click Apply or to apply the default settings, you can click Reset Default.
Note:You can use the Search box to find the required information.
Billing Account Settings on Azure Portal
To generate the savings plan information in the platform for any Azure accounts like – Pay as You Go (PAYG) and Enterprise Agreement (EA), the savings plan setting must be enabled explicitly in the Azure portal - billing account section.
Perform the following steps to enable savings plan settings for Azure accounts:
- In the Azure portal, go to Cost Management + Billing | Billing scopes.
- Select the billing account for which savings plan setting needs to be enabled.
- In the Savings Plan field, click to select On.
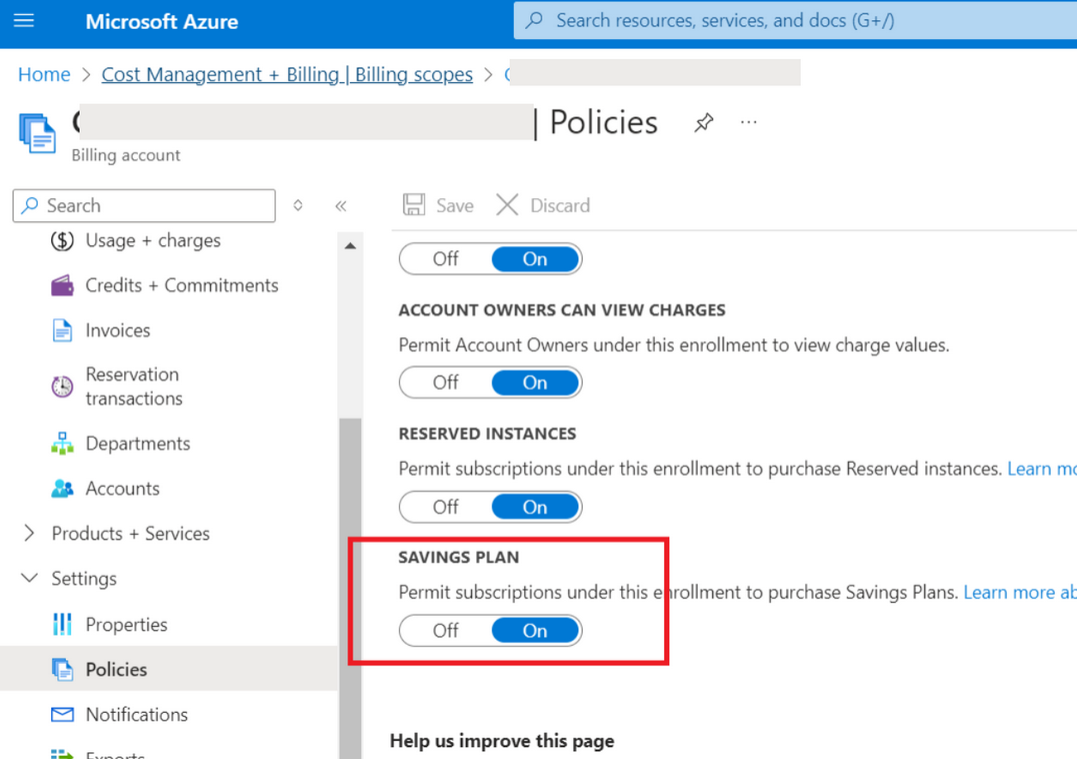
After the setting is enabled, you will be able to view savings plans information in the platform.
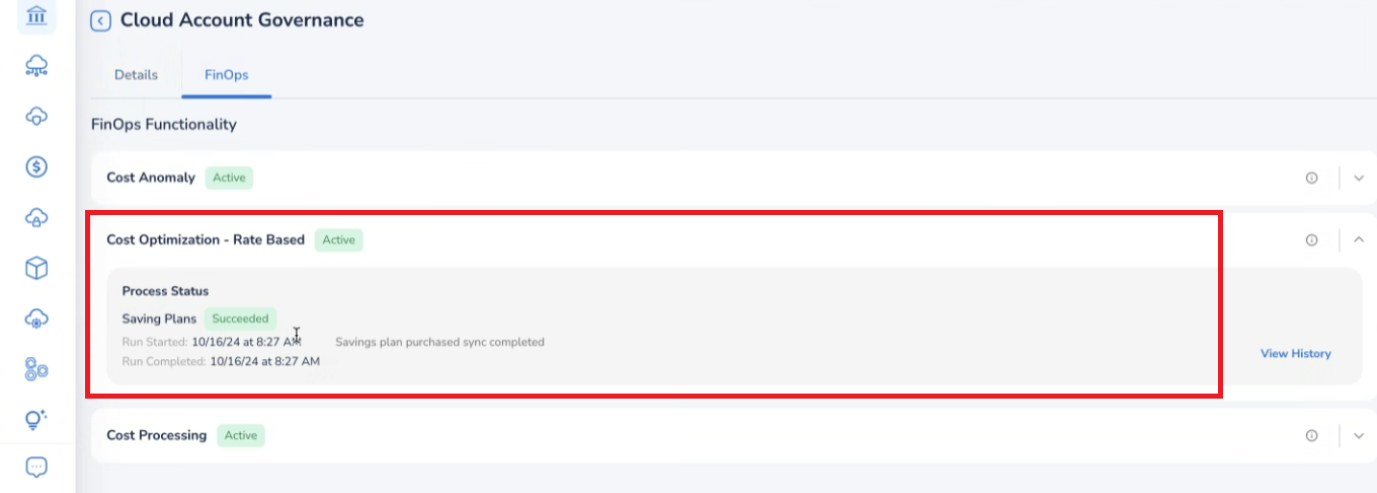
Note:For Azure EA, and MCA under the Account Governance unified page, even if the status of Cost Optimization – Rate Based feature is shown as Active and no savings plan(s) information is pulled into the platform, then ensure to turn on the Savings Plan setting in the Azure portal.
Note:Service principals used to onboard Azure accounts should have 'Microsoft.BillingBenefits/savingsPlanOrders/savingsPlans/read' permission to read savings plans information.
Updated 3 months ago