Scripts
Introduction
A script is a single file (or multiple files) that contains a sequence of commands a program that are used for automation. CoreStack™ supports commonly used automation tools such as Chef, Ansible, Puppet and Shell (Bash and PowerShell).
- Chef - Chef is a configuration management technology used to automate the infrastructure provisioning. It is developed on the basis of Ruby DSL language. It is used to streamline the task of configuration and managing the company's server. It has the capability to get integrated with any of the cloud technology.
- Ansible - Ansible is an open source automation platform. Ansible can help you with configuration management, application deployment, task automation. It can also do IT orchestration, where you have to run tasks in sequence and create a chain of events which must happen on several different servers or devices.
- Puppet - Puppet is an open-core software configuration management tool. It runs on many Unix-like systems as well as on Microsoft Windows and includes its own declarative language to describe system configuration.
- Shell – Bash or PowerShell scripts. Bash Scripts is widely available on various operating systems and is a default command interpreter on most GNU/Linux systems. PowerShell is an automated task framework from Microsoft, with a command line shell and a scripting language integrated into the .NET framework, which can be embedded within other applications. It automates batch processing and creates system management tools.
Navigating to Scripts
Navigate to the Automation option under Operations in the left navigation menu and select Scripts to go to the Scripts (Marketplace) page.
The tabs at the top represent the scope of the scripts. You can see 2 tabs:
- Marketplace
- My Scripts
Marketplace
CoreStack™ provides a wide range of pre-defined scripts which can help in realizing multiple use cases. These are pre-loaded for all subscriptions and are FREE to be executed on-demand or scheduled.
These scripts are available across all tenants and are usually created by the Product Administrator.
Tip: These scritps have the scope value set to Global.
My Scripts
These scripts have been created by users within the tenant. These are available only for users within the tenant. You can add more scripts or edit/delete existing scripts in this tab based on your role and access policies.
Tip: These scripts have the scope value set to Tenants.
Search and Filter Scripts
CoreStack™ offers search and filter functions to help quickly look for the scripts you need to execute. The Search bar is available just above the script list. To Filter Scripts, you can click on the "Filter" icon placed to the right end above the script list.

The Text Search helps you search using any string available in the following fields:
- Name of the Script
- Description of the Script
- Type
- Category
- OS Version
- Platform
The text search is thus quite useful in refining your search results based on any little information you have on the preferred result set.
CoreStack™ also offers Filters to help you narrow down the list of scripts by using one or a combination of filters. On clicking the Filter icon, you will see the list of Filter options available as shown below. Select the preferred options and click on "Apply Filter" button at the bottom of this box.
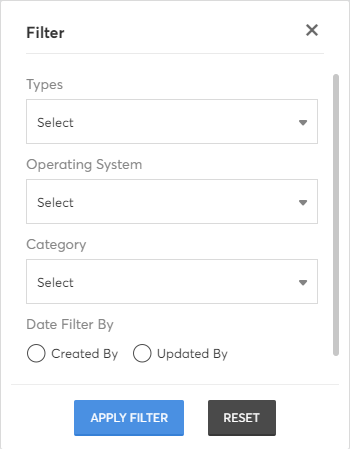
Tip: Use the Reset button to quickly remove all selected filters and view all results.
Once you decide on a script that you would like to try out, you can execute it on-demand or schedule it for a one-time or recurring execution(s) in future.
View Script Details
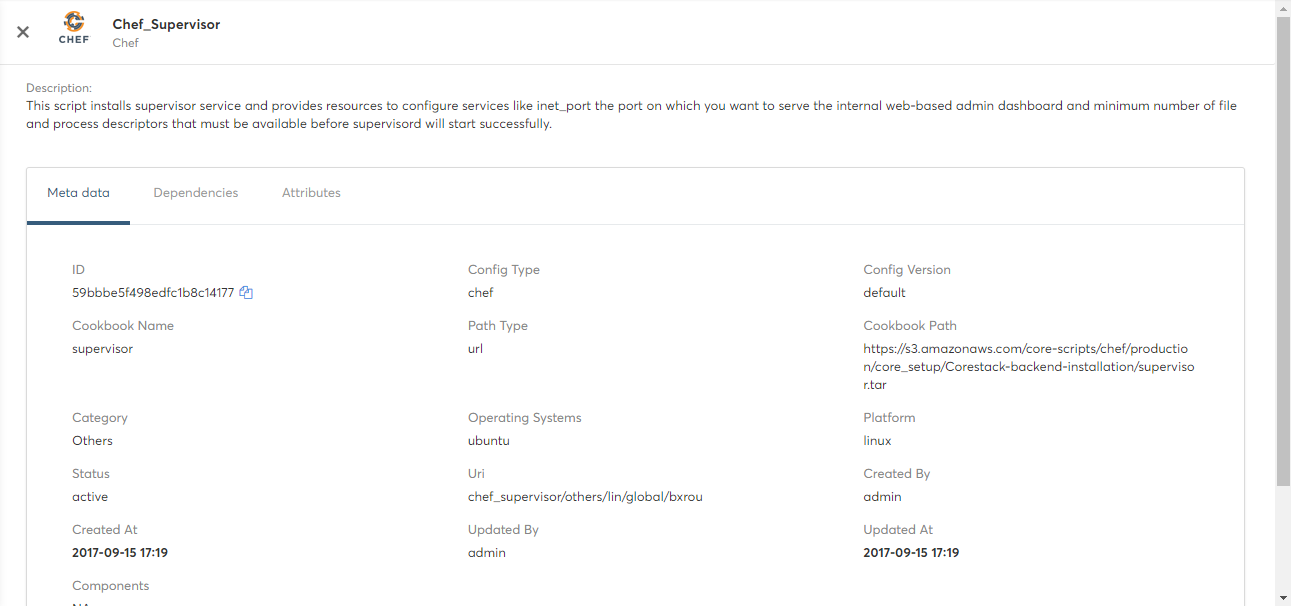
To get more information about a specific script, click on the script to open the 'Script Detail' page. Script Detail page has three tabs as follows:
- Metadata – Script properties and main content details collected in Create
- Dependencies – Specific to Chef scripts. Lists the set of dependent scripts that are required for this script. While adding a script, CoreStack™ can automatically scan for dependencies and add them here.
- Attributes – The list of Optional and Mandatory attributes required for executing the script are listed here.
- Tags – Available only for custom scripts uploaded by users. The list of all the parameters defined by the user in the custom script required for executing the script are listed here.
- Content – The content available within the script file are listed here.
Script Actions
Script actions will be shown to every script listed when you are hovering mouse on a script. The list of actions depends on the scope of the script (Marketplace, Shared (My Scripts)) and the RBAC access for scripts that user has.

- Execute – Executes the script immediately and redirects to "Job history" where you can see the status and output of the execution.
- Edit– Modifies the properties, content, metadata of the Script. It's like Script Create workflow.
- Schedules – Similar to Execute, but schedules it to be run later once/multiple times.
- Delete – Deletes the Script
Execute Script
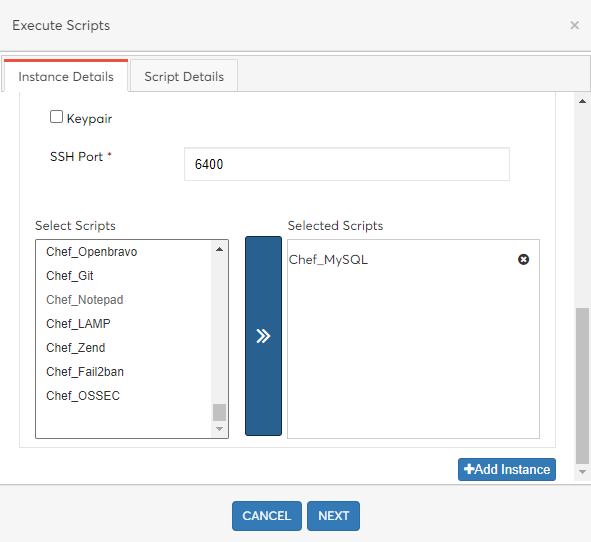
Scripts are to be executed against selected target instance(s). The additional flexibility provided is that, you can execute multiple scripts across multiple instances.
- Single Script in a single instance
- Multiple Scripts in a single instance
- Single Scripts into multiple instances
- Multiple Scripts into multiple instances
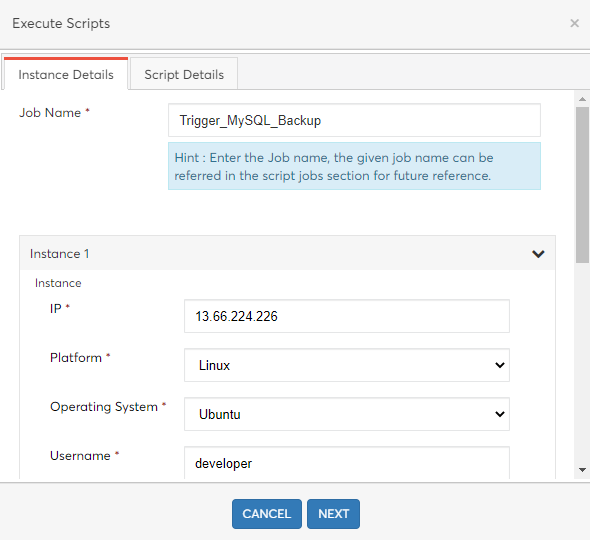
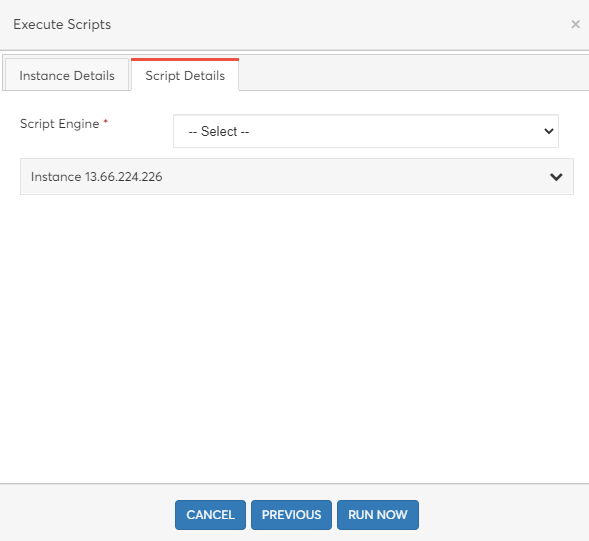
In 'Job History' you can find the status and outputs for this execution. Execute requires following inputs:
- Job Name – name of the Job
- Instances Details – Instance Credentials like IP Address, Username, Password or Key File. CoreStack supports to select more than one instance for single execution.
- OS Details – Platform and OS Versions
- Script Details – By default the selected will be script will be available, you can also add more scripts to execute.
- Parameters – Mandatory parameters required by the Scripts. This will be grouped by the Instance and Script. CoreStack supports to run the same script with different inputs based on Instance.
Schedule Scripts
Schedules the scripts execution to be run later once or multiple times. Schedule requires the following details:
- Name – Name of the schedule
- Description – Detailed description about the schedule
- Schedule Settings – Execution options. Scripts can be scheduled to execute Once or to repeat Minutes, Hours, Daily, Weekly, Monthly, and Yearly.
- Instances Details – Instance Credentials like IP Address, Username, Password or Key File. CoreStack supports to select more than one instance for single execution.
- OS Details – Platform and OS Versions
- Script Details – By default the selected will be script will be available, you can also add more scripts to execute.
- Parameters – Mandatory parameters required by the Scripts. This will be grouped by the Instance and Script. CoreStack supports to run the same script with different inputs based on Instance.
Create (Upload) Custom Scripts
CoreStack™ also provides the option for users to create their own scripts and use them to execute against their instaces. Follow the steps given below: Use the '+' button next to the 'Search' bar at top right.
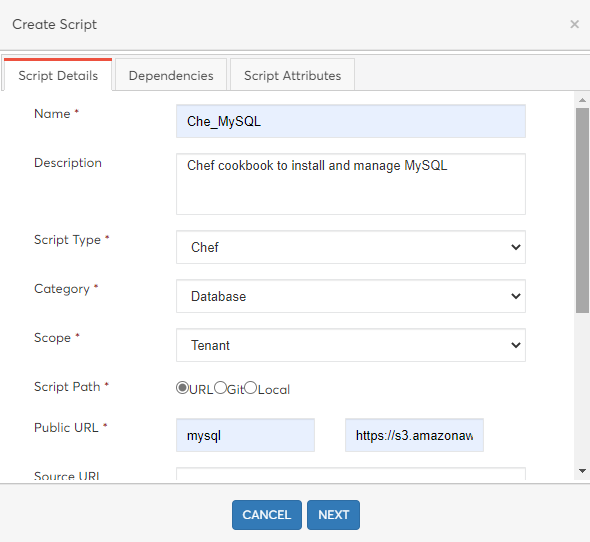
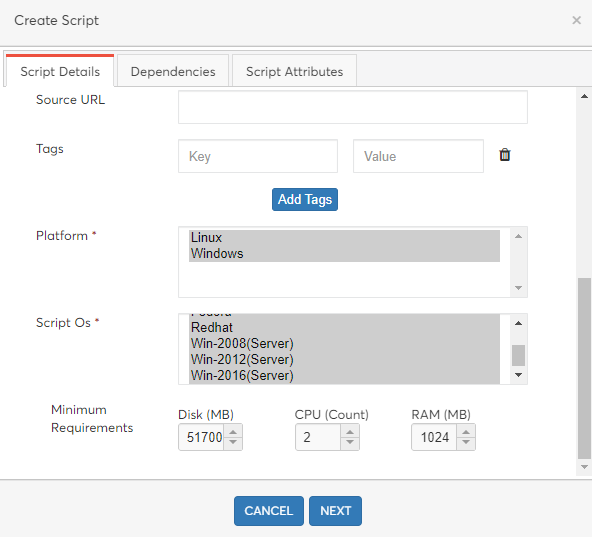
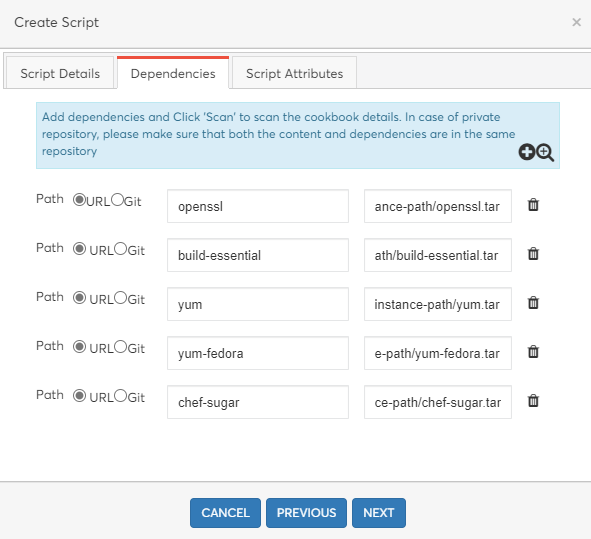
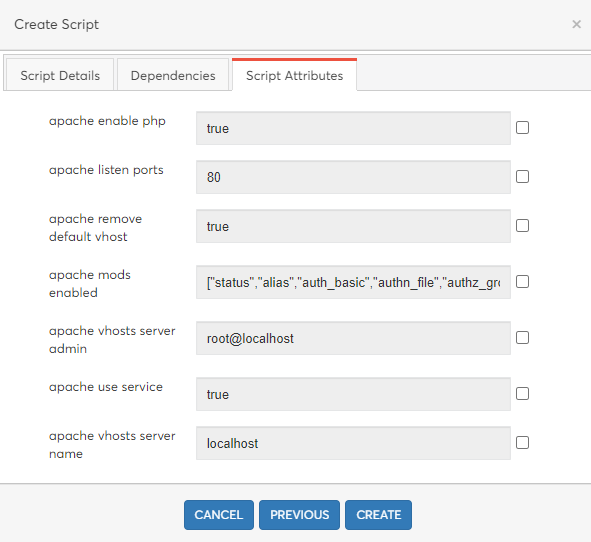
Script create window will have 3 sections as follows: Script Details, Dependencies (specific to Chef) and Attributes.
| Field | Description |
|---|---|
| Name | Name of the script. |
| Description | Detailed description about Script |
| Script Type | Type of Script |
| Category | Category of script. Used to group and list the scripts. |
| Scope | Scope of the template. |
| Script Path | Path type of Script Content. File, URL, Git and Local. This option will be shown based on the Script type. |
| Script Details | Details about Script Content. Will vary based on the Scrip Path chosen. Content can be single file or compressed set of files or a project in Git. |
| Platform | Platforms supported by the Script. |
| Script OS | OS Versions supported by Script. |
| Minimum Requirements | Minimum specification required for the instance to execute this Script. |
| Dependencies | Specific to Chef. You can use 'Scan Dependencies' option to fins dependencies of main cookbook. |
| Attributes | Input parameters for the Script. For Chef and Ansible this will be collected from the content. For Shell scripts user needs to add the attributes. All the parameters will be shown as optional by default. User can make it as mandatory by clicking the checkbox. |
Script Paths
- File – Content needs to be uploaded as file using 'Browse' button.
- URL – Content will be downloaded from a public URL.
- Git – Content will be available in Git project.
- Local – Compressed archive of the Script content.
- Repository – Puppet's default modules library. Only the module name will be asked.
Job History
Lists all script executions of the current tenant. A sample screenshot is shown below. The tabs at the top right represents the archive status of jobs. You can see 2 tabs: Active Jobs and Archived Jobs.
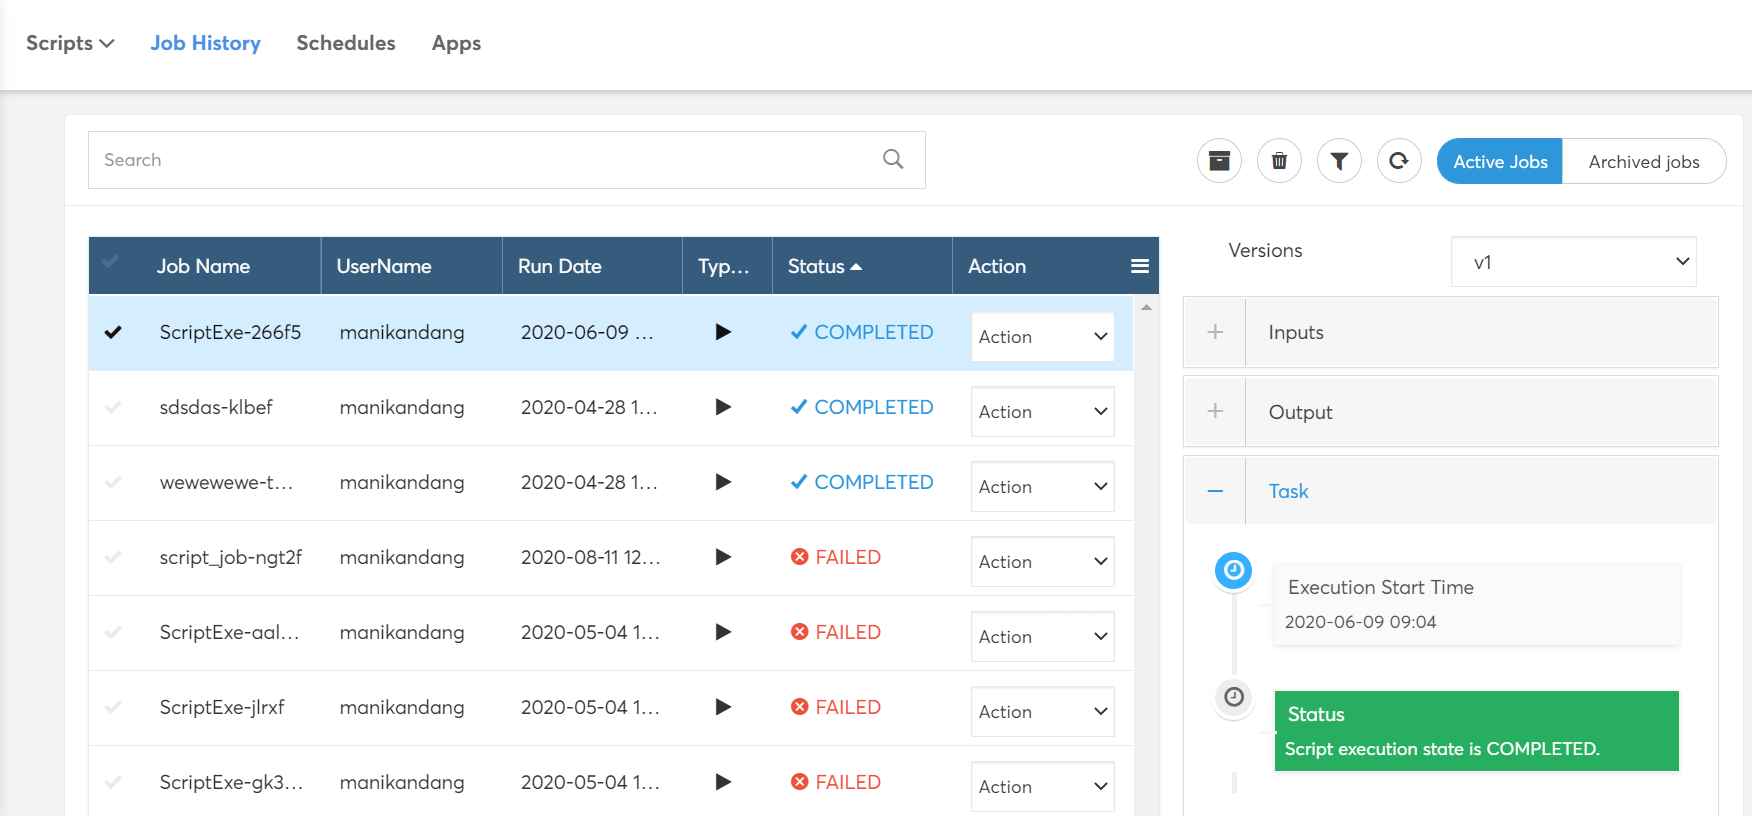
Script Job History page offers search and filter functions to help quickly look for the executions. The Search bar is available just above the jobs list. To Filter Jobs, you can click on the "Filter" icon placed to the right end above the Job detail tab.
Script Job History page also has Archive, Un-Archive and Delete Actions. These actions can be used to have limited number of executions in Job history page.
Job history page has option to refresh the Jobs list. This will help when you are landing here from template execute page. By the time you are landing the Job might be IN_PROGRESS state. This will help to refresh the status.
Script Jobs list show the following columns in the list.
- Username – CoreStack username who triggered the Job.
- Run Date – Date & Time of the Job execution
- Type – Execution Type (On-Demand or Scheduled)
- Status – Status of the Job execution
- Actions – Re-Run, will trigger execution again with the same input details. Re-run of a job will create a new version for the Job. You can select the version in detail tab to view the status and output by version.
Script Job Detail will be shown on clicking Job from the list. This will show three tabs. Inputs, Output and Taks.
- Inputs – Instances and input parameters passed for the execution.
- Output – Outputs from the script execution grouped by Instance and Script.
- Task – Execution status and time taken to the execution.
Schedules
Lists all script execution schedules of the current tenant. The tabs at the top right represents the schedule status. You can see 2 tabs: Upcoming and Past. Upcoming will list the schedules which are active, to be execute on future based on its scheduled time. Past will list the schedules which are no longer going to be executed. Eg. Scheduled Once will be moved to Past tab after its execution.
Script Schedules page offers search and filter functions to help quickly look for the schedules. The Search bar is available just above the schedules list. To Filter Jobs, you can click on the "Filter" icon placed to the right end above the Schedule detail tab.
Script Schedules list show the following columns in the list.
- Schedule Name – Name of the schedule
- Recurrence – Recurrence of the Schedule (Once/ Daily / Weekly / Monthly / Yearly)
- Next Run Time – Date and Time of the Next execution
- Requested By – CoreStack username who created the schedule.
Script Schedule Detail will be shown on clicking Schedule from the list. This will show the execution history the schedule which will redirect to Job history page and filter by this schedule. It's also supports the following actions on schedule.
- Edit (All Occurrences) – Modifies the Schedule like Schedule Create
- Delete (All Occurrences) – Deletes the Schedules.
CoreStack™ also provides the control over the next execution of the schedule. You can remove the next execution or can edit the next execution time alone without modifying the schedule. For example, in a daily 12pm schedule, you can change the time of the next execution.
Updated about 2 months ago