How to Onboard a GCP Billing Account
Learn how to onboard a Google Cloud Platform (GCP) billing account in CoreStack.
Overview
In this section, we'll help guide you in onboarding a Google Cloud Platform (GCP) Billing Account into CoreStack.
Pre-onboarding
GCP Projects can be onboarded as a Billing Account in CoreStack. Onboarding a Billing Account allows you to discover the cost information of all its linked GCP Projects.
However, before your GCP project can be onboarded into CoreStack, there are certain prerequisites that need to be met.
Set Up Cloud Billing Data Export to BigQuery:
To enable your Cloud Billing usage costs and/or pricing data to be exported to BigQuery, please do the following:
-
In the Google Cloud console, go to the Billing export page.
-
Click to select the cloud Billing account for which you would like to export the billing data. The Billing export page opens for the selected billing account.
-
On the BigQuery export tab, click Edit settings for each type of data you'd like to export. Each type of data is configured separately.
-
From the Projects list, select the project that you set up which will contain your BigQuery dataset.
The project you select is used to store the exported Cloud Billing data in the BigQuery dataset.
- For standard and detailed usage cost data exports, the Cloud Billing data includes usage/cost data for all Cloud projects paid for by the same Cloud Billing account.
- For pricing data export, the Cloud Billing data includes only the pricing data specific to the Cloud Billing account that is linked to the selected dataset project.
-
From the Dataset ID field, select the dataset that you set up which will contain your exported Cloud Billing data.
For all types of Cloud Billing data exported to BigQuery, the following applies:
-
The BigQuery API is required to export data to BigQuery. If the project you selected doesn't have the BigQuery API enabled, you will be prompted to enable it. Click Enable BigQuery API to enable the API.
-
If the project you selected doesn't contain any BigQuery datasets, you will be prompted to create one. If necessary, follow these steps to create a new dataset.
-
If you use an existing dataset, review the limitations that might impact exporting your billing data to BigQuery, such as being unable to export data to datasets configured to use customer-managed key encryption.
For pricing data export, the BigQuery Data Transfer Service API is required to export the data to BigQuery. If the project you selected doesn't have the BigQuery Data Transfer Service API enabled, you are prompted to enable it. If necessary, follow these steps to enable the API.
-
-
Click Save.
Onboarding a GCP Billing Account with Terraform
Perform the following steps to onboard GCP billing account:
- Sign in to the GCP console: https://console.cloud.google.com.
- Sign in to your organization’s cloud account with a user ID and a password.
- Click the icon for Command Line Interface as shown in the image below.

-
On the Cloud Shell Terminal screen, clone the GitHub repository by running the below command in a specific folder.
git clone https://github.com/corestacklabs/Onboarding_Templates.git

The repo is now downloaded.
- To switch to a particular directory, use the command provided below.
cd Onboarding_Templates/GCP/Billing-account/

-
To execute the file, run the command:
chmod +x run.sh

- You need the Project ID which is going to be onboarded as a billing account and can be found in the hierarchy. After you get the Project ID, paste the details in a notepad and use this information when prompted.

- You will also need the Table ID and the data location later, when prompted. Perform the following steps to retrieve them:
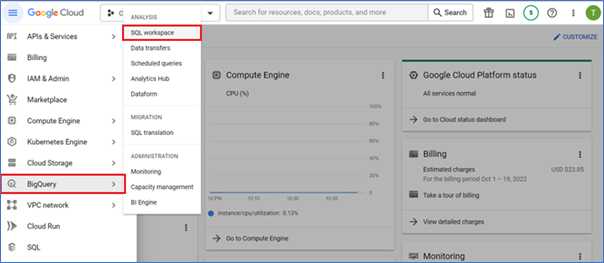
a. Click BigQuery > SQL Workspace.
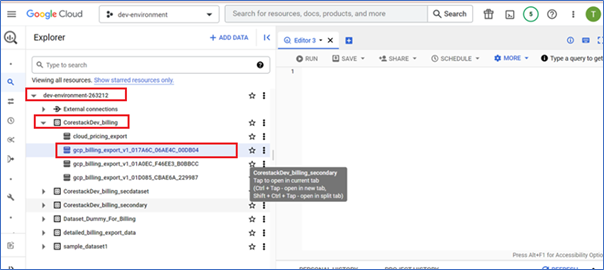
b. On the left panel, click the arrow icon to expand the main project > click the required dataset > click the relevant billing export file.
Copy the Table ID and data location.
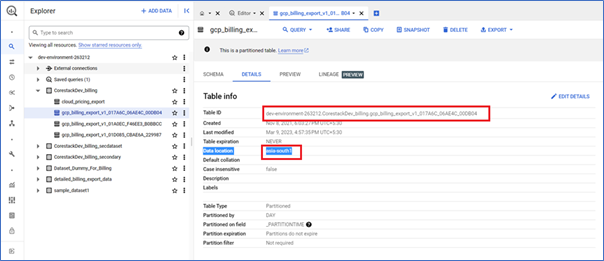
After you get the Table ID and data location, paste the details in a notepad so you can access this information when prompted.
- On the Cloud Shell Editor screen, run the command:
sh run.sh
Note:
A Project Owner and BigQuery Admin can successfully execute this script. Make sure to assign both of these roles to the user who is executing the script.
A message is displayed asking if you have the Project Owner role and the BigQuery Admin role needed to successfully run the script.
- In the command prompt, type yes or no.

- If you type no, the script will exit without executing it.
- If you type yes, then you will get prompts to enter the Project ID, bucket location, and Table ID.
- Type the Project ID, data location, and Table ID.

Note:
- Refer to step 7 to get the Project ID.
- Refer to step 8 to get the data location and Table ID.
The following command should run now.
terraform init
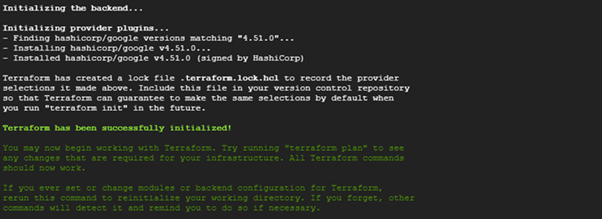
- If the BigQuery data transfer service was never used before, then provide the authentication when prompted. The auth prompt will appear and you must click the link to get the verification code.
- Click Allow and then you will get the verification code.
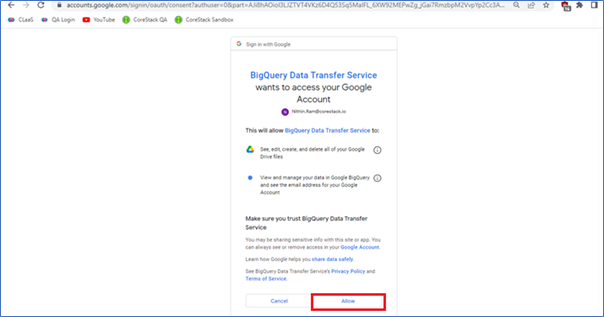
- Copy the verification code and paste it in the Cloud Shell terminal when you see the prompt for version_info.

If it works successfully, you will see that a transfer configuration is created and Terraform starts executing.

Run the Shell script to see the resources created through Terraform.

Steps to Overcome Failure
If something fails, perform this step before re-running the Run.sh command:
Sh delete.sh

This will fail into the error, which is a dependency error, but you are good to go and can run the Run.sh command again.

Generating JSON File for Account Onboarding
A key file, also known as JSON file, can be downloaded from the service account which you created from the onboarding script. After the key file is downloaded, you can use the same file to onboard an account in CoreStack.
- Navigate to IAM & Admin > Service Accounts.
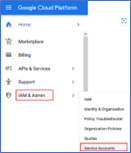
- Click Service accounts and then click the service account name created for CoreStack. In this case, click corestack-auth.

- In the KEYS tab, click ADD KEY list and then select Create new key.
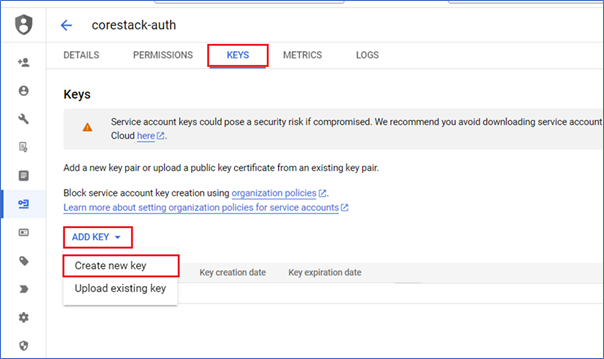
- In the Create private key for “corestack-auth” dialog box, do the following:
- In the Key type field, click to select JSON.
- Click CREATE.
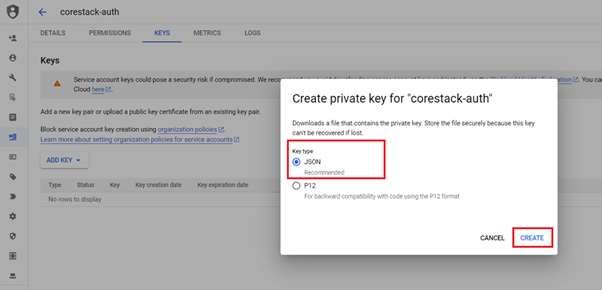
After the key is downloaded, proceed with GCP account onboarding in the CoreStack portal.
Generating Authentication Credentials for Onboarding Account
For onboarding an account in CoreStack, you will need bucket name, account ID, dataset name, and project ID.
Perform the following steps to get the account credentials:
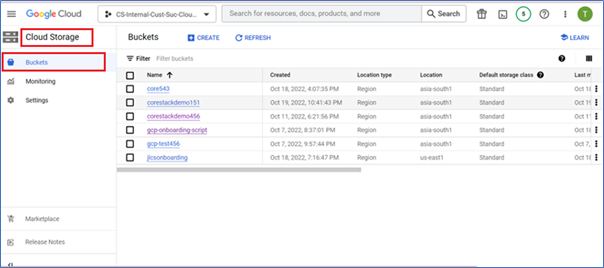
- To get the bucket name, perform the following:
- On the GCP Cloud Console, click Cloud Storage > Buckets.
- Identify the bucket for account onboarding and copy the bucket name.
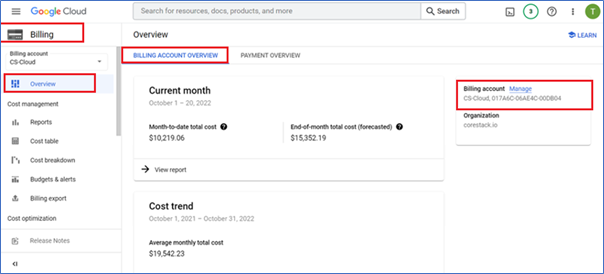
- To get the billing account ID, perform the following:
- Click Billing.
- In the Billing Account list, click to select the account name.
- Click Overview > BILLING ACCOUNT OVERVIEW.
- Note the billing account ID from Billing account field.
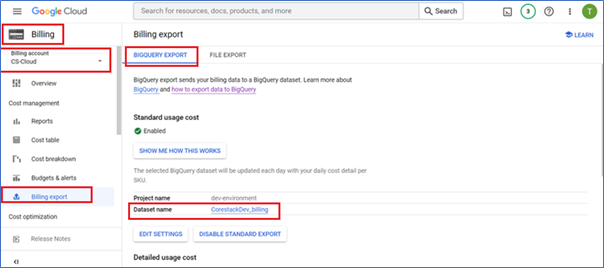
- To find the dataset name in the billing data export to BigQuery, perform the following:
- Click Billing.
- In the Billing Account list, click to select the account name.
- Click Billing export > BIGQUERY EXPORT.
- In the Dataset name field, note the name of the dataset.
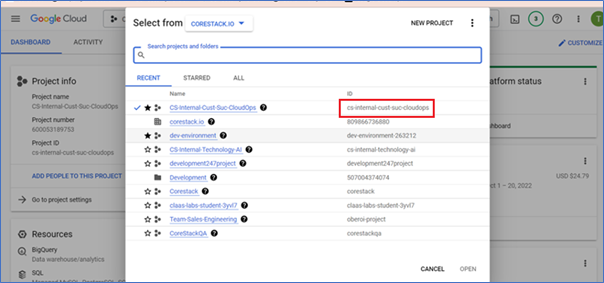
- Identify the project ID from the hierarchy.
Onboarding GCP Billing Account
Perform the following steps to onboard a GCP billing account:
- Sign in to the CoreStack application.
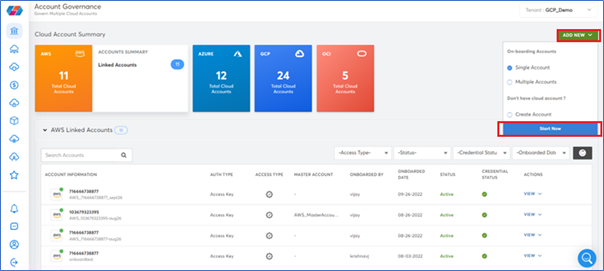
- Click ADD NEW > Start Now.
Note:
Ensure that the option Single Account is selected.
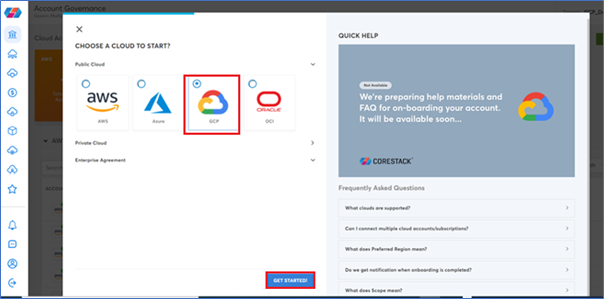
- On the CHOOSE A CLOUD TO START? screen, do the following:
- In the Public Cloud field, click to select GCP.
- Click GET STARTED.
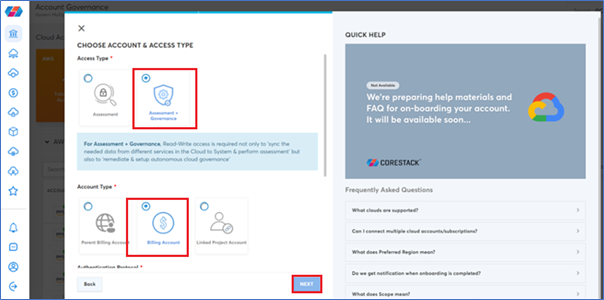
- On the CHOOSE ACCOUNT & ACCESS TYPE screen, perform the following:
- In the Access Type field, click to select Assessment + Governance.
- In the Account Type field, click to select Billing Account.
- Click NEXT.
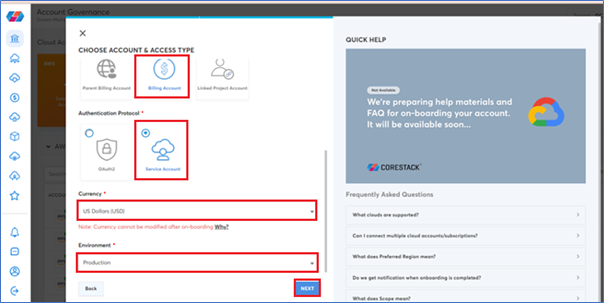
- On the next screen, do the following:
- In the Account Type field, click to select Billing Account.
- In the Authentication Protocol field, click to select Service Account.
- In the Currency list, click to select an appropriate currency. The option US Dollars (USD) is selected here.
- In the Environment list, click to select Production.
- Click NEXT.
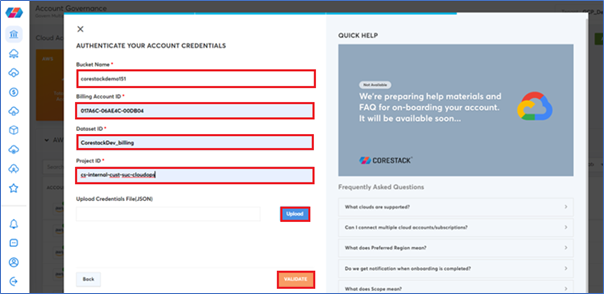
- On the AUTHENTICATE YOUR ACCOUNT CREDENTIALS screen, perform the following:
Fill the following fields:
- Bucket Name
- Billing Account ID
- Dataset ID
- Project ID
Note:
Refer to Generating Authentication Credentials for Onboarding Account to get details to be filled in the above four fields.
In the Upload Credentials File (JSON) field, click Upload and select the file to be uploaded.
- Refer to Generating JSON File for Account Onboarding.
Click VALIDATE.
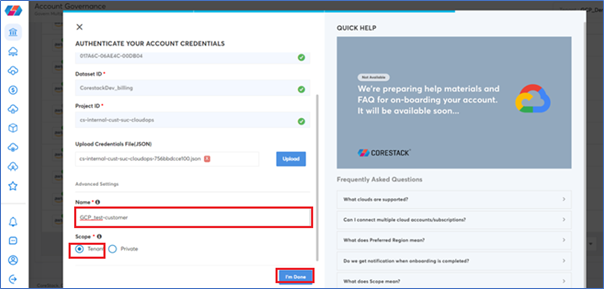
- In the Advanced Settings section, perform the following steps:
- In the Name box, type the new account name.
- In the Scope field, click to select Tenant.
- Click I’m Done.
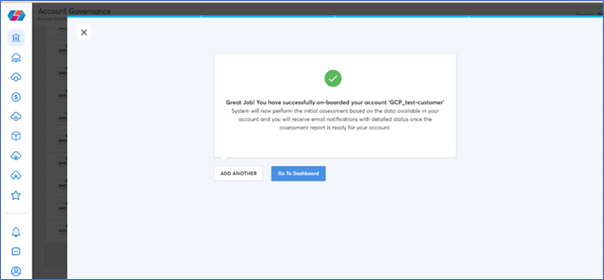
A confirmation message displays that says that the GCP account is successfully onboarded.
Updated about 1 year ago