
How to Onboard an Azure Subscription (Pay as You Go)
This topic guides you to onboard an Azure Subscription (Pay as You Go) into CoreStack.
Pre-onboarding
There are certain pre-requisites that need to be set up in your Azure Subscription before it can be onboarded into CoreStack.
CoreStack uses Daemon Application scenario with Client Credentials flow for OAuth 2.0 flow and grant type as depicted here. Client Credential flow requires a valid Application registration to be created for a specific Azure subscription to successfully allow access to the required Azure resources.
To onboard your Azure subscription into CoreStack, the following values must be generated/copied from your Azure console and configured in CoreStack.
- Tenant ID
- Application ID
- Application Secret
- Subscription Information
As you retrieve each of these values, keep them ready in a notepad to be able to copy/paste into CoreStack while onboarding.
Step 1: Fetch Tenant ID
- Login to the Azure Portal (https://portal.azure.com).
- Navigate to Azure Active Directory ( Microsoft Entra ID).
- Click Properties. The Properties screen appears.
- The Tenant ID value will be displayed on the Properties screen.
- Click on the Copy icon to copy the Tenant ID.
Step 2: Fetch Application ID
- Navigate to Azure Active Directory > App registrations > New registration in the Azure Portal. The Register an application screen appears.
- Provide a name for the application, such as “CoreStack.App”.
The other fields can be left with the default options.
- The value of the Supported account types field can be Single Tenant.
- The value of the Redirect URI field can be blank.
- Click Register button.
The application will be registered, and the Application ID (Client ID) will be displayed in the Overview screen. Copy the Application ID.
Step 3: Fetch Application Secret
Application Secret is the password or key that you need to provide for the specific app that was just created.
- Navigate to Certificates & secrets from the Overview screen under Manage sub section.
- Click New client secret.
- Provide a description and expiry duration for the secret. You can leave the duration with the default value of 1 year. You can revoke this anytime later, if required.
- Click Add button. The Client secret will be created and displayed. Ensure that you copy this value since you cannot retrieve this later.
Step 4: Fetch Subscription Information
- Navigate to Subscriptions in the Azure Portal. A list of subscriptions will be listed under the selected AD Tenant.
- Select the Subscription that will be used for onboarding into CoreStack. The Overview screen appears.
- The subscription details will be displayed in the Overview screen.
- Copy the Subscription ID and Subscription Name values.
Step 5: IAM Access for App
The app that is created in Step 2 must have the required access within the subscription. To provide the access, please follow the below steps:
- Navigate to Subscriptions in the Azure Portal.
- Select Access Control (IAM).
- Click + Add and select Add role assignment. Add role assignment screen appears.
- Select Contributor or Reader in the Role drop-down. These should be available under Privileged administrator roles tab.
Note:
Contributor role is required for subscriptions that will be onboarded with Assessment + Governance option. If the subscription will be onboarded with Assessment option, Reader role can be selected.
- Ensure that the Azure AD user, group, or service principal option is selected in the Assign access to field.
- Search and select the app that was created earlier in the Select Members action – in this example “CoreStack.App” – in the Select field.
- Click Save button to assign the role.
Once the role is assigned, it will be listed in the Role Assignments tab.
- Repeat the steps 3 to 7 as specified above, but with Resource Policy Contributor selected in the Role drop-down and everything else remaining the same. This is required only if you intend to use CoreStack to create policies for your Azure subscription.
Note:
The Resource Policy Contributor role assignment is required only if you intend to use CoreStack to create policies for your Azure subscription.
Once the role is assigned, it will be listed in the Role Assignments tab.
Copy all these details and provide them while onboarding your Azure Subscription into CoreStack.
Why are these Permissions Required?
CoreStack requires Contributor access to the following Service Providers. However, the account owner can restrict access to specific services that will only be managed through CoreStack.
Following table explains the need for access to the service with the rationale:
| Azure Provider | Product/Category | Reader Access (For Discovery) | Contributor Access (For Actions) | Remarks |
|---|---|---|---|---|
| Microsoft.Compute | Virtual Machines Virtual Machines Scale Sets Virtual Machines Sizes Availability Sets Image Publishers Images Disks | Mandatory | Mandatory | |
| Microsoft.ContainerInstance | Container Groups | Preferred | Optional | |
| Microsoft.ContainerRegistry | Container Registry | Preferred | Optional | |
| Microsoft.ContainerService | Container Service Kubernetes | Preferred | Optional | |
| Microsoft.Storage | Storage accounts Storage Snapshots | Mandatory | Mandatory | |
| Microsoft.RecoveryServices | Recovery Vault | Preferred | Optional | |
| Microsoft.Network | Route Tables Network Security Group Virtual Networks Public IP Address Traffic Manager Profiles Load Balancer Express Routes Application Gateway Application Gateway Available SSL Policy | Mandatory | Mandatory | |
| Microsoft.Sql | SQL | Preferred | Optional | |
| Microsoft.DBforPostgreSQL | PGSQL | Preferred | Optional | |
| Microsoft.DBforMySQL | Mysql | Preferred | Optional |
- Preferable: Access is not mandatory. However, some of the automation features will be not functional without the required access. You can exclude them for “Assessment-Only”.
- Optional: Not mandatory, similar to that of Preferable, core features will continue to work. Some low-level actions will have an Impact. You can exclude them for “Assessment-Only”.
- Mandatory: Non-negotiable, even to onboard account with read-only permissions (“Assessment-Only”), these access details would be needed.
Impact on the Azure Subscription
If you intend to use CoreStack for remediation and automation, CoreStack creates resources and applies some configurations in Azure while configuring these capabilities in CoreStack.
Alert Rules and Alert Actions:
Alert rules will be created when monitoring thresholds are configured as part of the Operations – Alerts module.
A new alert action will be added to the created rules to invoke CoreStack notification webhook when threshold alert is triggered.
Azure Policy
CoreStack will create the Policy Definitions and Assignments based on the GuardRails you prefer to set-up for your Azure Subscription.
Security Center
CoreStack will enable the Free-tier or Standard Tier for the resources based on the security configurations. (Enabling Standard Tier has cost implications, please exercise caution during configuration).
Billing Impact due to CoreStack Onboarding
There is no billing impact as such in configuring your account with CoreStack until certain services are consumed through CoreStack. Following are the few areas where there might be cost implications.
| Feature | Free Units Included | Price | CS Remarks |
|---|---|---|---|
| Alert Notifications | 100,000 web hooks per month | $0.60/1,000,000 web hooks | N/A |
| Dynamic Thresholds | None | $0.10 per dynamic threshold per month | CoreStack does not create Dynamic Thresholds as part of account onboarding. However, you can configure through Operations template, if required. |
| Azure Security Center | Free Tier | Pricing varies per resource type. | Standard Tier if opted will have higher cost impact. Refer Azure pricing page for more details. |
| Monitoring Metrics | 10 monitored metric time-series per month | $0.10 per metric time-series monitored per month | N/A |
Account Onboarding Using PowerShell Script
Overview
Users can utilize a PowerShell script that simplifies the process of onboarding new accounts into the platform by automating several critical steps. This allows for an efficient and error-free operation, ensuring that all required components are properly configured without the need for any manual intervention.
The steps involved in the onboarding process are:
- Selecting Azure Subscriptions
- Assigning roles
- Creating a service principal
- Registering the necessary resource providers
Prerequisites
Before going ahead with the automated process of onboarding Azure accounts, users must check for the following prerequisite conditions.
- First, check whether the Azure PowerShell module is installed. Run the command below to check for the Azure PowerShell module.
Get-Module -Name Az -ListAvailable- If Azure PowerShell module is not installed, then install it by running:
Install-Module -Name Az -AllowClobber -Scope CurrentUser Import-Module Az - Next, run the command below to check whether AzureAD module is installed.
Get-Module -Name AzureAD -ListAvailable- If AzureAD module is not listed, then install it by running:
Install-Module -Name AzureAD -AllowClobber -Scope CurrentUser Import-Module AzureAD - Users must have the appropriate permissions (i.e. Owner-level access in Subscription) to create applications and assign roles in Azure.
Script Description
The PowerShell script performs the following main tasks:
- Create a Service Principal: Facilitates the creation of a new service principal in Azure AD with a display name provided by the user.
- Select Azure Subscriptions: Allows the user to select one or multiple Azure Subscriptions or choose all enabled Subscriptions.
- Assign Roles to Service Principal: Assigns the selected roles (like Reader, Contributor, etc.) to the service principal across chosen Subscriptions.
- Register Azure Resource Providers: Registers a predefined list of Azure resource providers necessary for operations in the platform.
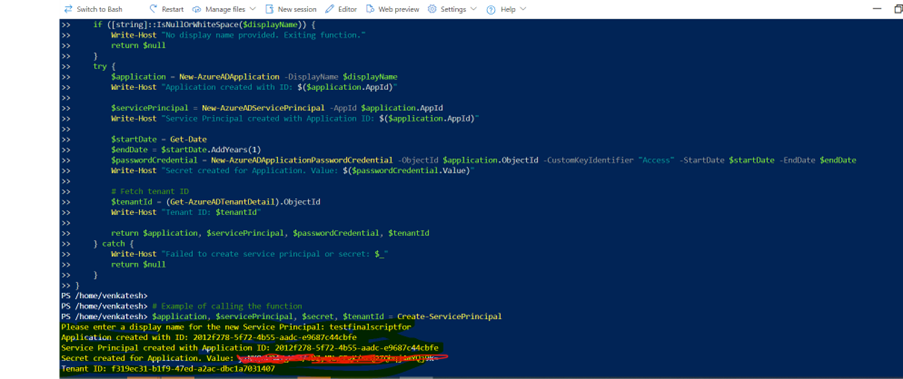
Refer to the PowerShell script below that can be used for onboarding.
# Function to create Service Principal and generate a secret
Connect-AzureAD
function Create-ServicePrincipal {
	$displayName = Read-Host "Please enter a display name for the new Service Principal"
	if ([string]::IsNullOrWhiteSpace($displayName)) {
    Write-Host "No display name provided. Exiting function."
    return $null
 }
 try {
    $application = New-AzureADApplication -DisplayName $displayName
    Write-Host "Application created with ID: $($application.AppId)"
    $servicePrincipal = New-AzureADServicePrincipal -AppId $application.AppId
    Write-Host "Service Principal created with Application ID: $($application.AppId)"
    $startDate = Get-Date
    $endDate = $startDate.AddYears(1)
    $passwordCredential = New-AzureADApplicationPasswordCredential -ObjectId
   	$application.ObjectId -CustomKeyIdentifier "Access" -StartDate $startDate -EndDate $endDate
   	 Write-Host "Secret created for Application. Value: $($passwordCredential.Value)"

   # Fetch tenant ID
   $tenantId = (Get-AzureADTenantDetail).ObjectId
   Write-Host "Tenant ID: $tenantId"
   return $application, $servicePrincipal, $passwordCredential, $tenantId
 } catch {
    Write-Host "Failed to create service principal or secret: $_"
    return $null
 }
}

# Example of calling the function
$application, $servicePrincipal, $secret, $tenantId = Create-ServicePrincipal
Start-Sleep -Seconds 10

# Function to list and select the subscriptions
function Select-Subscription {
  param (
    [string]$title,
    [array]$subscriptions
 )
 Write-Host $title
 for ($i = 0; $i -lt $subscriptions.Count; $i++) {
    Write-Host "$($i+1) : $($subscriptions[$i].name) - $($subscriptions[$i].id)"
 }

# Adding an option for selecting all subscriptions
Write-Host "$($subscriptions.Count + 1) : All Subscriptions"
$indices = Read-Host "Enter the indices of the subscriptions (comma separated, or select 'All'):"

# Check if the user selected "All"
if ($indices -eq $($subscriptions.Count + 1)) {
    return $subscriptions
}
else {
   $selectedIndices = $indices -split ',' | ForEach-Object { [int]$_ - 1 }
   $selectedSubscriptions = $selectedIndices | ForEach-Object { $subscriptions[$_] }
   return $selectedSubscriptions
 }
}

# Assuming $subs is a JSON string from the output of `az account list`
$subs = az account list --query "[?state=='Enabled']" --only-show-errors
$subs_ids = $subs | ConvertFrom-Json
$selectedSubscription = Select-Subscription -title "Please select a subscription:" -subscriptions $subs_ids

# Displaying the selected subscriptions
foreach ($sub in $selectedSubscription) {
	Write-Host "Selected subscription: $($sub.name) - $($sub.id)"
}
$selectedSubscription | Format-Table -Property Name, Id, State, IsDefault -AutoSize

# Function to define the roles
function Show-Menu {
  param (
    [string]$title,
    [hashtable]$menuItems,
    [bool]$allowMultiple = $false
	)
	Write-Host "`n$title"
	$menuItems.Keys | Sort-Object | ForEach-Object { Write-Host "$_ : $($menuItems[$_])" }
	if ($allowMultiple) {
    $input = Read-Host "Enter choices separated by commas (e.g., 1,2)"
    $choices = $input -split ',' | ForEach-Object { $_.Trim() }
	} else {
    $choices = @(Read-Host "Enter choice")
	}
 $selectedItems = $choices | ForEach-Object { $menuItems[$_] }
  return $selectedItems
}

# Define the possible role definitions in a hashtable
$roleDefinitions = @{
  "1" = "Reader"
	"2" = "Contributor"
	"3" = "Resource Policy Contributor"
  }

# Display menu and get user choices
$selectedRoles = Show-Menu -title "Select Role Definitions" -menuItems $roleDefinitions -allowMultiple $true

# Display the selected roles
$selectedRoles | ForEach-Object { Write-Host "- $\_" }

# Assining the role to the selected subscriptions
foreach ($sub in $selectedSubscription) {
  $context = Set-AzContext -SubscriptionId $sub.id -ErrorAction SilentlyContinue
	if ($context) {
    Write-Host "Switched to subscription: $($sub.name)"

    # Assign each selected role to the service principal for the subscription
    foreach ($role in $selectedRoles) {
        try {
            # Make sure to use ServicePrincipal ObjectId
            $roleAssignment = New-AzRoleAssignment -ObjectId $servicePrincipal.ObjectId -RoleDefinitionName $role -Scope "/subscriptions/$($sub.id)" -ErrorAction Stop
            Write-Host "Successfully assigned $role to service principal $($servicePrincipal.AppId) in subscription $($sub.name)"
       	 } catch {
            Write-Host "Failed to assign $role to service principal $($servicePrincipal.AppId) in subscription $($sub.name): $_"
      	 }
     	}
		}
 }

# Registering the Mandatory Resources Providers for the selected subscription/subscriptions
$resourceProviders = @(
  "Microsoft.Authorization",
	"Microsoft.Billing",
	"Microsoft.Commerce",
	"Microsoft.Consumption",
	"Microsoft.CostManagement",
	"Microsoft.Insights",
	"Microsoft.Network",
	"Microsoft.PolicyInsights",
	"Microsoft.Security",
	"Microsoft.Compute",
	"Microsoft.ContainerInstance",
	"Microsoft.ContainerRegistry",
	"Microsoft.ContainerService",
	"Microsoft.DBforMySQL",
	"Microsoft.DBforPostgreSQL",
	"Microsoft.DevTestLab",
	"Microsoft.RecoveryServices",
	"Microsoft.SQL",
	"Microsoft.Storage",
	"Microsoft.Web"
)
foreach ($sub in $selectedSubscription) {

  # Set the Azure context to the current subscription in the loop
  $context = Set-AzContext -SubscriptionId $sub.id -ErrorAction SilentlyContinue

# Pause after setting the context to ensure it has been applied
Start-Sleep -Seconds 10
  if ($context) {
    Write-Host "Switched to subscription: $($sub.name)"
    # Now perform actions on the current subscription
    foreach ($provider in $resourceProviders) {
        try {
            $status = Get-AzResourceProvider -ProviderNamespace $provider
            if ($status.RegistrationState -eq "Registered") {
                Write-Host "Resource provider $provider is already registered in $($sub.name)."
            } else {
                Register-AzResourceProvider -ProviderNamespace $provider | Out-Null
                Write-Host "Registered resource provider: $provider in $($sub.name)"

# Wait after registering a provider to ensure the operation completes
Start-Sleep -Seconds 20
         }
        } catch {
          Write-Host "Failed to retrieve or register the resource provider $provider in $($sub.name). Error: $_"
        }
      }
		} else {
   		 Write-Host "Failed to set context to subscription: $($sub.name)"
	  }
  }
exit-PSSession
Onboarding Steps
Perform the following steps to complete the onboarding process for Azure cloud accounts using the PowerShell script:
-
To create a service principal, when prompted, enter a display name for a new Azure AD application and service principal.
The script creates the application and service principal, and generates a secret key valid for one year. You can view the tenant ID, application ID, and secret value (Note: We strongly recommend copying these values down in a notepad).
-
When prompted, enter the indices of the Azure Subscription(s) for onboarding separated by commas, or choose all Subscriptions by entering a special index.
-
When prompted, select one or more roles to assign to the service principal. It then assigns the selected roles to the service principal for each chosen Subscription.
-
The script automatically attempts to register a set of required Azure resource providers if they are not already registered.
Error Handling:
The script includes error handling to provide feedback if any operation(s) fail, such as role assignments or resource provider registration.
Onboarding
The following steps need to be performed to onboard an Azure Subscription.
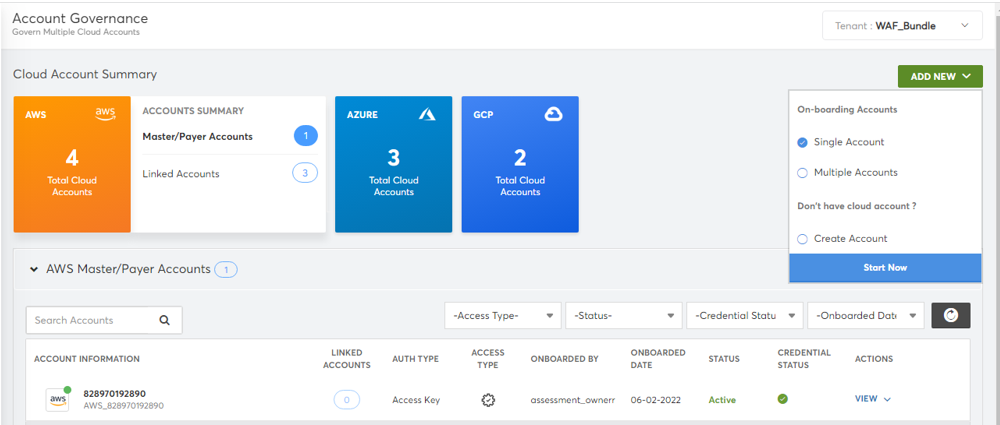
- Click Add New button in the CoreStack dashboard and select Single Account.
- Click Start Now. The onboarding screen appears.
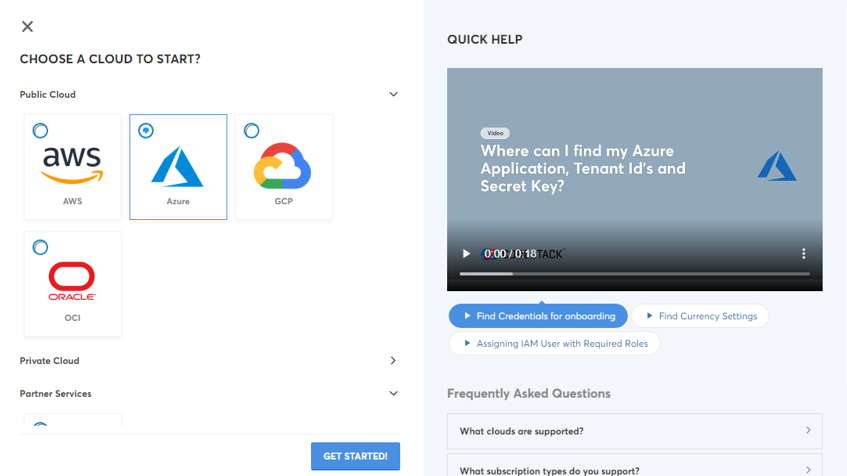
- Select Azure option in the Public Cloud field.
- Click Get Started button.
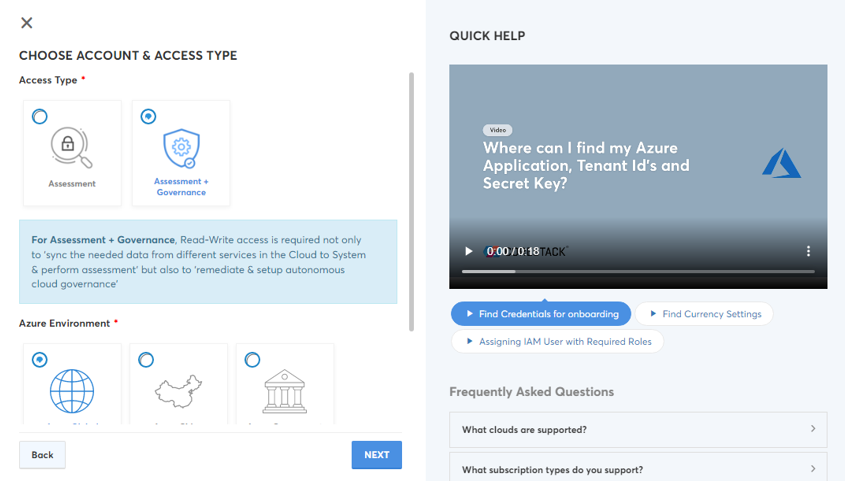
- Select the required option in the Access Type field. The options are: Assessment and Assessment + Governance.
- Select the required option in the Azure Environment field. The options are: Azure Global, Azure China, and Azure Government.
- Select the required currency in the Currency drop-down list.
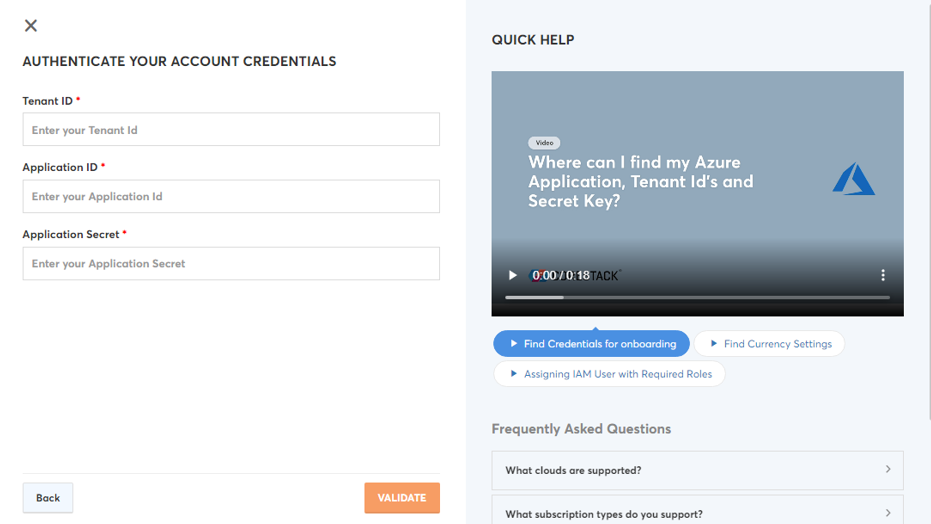
- Click Next.
- Provide the details for other fields (Tenant ID, Application ID, Application Secret) as explained in the Pre-onboarding section.
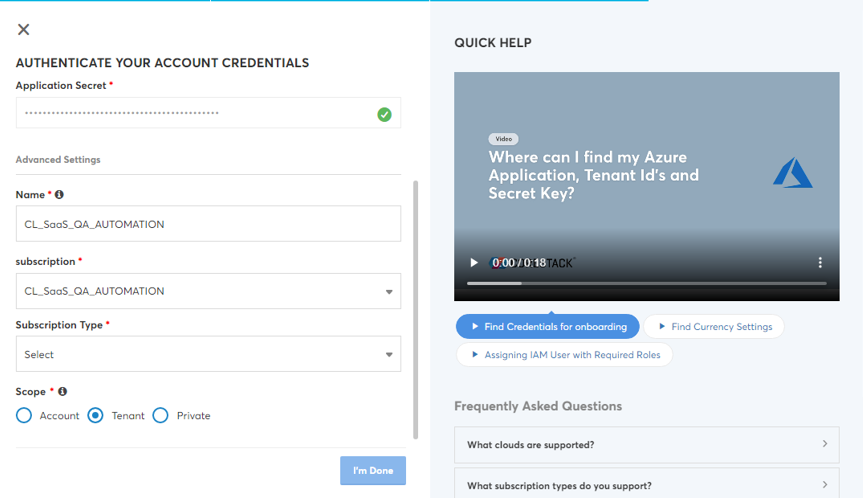
- Click Validate button.
- The Advanced Settings section will be displayed with additional fields (Name, Subscription, Subscription Type, Parent Account, and Scope).
- Modify the pre-populated name of the account in the Name field, if required.
- Select the required subscription in the Subscription drop-down list.
- Select the Pay As You Go option in the Subscription Type field.
- Select the required option in the Scope field. The options are: Account, Private, and Tenant.
- Click I’m Done button.
The Azure Subscription will be onboarded successfully into CoreStack. Relevant insights and information about the resources available in the account will be populated under each cloud governance pillars in CoreStack.
Updated about 1 year ago