
AWS Post-Onboarding
Post-Onboarding for AWS cloud accounts
This section covers assessment validation and governance configuration for your cloud accounts.
After you've added your AWS cloud accounts into CoreStack, you can see accounts listed as part of the Account Governance dashboard. You can check if CoreStack has valid permission to assess the data from cloud account and complete the governance configurations.
During on-boarding, you can create the following resources:
-
CloudTrail: This feature allows you to log, monitor, and retain account activity related to actions across your AWS infrastructure.
CoreStack requires a CloudTrail to be available in each of your AWS regions. CloudTrail is available with the resources running on your account. CoreStack will fetch all the users, account and resources related activity from CloudTrail and publish in operation posture in CoreStack. You may select an existing trail or create a new trail. Such new trails created may attract additional charges.
(Note: The first trail is free of cost. Any additional trail may involve charges).
-
S3 Buckets: As part of the cloud trail configurations, S3 buckets are also created in the respective AWS regions to collect the logs. CloudTrail will keep all logs and activity in respective S3 bucket. We can create a new S3 bucket or choose an existing S3 bucket for storing the trail log files.
- a) For existing trail, there are no new buckets created.
- b) To create a new trail, the corresponding S3 Bucket will be created and there will be a charge associated with it.
-
CloudWatch: This is a monitoring service for AWS cloud resources and the applications you run on AWS. You can use CloudWatch to collect and track metrics, collect and monitor log files, set alarms, and automatically react to changes in your AWS resources.
CloudWatch can monitor AWS resources such as EC2 instances, DynamoDB tables and RDS DB instances, as well as custom metrics generated by your applications and services, and any log files your applications generate. Alarms will be created for selected metrics for various resource types supported by CoreStack.
Post on-boarding, you will see the list of metrics for each resource type. You can define monitoring thresholds and alerts in CoreStack.
-
GuardDuty: GuardDuty is a threat detection service that continuously monitors for malicious activity and unauthorized behavior to protect your AWS accounts, workloads, and data stored in S3. The service uses machine learning, anomaly detection, and integrated threat intelligence to identify and prioritize potential threats.
CoreStack requires a GuardDuty to be available in each of your preferred AWS regions. CoreStack will fetch all identified threat by GuardDuty and publish in Security posture in CoreStack. You may select an existing GuardDuty to be used or choose the option to create a new GuardDuty.
(Note: Creating new GuardDuty instances may attract additional charges.)
-
Inspector: Amazon Inspector is an automated security assessment service that helps improve the security and compliance of applications deployed on AWS. Amazon Inspector automatically assesses applications for exposure, vulnerabilities, and deviations from best practices.
Assessment target needs to be enabled in AWS console to group the AWS EC2 instances to run the assessment. After performing an assessment, Amazon Inspector produces a detailed list of security findings prioritized by level of severity. CoreStack requires an Inspector to be available in each of your preferred AWS regions. CoreStack will fetch all identified vulnerabilities by Inspector and publish in Security posture in CoreStack.
You may select an existing Inspector to be used or choose the option to create a new Inspector in AWS console and then select the new Inspector when made available in CoreStack.
(Note: Creating new Inspector instances may attract additional charges.)
Note:
CoreStack currently supports the Inspector Classic version. However, the other version will also be supported soon.
Assessment validation for onboarded AWS accounts in CoreStack:
- Click View under Actions and select View Settings.
- Click Assessment Validation and Select Operations and Click Re-Validate.
This will validate if assigned permission to CoreStack is intact. - On Successful validation will reflect as permission Allowed.
- Perform the same validation for Security & Cost pillar.
Governance configuration for Onboarded AWS accounts:
Configuring Operation Pillar in CoreStack for an onboarded account
- Click View under Actions and select View Settings.
- Click Governance Configuration and Select Operations.
- Expand Activity logs and Click Configure.
- Select ‘Create New / use Existing’ based on cloudtrail availability in onboarded
cloud account and click Next. - Select desired Region and Cloudtrail for selected region.
- Click Validate and Save.
- Click Finish.
- Expand Alerts and click configure .
- Select Create Sample Alert and click Next.
- Click Validate and Next.
- Add respective email address/Webhook/MS Teams Webhook for alert notification.
- Click Finish.
Configuring Security Pillar in CoreStack for an onboarded account
- Click Governance Configuration and select Operations.
- Expand Threat Management and click Configure.
- Select Create New / Check existing configuration based on AWS GuardDuty
availability in onboarded cloud account and click Next. - Select desired Region and click Validate.
- Click Save & Finish.
- Expand Vulnerability Assessment and configure.
- Select Check Existing Configuration and click Next.
- Select desired Region and click Validate.
- Select Save & Finish.
- Expand Notification Settings and configure notification list based on your
requirements. Click Save & Apply.
Configuring Cost Pillar in CoreStack for an onboarded account
Enable Cost Anomaly. This will alert us if any deviation of cost from the baseline settings.
- Click Governance Configuration and Select Cost.
- Expand Cost Anomaly.
- Enable Cost Anomaly and configure notification list of Email address or
Webhook. - Click Save & Apply.
Policy Engine Option for AWS Accounts
CoreStack policy engine support is now available for AWS cloud accounts. Users can select from two options for policy engine -- CoreStack and AWS Config.
The CoreStack policy engine option is selected by default. This option requires the least amount of access permissions, and the execution results are available in real-time. To learn which permissions are required for the CoreStack policy engine option, refer to Onboarding Permissions for AWS - Assessment.
The AWS Config policy engine option is associated with charges from AWS. It requires elevated permissions to run policies. To learn which permissions are required for the AWS Config policy engine option, refer to Onboarding Permissions for AWS - Assessment + Governance.
Note:
The policy engine selection done during onboarding can be changed in post-onboarding settings, but in both the scenarios, only one engine type can be selected by the user.
For example, when a user selects the CoreStack policy engine and then triggers a compliance assessment against a standard, only the policies mapped to CoreStack will be executed (any other policy engine types will not be executed).
Configuring Policy Engine for AWS
Perform the following steps to configure policy engine for AWS account:
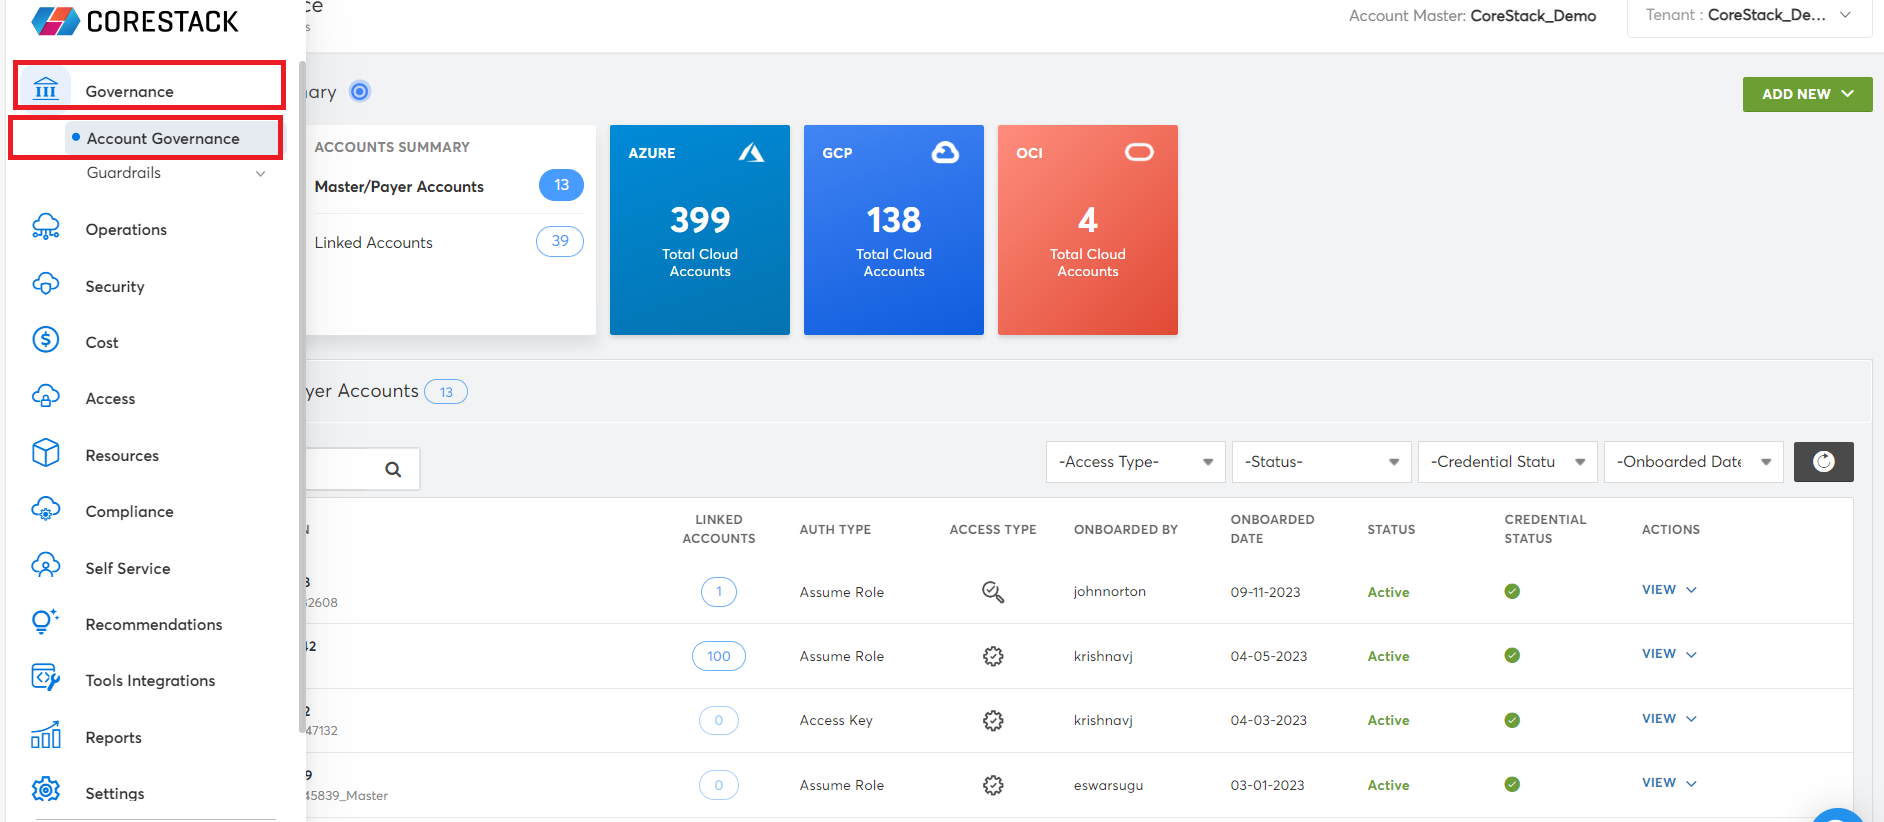
- Access the CoreStack application and go to Governance > Account Governance.
-
In the AWS block, click either Master/Payer Accounts or Linked Accounts to view the list of AWS cloud accounts.
-
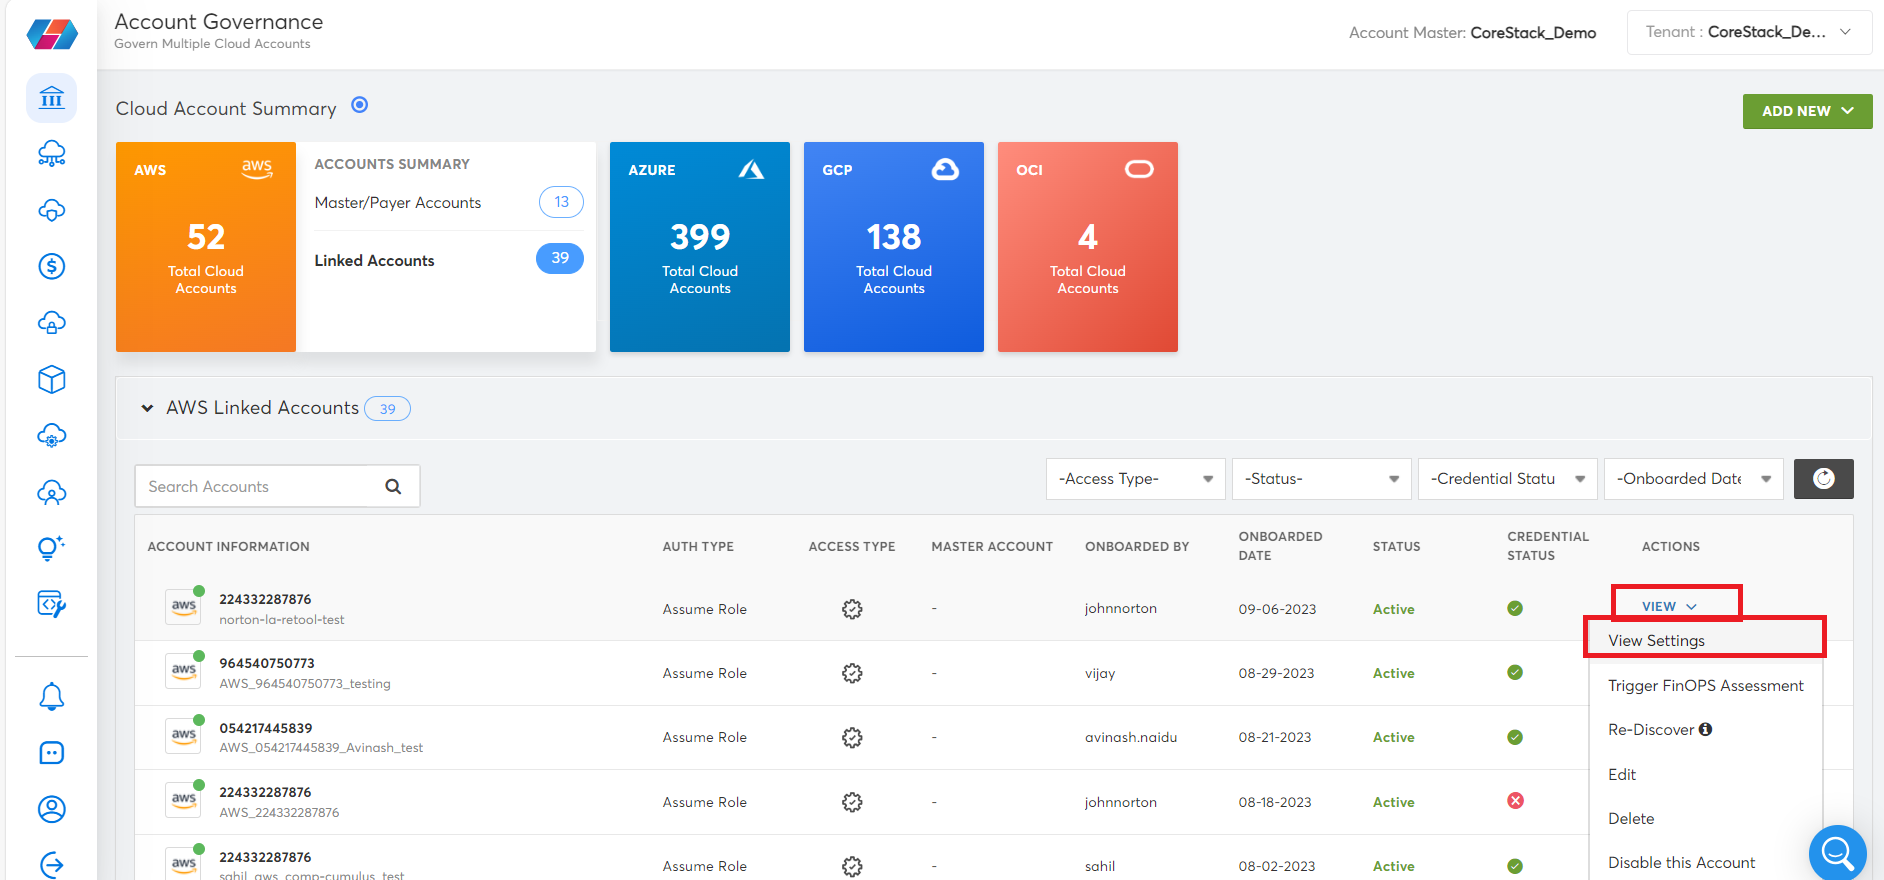
For a particular account, in the ACTIONS column, click VIEW > View Settings.
-
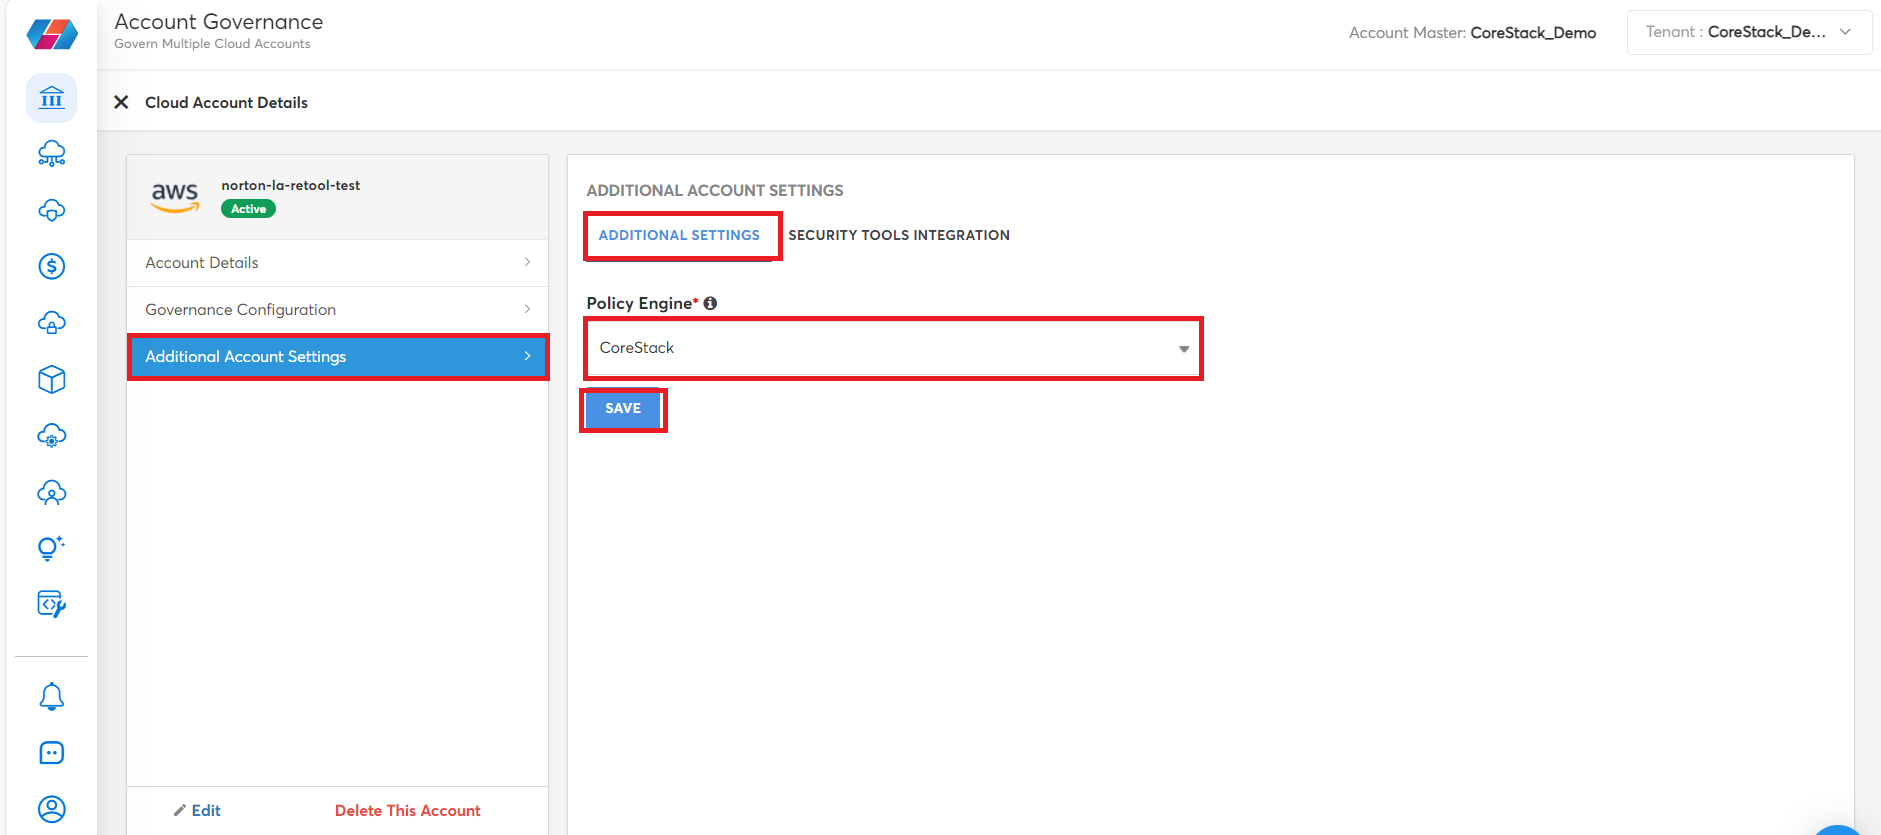
Click Additional Account Settings > ADDITIONAL SETTINGS.
-
In the Policy Engine list, click CoreStack or AWS Config.
-
Click SAVE.
Updated 8 months ago