Activity
Observability is an important aspect of Cloud Governance. You need to be aware of all activities happening in your cloud accounts to be able to control unnecessary activities and take necessary actions on time.
This section handles the configurations associated with managing notifications for cloud management activities happening in your cloud account(s). You can create notification rules for one or more specific activities and define the required notification mechanism – an email, standard webhook, or Microsoft Teams webhook.
Navigation
Click on Operations in the Left navigation menu and select the Activity option to go to the Activity and Notifications screen.
Creating a New Activity Notification
The following steps need to be performed to create a new activity notification:

- Click on the "New" button.
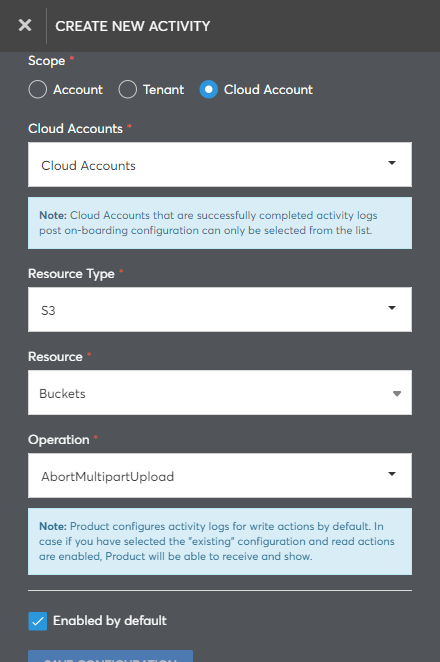
- Select the Scope involved in the notification: Account, Tenant, or Cloud Account.
- Account: Rule will apply to all cloud accounts across all your Tenants in CoreStack
- Tenant: Rule will apply to all cloud accounts added within this Tenant
- Cloud Account: Rule will apply only to the selected cloud account
Note:
If you select "Cloud Account" as the Scope, the required cloud accounts must be selected from the Cloud Accounts drop-down list.
- Select the type of resource in the Resource Type field for which the notification must be enabled.
- A list of resources will be populated in the Resource field based on the resource type selected. Select the required resource from the list.
- Select the activities for which notifications should be sent in the Operation field. The activity list is populated based on the resource selected.
- Tick the Enable by default checkbox to make the notification active as soon as it is created.
- Click on the Save Configuration button to create the activity notification.
A new activity notification will be created and listed in the Activity and Notification screen.
You can configure the mechanism for the newly created activity notification for email and/or webhook notifications.
- To select a notification mechanism, select the notification from the list.
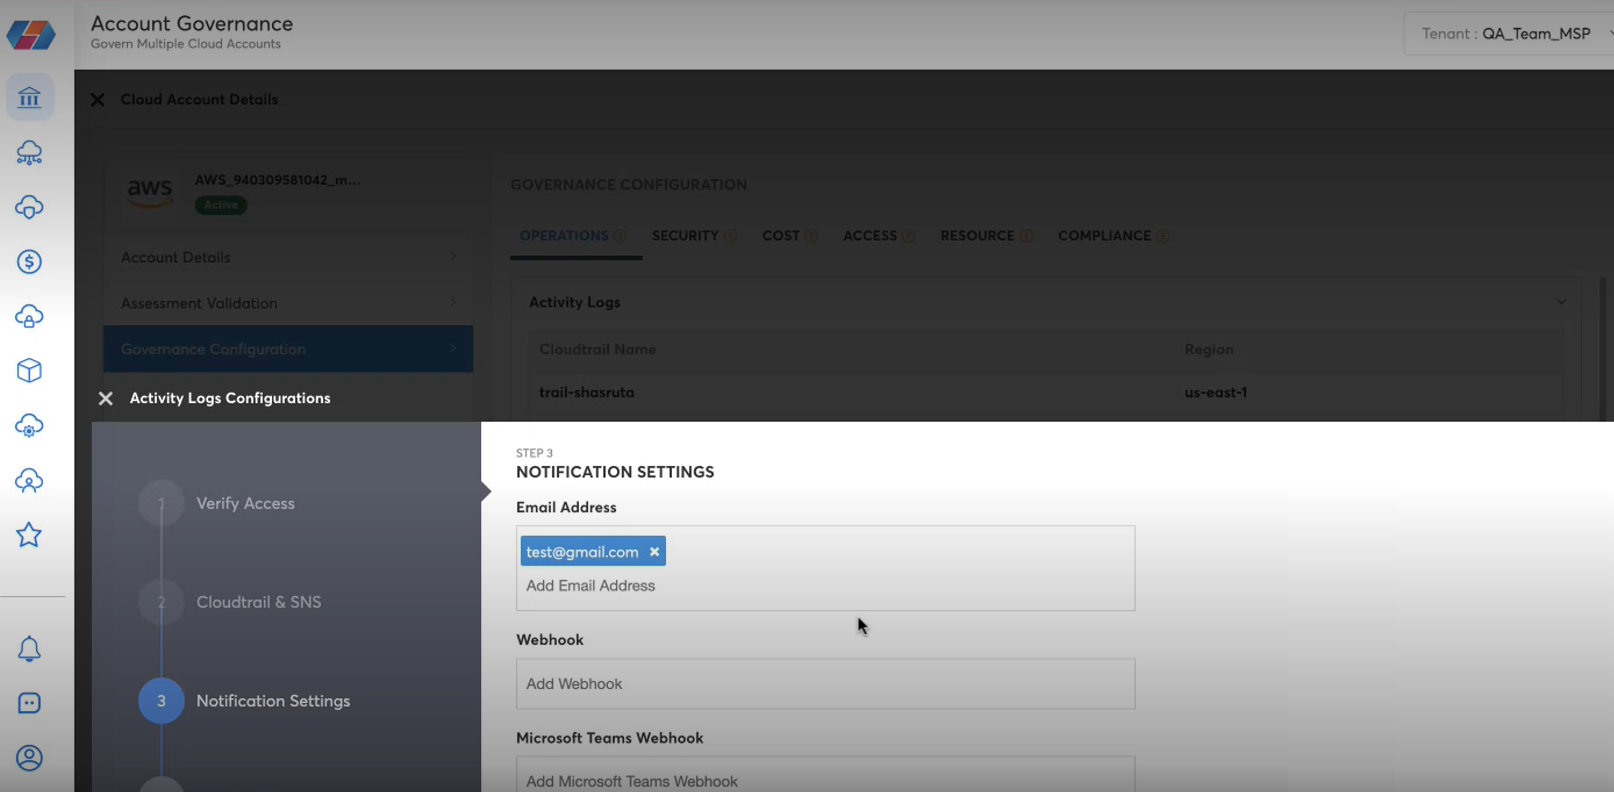
- Specify the email addresses in the Notifications section.
- Specify the webhook URL in the Webhooks section.
- Specify the URL retrieved from Microsoft Teams in the Microsoft Teams Webhooks section.
Note:
Retrieve the webhook URL of the required Microsoft Teams channel to configure Microsoft Teams Webhook notifications.
- Click on the Save button to save any changes.
The activity notification will be configured with the specified notification mechanism. Similarly, you can select the activity notification from the list and modify the notification mechanism whenever required.
Managing Existing Activity Notifications
You can manage the activity notifications by using the below options:
- Select the required Resource Type and Resources in the drop-down menus to filter and view the activity notifications in the list.
- The activity notification can be enabled or disabled by toggling the On/Off button in the Status column of the list.
- Selecting one or more activity notifications from the list will enable the Bulk Actions option which allows you to either enable or disable the selected activities.
- Select the hamburger button (three horizontal bars) and enable or disable the columns to display or hide them for viewing in the table.
Viewing Activities
You can view the activities in the following places:
- Receive email alerts when the selected activities happen
- Receive alerts on other applications configured using the webhook option under notification
- The Operations Posture Dashboard lists activities that happened within the last 24 hours. You can view these at the Tenant or Cloud Account level and drill down further to view more details
- The Reports option in the left navigation menu has the following reports in the Activity Analytics section. These reports provide a view of all activities that happened in your cloud accounts, irrespective of the activity notifications configured. You can further slice and dice the data presented in these analytics reports and export as a .CSV file if required.
- AWS Activity
- Azure Activity
- Multi-Cloud Activity
Modify Notification Settings
You can change notification settings, such as those for email and webhooks.
- Click Governance, then Account Governance.
- Click View, then View Settings.
- Click Governance Configuration, then Operations.
- Click Modify. You can add or delete an email address. Additionally, you can add multiple emails.

- Click Finish.
Updated over 1 year ago