

Policies
Browse, run, schedule, and create cloud governance policies in CoreStack, and review job history to track violations across your cloud accounts.
Feature Overview
Policies is the policy management area in CoreStack's Governance module, under Guardrails. A policy defines which cloud resource configurations are allowed and which are not. CoreStack runs policies against your cloud accounts to find resources that break your standards. The Policies page is where you find built-in and custom policies, run them on demand, schedule recurring runs, review job results, and create your own policies.
This feature is most valuable to Account Admins, Tenant Admins, and security, compliance, and FinOps teams who manage cloud guardrails across AWS, Azure, GCP, and OCI. It is not where you review compliance scores against standards (use Compliance Posture) or act on individual cost recommendations (use Recommendations).
Note: Engine-specific cloud permissions must be granted before CoreStack can run AWS Config or Azure Policy policies. See Cloud Permissions for Policy Engines.
How It Works
Each policy uses an engine, such as CoreStack Policy, AWS Config, or Azure Policy, to evaluate resources in a cloud account against its rules. A policy runs when you execute it on demand, when a schedule fires, or automatically when it is a system policy. Each run creates a job in Job History that records how many resources were evaluated and how many violated the policy. From there, violations flow into recommendations and notifications, so the right people can fix them. Built-in policies are available to every tenant. Custom policies you create are available within the scope you choose.
If Policies ticketing is enabled for the tenant, each violation can also open a linked ServiceNow incident.
Prerequisites
Before you begin, make sure that:
-
Role: You have a role with Governance policy access, such as Account Admin or Tenant Admin. Creating, editing, and deleting custom policies requires admin-level access.
-
Cloud accounts: At least one cloud account is onboarded to CoreStack.
-
Engine permissions: The cloud account grants the permissions required by the policy engine. See Cloud Permissions for Policy Engines.
-
Templates: For custom policies with remediation actions, the templates you plan to use are already available in CoreStack.
-
Access: You can open
Governance > Guardrails > Policies. -
For ITSM ticketing: A ServiceNow tool account is configured under
Settings > Integrated Tools, and Policies ticketing is enabled in the tenant's Activity Queue Settings. See Enabling ITSM Ticketing for Policy Violations below.
Browsing and Finding Policies
Navigate to Governance > Guardrails > Policies. The Policies page opens on the Policies tab. The Job History and Schedules tabs sit beside it.
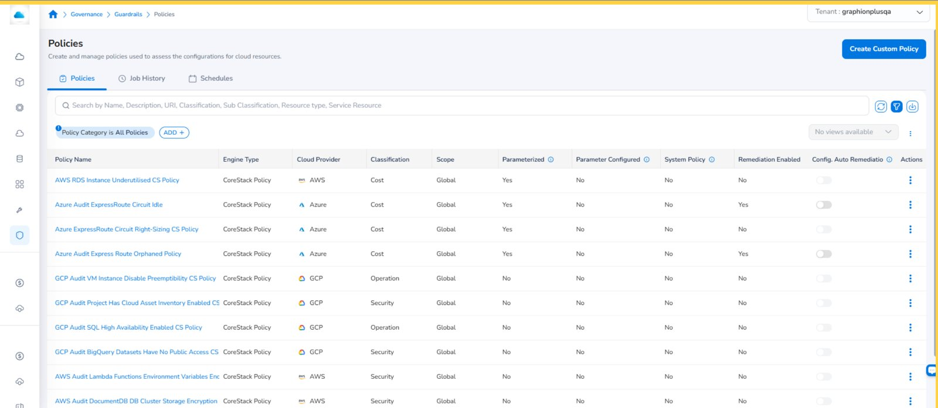
Policies page with the Policies, Job History, and Schedules tabs
Step 1: Review the Policy List
By default, the Policy Category is All Policies filter shows every policy available to you. Each row shows:
| Column | Description |
|---|---|
| Policy Name | The policy name. Click it to open the policy details. |
| Engine Type | The engine that runs the policy, such as CoreStack Policy, AWS Config, or Azure Policy. |
| Cloud Provider | AWS, Azure, GCP, or OCI. |
| Classification | Cost, Security, Operation, or Performance. |
| Scope | Who can use the policy. Built-in policies show Global. |
| Parameterized | Whether the policy accepts input parameters. |
| Parameter Configured | Whether saved parameter values exist for the policy. |
| System Policy | Whether CoreStack runs the policy automatically on all onboarded accounts. |
| Remediation Enabled | Whether the policy has remediation actions. |
| Config. Auto Remediation | A toggle that turns on automatic remediation. See Enabling Auto Remediation. |
| Actions | The Actions (⋮) menu. |
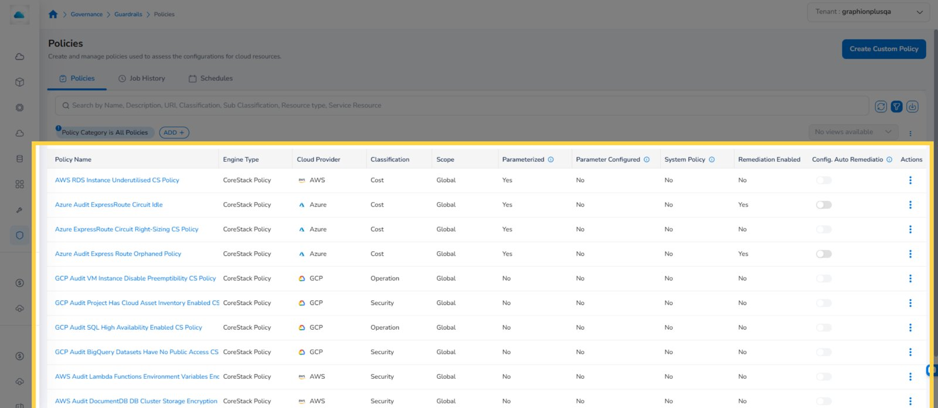
Policy list with column headers highlighted
Step 2: Search for a Policy
Type in the search bar to find policies by name, description, UPI, classification, sub classification, resource type, or service resource.
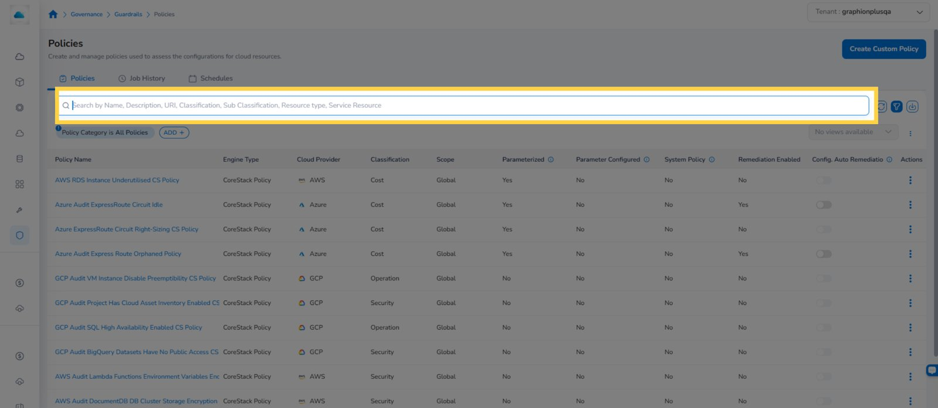
Policy search bar highlighted
Step 3: Add a Filter
Click ADD and select a field. Choose the values you want. The filter appears as a chip, and the list updates. The available filter fields are Classification, Cloud Provider, Engine Type, Parameter Configured, Parameterized, Remediation Enabled, Severity, Status, Sub Classification, and System Policies.
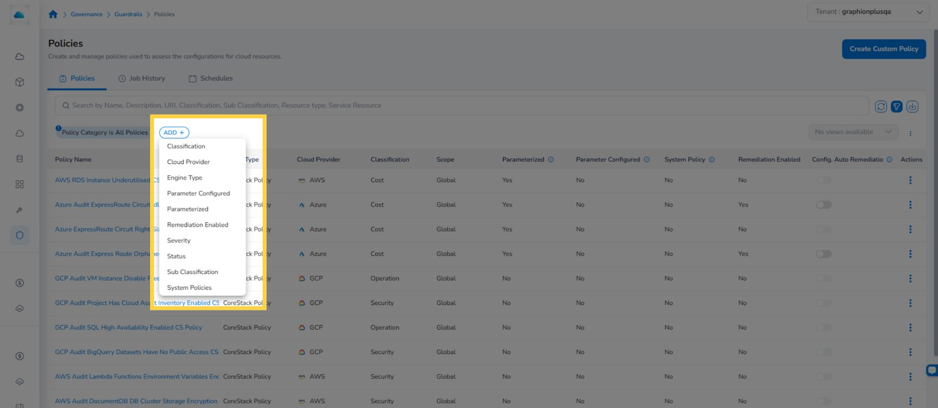
ADD filter menu on the Policies tab
Tip: Click the Policy Category chip to switch between all policies and a specific category. Click any chip to change or remove it.
Step 4: Save the Current View
To reuse a set of filters, click the More (⋮) icon next to the views drop-down and select Create New View. Saved views appear in the views drop-down. Use Update View to save changes to a view, or Reset to View to discard unsaved changes.
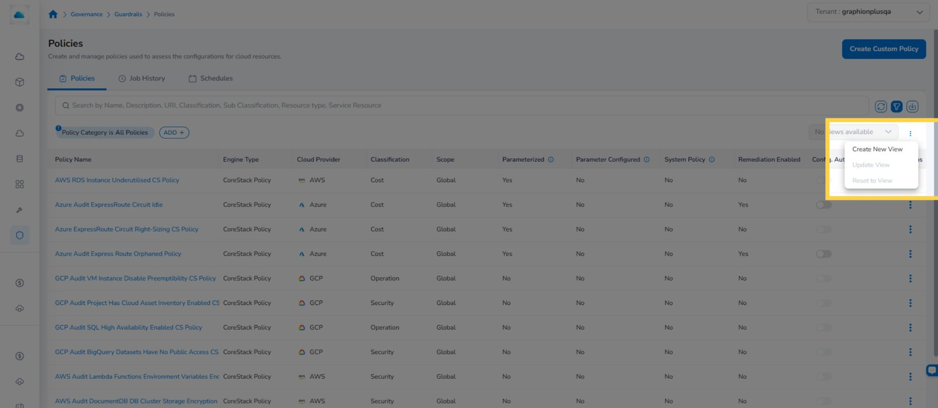
More menu showing Create New View, Update View, and Reset to View
Step 5: Refresh or Download the List
Click the Refresh icon to reload the list. Click the Download icon to export it.
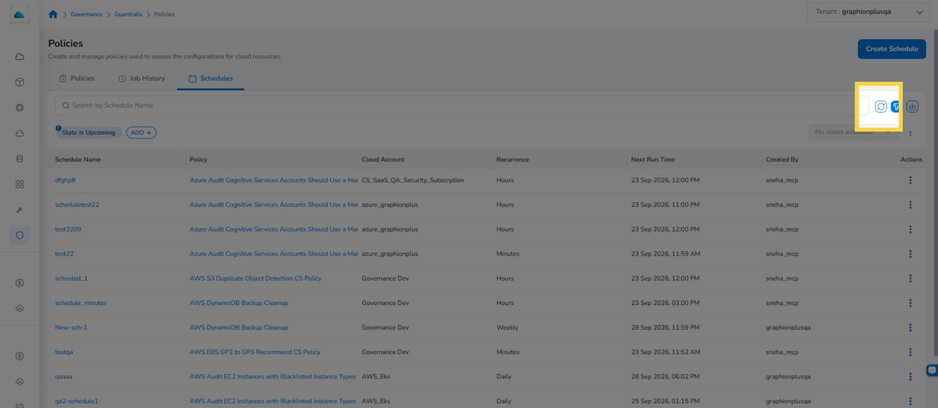
Refresh, filter, and Download icons at the top right of the list
Viewing Policy Details
Click a policy name to open its detail page. The page has five tabs:
| Tab | What it shows |
|---|---|
| Metadata | Policy details (name, status, severity, ID, created by, UPI, description) and classification and resources (engine type, cloud provider, classification, sub classification, content type, resource category, resource type, service resource, equivalent policies). |
| Content | The policy's rule definition, including input parameters and their defaults. |
| Compliance | The compliance controls mapped to this policy, or a message if none are mapped. |
| Recommendations | The recommendation name and description shown to users, plus any remediation actions. |
| Notification | The tenant-level notification configuration for the policy. |
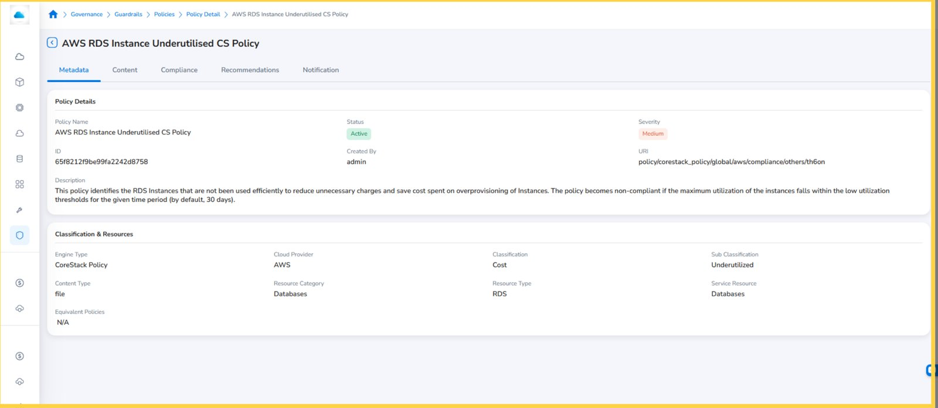
Policy detail page with the Metadata tab selected
Click the back arrow next to the policy name to return to the list.
Taking Action on a Policy
Click the Actions (⋮) icon at the end of a policy row. The options depend on the policy and your role.
| Action | What it does |
|---|---|
| View Schedules | Opens the Schedules tab filtered to this policy. |
| View Executions | Opens the Job History tab filtered to this policy. |
| Execute | Runs the policy immediately against a cloud account. See Executing a Policy. |
| Configure Policy | Saves parameter values for the policy at tenant, cloud account, or account master level. See Configuring Policy Parameters. |
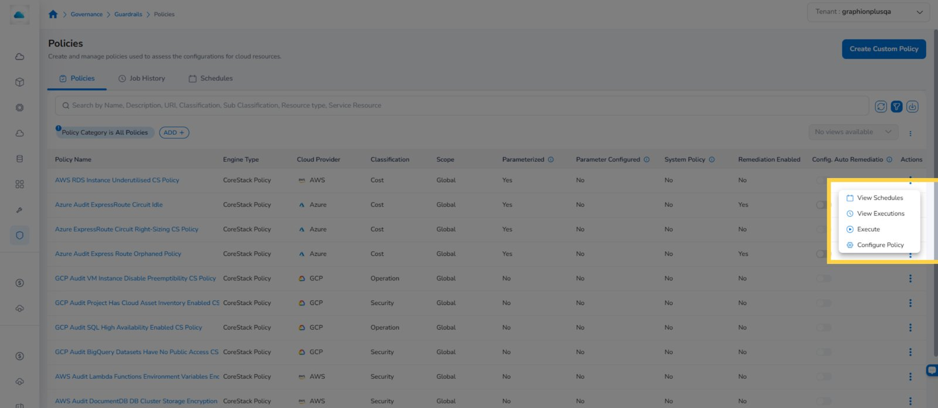
Actions menu open on a policy row
Note: Edit and Delete are available only for custom policies you have access to manage.
Executing a Policy
Run a policy on demand when you need current results for a specific cloud account.
-
Click
Actions (⋮) > Execute. The Execute Policy panel opens for the selected policy. -
Under 1. Scope & Parameters, open the Cloud Account drop-down and select the account to check.
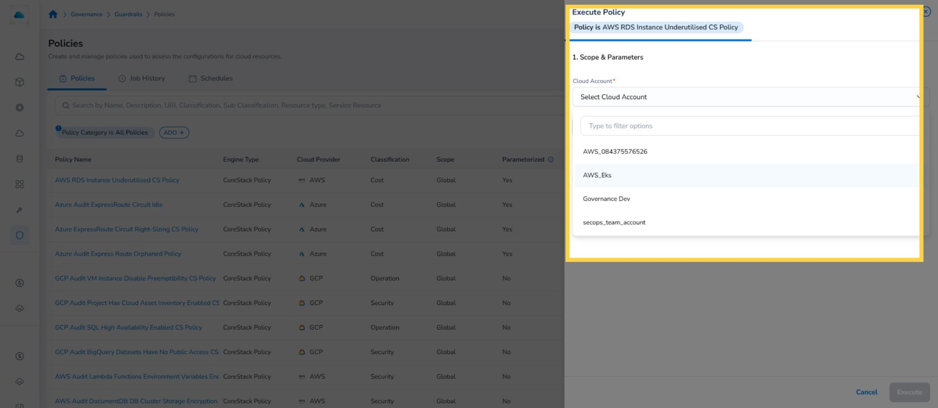
Execute Policy panel with the Cloud Account drop-down open
-
For parameterized policies, click Load Parameters. The policy's input parameters appear, pre-filled with the values that apply to the selected account.
-
Review the parameter values, and change any you need. Required fields are marked with an asterisk. Changes apply to this run only.
-
Under 2. Notifications, select Yes to add Email ID, Webhook, or Microsoft Teams Webhook recipients, clicking Add after each one. Select No to skip notifications.
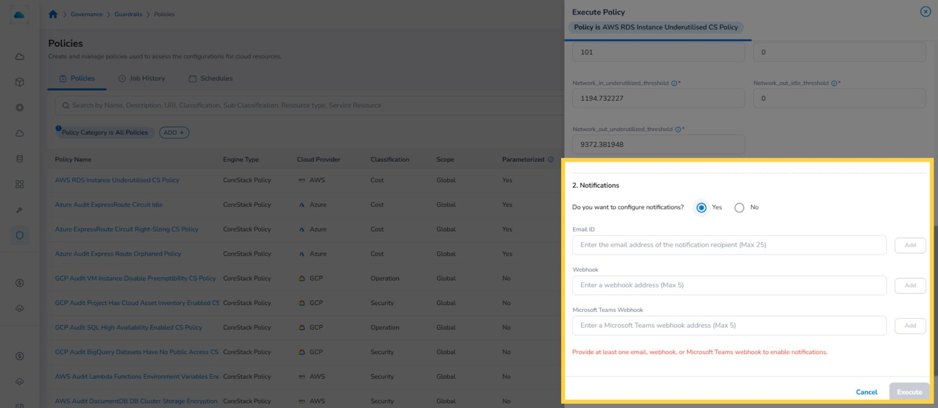
Notifications section and Execute button in the Execute Policy panel
-
Click Execute. The job appears in Job History with its results.
Note: To use the same values on every run, save them with Configure Policy instead of editing them each time. See Configuring Policy Parameters.
Enabling Auto Remediation
For system policies, turn on the Config. Auto Remediation toggle in the policy row. Confirm when prompted. CoreStack then runs the remediation actions defined in the policy's Recommendations tab whenever violations are found. The policy runs automatically every 12 hours.
Note: Auto remediation cannot be enabled for policies that require input parameters.
Reviewing Job History
Click the Job History tab. Every policy run in your tenant is listed here, including on-demand, scheduled, and system runs.
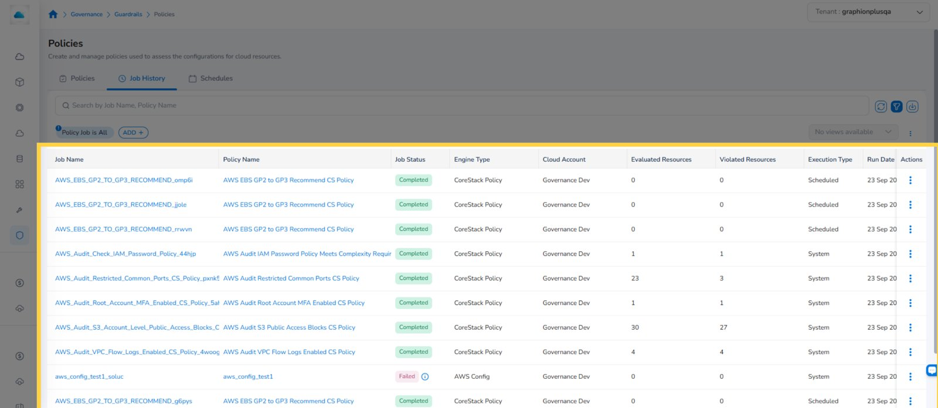
Job History tab with the job list
Step 1: Review the Job List
Each job shows:
-
Job Name: A name generated from the policy name plus a random suffix.
-
Policy Name: The policy that was run.
-
Job Status: For example, Completed or Failed.
-
Engine Type
-
Cloud Account: The account the job ran against.
-
Evaluated Resources: How many resources were checked.
-
Violated Resources: How many resources failed.
-
Execution Type: On-Demand, Scheduled, or System.
-
Run Date
Step 2: Search and Filter Jobs
Type in the Search by Job Name, Policy Name box, or click ADD and filter by Cloud Account, Cloud Provider, Execution Group, Execution Type, Has Violations, Job Status, Policy, or Run Date.
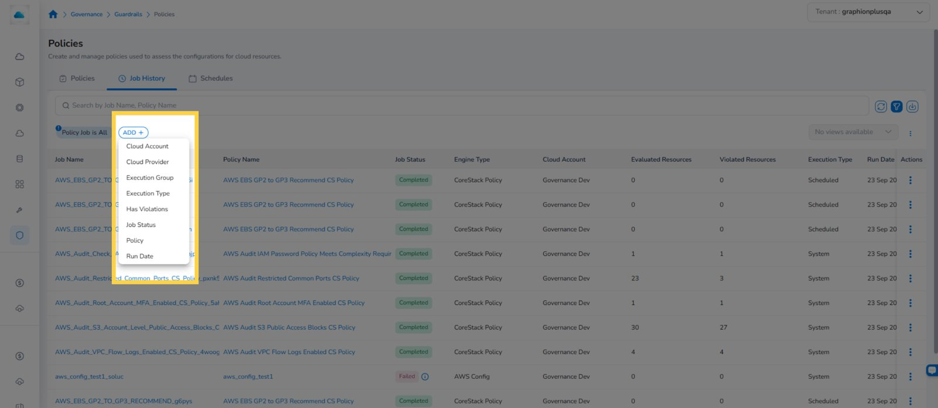
ADD filter menu on the Job History tab
Step 3: Refresh or Archive a Job
Click the Actions (⋮) icon for a job and select Refresh to update its status, or Archive to remove it from the active list.
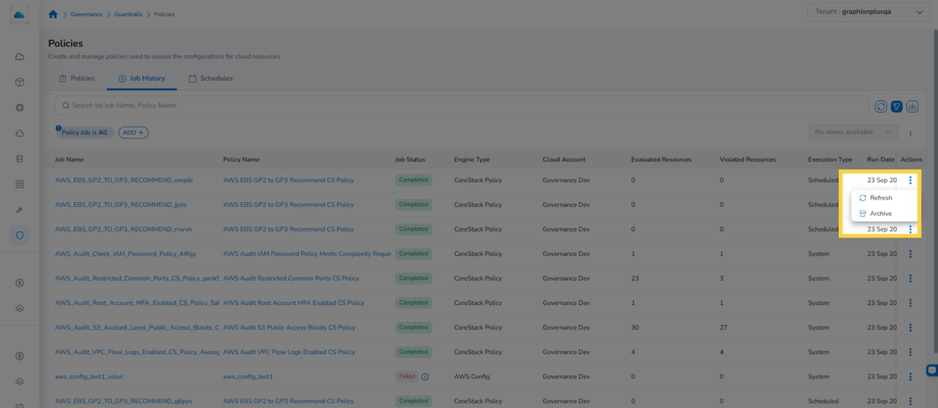
Job Actions menu showing Refresh and Archive
Step 4: Open Job Details
Click a job name. The job detail page shows:
-
Summary: Job name, policy name, engine type, run date, evaluated and violated resources, execution type, and job status.
-
Inputs: The cloud account and parameters used for the run.
-
Notifications: The notifications sent for the run.
-
Violated Resources: The resources that failed the policy.
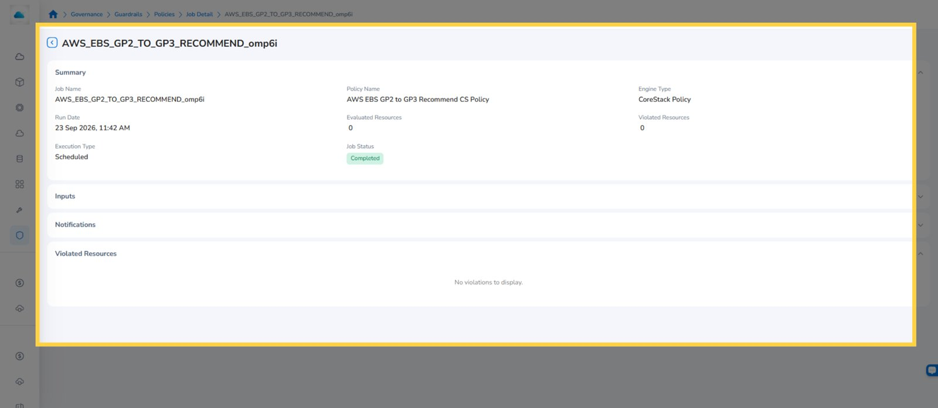
Job detail page showing Summary, Inputs, Notifications, and Violated Resources
Scheduling Policies
Click the Schedules tab. The State is Upcoming filter shows active schedules
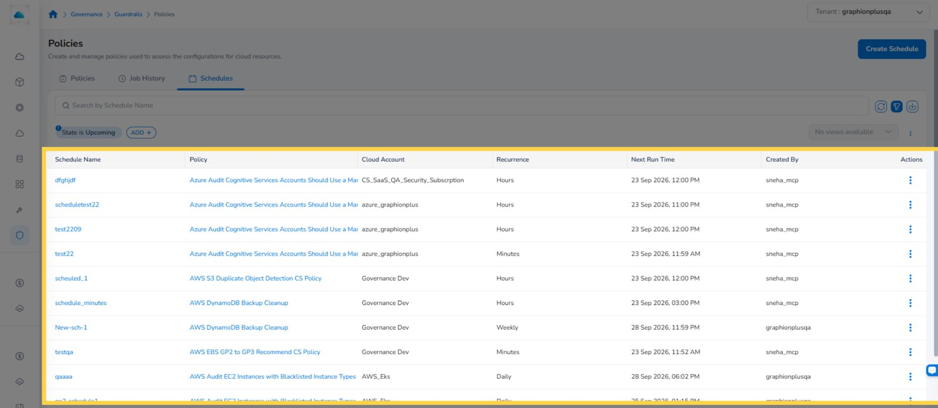
Schedules tab with upcoming schedules
Step 1: Review Schedules
Each schedule shows its Schedule Name, Policy, Cloud Account, Recurrence, Next Run Time, and Created By. To narrow the list, search by schedule name, or click ADD and filter by Created By, Policy, or Recurrence.
Step 2: View, Edit, or Delete a Schedule
Click the Actions (⋮) icon for a schedule and select View, Edit, or Delete. View, or clicking the schedule name, opens a details panel. The panel shows the schedule details (policy, next run time, recurrence, created and last updated time), the inputs, and the notifications.
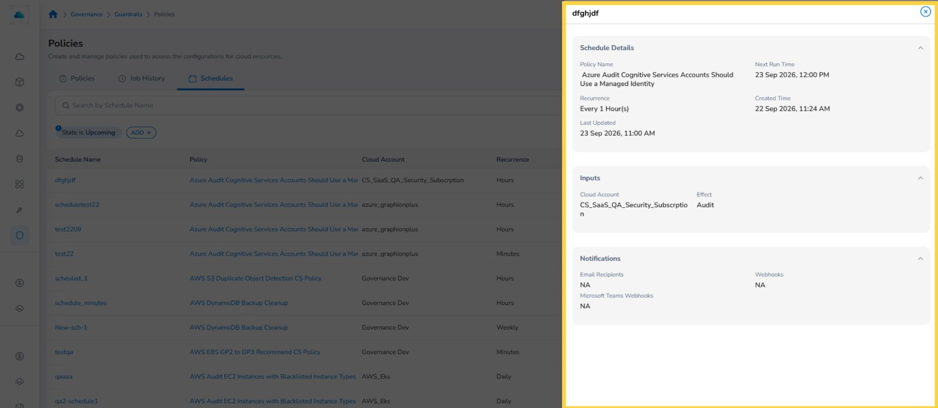
Schedule details panel
Step 3: Create a Schedule
Click Create Schedule. Complete the panel:
| Section | Fields |
|---|---|
| 1. Schedule Details | Name (required), Description |
| 2. Scope & Parameters | Policy (required), Cloud Account (required), plus any policy parameters |
| 3. Schedule | Next Run Time Date and Time (required), Recurrence (required), End Date (required) |
| 4. Notifications | Select Yes to add up to 25 Email ID entries, 5 Webhook entries, or 5 Microsoft Teams Webhook entries. At least one is required when notifications are on. |
Click Create. The schedule appears in the list with its next run time.
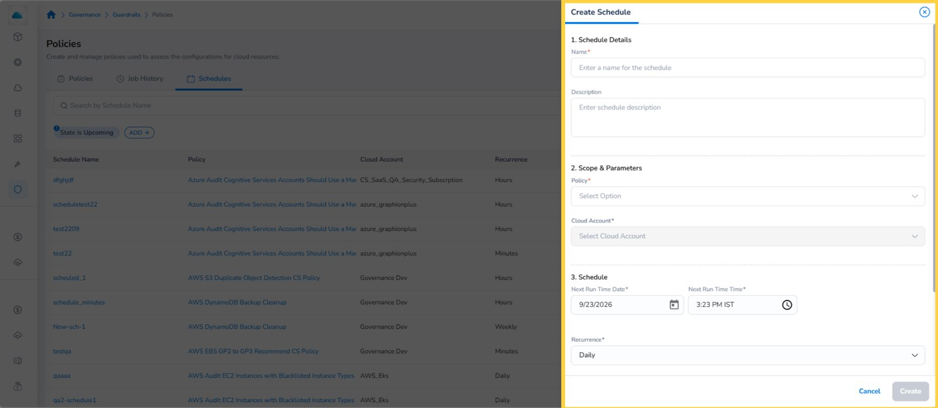
Create Schedule panel showing Schedule Details, Scope & Parameters, and Schedule
Note: If the user who created a schedule is later deleted, the schedule runs under the tenant admin or account admin, and the Updated By field changes to that user.
Creating a Custom Policy
Create a custom policy when the built-in policies don't cover a requirement. On the Policies tab, click Create Custom Policy. The Create Policy wizard opens. Its five stages are listed on the left: Basic Information, Classification & Engine, Recommendation, Trigger & Notification, and Review & Create
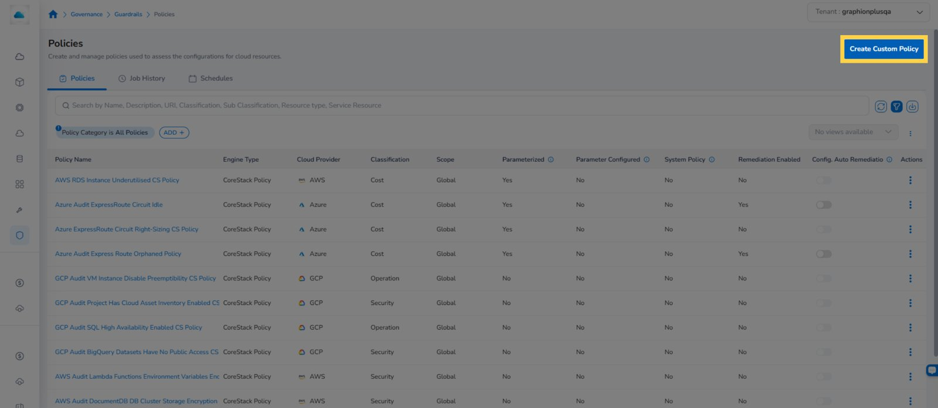
Create Custom Policy button on the Policies page
Step 1: Enter Basic Information
Complete the Basic Details:
-
Name (required): A name that identifies the policy.
-
Description (required): What the policy checks, up to 500 characters.
-
Severity (required): High, Medium, or Low.
-
Scope (required): Account, Tenant, or Private.
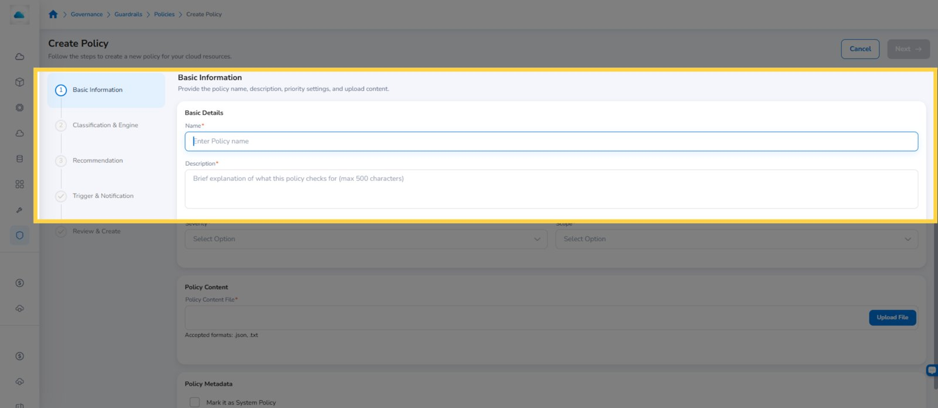
Basic Information stage with Name and Description fields
Step 2: Upload the Policy Content
In Policy Content, click Upload File. Drag and drop the file, or click Choose file, then click Upload. Accepted formats are .json and .txt.
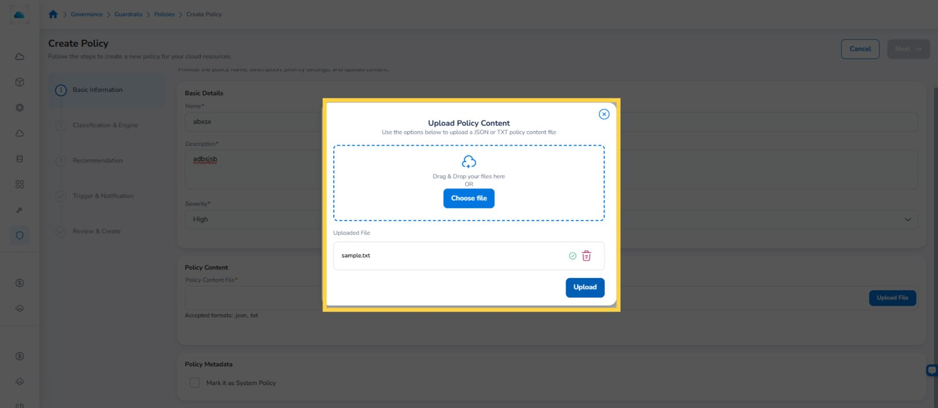
Upload Policy Content dialog
Step 3: Mark as System Policy (Optional)
Under Policy Metadata, select Mark it as System Policy only if CoreStack should run this policy by default on every cloud account you onboard. Click Next.
Step 4: Select the Engine and Classification
On Classification & Engine, complete these fields:
-
Engine Type (required): The engine that evaluates the policy, such as AWS Config or Azure Policy. Cloud Provider fills in automatically.
-
Classification (required): Cost, Security, Operation, or Performance.
-
Sub Classification (required): A narrower category, such as Access, Application, Data, or Encryption.
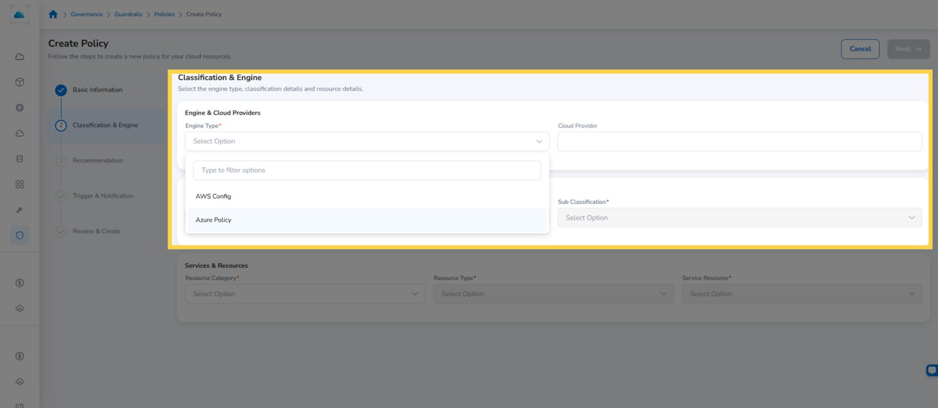
Engine Type drop-down on the Classification & Engine stage
Step 5: Select Services and Resources
Under Services & Resources, select the Resource Category (for example, Identity), then the Resource Type (for example, IAM). Then select one or more Service Resources (for example, Role_Assignments) and click OK. Each field narrows the options in the next. Click Next.
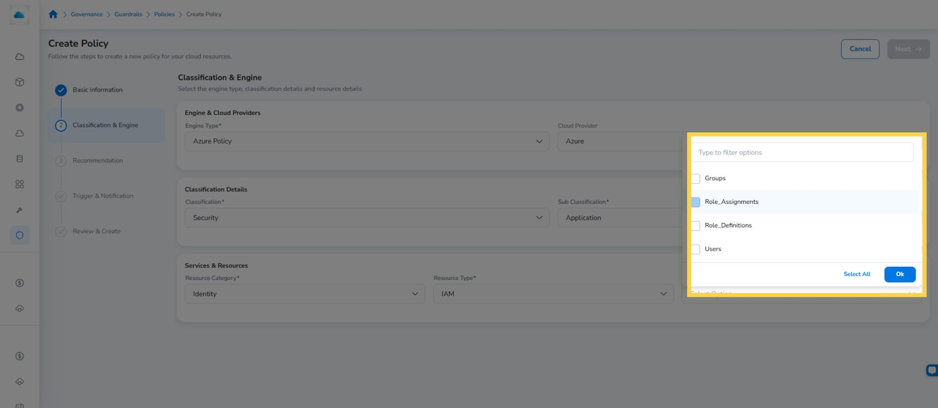
Service Resource multi-select with OK button
Step 6: Add a Recommendation and Actions
On Recommendation, enter a Name and Description that tell users how to resolve a violation. To let users fix violations from CoreStack, click Add action. Enter an Action Name, select a Template, and review the Terms & Conditions. Repeat for more actions, or click Remove to delete one. Click Next.
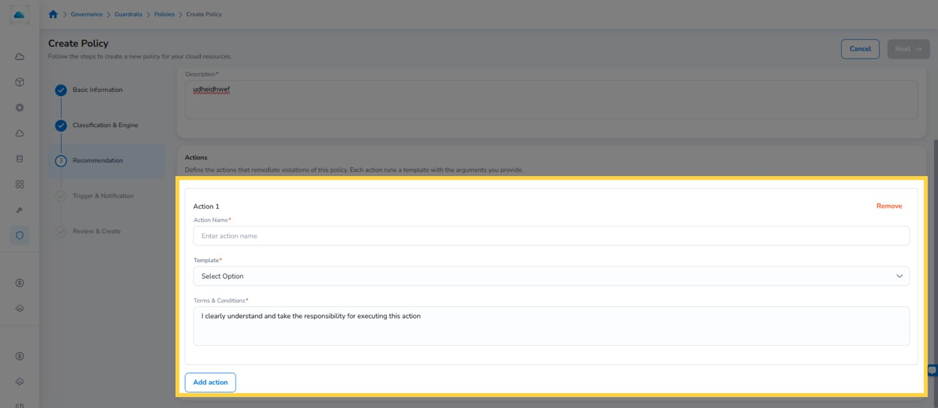
Action form showing Action Name, Template, and Terms & Conditions
Note: Each action runs an existing CoreStack template. Make sure the template is available before you add the action.
Step 7: Configure Triggers and Notifications
On Trigger & Notification, open the Trigger Activity List and select the cloud activities that should trigger the policy. For example, choose a role assignment write event. Click OK. Under Notification Settings, select Yes to add Email ID, Webhook, or Microsoft Teams Webhook recipients, clicking Add after each one. Select No to skip notifications. Click Next.
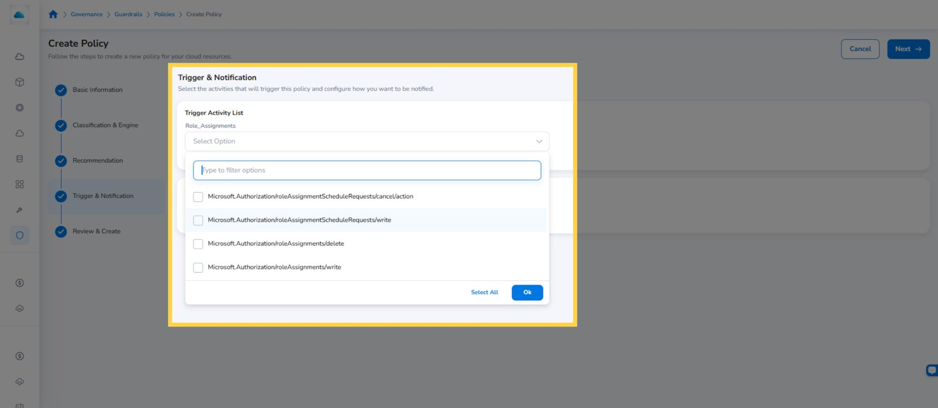
Trigger Activity List with cloud activity options
Step 8: Review and Create the Policy
On Review & Create, check each section. Click Edit on a section to change it. When everything is correct, click Create Policy. The policy is saved and appears in the policy list, ready to execute or schedule.
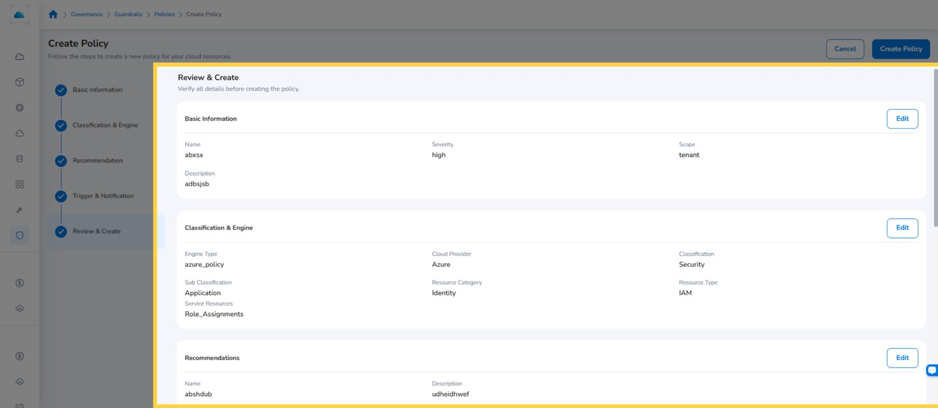
Review & Create stage with Edit buttons for each section
Tip: Click Cancel at any point to leave the wizard without saving.
Configuring Policy Parameters
Parameterized policies use threshold values, such as the number of days to look back or a utilization limit. Save these values once so every run uses them. Saved configurations are also used when the policy runs as part of FinOps, Compliance, and Workload Assessments, and when it runs as a system policy.
-
Click Actions (⋮) > Configure Policy. The Policy Parameter Configuration panel opens. It shows the List of Parameter Configurations, with each configuration's Selected Values, Parameter Scope, and Parameters. If none are saved, the System Defined values apply.
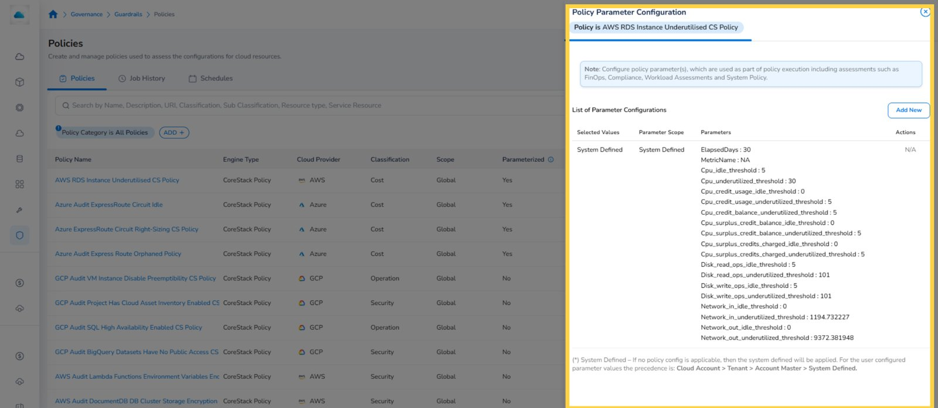
Policy Parameter Configuration panel listing System Defined values
-
Click Add New.
-
Under Parameter Configuration Scope, select where the values apply:
-
Tenant: all cloud accounts in the current tenant.
-
Cloud Account: one or more specific accounts. Open Cloud Accounts, select the accounts, and click Ok.
-
Account Master: all child tenants and cloud accounts under the master tenant.
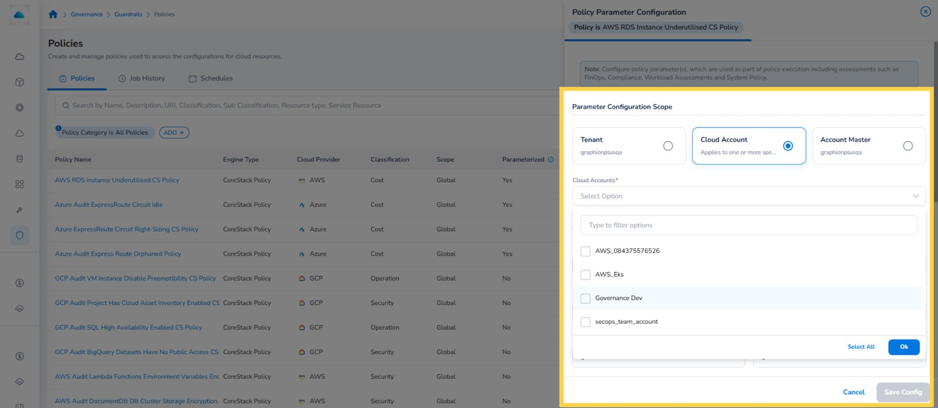
Cloud Account scope with the Cloud Accounts multi-select open
-
-
Under Policy Parameters, enter the threshold values.
-
Click Save Config. The configuration appears in the list with its scope. Click Cancel to discard it.
Note: When more than one configuration applies, CoreStack uses the most specific one, in this order: Cloud Account > Tenant > Account Master > System Defined.
Note: Account Master is visible only to Account Admins working in a Master Tenant context.
Enabling ITSM Ticketing for Policy Violations
If your organization tracks policy violations through an ITSM tool, CoreStack can also open one ITSM incident per violating resource for a policy — enabled once at the tenant level, under Settings > Tenant Management > Activity Queue Settings, not per policy. For the full setup steps and the one-ticket-per-resource behavior, see the ServiceNow Integration guide.
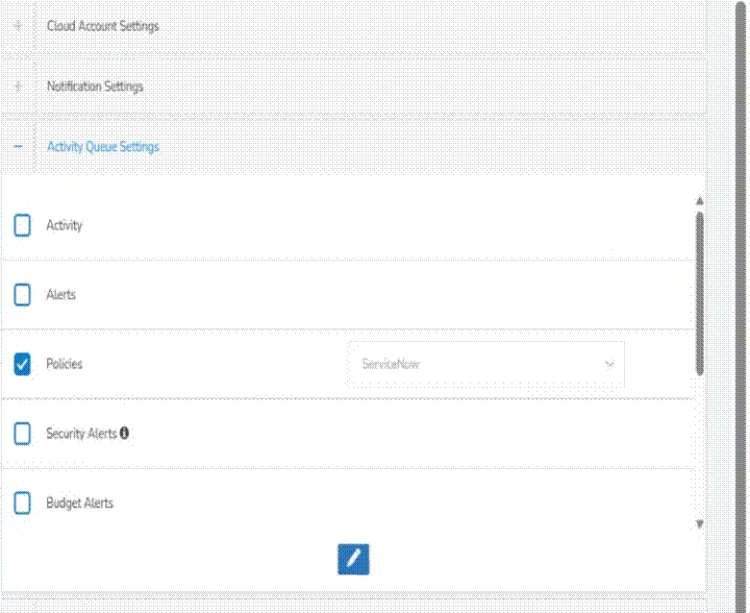
Activity Queue Settings with Policies ticketing enabled for ServiceNow
Note: This tenant-level toggle is separate from the per-policy notification settings in Step 19: Configure Triggers and Notifications above, which send Email, Webhook, or Microsoft Teams notifications for an individual custom policy.
To integrate a tool with CoreStack, see Integrating Tool Accounts.
Supported Policy Engines
| Engine | What it uses |
|---|---|
| CoreStack Policy | CoreStack's own policy language, used across all governance categories. |
| AWS Config | Native AWS Config managed and custom rules. |
| AWS Organization Policy | AWS Service Control Policies. |
| Azure Policy | Native Azure Policy definitions. |
| GCP Policy / GCP Organization Policy | Native GCP policy services. |
| Oracle Cloud Guard | Native OCI Cloud Guard. |
| Kubernetes Policy | Kubernetes policy definitions. |
Note: No part of the CoreStack policy library runs on Cloud Custodian.
Cloud Permissions for Policy Engines
AWS Config: CoreStack needs these permissions to run managed AWS Config policies:
-
config:DeleteConfigRule
-
config:DescribeConfigRuleEvaluationStatus
-
config:GetComplianceDetailsByConfigRule
-
config:PutConfigRule
Custom Config rules also need Lambda and IAM permissions.
Azure Policy: CoreStack needs access to Microsoft.Authorization and Microsoft.PolicyInsights, with these roles:
-
Resource Policy Contributor: to run Azure Policy operations.
-
Contributor: to perform remediation actions on resources.
Note: The Contributor role has only read access to Azure Policy, so it cannot run policies on its own.
Cost-Optimization Policies by Category and Provider
| Recommendation Type | Provider | Policies | Services Covered |
|---|---|---|---|
| Optimize Configurations (85) | AWS | 32 | Account, AppStream, CloudTrail, Cost, DynamoDB, EBS, EC2, ECS, EMR, Fsx, Lambda, RDS, S3, VPC, Workspaces |
| Azure | 32 | Analysis Services, App Services, Azure Databricks, Cosmos DB, Event Hubs, File Storage, Servers, Storage Disks, Virtual Machines, Virtual Networks | |
| GCP | 20 | App Engine, Big Query, Compute Engine, FileStore, SQL, Storage Disks | |
| OCI | 1 | Block Storage | |
| Manage Idle (82) | AWS | 25 | AppStream, Cloudwatch, DMS, DynamoDB, EBS, EC2, ECR private repository, EFS, EMR, Fsx, RDS, Redshift, Route53 Resolver, S3, Traffic Mirroring, VPC |
| Azure | 36 | Analysis Services, App Services, Application Gateway, Azure AI Services, Azure Cache Redis, Azure Kubernetes Service, Azure Synapse Analytics, Container Instances, Cosmos DB, DNS Forwarding Rulesets, DNS Resolvers, Databases, Desktop Virtualization, Event Hubs, Load Balancers, Servers, Storage Disks, Virtual Machines | |
| GCP | 15 | App Engine, Bucket, Compute Engine, FileStore, Memory Store, SQL, Storage Disks | |
| OCI | 6 | Block Storage, Compute, File Storage, Load Balancers, MySQL | |
| Manage Orphaned (71) | AWS | 21 | AppStream, DMS, DynamoDB, EBS, EC2, EFS, RDS, Redshift, Route53, Route53 Resolver, S3, Traffic Mirroring, VPC, Workspaces |
| Azure | 31 | Accounts, App Services, Application Gateway, Azure Kubernetes Service, Azure Private Link, Azure SQL Managed Instance, Cosmos DB, DNS Forwarding Rulesets, DNS Resolvers, DNS Zones, Databases, Desktop Virtualization, Event Hubs, Images, Load Balancers, Logic Apps, Private DNS Zones, Servers, Storage Disks, Virtual Networks | |
| GCP | 14 | Bucket, Compute Engine, FileStore, Network Services, SQL, Spanner, Storage Disks, VPC | |
| OCI | 5 | Block Storage, File Storage, Ip Management, Load Balancers |
For the complete list, see the Engine Cost-Optimization Policies Reference.
Frequently Asked Questions
Q: Where did the Marketplace and My Policies tabs go?
They have been replaced by the Policy Category filter and the Scope column. Built-in (marketplace) policies show Global scope. Custom policies show the scope chosen when they were created. Use ADD or the Policy Category chip to show only the policies you want.
Q: Where are Schedules and Job History now?
They are tabs on the Policies page. You can also jump to them for a single policy with Actions (⋮) > View Schedules or View Executions.
Q: Can I edit or delete a built-in policy?
No. Built-in policies are managed by CoreStack (or by your on-site administrator in on-premises installations). To change a built-in policy's behavior, create a custom policy, or save parameter values with Configure Policy.
Q: Which parameter values does a policy run use?
CoreStack uses the most specific saved configuration: Cloud Account, then Tenant, then Account Master, then the System Defined defaults. Values you change in the Execute Policy panel apply to that run only.
Q: What does marking a policy as a system policy do?
CoreStack runs system policies automatically on every cloud account onboarded for that cloud. Only mark a policy as a system policy if it should apply to all accounts by default.
Q: Why can't I turn on Config. Auto Remediation for a policy?
Auto remediation is available only for system policies that don't require input parameters. The policy must also have remediation actions defined in its Recommendations tab.
Q: Why is the Create button disabled in the Notifications section?
When notifications are set to Yes, you must add at least one Email ID, Webhook, or Microsoft Teams Webhook. Either add a recipient or select No.
Q: Can I enable ITSM ticketing for just one policy instead of all of them?
The Activity Queue Settings Policies checkbox enables ServiceNow ticketing for policy violations tenant-wide, not for a single policy.
Troubleshooting
A policy job shows Failed
Cause: The cloud account is missing permissions the policy engine needs, or the credentials have expired.
Solution:
-
Click the job name and review the Inputs and Summary sections.
-
Check the account's credentials and the engine permissions listed in Cloud Permissions for Policy Engines.
-
Run the policy again with Actions (⋮) > Execute and confirm the job completes.
If the issue persists, contact CoreStack support with the job name, policy name, cloud account, run date, and the error shown on the job.
I can't find a policy in the list
Cause: A filter chip or saved view is hiding it, or the policy's scope doesn't include your tenant.
Solution:
-
Clear the search box and remove any filter chips.
-
Set Policy Category to All Policies and clear the views drop-down.
-
For a custom policy, confirm its scope with the person who created it.
A schedule did not run
Cause: The schedule's end date has passed, the policy needs parameters that weren't provided, or the cloud account is unavailable.
Solution:
-
On the Schedules tab, open the schedule with View. Check the Next Run Time, recurrence, and inputs.
-
Click Edit to update the end date or inputs.
-
Check Job History after the next run time for a new job.
A policy violation isn't creating a ServiceNow ticket
Cause: Policies ticketing isn't enabled for this tenant, or no ITSM tool account is selected for it.
Solution:
-
Navigate to Settings > Tenant Management, select the tenant, then open the Activity Queue Settings tab.
-
Click Edit.
-
Select the Policies checkbox and choose your configured ServiceNow tool account from the dropdown.
-
Click Apply, then re-run the policy and confirm the Incident Number column is populated on the Recommendations dashboard for newly evaluated resources.
Enabling Policies ticketing doesn't retroactively create tickets for resources already flagged before it was enabled.
If the issue persists, contact CoreStack support with the tenant name, the policy name, and the affected resource ID.
Updated about 9 hours ago