

AI Services Accounts
Learn how to onboard, monitor, and manage OpenAI and Anthropic accounts in CoreStack's AI Services dashboard with summary cards, quick actions, and credential management.
Feature Overview
AI Services is a section within CoreStack's Governance module that lets you onboard AI service provider accounts and manage them. It also lets you monitor their usage and spend across two governance dashboards. It currently supports OpenAI and Anthropic. Usage data is organized under a Cloud Native tab (AI services discovered through your onboarded AWS, Azure, or GCP cloud accounts) and a Frontier AI tab (directly integrated providers such as Anthropic's Claude API).
This feature is most valuable to FinOps Practitioners and Platform Engineers who need visibility into AI service spend and token usage. It's also for anyone responsible for onboarding new AI provider accounts or keeping existing ones in good governance standing.
Note: Onboarding steps differ depending on the provider you select. OpenAI accounts connect via cloud storage access to billing export files; Anthropic accounts authenticate directly with API key credentials. See Onboarding an AI Service Account below.
How It Works
When you navigate to the AI Services page, it opens to two governance dashboards. The Cloud Native tab shows AI services discovered under your onboarded cloud accounts, and the Frontier AI tab shows directly integrated providers such as Anthropic. From either tab, you filter down to a specific provider and service, then review spend and token usage across categories such as Agents, Models, Users, or Workspaces. From there, you drill into an individual instance for a detailed cost and usage breakdown. Separately, you onboard new provider accounts through a guided wizard and manage existing ones — viewing, editing, deactivating, or deleting them — from the AI Services Accounts page. Once an account is onboarded and its credentials validated, CoreStack begins collecting and processing cost and usage data on the next scheduled refresh cycle.
Prerequisites
Before using the AI Services Accounts section, ensure the following are in place:
-
Role: You have the Account Admin, Tenant Admin, or FinOps Practitioner role (Governance bundle) with access to
Governance > Account Governance. -
AI service accounts onboarded: At least one account must be onboarded for a provider to show usage data on the Cloud Native or Frontier AI tabs, or non-zero counts on the AI Services Accounts page.
-
Valid credentials: AI service account credentials should be valid and active — cloud storage credentials for OpenAI, or API key credentials for Anthropic. Accounts with invalid or expired credentials appear in the Fix It count on the relevant card.
-
Anthropic-specific: For Anthropic, you need an Organization ID, Organization Name, and Admin API Key from your Anthropic Console.
Onboarding an AI Service Account
Navigate to Governance > Account Governance > AI Services.
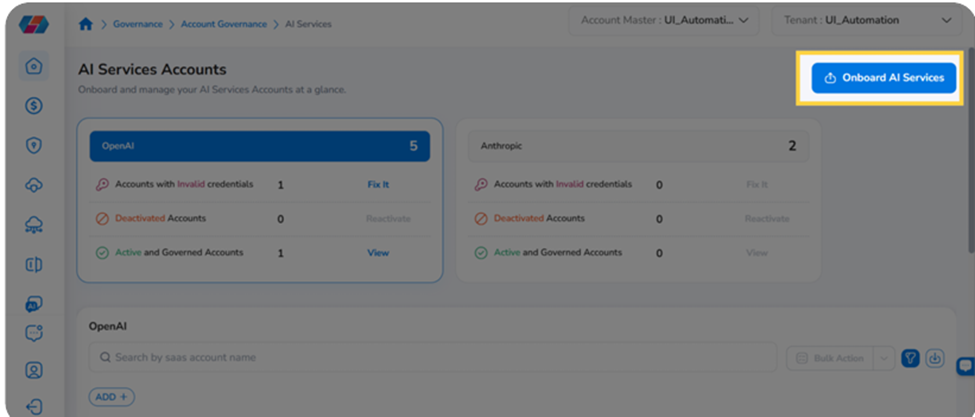
Click Onboard AI Services in the top right corner. On the Onboard AI Services page, select the provider:
-
OpenAI — tracks API usage and costs for OpenAI services.
-
Anthropic — imports billing data for Claude API usage and consumption insights.
Click Onboard under the chosen provider to enter the onboarding wizard. The wizard has three steps.
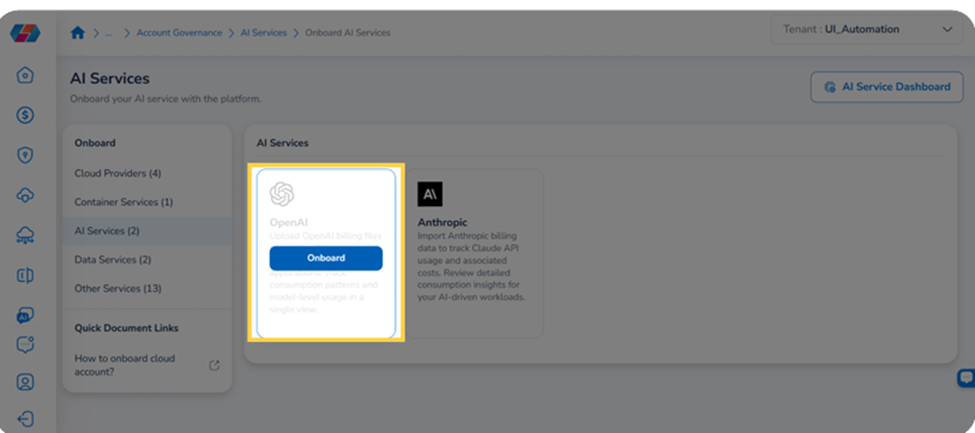
Note: The wizard has three steps for both providers, but Step 2 and Step 3 differ by provider. OpenAI completes Basic Details before Storage Access; Anthropic completes Add & Validate Credentials before Basic Details and does not require Storage Access at all.
Step 1: Prerequisites
In the Prerequisites step, confirm that FinOps is selected under Select Product(s). For AI service integrations, only FinOps-related products are applicable for data cost analysis and optimization.
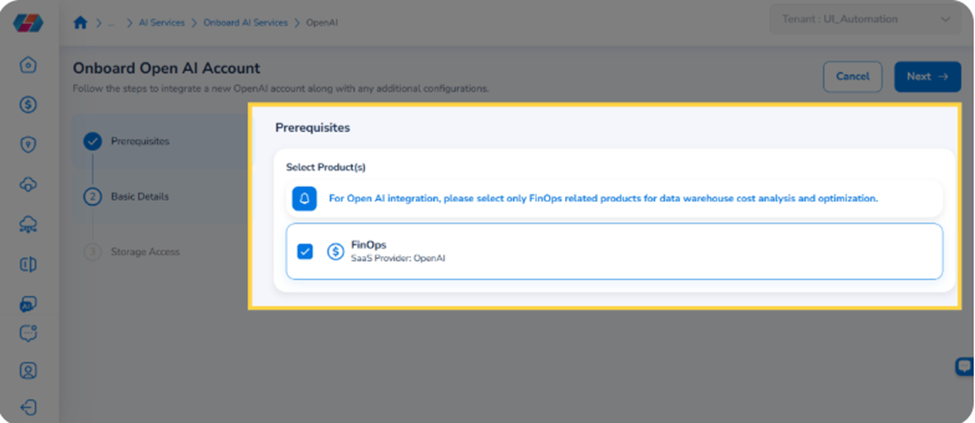
Click Next to proceed.
Onboarding an OpenAI Account
Follow these steps if you selected OpenAI.
Step 2: Basic Details
In the Basic Details step, enter the following:
-
Account Name: Enter a name to identify this account within CoreStack.
-
Description (optional): Enter a description for the account.
If you need to onboard multiple accounts at once, click Click here to download the CSV Template to download a bulk import template.
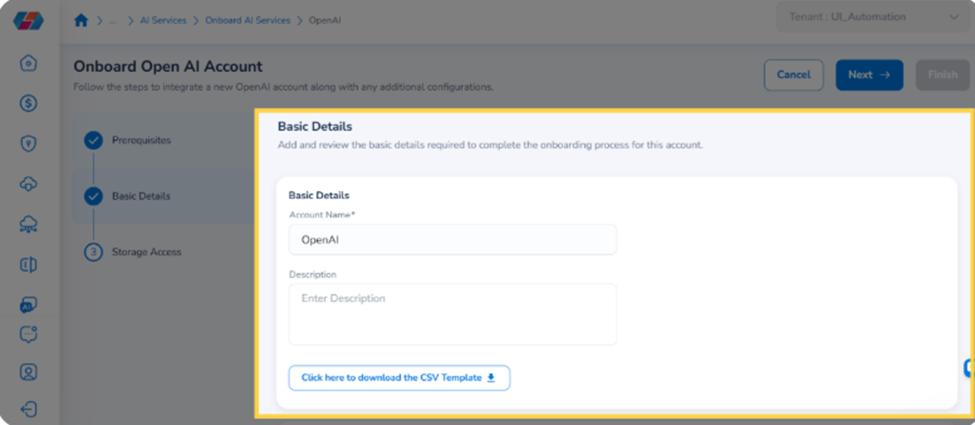
Click Next to proceed.
Step 3: Storage Access
In the Storage Access step, configure how CoreStack accesses billing data for this account.
Under Select Cloud Provider, choose AWS, Azure, GCP, or OCI to indicate where your billing data is stored. CoreStack renders the matching configuration panel below your selection.
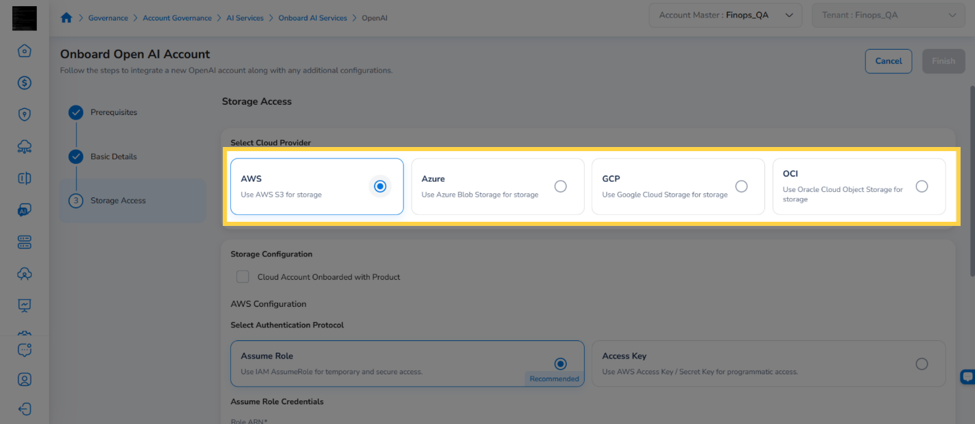
Note: The fields required below vary by provider. Azure uses a Storage Account and Blob Container Name in place of a Storage Bucket; OCI requires Tenancy-specific identifiers.
AWS
Option 1: Use a Cloud Account Onboarded with Product
If your AWS storage bucket is already associated with a cloud account onboarded in CoreStack, select the Cloud Account Onboarded with Product checkbox, then select the Cloud Account, Storage Bucket, and File Path. Only active AWS cloud accounts onboarded in CoreStack appear in the dropdown; if none are available, CoreStack displays "No active Cloud Accounts found."
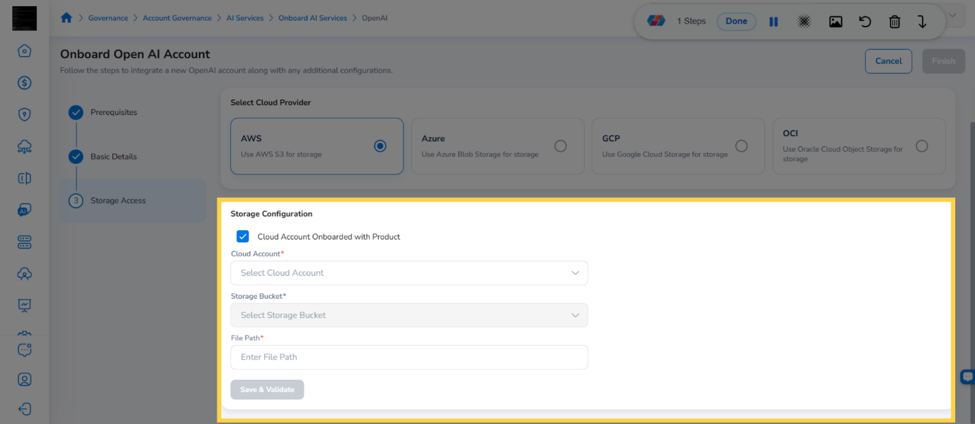
Click Save & Validate to verify the configuration before proceeding.
Option 2: Enter AWS Credentials Directly
If the storage bucket's AWS account is not onboarded in CoreStack, leave Cloud Account Onboarded with Product unselected and select an authentication method under AWS Configuration.
Option 2a
Assume Role: uses IAM-based temporary credentials. Enter the Role ARN, External ID, and whether MFA Enabled is True or False, along with the Storage Bucket and File Path.
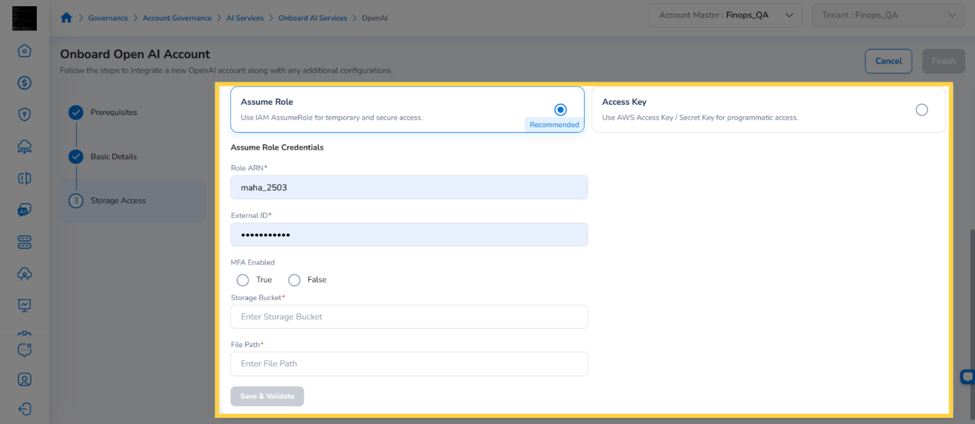
Click Save & Validate to verify the configuration before proceeding.
Option 2b
Access Key: uses static, long-term credentials. Enter the Access Key, Secret Key, Storage Bucket, and File Path.
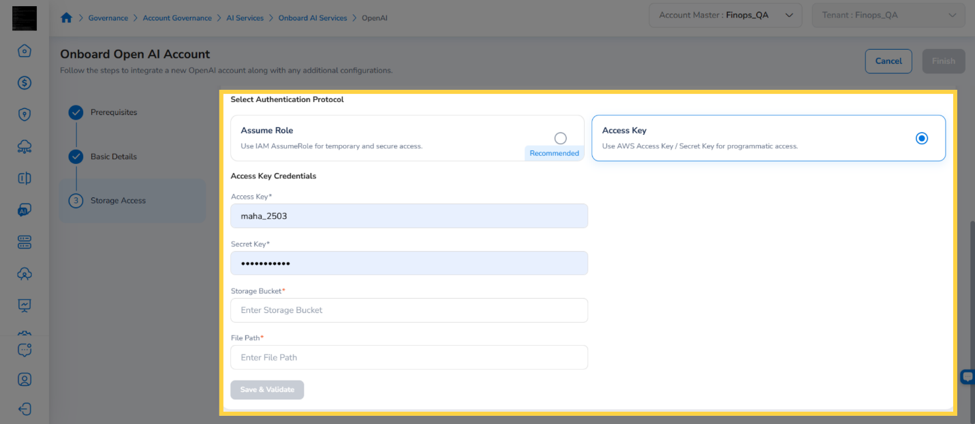
Click Save & Validate to verify the configuration before proceeding.
Azure
Option 1: Use a Cloud Account Onboarded with Product
If your Azure storage account is already associated with a cloud account onboarded in CoreStack, select the Cloud Account Onboarded with Product checkbox, then select the Cloud Account, Storage Account, Blob Container Name, and File Path. Only active Azure cloud accounts onboarded in CoreStack appear in the dropdown; if none are available, CoreStack displays "No active Cloud Accounts found."
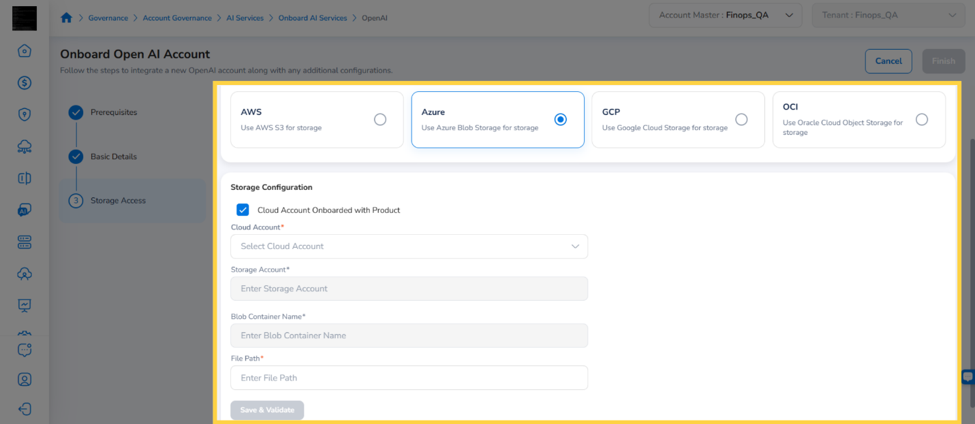
Click Save & Validate to verify the configuration before proceeding.
Option 2: Enter Azure Application Credentials Directly
If the storage account's Azure subscription is not onboarded in CoreStack, leave Cloud Account Onboarded with Product unselected and enter your Azure Application Credentials under Azure Configuration
- Tenant ID
- Application ID
- Application Secret
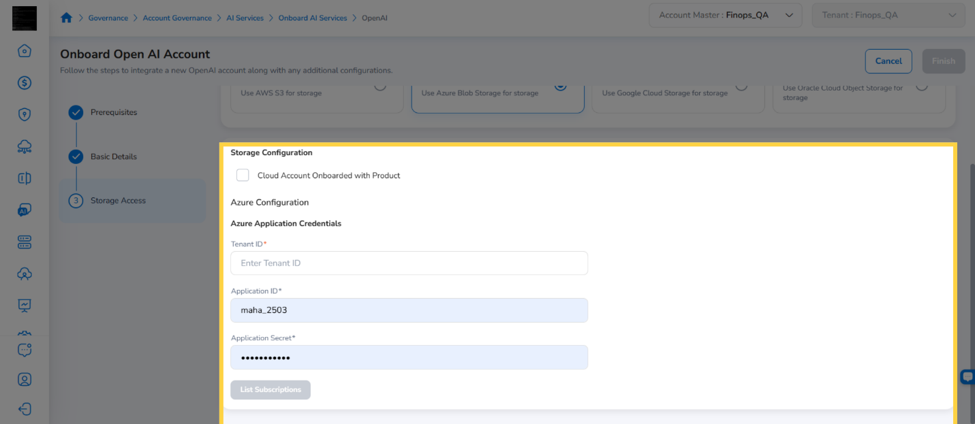
Click List Subscriptions to continue.
Click Save & Validate to verify the configuration before proceeding.
GCP
Option 1: Use a Cloud Account Onboarded with Product
If your GCP storage bucket is already associated with a cloud account onboarded in CoreStack, select the Cloud Account Onboarded with Product checkbox, then select the Cloud Account, Storage Bucket, and File Path. Only active GCP cloud accounts onboarded in CoreStack appear in the dropdown; if none are available, CoreStack displays "No active Cloud Accounts found."
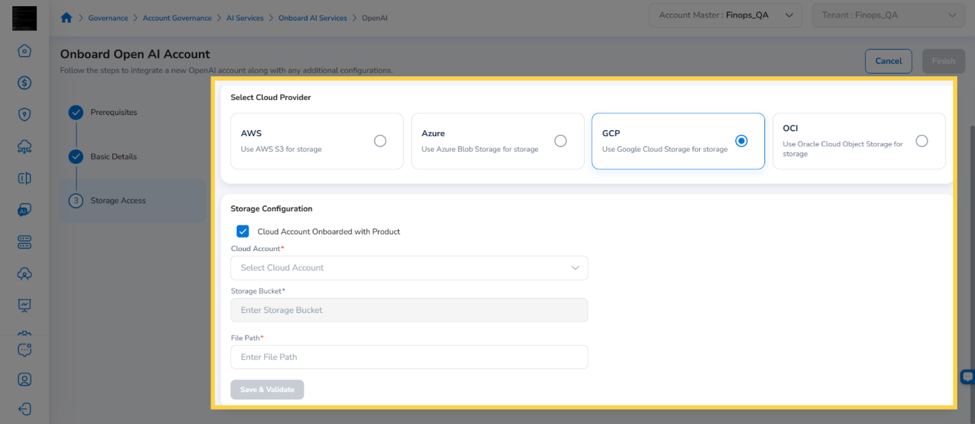
Click Save & Validate to verify the configuration before proceeding.
Option 2: Enter GCP Credentials Directly
If the storage bucket's GCP project is not onboarded in CoreStack, leave Cloud Account Onboarded with Product unselected and select an authentication protocol under Select Authentication Protocol.
Option 2a
Service Account (Recommended): enter the Project ID and upload a JSON credentials file using Upload Credentials File (JSON).
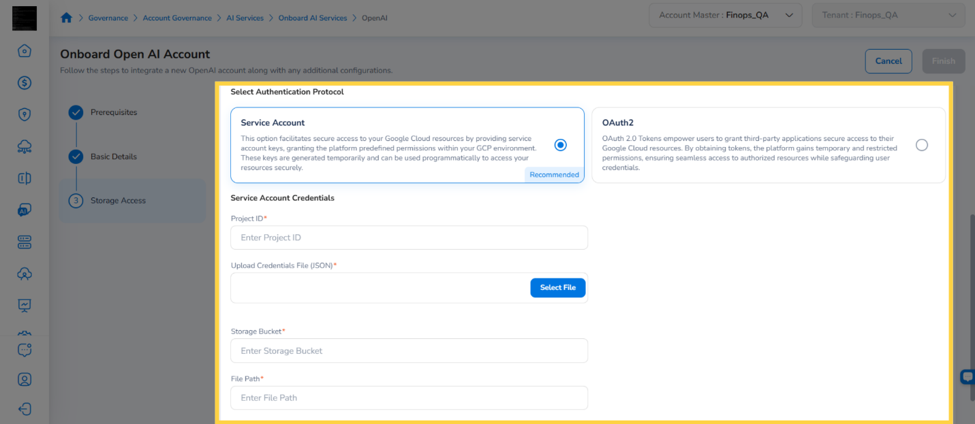
Enter the Storage Bucket and File Path, then click Save & Validate to verify the configuration before proceeding.
Option 2b
OAuth2: enter the Client ID, Client Secret, Redirect URI, and Authorization Code.
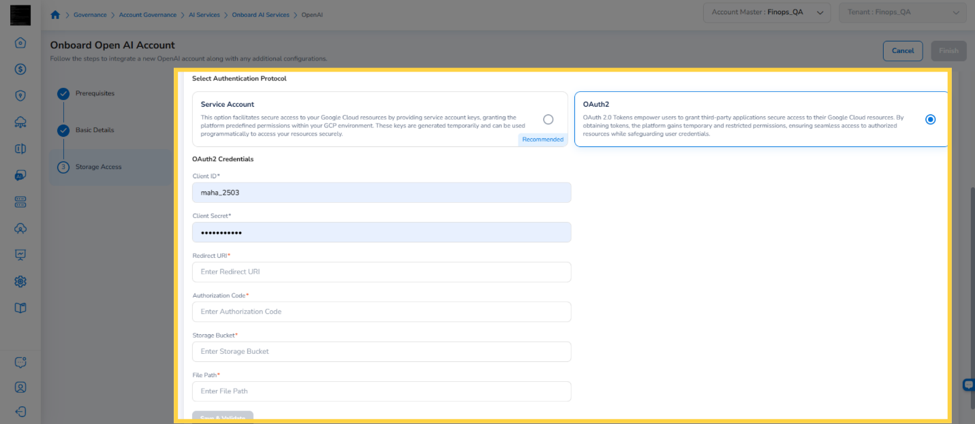
Enter the Storage Bucket and File Path, then click Save & Validate to verify the configuration before proceeding.
OCI
Option 1: Use a Cloud Account Onboarded with Product
If your OCI storage bucket is already associated with a cloud account onboarded in CoreStack, select the Cloud Account Onboarded with Product checkbox, then select the Cloud Account, Storage Bucket, and File Path. Only active OCI cloud accounts onboarded in CoreStack appear in the dropdown; if none are available, CoreStack displays "No active Cloud Accounts found."
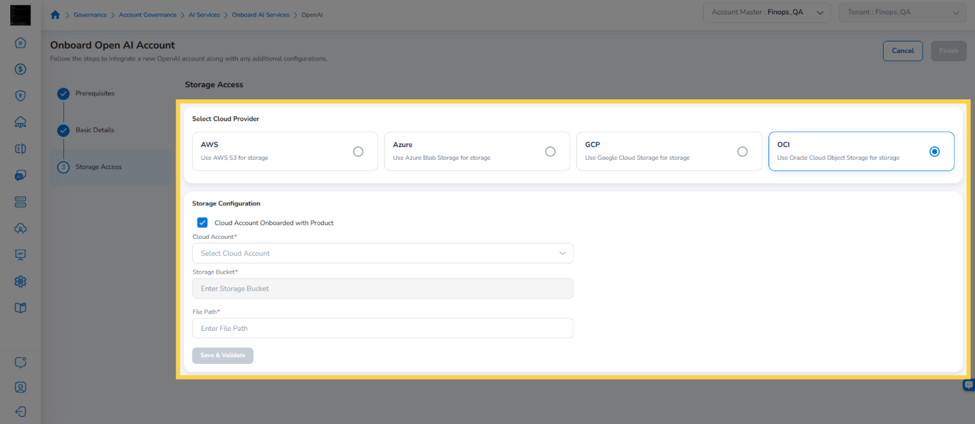
Click Save & Validate to verify the configuration before proceeding.
Option 2: Enter Tenancy Credentials Directly
If the storage bucket's OCI tenancy is not onboarded in CoreStack, leave Cloud Account Onboarded with Product unselected and enter your Tenancy Credentials under OCI Configuration:
- User ID
- Fingerprint
- Tenancy ID
- Region
- Upload Credentials File (PEM)
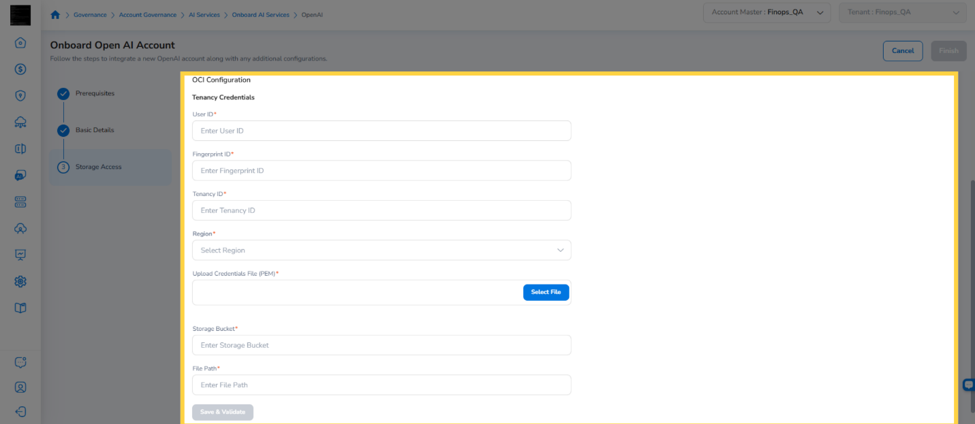
Enter the Storage Bucket and File Path, then click Save & Validate to verify the configuration before proceeding.
Click Finish to complete onboarding. The newly onboarded account appears in the account table and the relevant summary card updates its counts.
Note: If you prefer to use an existing cloud account for any provider, select the Cloud Account Onboarded with Product option. If no active cloud accounts are available for that provider, this option shows 'No active Cloud Accounts found.'
Onboarding an Anthropic Account
Follow these steps if you selected Anthropic.
Step 2: Add & Validate API Credentials
For Anthropic accounts, this step comes right after Prerequisites and replaces cloud storage configuration entirely. Under API Key Credentials, enter your Organization ID, Organization Name, and Admin API Key from the Anthropic Console.
Click Save & Validate to authenticate and verify the account before continuing to Basic Details.
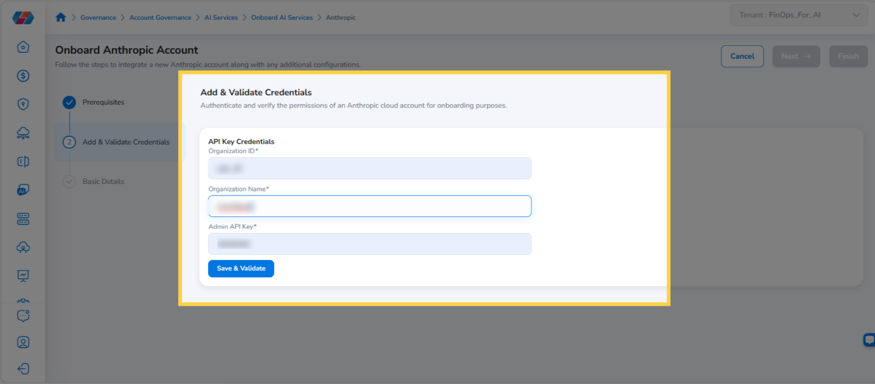
Step 3: Enter Basic Details
In the Basic Details step, enter the Account Name to identify this account within CoreStack, and an optional Description. This completes onboarding for Anthropic accounts.
Once onboarding is complete for either provider, the newly onboarded account appears in the account table on the AI Services Accounts page, and the relevant summary card updates its counts.
Monitoring AI Services Governance and Usage
Navigate to Governance > Account Governance > AI Services. The page opens directly to two governance dashboards, the Cloud Native tab and the Frontier AI tab.
Monitoring the Cloud Native Tab
Step 1: Select the Cloud Native Tab
Click the Cloud Native tab to view AI services discovered through your onboarded cloud accounts (AWS, Azure, GCP). This is distinct from the Frontier AI tab, which covers directly integrated providers such as Anthropic.
Step 2: Filter by Cloud Provider
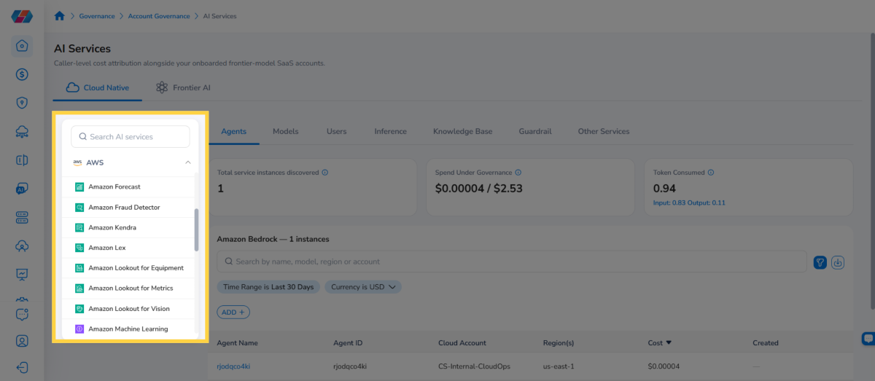
Select a provider — AWS, Azure, or GCP — from the filter panel on the left. This scopes the view to AI services discovered in that provider's onboarded cloud accounts.
Step 3: Select an AI Service
Expand the provider entry in the left panel and select an individual AI service to scope the dashboard to it. Each listed service can be selected on its own to filter the dashboard further.
Step 4: Open a Governance Category Tab
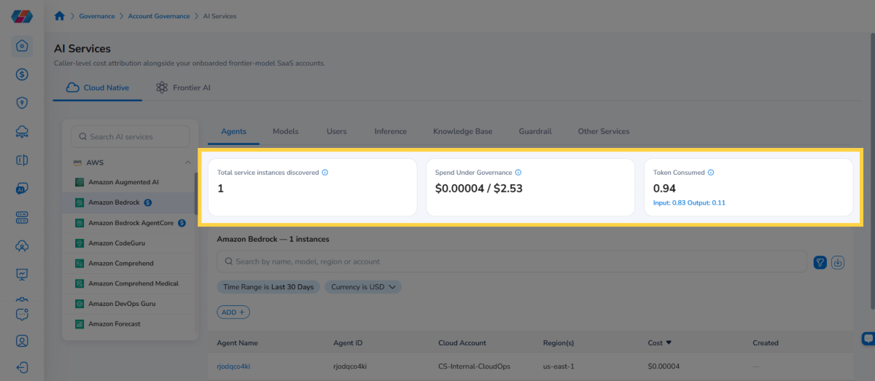
Click a category tab — Agents, Models, Users, Inference, Knowledge Base, Guardrail, or Other Services — to view instances of that resource type under the selected service. Every category shows the same three summary cards above its instance table: Total Service Instances Discovered, Spend Under Governance, and Token Consumed. Token Consumed breaks down into input and output tokens. The instance table's columns vary by category:
| Category | Instance Table Columns |
|---|---|
| Agents | Agent ID, Cloud Account, Region, Cost, Created |
| Models | Model Family, Category, Cloud Account, Region, Cost |
| Users | IAM User or Role, Resource Category, Cloud Account, Cost |
| Inference | Resource Category, Cloud Account, Region, Cost |
| Knowledge Base | Knowledge Base ID, Cloud Account, Region, Cost, Created |
| Guardrail | Cloud Account, Region, Cost |
| Other Services | Cloud Account, Region, Cost, Created |
Step 5: Adjust Filters and Time Range
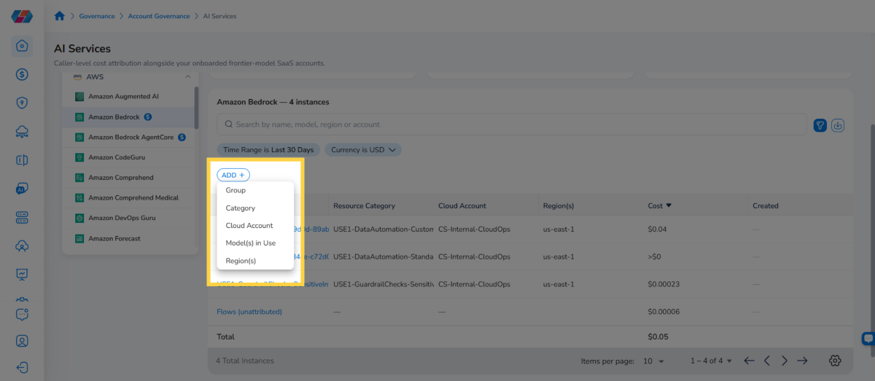
Use the Time Range and Currency filters above the table to adjust the reporting period. Click ADD + to add a filter — Group, Category, Cloud Account, Model(s) in Use, or Region(s).
Step 6: Search the Table
Enter a name, model, region, or account in the Search field to narrow the instance table to matching rows. The search works across every column in the currently selected tab.
Step 7: Export Table Data
Click the Download icon above the table to export the current table view.
Step 8: Drill Down into Instance Details
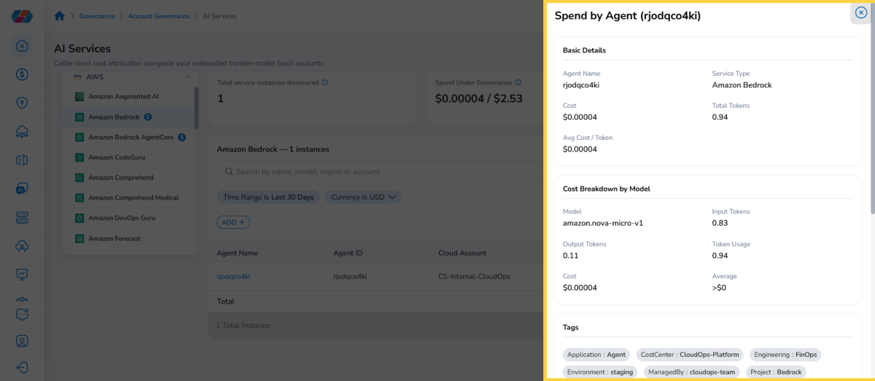
Click a Service Instance Name link in the table to open its detailed drill-down view. The panel shows Basic Details, a Cost Breakdown by Model, and Tags for the selected instance. Scroll down for the Usage section (total token consumption in a selectable unit) and Additional Details, such as the instance's ID, status, ARN, and version.
Monitoring the Frontier AI Tab
Step 1: Select the Frontier AI Tab
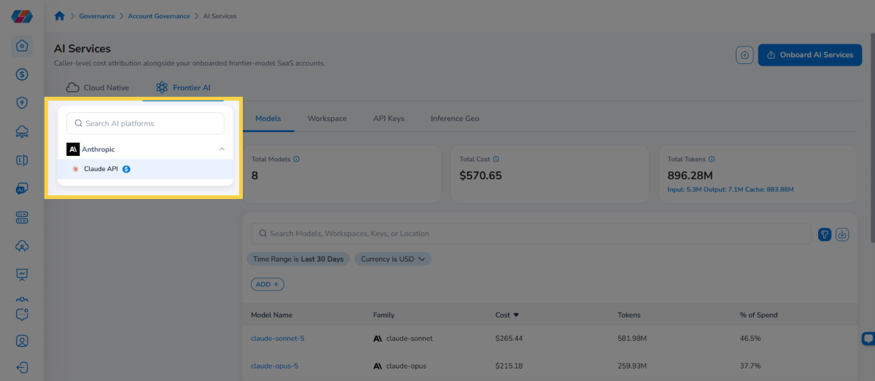
Click the Frontier AI tab to scope the page to directly integrated frontier-model providers, such as Anthropic, instead of the cloud-discovered services shown under Cloud Native. Selecting this tab scopes every sub-tab below — Models, Workspace, API Keys, and Inference Geo — to the provider you choose next.
Step 2: Select a Provider and Service
Expand a provider — for example, Anthropic — in the left panel and select the specific service, such as Claude API, to scope the dashboard to it. This loads usage statistics, models, and API keys associated with that service.
Step 3: Open a Usage Tab
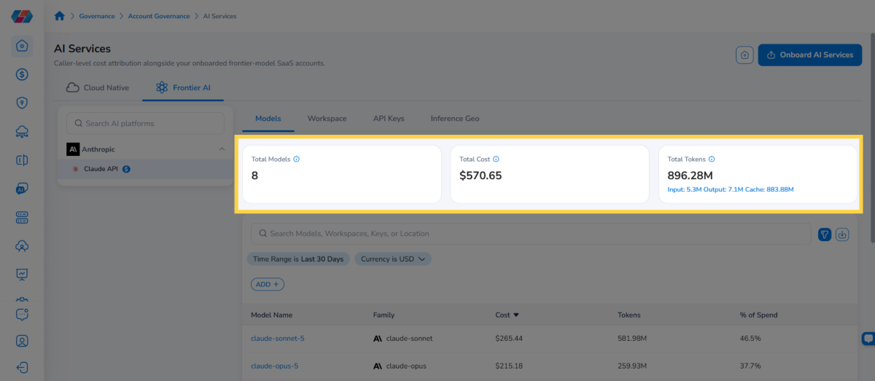
Click a sub-tab — Models (selected by default), Workspace, API Keys, or Inference Geo — to review usage from that angle. Each sub-tab shows its own summary cards and table:
| Tab | Summary Cards | Table Columns |
|---|---|---|
| Models | Total Models, Total Cost, Total Tokens (input, output, cache) | Model, Family, Cost, Tokens, % of Spend |
| Workspace | Total Workspaces | Workspace Name, Cost, Tokens |
| API Keys | Total API Keys, Total Cost, Total Tokens (input, output, cache) | Key, Cost, Blended Rate |
| Inference Geo | Total Locations, Total Cost, Total Tokens | Location, Cost, Tokens — includes a "Not reported" row for requests without an attributed location |
Step 4: Adjust Filters and Time Range
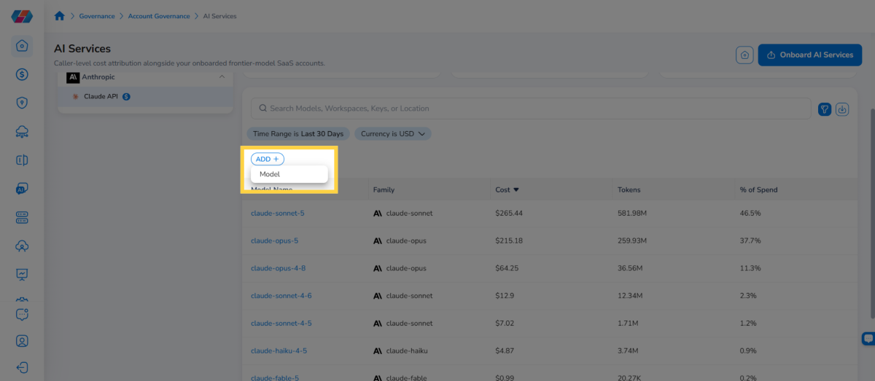
Use the Time Range and Currency filters above the table to adjust the reporting period. Click ADD + to add a filter, such as Model.
Step 5: Search the Table
Enter a model, workspace, key, or location name in the Search field to narrow the table to matching rows. The search works across every column in the currently selected tab.
Step 6: Export Table Data
Click the Download icon above the table to export the current filtered and sorted view. An adjacent help icon provides guidance specific to the selected tab.
Step 7: Drill Down into Resource Details
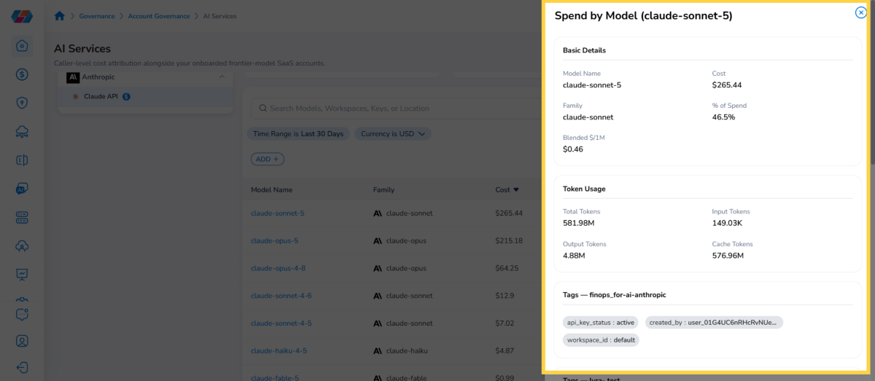
Click a row's name — a model, workspace, key, or location — to drill down into its detail panel. The panel opens titled Spend by Model, Spend by Workspace, Spend by Key, or Spend by Inference Geo to match the tab. Basic Details leads with the item's name, cost, percentage of spend, and blended rate per million tokens; Token Usage breaks total tokens down into input, output, and cache; and Tags lists metadata such as api_key_status, created_by, and workspace_id.
AI Services Dashboard
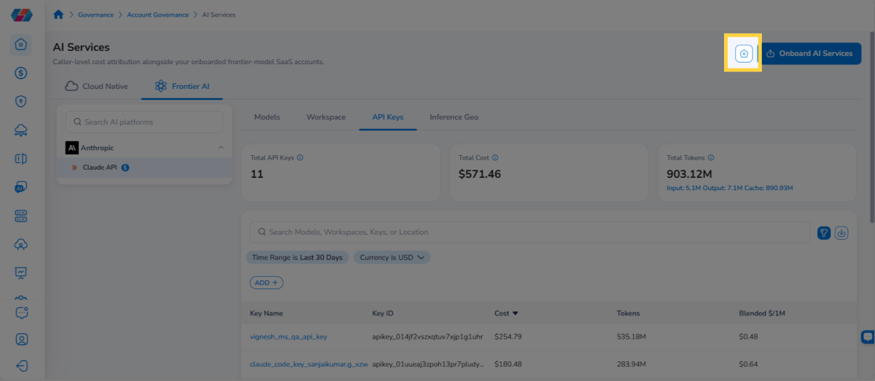
Click the home icon next to Onboard AI Services, in the top-right corner of the AI Services page, to open the AI Services Accounts page
The AI Services page displays one summary card for OpenAI and one for Anthropic. Each card shows:
-
Total Accounts: The total number of onboarded accounts for that provider.
-
Accounts with Invalid Credentials: Accounts with credential issues, with a Fix It action link.
-
Deactivated Accounts: Inactive accounts, with a Reactivate action link.
-
Active and Governed Accounts: Healthy, active accounts, with a View action link.
Click any card to highlight it and filter the account table below to show only accounts for that provider.
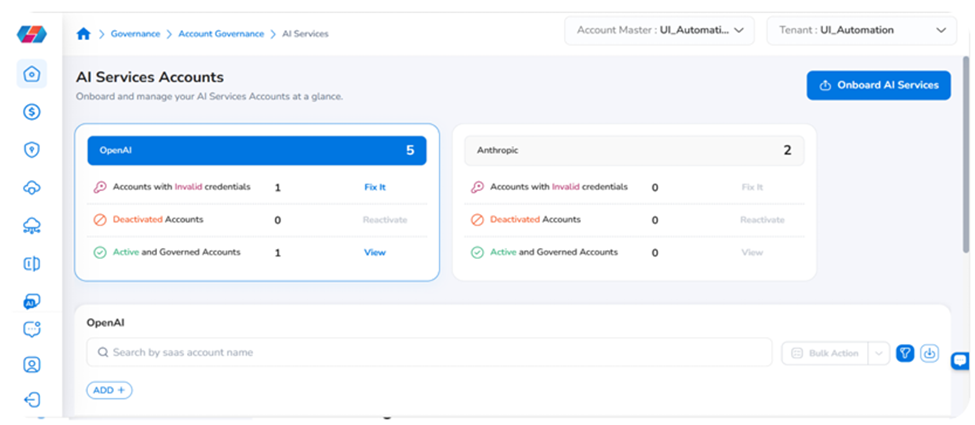
Quick Actions
Each summary card includes up to three quick-action links:
| Quick Action | When Active | What It Does |
|---|---|---|
| Fix It | Invalid credential count > 0 | Navigates directly to the account with invalid credentials |
| Reactivate | Inactive account count > 0 | Navigates to the first inactive account for that provider |
| View | Active account count > 0 | Filters the table to show only active and governed accounta |
Note: When the count for a quick action is zero, the link is greyed out and cannot be clicked.
Managing AI Service Accounts
After onboarding, click the ⋯ (actions menu) in the Actions column for any account row:
-
View: Opens the AI Service Account Summary page with full account details.
-
Edit: Opens the account for editing — update the account name, description, or storage credentials.
-
Deactivate: Suspends the account without deleting it.
-
Delete: Permanently removes the account from CoreStack.
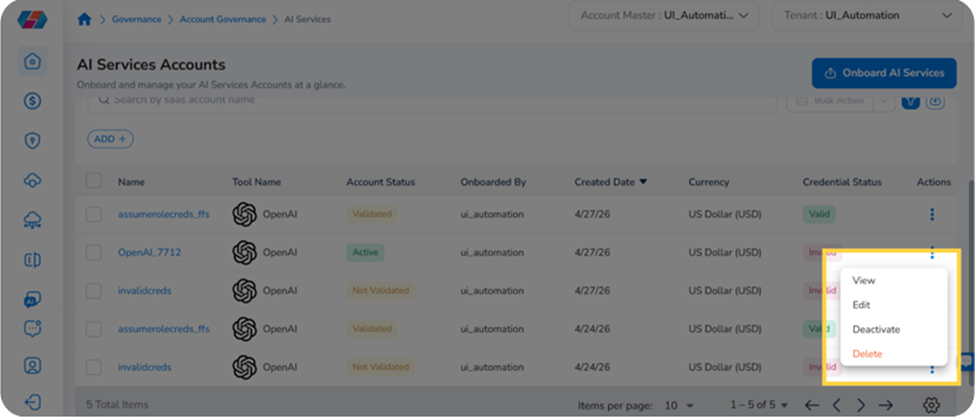
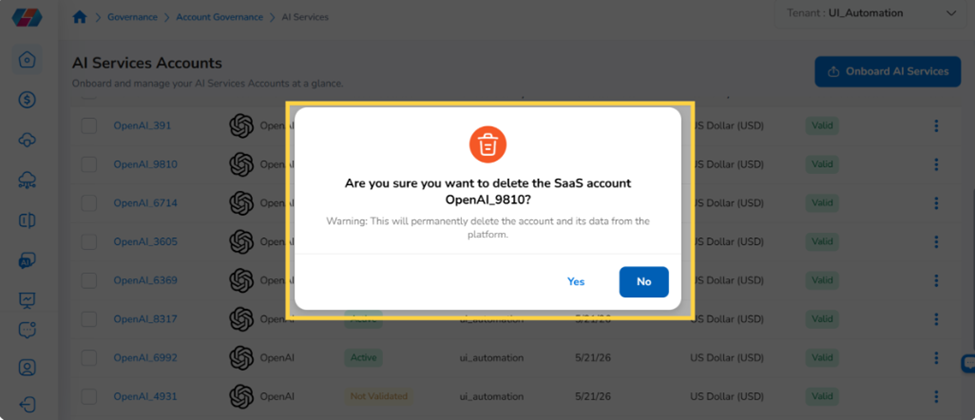
Warning: Deleting an AI service account permanently removes it and all associated data from CoreStack. This action cannot be undone.
View Account Details
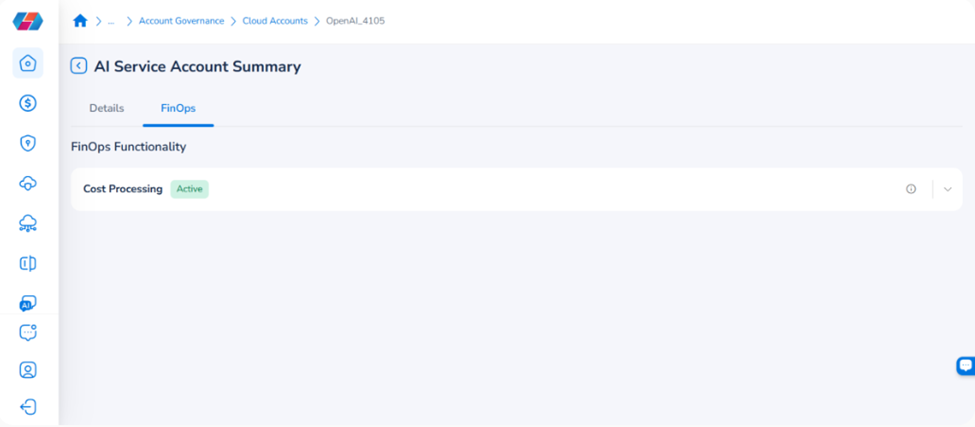
Click View from the actions menu to open the AI Service Account Summary page.
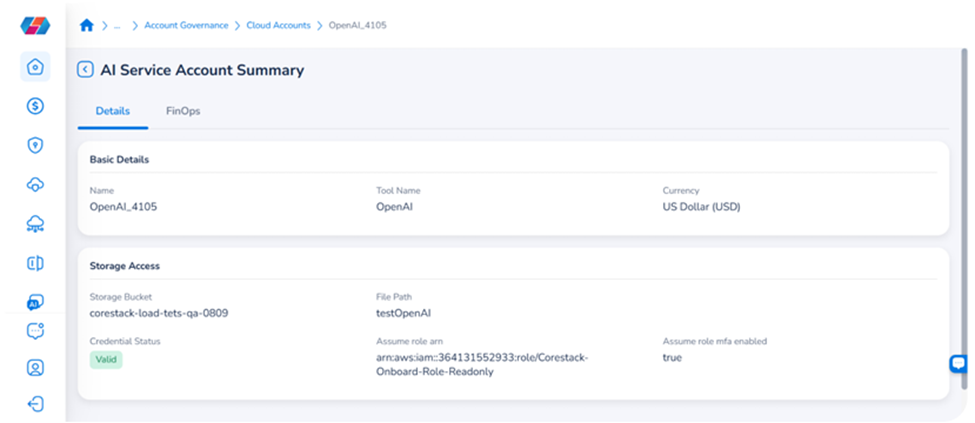
The Details tab shows:
-
Basic Details: Account Name, Tool Name, and Currency.
-
For OpenAI accounts, Storage Access: Storage Bucket, File Path, Credential Status, authentication method, and MFA settings.
-
For Anthropic accounts, API Credentials: Organization ID, Organization Name, and Credential Status.
Click the FinOps tab to review FinOps functionality. The Cost Processing status shows whether cost data is being actively collected and processed for the account.
Edit
Click Edit from the actions menu to open the account for editing.
The Basic Details tab allows you to update the account name and description.
The Storage Access tab allows you to update the storage credentials. You can switch between authentication methods — Assume Role or Access Key — and modify the Role ARN, External ID, Storage Bucket, and File Path for Assume Role, or the Access Key, Secret Key, Storage Bucket, and File Path for Access Key.
For Anthropic accounts, an API Credentials tab lets you update the Organization ID, Organization Name, and Admin API Key.
Click Finish to save your changes.
Deactivate
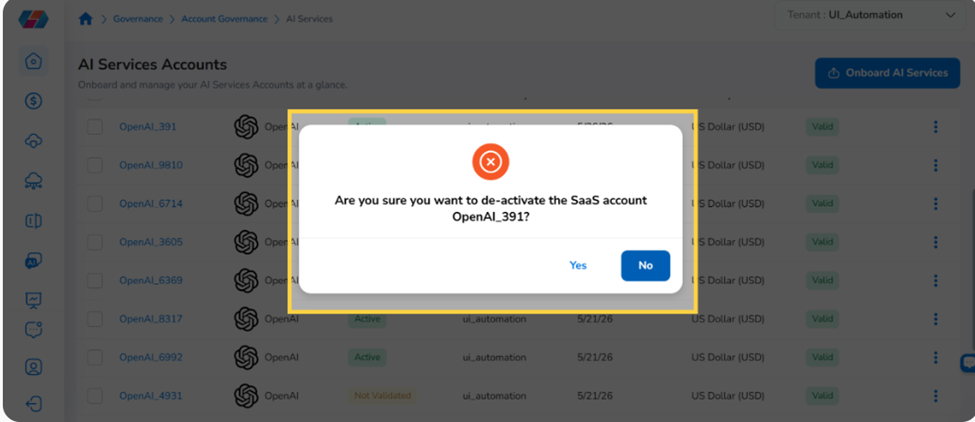
Click Deactivate from the actions menu to suspend the account without deleting it. A deactivated account stops collecting and processing cost data but retains all previously ingested data and configuration. The summary card for the relevant provider reflects the updated count under Deactivated Accounts. You can reactivate the account at any time using the Reactivate quick action on the summary card or from the actions menu.
Delete
Click Delete from the actions menu to permanently remove the account from CoreStack. Once deleted, the account no longer appears in the account table, all associated data is removed and cannot be recovered, and the summary card count for the relevant provider updates to reflect the removal. Use this option only when the account is no longer needed.
Filtering the Account Table
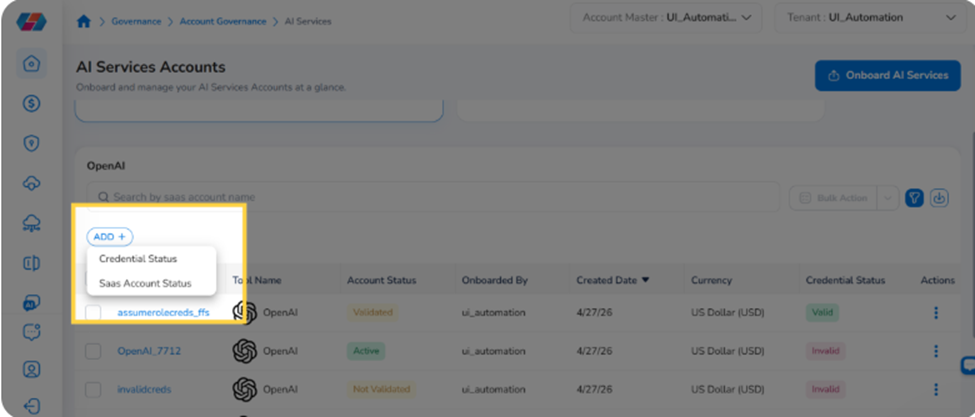
Use the ADD+ button above the account table to filter accounts. Available filter options:
-
Credential Status — filter by Valid or Invalid credentials.
-
SaaS Account Status — filter by account status (Active, Deactivated, etc.).
Exporting the Account List
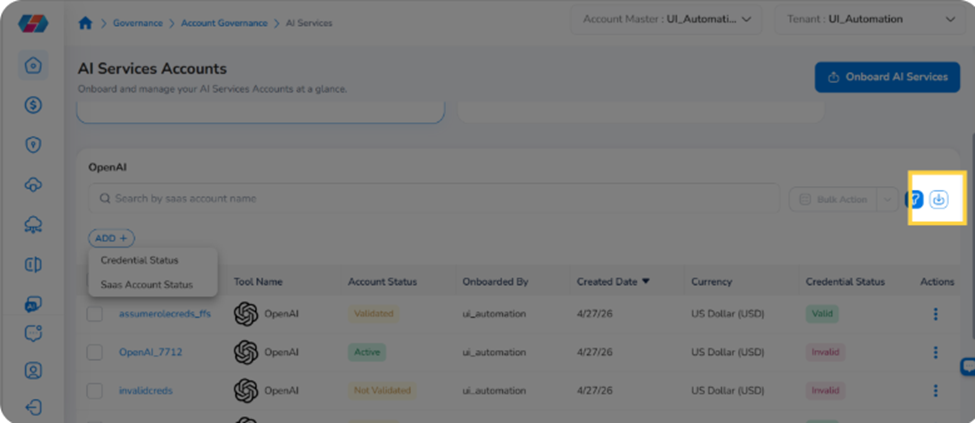
Click the download icon in the top right of the AI Services page to export the full account list. The exported file contains all account details visible in the table.
Frequently Asked Questions
Q: What's the difference between the Cloud Native tab and the Frontier AI tab?
Cloud Native shows AI services CoreStack discovers through your onboarded AWS, Azure, or GCP cloud accounts — agents, models, and other resources running inside your cloud infrastructure. Frontier AI shows usage from providers you've integrated directly, such as Anthropic's Claude API, where CoreStack authenticates with the provider's own API rather than reading cloud billing data.
Q: Why do the governance category tabs (Agents, Models, Users, etc.) show different table columns?
Each category tracks a different kind of resource, so CoreStack surfaces the columns most relevant to it — Model Family for Models, or IAM User or Role for Users, for example. All categories share the same three summary cards (Total Service Instances Discovered, Spend Under Governance, and Token Consumed) regardless of which columns their table shows.
Q: How do I get from the usage dashboards back to managing my onboarded accounts?
Click the home icon next to Onboard AI Services, in the top-right corner of the AI Services page. This opens the AI Services Accounts page, where you can view, edit, deactivate, or delete any onboarded account.
Q: Why is the Fix It link greyed out on my card?
The Fix It link is only active when the invalid credentials count is greater than zero. When all credentials are valid, the link is displayed in a disabled, greyed-out state.
Q: A card shows zero accounts — what should I do?
No accounts have been onboarded for that provider yet. Click Onboard AI Services and follow the onboarding wizard to add the first account.
Q: My credentials have changed — how do I update them?
Click the ⋯ actions menu for the relevant account and select Edit. For OpenAI, update the credentials in the Storage Access tab; for Anthropic, update them in the API Credentials tab. Click Finish to save.
Q: Can I onboard multiple AI service accounts at once?
Yes, for OpenAI. During the Basic Details step, click Click here to download the CSV Template to download a bulk import template.
Q: What is shown on the FinOps tab of an account's summary page?
The FinOps tab shows the FinOps Functionality section with the Cost Processing status — confirming whether cost data is being actively collected and processed for the account.
Troubleshooting
Summary cards are not loading
Cause: The API failed to load account health data.
Solution:
-
Check your network connection and refresh the page.
-
If the cards display a loading error, click the Retry option on the card.
-
If the issue persists, contact CoreStack support with the provider name and a screenshot of the error.
Credential validation fails during onboarding or edit
Cause: The account's credentials are incorrect, expired, or lack required permissions.
Solution:
-
For OpenAI (Assume Role): confirm the Role ARN is correct and the IAM trust policy permits CoreStack to assume the role.
-
For OpenAI (Access Key): confirm the Access Key and Secret Key are active and have the required permissions.
-
For Anthropic: confirm the Organization ID and Admin API Key are correct, active, and that the Admin API Key has permission to read usage and billing data. [VERIFY: confirm the exact required permissions/scopes]
-
Re-enter the credentials and click Save & Validate (or Finish) again.
If the issue persists, contact CoreStack support with the provider name and the exact error message displayed.
Card counts or governance dashboards do not reflect recent changes
Cause: Summary cards and governance dashboards update on the scheduled data refresh cycle, not immediately after an account or resource change.
Solution:
-
Wait for the next scheduled refresh cycle and reload the page.
-
Re-check the Time Range and Currency filters — a narrow time range can make recent activity appear missing rather than stale.
-
If counts appear stale for an extended period, contact CoreStack support with the provider name, the affected tab, and the expected count or spend change.
Updated about 4 hours ago