

ServiceNow
Learn how to onboard, configure, and manage a ServiceNow integration in CoreStack for Incident, Change, and Configuration Management, plus threat ticketing._
Feature Overview
The ServiceNow integration is an ITSM tool connection within CoreStack's Platform administration area that lets you onboard a ServiceNow instance and route CoreStack activity — threats, policy violations, cost optimization approvals, budget alerts, and metric alerts — into ServiceNow as Incidents, Change Requests, or Configuration Items (CMDB). It is relevant any time your team tracks operational or security work in ServiceNow rather than, or in addition to, CoreStack's own dashboards.
This feature is most valuable to Account Admins and Tenant Admins who manage tool integrations, and to SecOps and FinOps practitioners who rely on the resulting tickets in their day-to-day workflow. It is not a general-purpose ServiceNow connector for arbitrary data — it covers Incident Management, Change Management, and Configuration Management (CMDB) specifically, and each is configured independently.
Note: A ServiceNow tool account must be fully onboarded and validated before it can be selected in any tenant-level routing setting (such as Security Alert or Policy ticketing). If onboarding fails credential validation, none of the routing settings described below will have a usable tool to select.
How It Works
An administrator onboards a ServiceNow tool account with either Basic Auth or OAuth 2.0 credentials, scoped to either a single tenant or the whole platform account. Once onboarded, the administrator configures Incident Management and/or Change Management separately — mapping CoreStack fields (such as a threat's severity or a cost recommendation's savings amount) to ServiceNow fields, and, at the tenant level, selecting which categories of CoreStack activity (Alerts, Policy, Threats, and so on) should route to that tool account. From that point on, CoreStack automatically creates a ServiceNow Incident or Change Request whenever a matching event occurs, using the mapped attributes.
Prerequisites
Before you begin, ensure the following:
-
Role: You have a role with access to Integrated Tools onboarding and Tenant Management settings, such as Account Admin.
-
ServiceNow access: You have ServiceNow credentials with API access — either a username/password for Basic Auth, or a Client ID/Secret for OAuth 2.0 — and the corresponding Auth URL (and Token URL, for OAuth 2.0).
-
Access: You can access
Settings > Integrated Tools and Settings > Tenant Managementin the CoreStack navigation.
Onboarding a ServiceNow Tool Account
Navigate to Settings > Integrated Tools (or alternatively Governance > Account Governance > Tools, expand the ITSM category, hover over ServiceNow, and click Add New to begin onboarding. Both paths lead to the same onboarding flow.
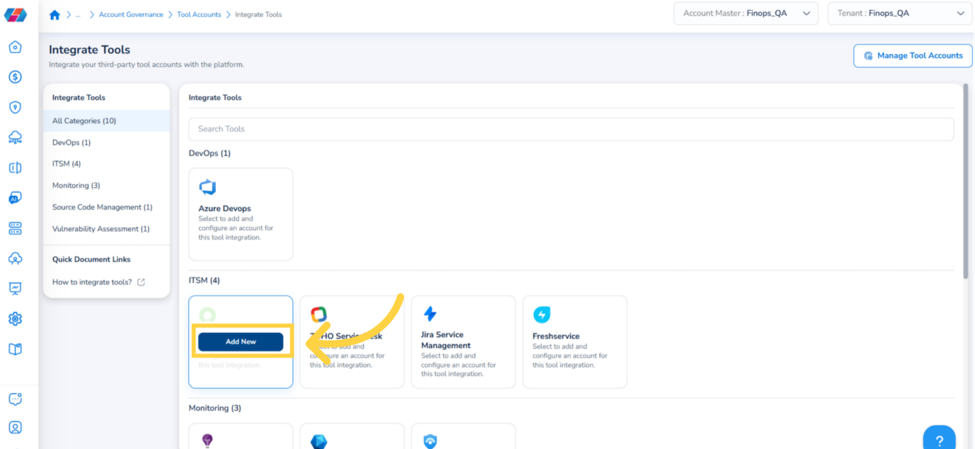
Follow these steps to complete onboarding:
Step 1: Select the tool account scope
In the Select Tool Account Scope field, select either Tenant or Account.
-
Tenant: The tool account is only available in the tenant it's onboarded to.
-
Account: The tool account is available in all tenants under your platform account.
Click Next to continue to Add & Validate Credentials.
Step 2: Select an authentication protocol and enter credentials
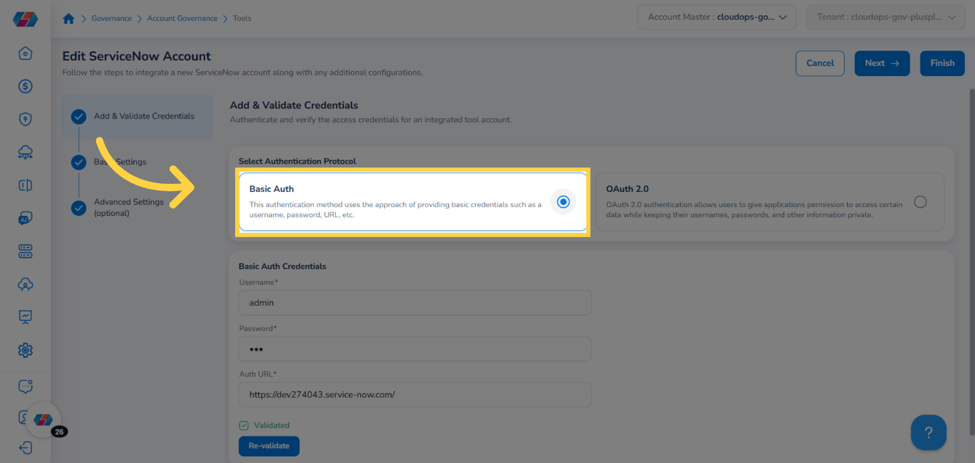
In the Select Authentication Protocol field, select either Basic Auth or OAuth 2.0, then enter the corresponding details:
-
Basic Auth: Username, Password, and Auth URL
-
OAuth 2.0: Client ID, Client Secret, Auth URL, and Token URL
Click Save and Validate. If validation fails, correct the details and click Re-validate.
Step 3: Enter account details
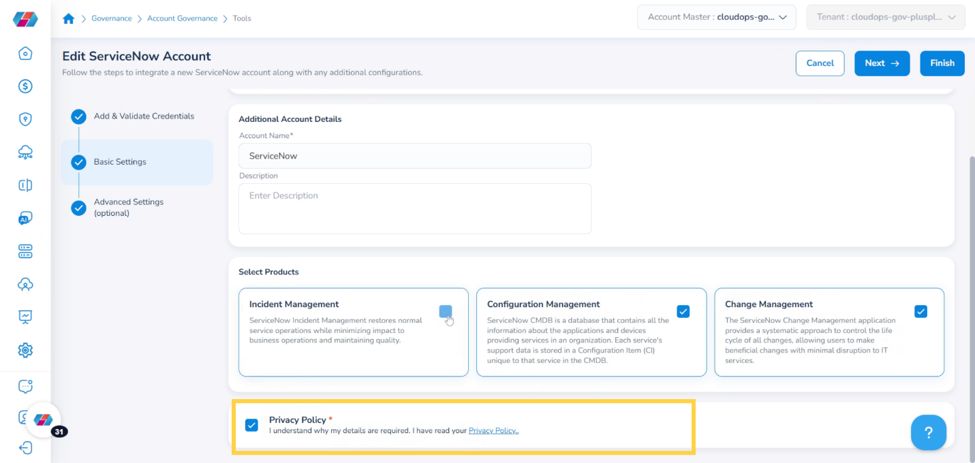
Click Next to go to the Basic Settings page. In the Account Name box, enter a name for the account, and in the Description box, enter a description.
Step 4: Select products
In the Select Products section, select any of the following:
-
Incident Management: Restores normal service operations while minimizing impact to business operations and maintaining quality.
-
Configuration Management: Populates the ServiceNow CMDB, the database that stores Configuration Items (CIs) for the applications and devices providing services in your organization.
-
Change Management: Provides a systematic approach to control the lifecycle of changes, letting you make beneficial changes with minimal disruption to IT services.
Step 5: Accept the privacy policy
Select the Privacy Policy checkbox and click Next.
Step 6: Configure advanced settings (optional)
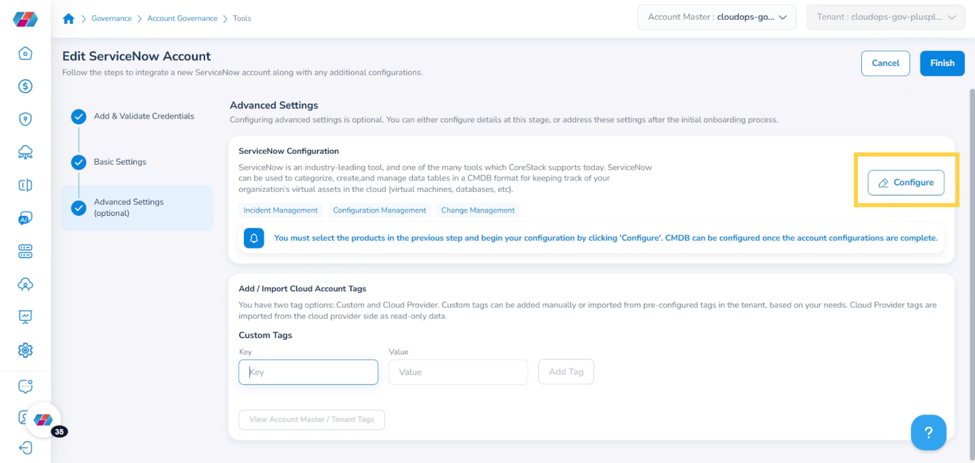
On the Advanced Settings page, you can add custom tags: enter a tag in the Key box and its value in the Value box, then click Add Tag. This step is optional.
Tip: Onboarding completes once you finish this step. The account then appears on the Integrated Tools page, where you can configure Incident Management, Change Management, and CMDB independently.
Configuring ServiceNow for Incident Management
Navigate to the onboarded ServiceNow account on the Integrated Tools page and click Configure, then select Incident Management on the left panel.
Step 1: Configure custom fields (optional)
In the Custom Fields (Optional) section, click Add New. In the Add Custom Fields dialog, select Direct or Request:
-
Direct: Links specific fields between the two systems directly. Select the relevant option(s) in the Source and Value dropdowns, then click Ok for each.
-
Request: Sets up a request-driven mapping. Select relevant option(s) in the ServiceNow and Platform dropdowns, then select a Tenant Value and Tenant Name Value and click Add to add the value mapping.
Click Save to add the field.
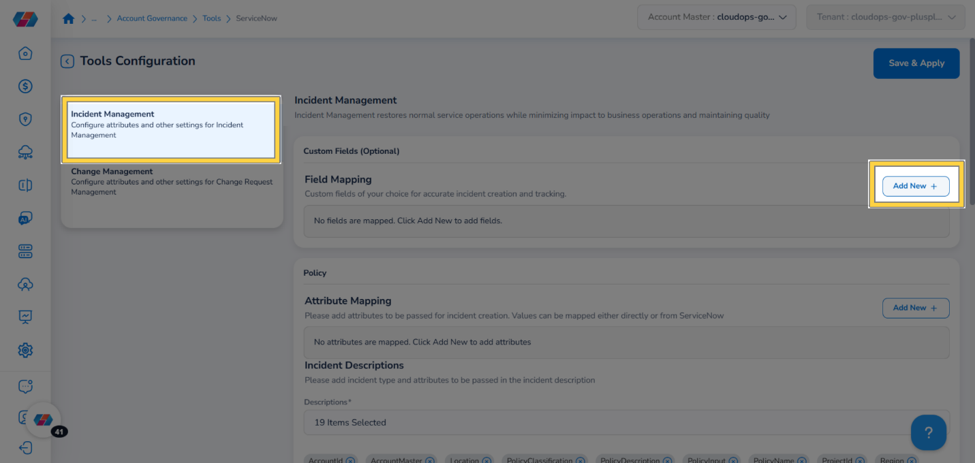
Note: To remove a value mapping, click the cross symbol next to it.
Step 2: Add a Policy attribute mapping
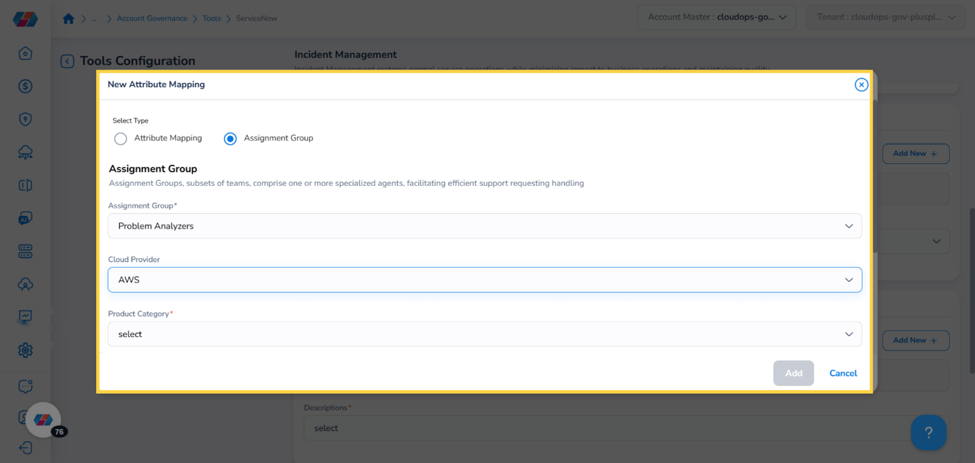
Click Add New to perform attribute mapping for Policy, then select Attribute Mapping in the New Attribute Mapping dialog. This adds attributes to be passed for incident creation, mapped either directly or from ServiceNow.
Enter the following details:
-
Name: Select an option and click Ok.
-
Source: Select Direct or Request.
-
Value: Enter a value for the selected source.
-
Assignment Group: Select Assignment Group as the type, then choose the specific group.
-
Cloud Provider, Product Category, Resource Types, Resources: Select the applicable options for each.
Click Add to save the attribute.
Step 3: Add descriptions and edit existing attributes
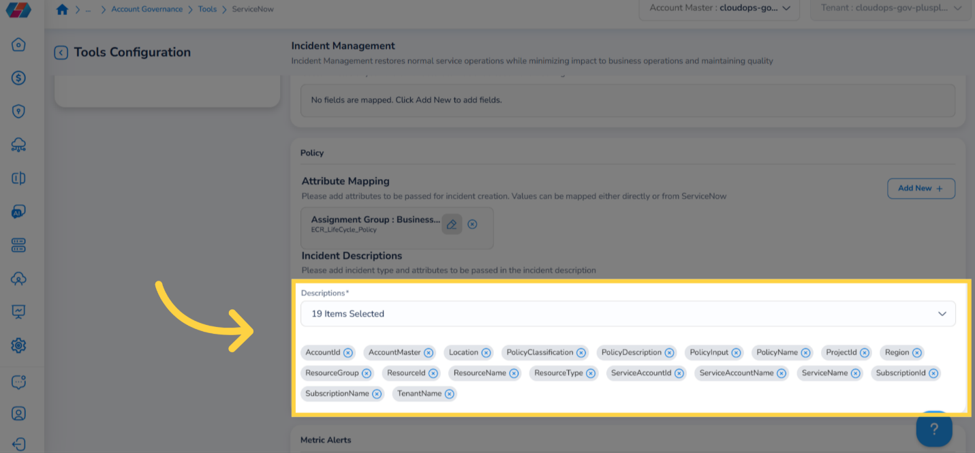
To add descriptions for a section, use the Descriptions dropdown to select and confirm the relevant options; click the cross symbol to remove one. To edit an existing attribute, click its edit icon, make changes in the dialog, and click Add. To delete an attribute, click the cross symbol next to it.
Step 4: Add attribute mapping for other sections
To perform attribute mapping for Metric Alerts, Budget Alert, or Security Alert, click Add New in the relevant section and follow the same process as Step 2. You can add multiple attributes per section.
Note: This attribute mapping controls which data fields populate an incident that has already been created — for example, mapping a threat's severity or resource type to a ServiceNow field. It does not control whether a threat generates an incident in the first place. That is a separate, tenant-level setting — see the next section.
Configure tenant-level routing for Incident Management
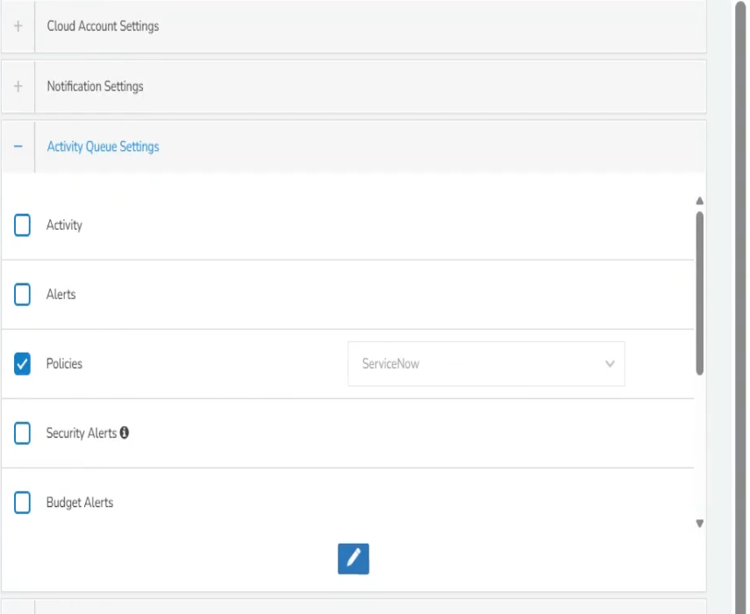
Navigate to Settings > Tenant Management, expand Activity Queue Settings, and click Edit.
Step 5: Select the tool account and activate routing
Select the checkbox(es) for the categories you want to route to ITSM — Policies, Security Alerts, Budget Alerts each appear as a separate checkbox, matching the attribute-mapping sections configured above. To enable ticketing for policy violations, select the Policies checkbox. In the dropdown that appears on the right, select your configured ITSM tool account, then click the Apply icon (tick mark) to activate routing for that category.
Step 6: Select severities for automatic threat ticketing
Under Security Alert, use the severity list to select which threat severities should automatically create a ticket in your configured ITSM tool. Critical and High are selected by default.
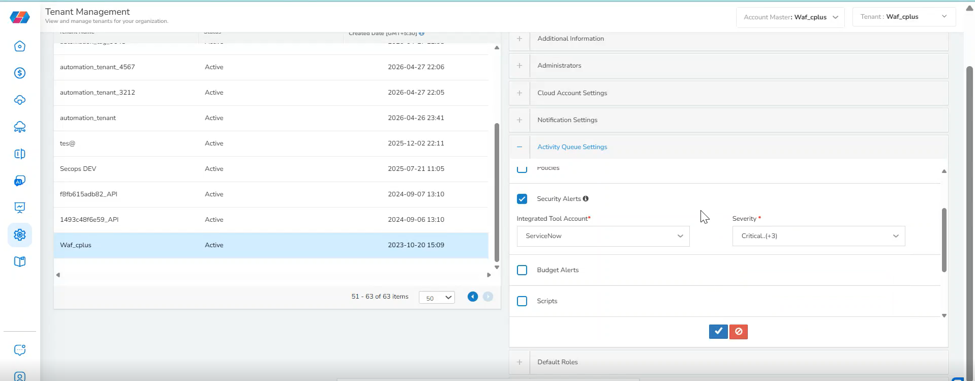
This severity rule applies the same way regardless of how the threat was detected — through CoreStack's real-time detection or the periodic/regular threat sync Once a threat matching a selected severity is found, CoreStack automatically creates the incident and links it to the finding. You can see the linked incident in the Ticket ID column of the Cloud Security Dashboard's Threats table, or in the Threat Explorer tab under Infrastructure Explorers.
Note: If no severities are selected, or no ITSM tool account is selected in Step 5, threats are still visible in CoreStack but no incident is created for them.
Ticket creation for Policy violations
Unlike Security Alert, Policy ticketing has no severity filter. Once the Policies checkbox is enabled with a tool account selected, CoreStack creates a ticket for every resource that violates an enabled policy on each policy run.
Ticketing is per resource, not per policy run — if a policy finds 3 non-compliant resources, CoreStack creates 3 separate incidents, each with its own incident number. Ticket fields are populated from the attribute mapping configured for Policy under Incident Management Configuration — typically including the policy name, description, classification, the account ID, and the resource that violated it.
Viewing and filtering ticketed threats
In the Threats table under Cloud Security, click a threat's Ticket ID to open the linked incident. If the threat's underlying finding is later archived or closed at the source (for example, in AWS GuardDuty), its ticket entry is removed from the Threats table
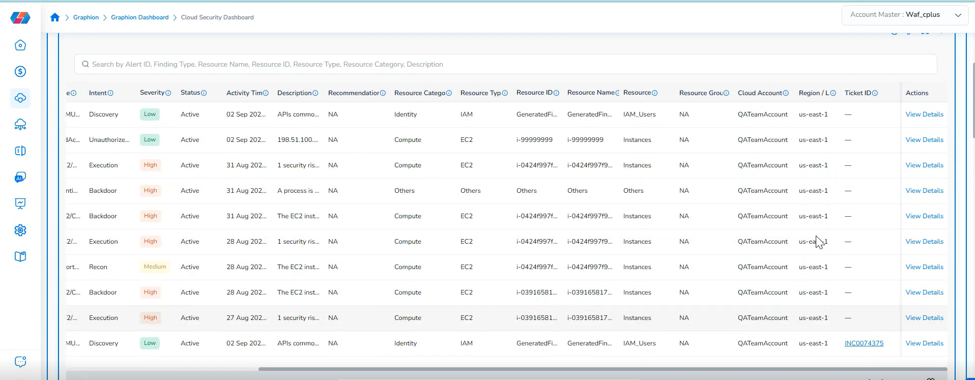
Use the Has Ticket filter to show only threats that have a linked ITSM ticket, or only those that don't.
Viewing ticketed policy violations
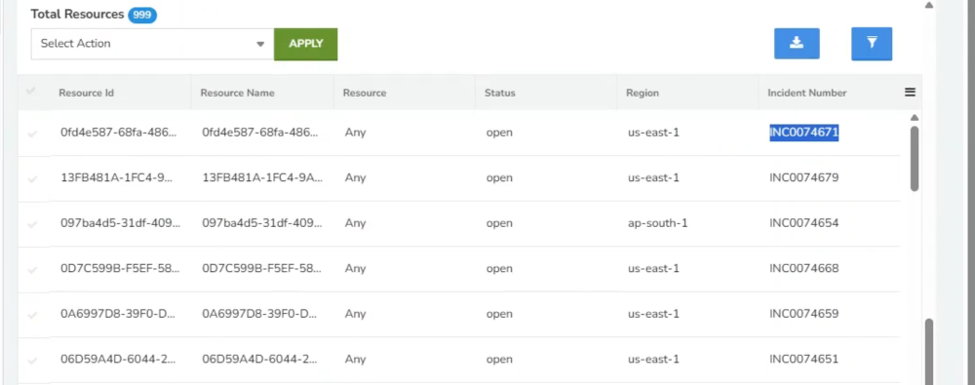
You can see the linked incident for a policy violation under overnance > Account Governance > Guardrails > Recommendations: select the violated policy, and each resource in its results table includes an Incident Number column linking to that resource's ServiceNow ticket.
The same reference may also appear under the Misconfigurations tab in Infrastructure Explorers (Cloud Security Dashboard) depending on your CoreStack version.
Configuring ServiceNow for Change Management
On the Configure page, select Change Management on the left panel.
Step 1: Add a Change Management attribute mapping
Click Add New. In the Name dropdown, select an option and click Ok. In the Source field, select Direct or Request. In the Value box, enter a value for the selected source and click Add.
To edit an existing attribute, click its edit icon, make changes, and click Add; to delete one, click the cross symbol next to it.
Step 2: Save and apply
After all details are added and configuration is complete, click Save & Apply to save the account details.
Configure tenant-level routing for Change Management
Navigate to Settings > Tenant Management, expand Activity Queue Settings, and click Edit.
Step 3: Select the tool account and activate routing
Select the checkbox(es) for the relevant alert category — in this case, the Alerts checkbox. In the dropdown that appears on the right, select your configured ITSM tool account, then click the Apply icon (tick mark). This completes the tenant-level setting for Change Management.
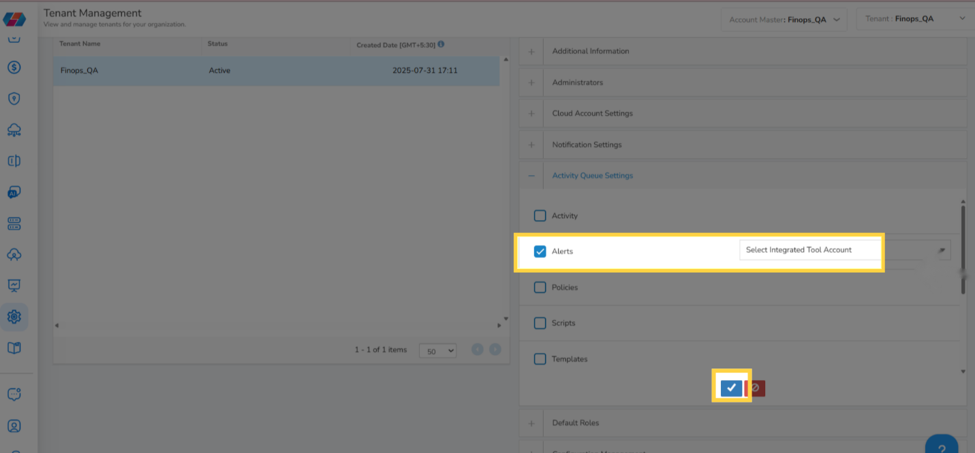
Tip: In Cost Recommendations, users can request approval via ServiceNow. This creates a Change Request with the attributes mapped above, and CoreStack automatically executes the optimization action once the request is approved.
Managing ServiceNow Tool Accounts
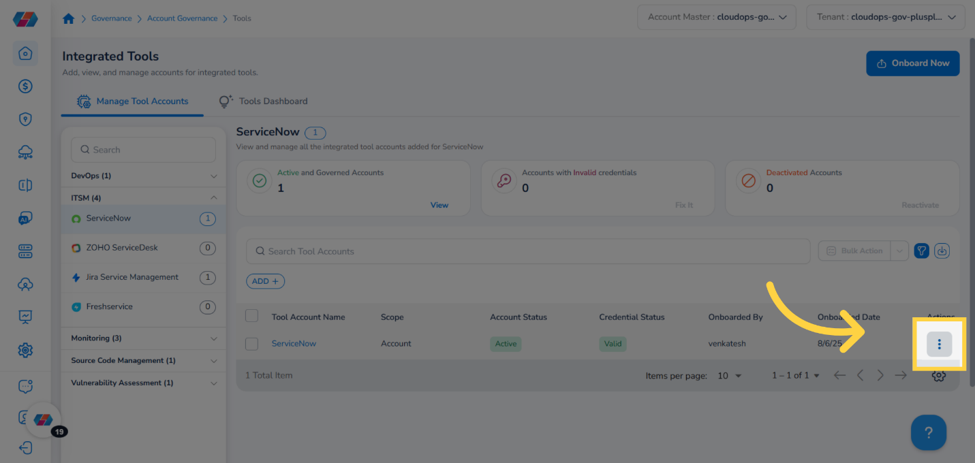
On the Integrated Tools page, three cards at the top show Active and Governed Accounts, Accounts with Invalid Credentials, and Deactivated Accounts, each linking to the corresponding filtered list. Use the Filter icon to show or hide the ADD+ custom filter option, or use Search to find a specific account. The account table shows Tool Account Name, Scope, Account Status, Credential Status, Onboarded By, Onboarded Date, and an Actions column with View, Edit, Configure CMDB, Deactivate, and Delete.
Viewing account details
Click a Tool Account Name to open its Tool Account Summary page, which shows Details, Change Management, Incident Management, and Configuration Management tabs.
Editing account details
Click the ellipses next to a tool account and select Edit. Make your updates, click Next, and after all changes are complete, click Finish.
Configuring CMDB
Click the ellipses next to a tool account and select Configure CMDB. Enter the following details:
-
Scope: Select Account, Tenant, or Cloud Account, then click Next.
-
Select Resource: Choose the Cloud Provider, Cloud Accounts (only if scope is Cloud Account), Resource Category, Resource Type, and Resource, then click Next.
-
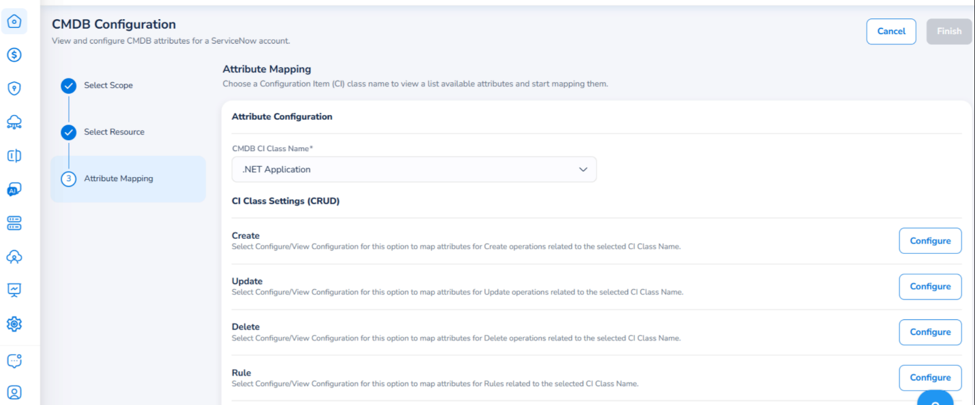
Attribute Mapping: Select a CMDB CI Class Name, then configure Create, Read, Update, and Delete access in the CI Class Settings (CRUD) section — enabling Auto Apply fields to CMDB update action, selecting relevant Attributes, and clicking Save & Close for each access type you configure.
Click Finish to complete the CMDB configuration. Click View Configuration at any time to review or change it.
Deactivating or deleting an account
Click the ellipses next to a tool account and select Deactivate or Delete. Confirm the action in the dialog that appears by selecting Yes or select No to cancel.
Frequently Asked Questions
Q: What's the difference between Tenant and Account scope when onboarding, and can I change it later?
Tenant scope makes the tool account available only in the tenant it was onboarded to; Account scope makes it available across every tenant under your platform account
Q: Does the Security Alert severity setting also control ticketing for Policy violations?
No. Security Alert governs threat ticketing only. Whether a Policy violation creates a ServiceNow incident is controlled by the Policies checkbox under Activity Queue Settings (Tenant Management) — a separate, tenant-level setting from Policy attribute mapping, which only controls what data appears on the incident once it exists. Unlike Security Alert, Policy ticketing has no severity filter: once enabled, every resource that violates a policy on a given run gets its own incident.
Q: Can I configure more than one ITSM tool, such as ServiceNow and Jira Service Management, at the same time?
Yes — Activity Queue Settings lets you select a specific integrated tool account per alert category, so different categories (or different tenants) can route to different ITSM tools.
Troubleshooting
Onboarding fails at "Save and Validate"
Cause: The Auth URL (or Token URL, for OAuth 2.0) is incorrect, or the ServiceNow credentials don't have sufficient API access.
Solution:
-
Confirm the Auth URL and Token URL match your ServiceNow instance exactly, including protocol (https://) and any trailing path.
-
Confirm the ServiceNow user or OAuth client has API access enabled.
-
Click Re-validate to test the corrected details.
If validation continues to fail, contact CoreStack support with the tool account scope (Tenant or Account), the authentication protocol used, and the exact error message shown.
A threat matches my selected severity, but no ServiceNow incident was created
Cause: Either no ITSM tool is selected under Security Alert, or the tool connection has an issue.
Solution:
-
Go to
Settings > Tenant Management > Activity Queue Settingsand confirm an ITSM tool account is selected for Security Alert. -
If no tool is listed, go to Integrated Tools and confirm the ServiceNow account shows Active and Governed status, not Invalid Credentials.
-
Re-select the tool account under Security Alert, apply, and check the Threats table's Ticket ID column again after the next sync.
If the issue persists, contact CoreStack support with the tenant name, the affected finding's ID, its severity, and the timestamp it was detected.
A policy violation occurred, but no ServiceNow incident was created
Cause: Either the Policies checkbox isn't selected under Activity Queue Settings, no ITSM tool account is selected for it, or no Policy attribute mapping has been saved.
Solution:
-
Go to
Settings > Tenant Management > Activity Queue Settingsand confirm the Policies checkbox is selected with an ITSM tool account chosen. -
Confirm the ServiceNow account shows Active and Governed status under Integrated Tools, not Invalid Credentials.
-
Confirm a Policy attribute mapping has been added and saved under Incident Management Configuration.
-
Re-check the Incident Number column under
Governance > Account Governance > Guardrails > Recommendationsafter the next policy run.
If the issue persists, contact CoreStack support with the tenant name, the policy name, and the affected resource ID.
A tool account shows "Invalid Credentials" on the Integrated Tools page
Cause: The ServiceNow credentials have expired, been revoked, or been changed on the ServiceNow side since onboarding.
Solution:
-
Click the ellipses next to the account and select Edit.
-
Re-enter the current credentials and click Re-validate.
-
Confirm the account's status updates to Active and Governed on the Integrated Tools page.
If the account still shows Invalid Credentials after updating them, contact CoreStack support with the tool account name and scope.
Updated about 8 hours ago