

Adding Billing Plans
This guide provides more detailed instructions on how to add a new Billing Plan in the platform.
Introduction
The new BillOps module offers comprehensive billing operations for multi-cloud and multi-account environments (AWS, Azure, GCP, OCI). It introduces Billing Plans to streamline and scale billing configurations across partners with features like flexible pricing rules, dynamic cost metric targeting (e.g., List Cost, Unblended Cost), and rule execution control.
Key features include:
- Contracted Cost included as a cost metric
- Adjustments like markup, discount, and margin
- Temporal rule flexibility (past 37 months up to 3 years ahead)
- Multi-partner scalability with rule inheritance and overrides
From setting up plan names to defining pricing rules, this guide will walk you through each step to create new Billing Plans and manage them within the platform.
Note: Billing Plans are available via UI and API, though charge allocation is currently API-only.
Adding Billing Plans
Perform the following steps to add a billing plan:
1. Login to the Platform
You should see a landing page based on your preferences.
2. Navigate to "FinOps" in the Menu
On the left navigation pane, click FinOps.
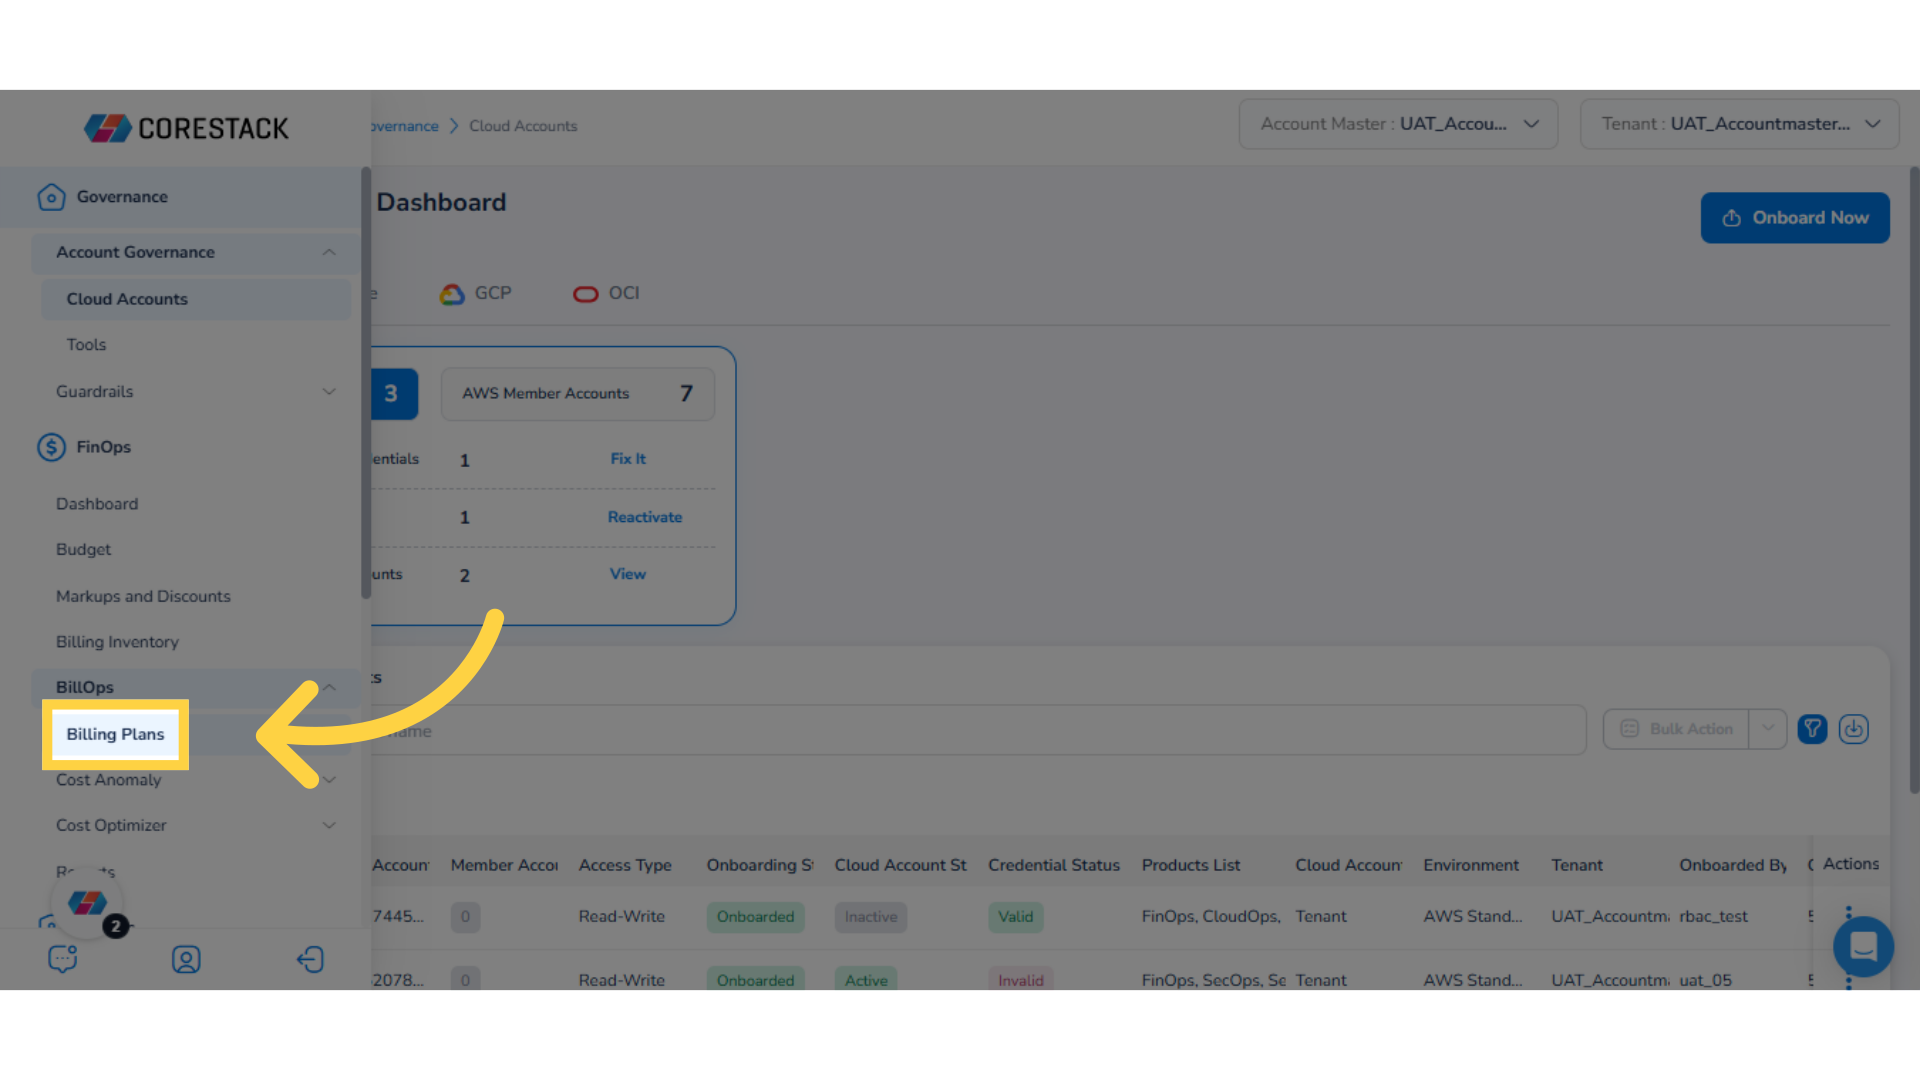
3. Select "BillOps" in the Menu
Navigate to the BillOps sub-section, and select it.
4. Select "Billing Plans"
Under BillOps, select Billing Plans. The Billing Configuration screen appears -- here users can view the existing Billing Plans and their status.
5. Adding a New Billing Plan
To add a new Billing Plan from the Billing Configuration page, first select the Actions button.
6. Click "Add Billing Plan"
Click Add Billing Plan to initiate the process of adding a new Billing Plan.

Adding Basic Details for Billing Plan
Perform the following steps to add basic details:
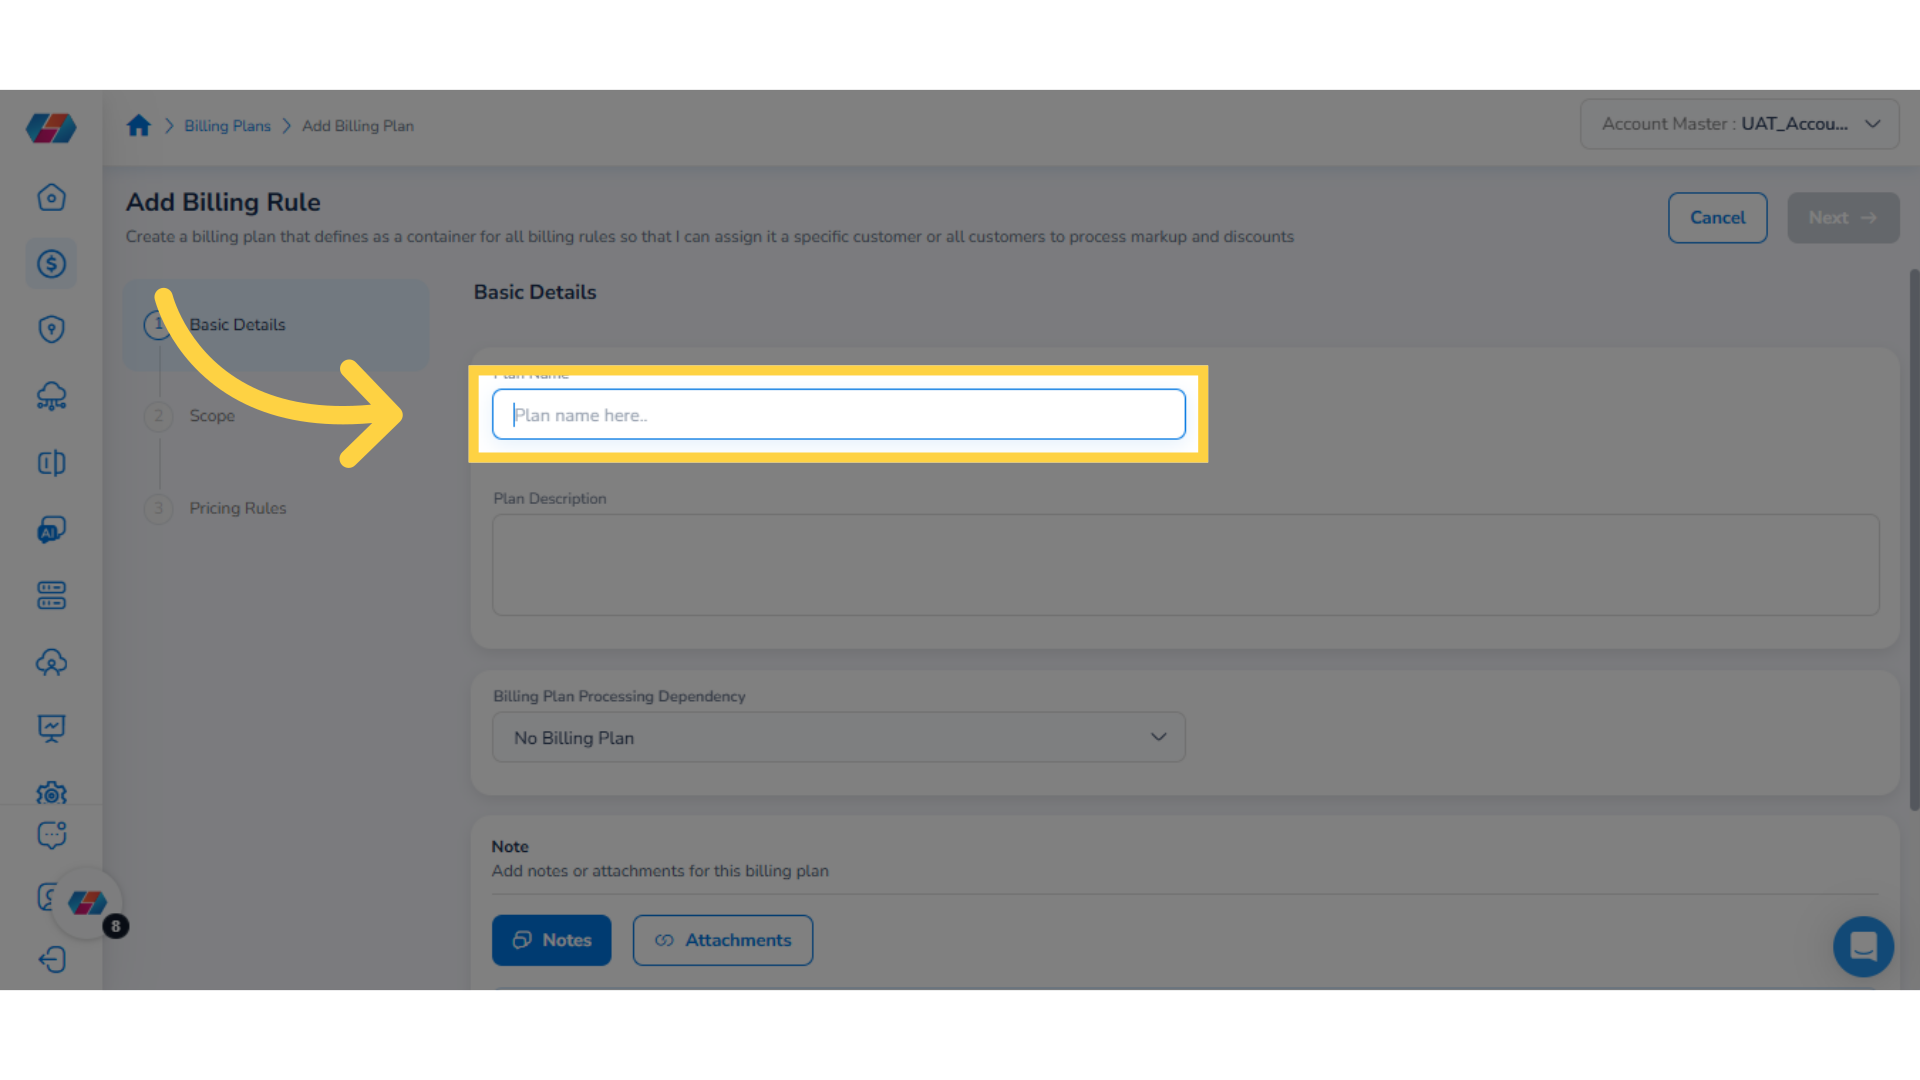
1. Enter "Plan Name"
In the Plan Name box, type the name of the Billing Plan.
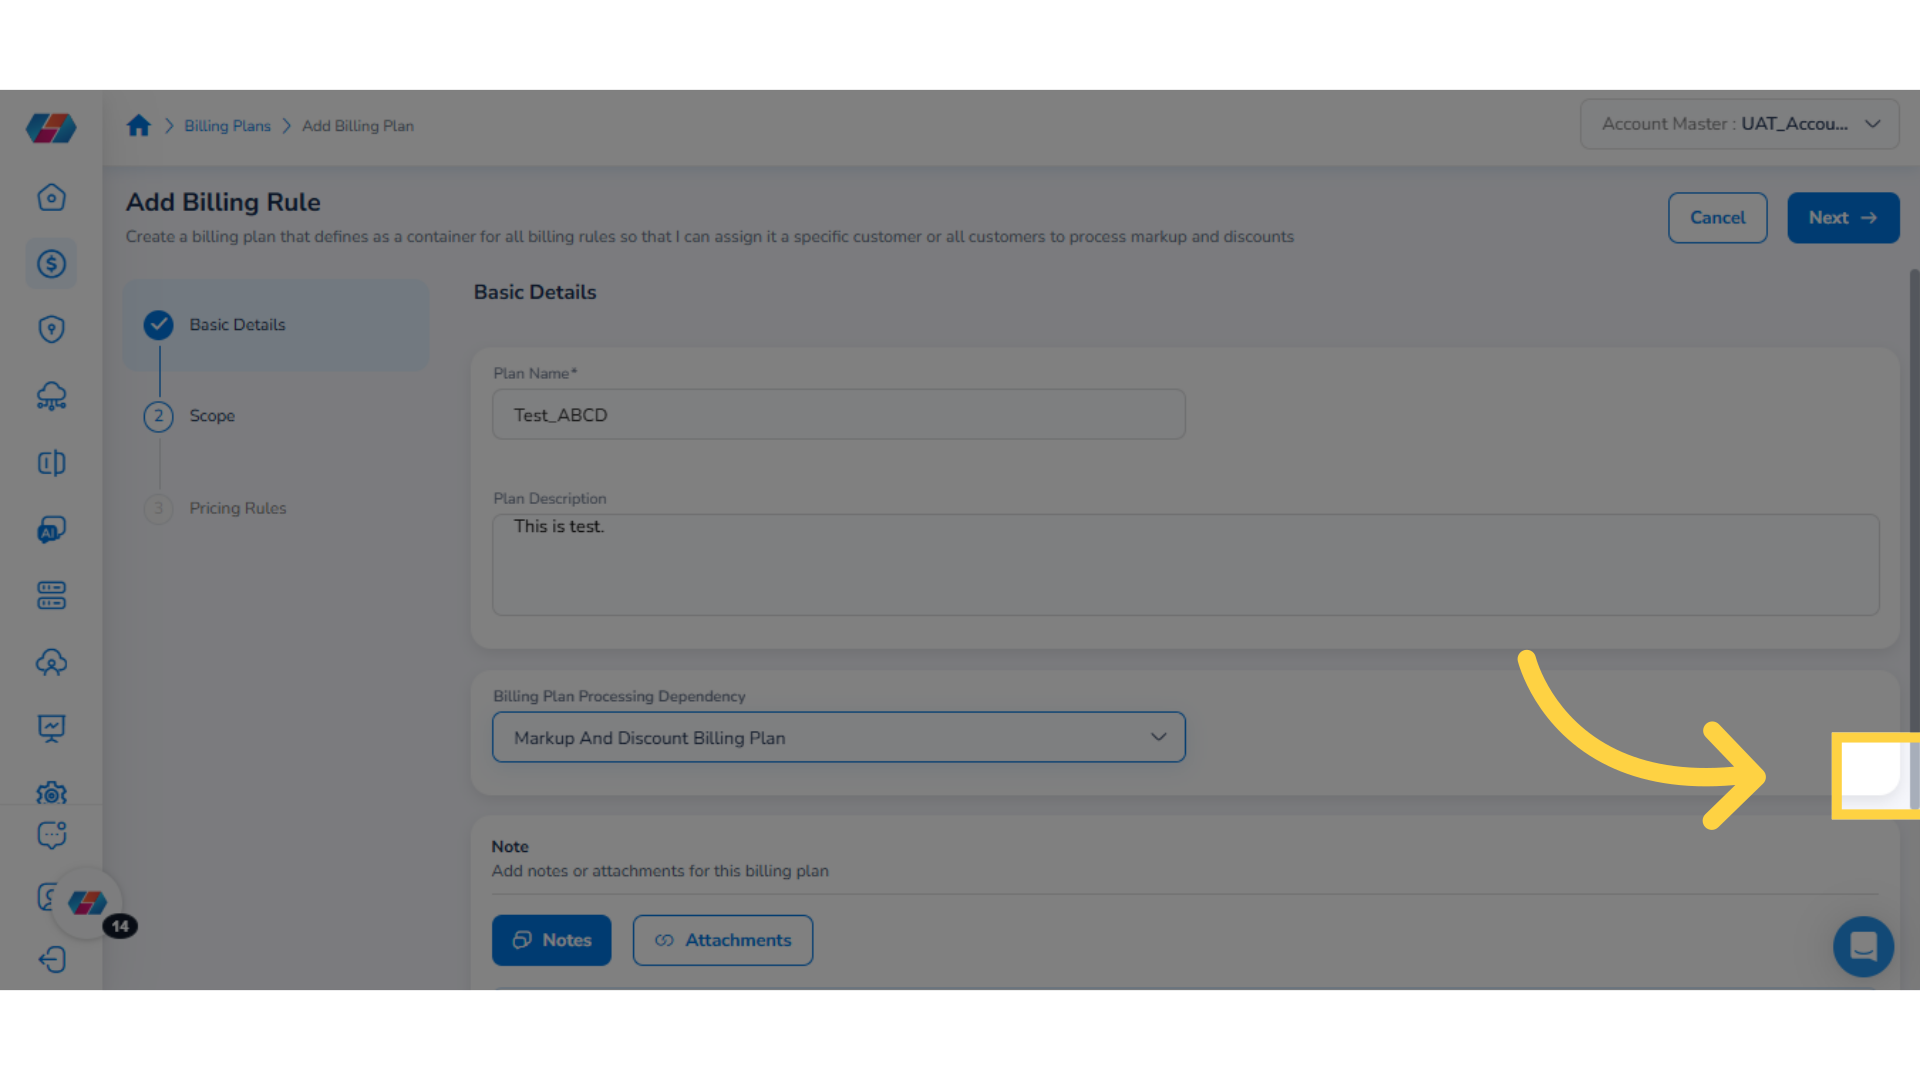
2. Fill "Plan Description"
In the Plan Description text box, type description about the plan.
3. Select an Option in "Billing Plan Processing Dependency" drop-down
In the Billing Plan Processing Dependency drop-down list, click to select an option.
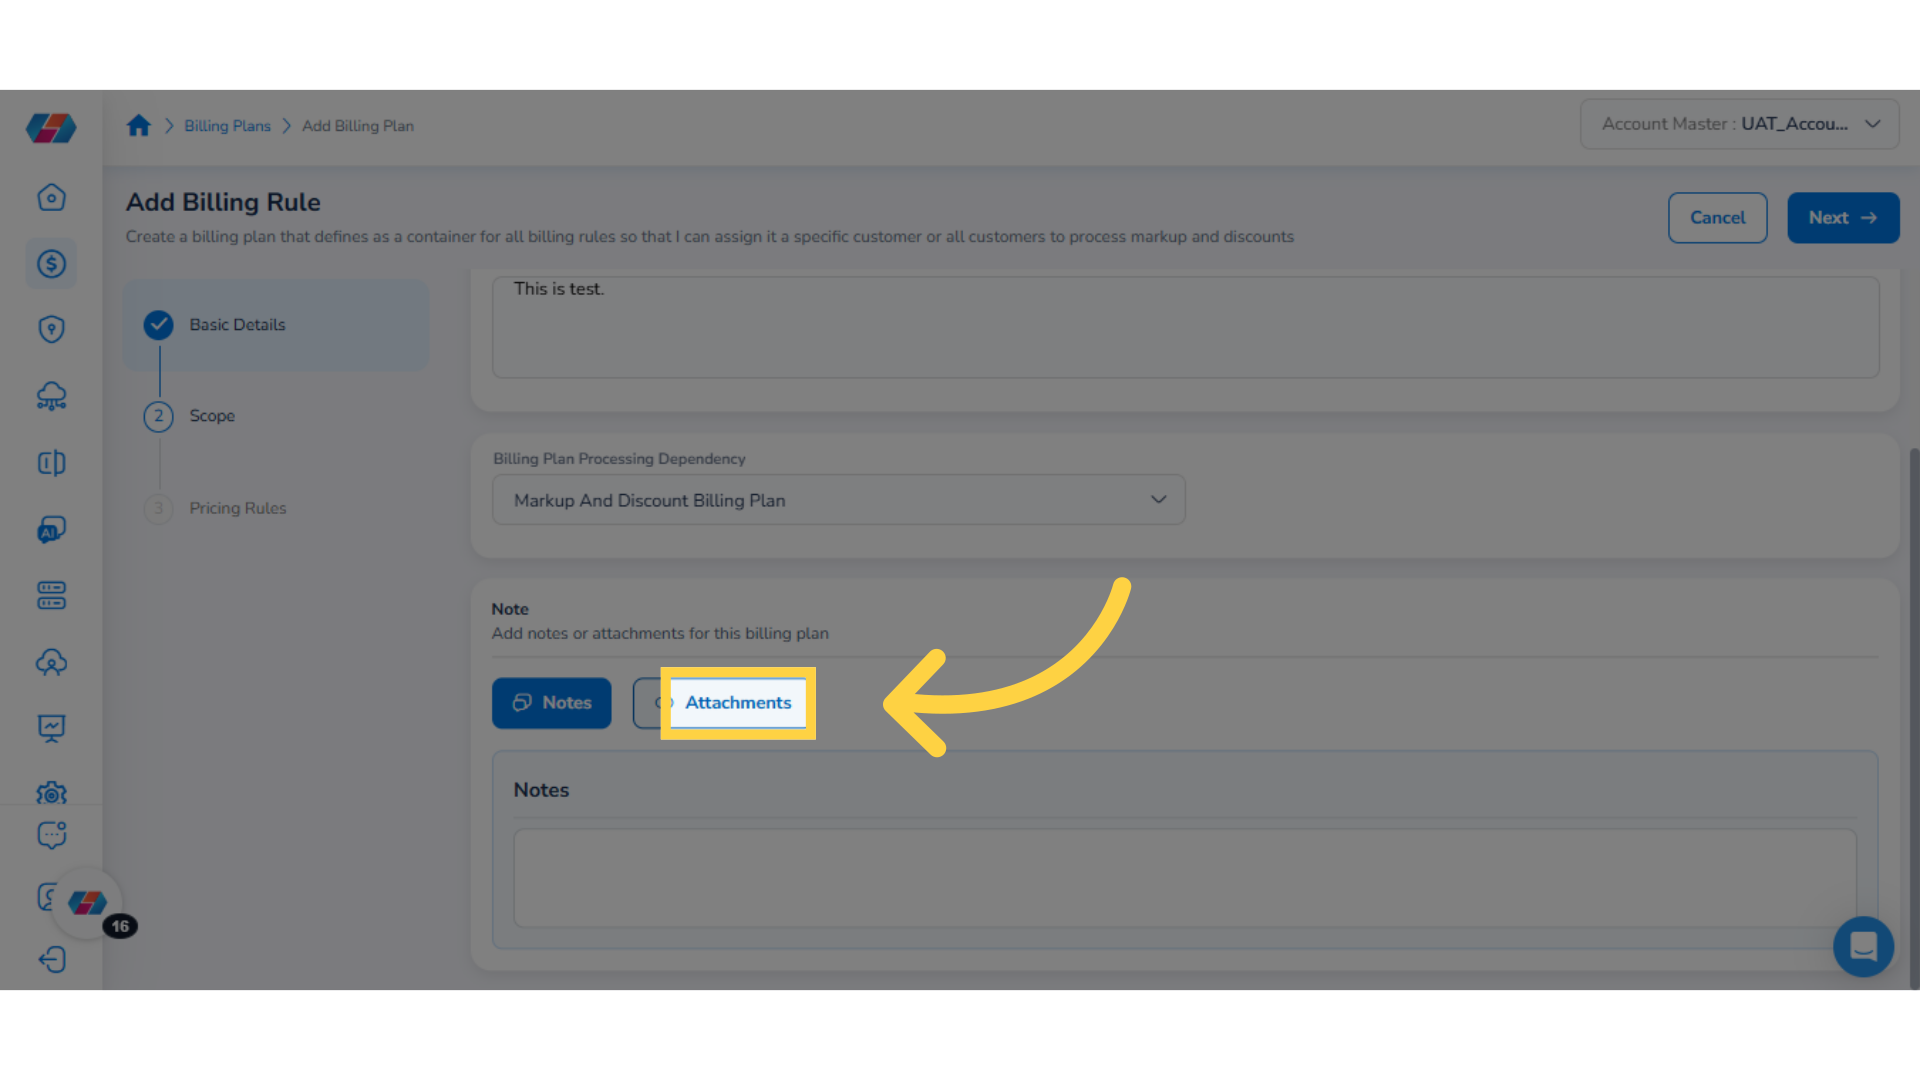
4. Select Notes or Attachments
Click to select either Notes or Attachments.
5. Add Notes
If you select Notes, then you can add notes about the Billing Plan in the text box the appears.
6. Select "Attachments"
If you select Attachments, then you can add any relevant attachments about the Billing Plan.
7. Go to Next Page
Click Next to proceed to the next step.
Adding Scope for Billing Plan
Perform the following steps to add scope for billing plan:
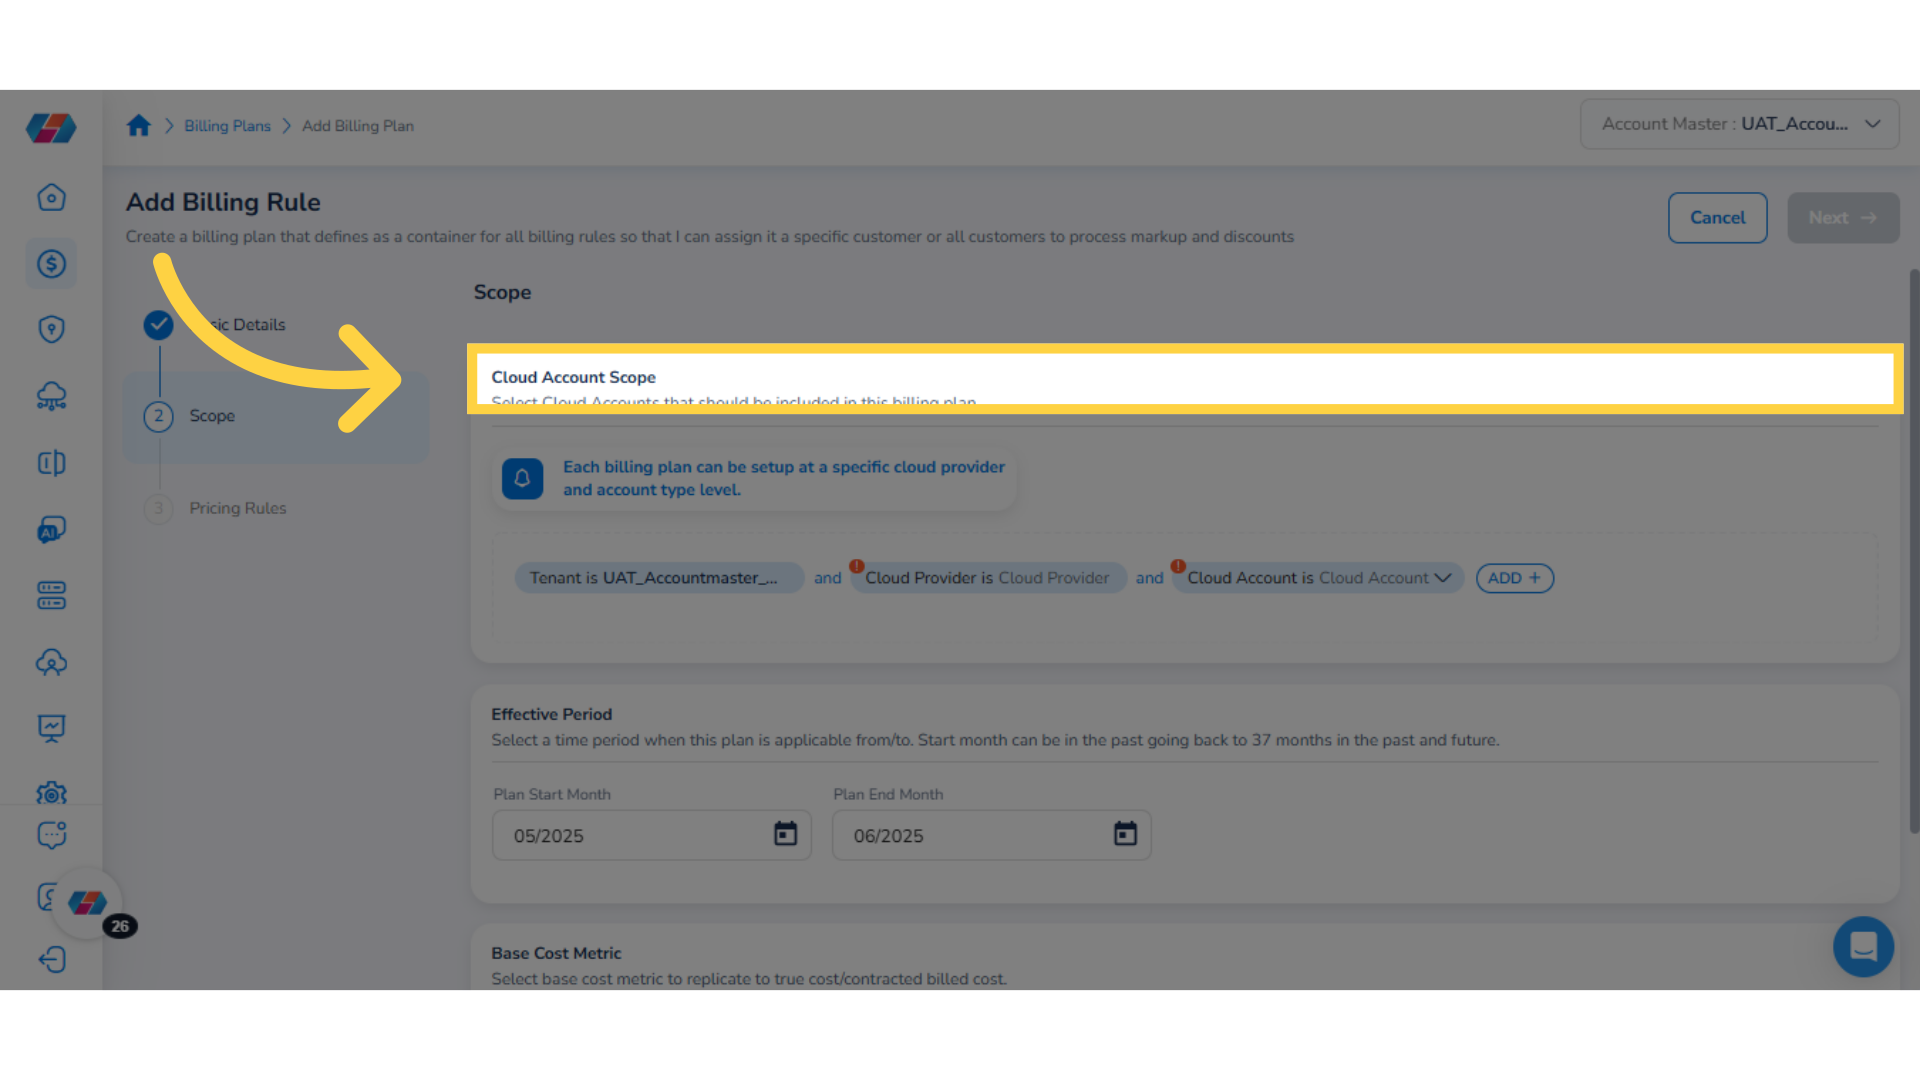
1. Select a Scope
In the Scope section, select the cloud account scope.
In the Tenant field, click the drop-down list, select the required options, and click Ok. You can use ADD+ and add additional scopes such as Cloud Provider, Cloud Account, etc.
Note:The Account filter now includes an option for cost center. This allows users to select the Cost Center option when they select the Account filter.
2. Add Additional Filters
Click ADD+ to add additional filtering fields to define the account scope.
3. Select "Cloud Account Tag Key Value"
For example, from the available list of options, select Cloud Account Tag Key Value.
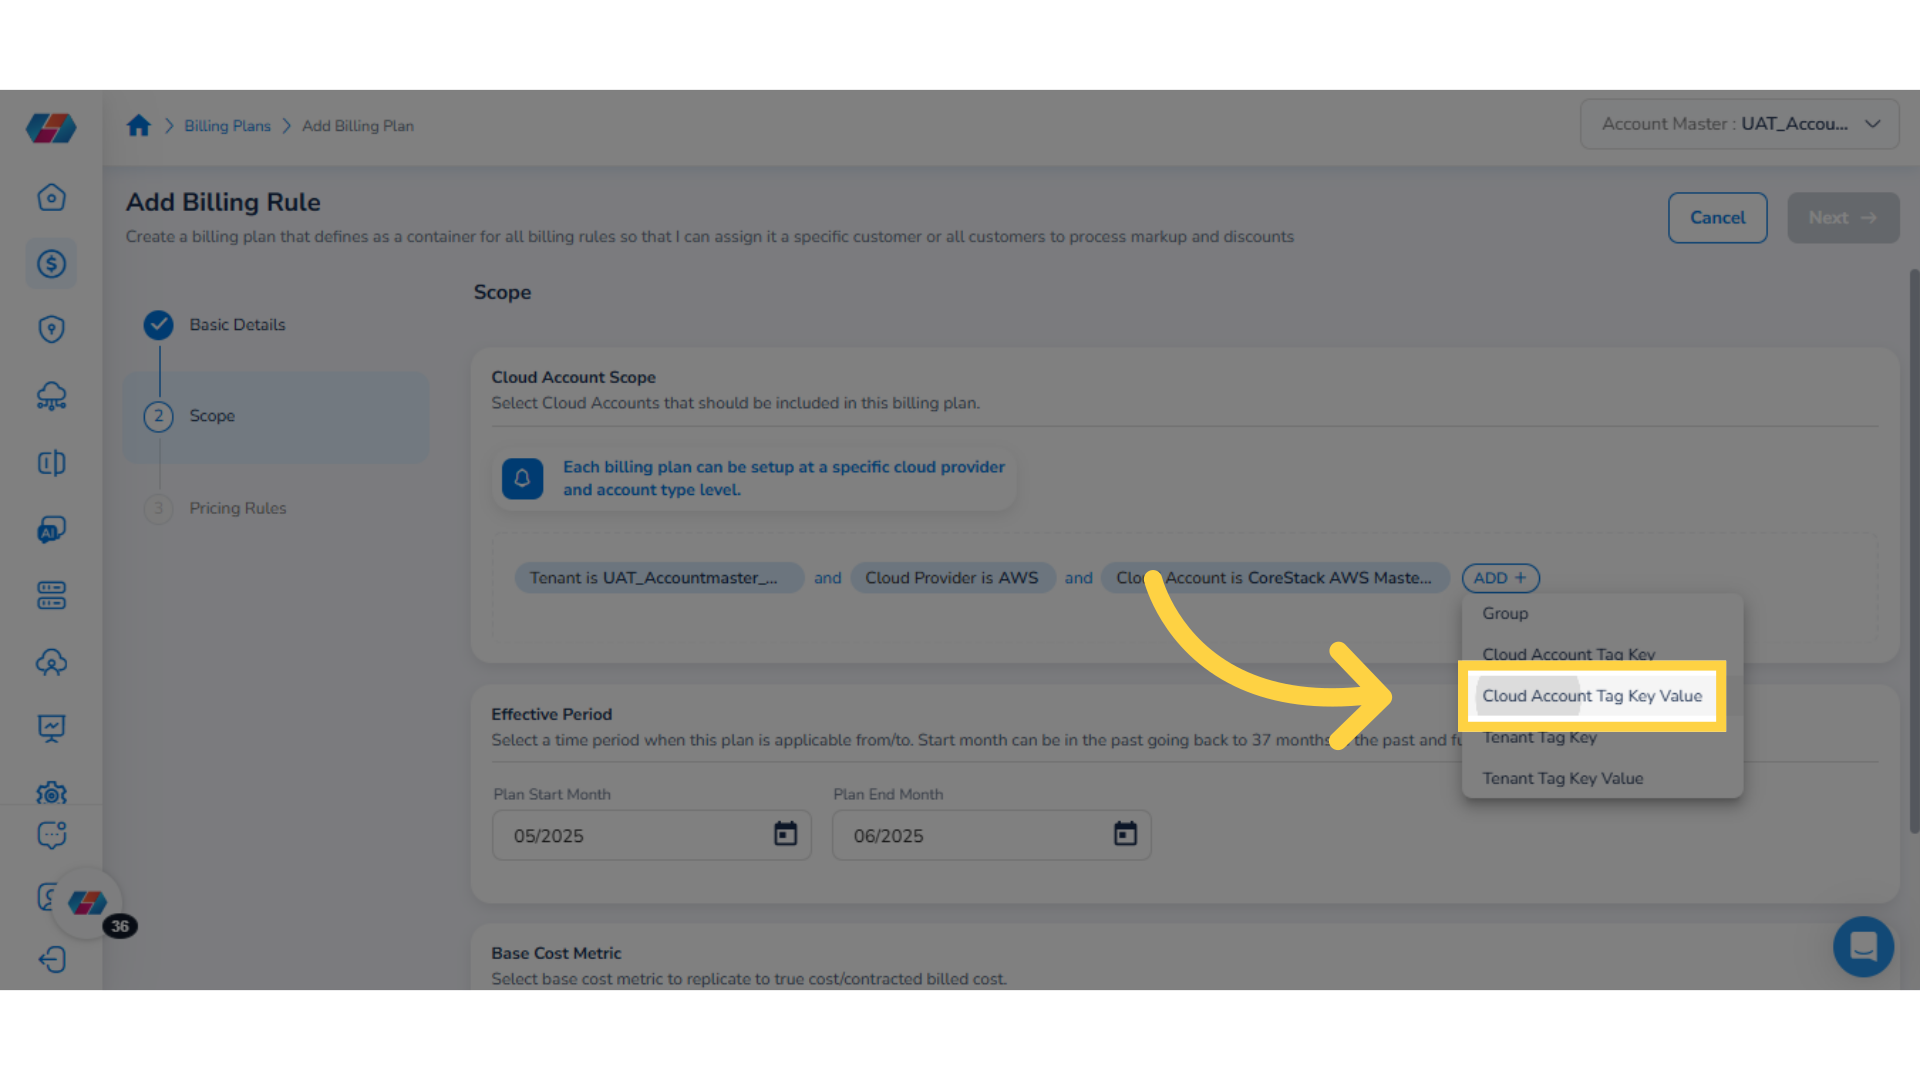
4. Select Value for the Filter
Click the drop-down list for Cloud Account Tag Key Value filter, select the relevant values, and then click Ok. You can add multiple fields using ADD+ to define the scope.
5. Select "Plan Start Month"
In the Plan Start Month field, click the calendar and select the plan start year and month.

6. Select "Plan End Month"
In the Plan End Month field, click the calendar and select the plan end year and month.
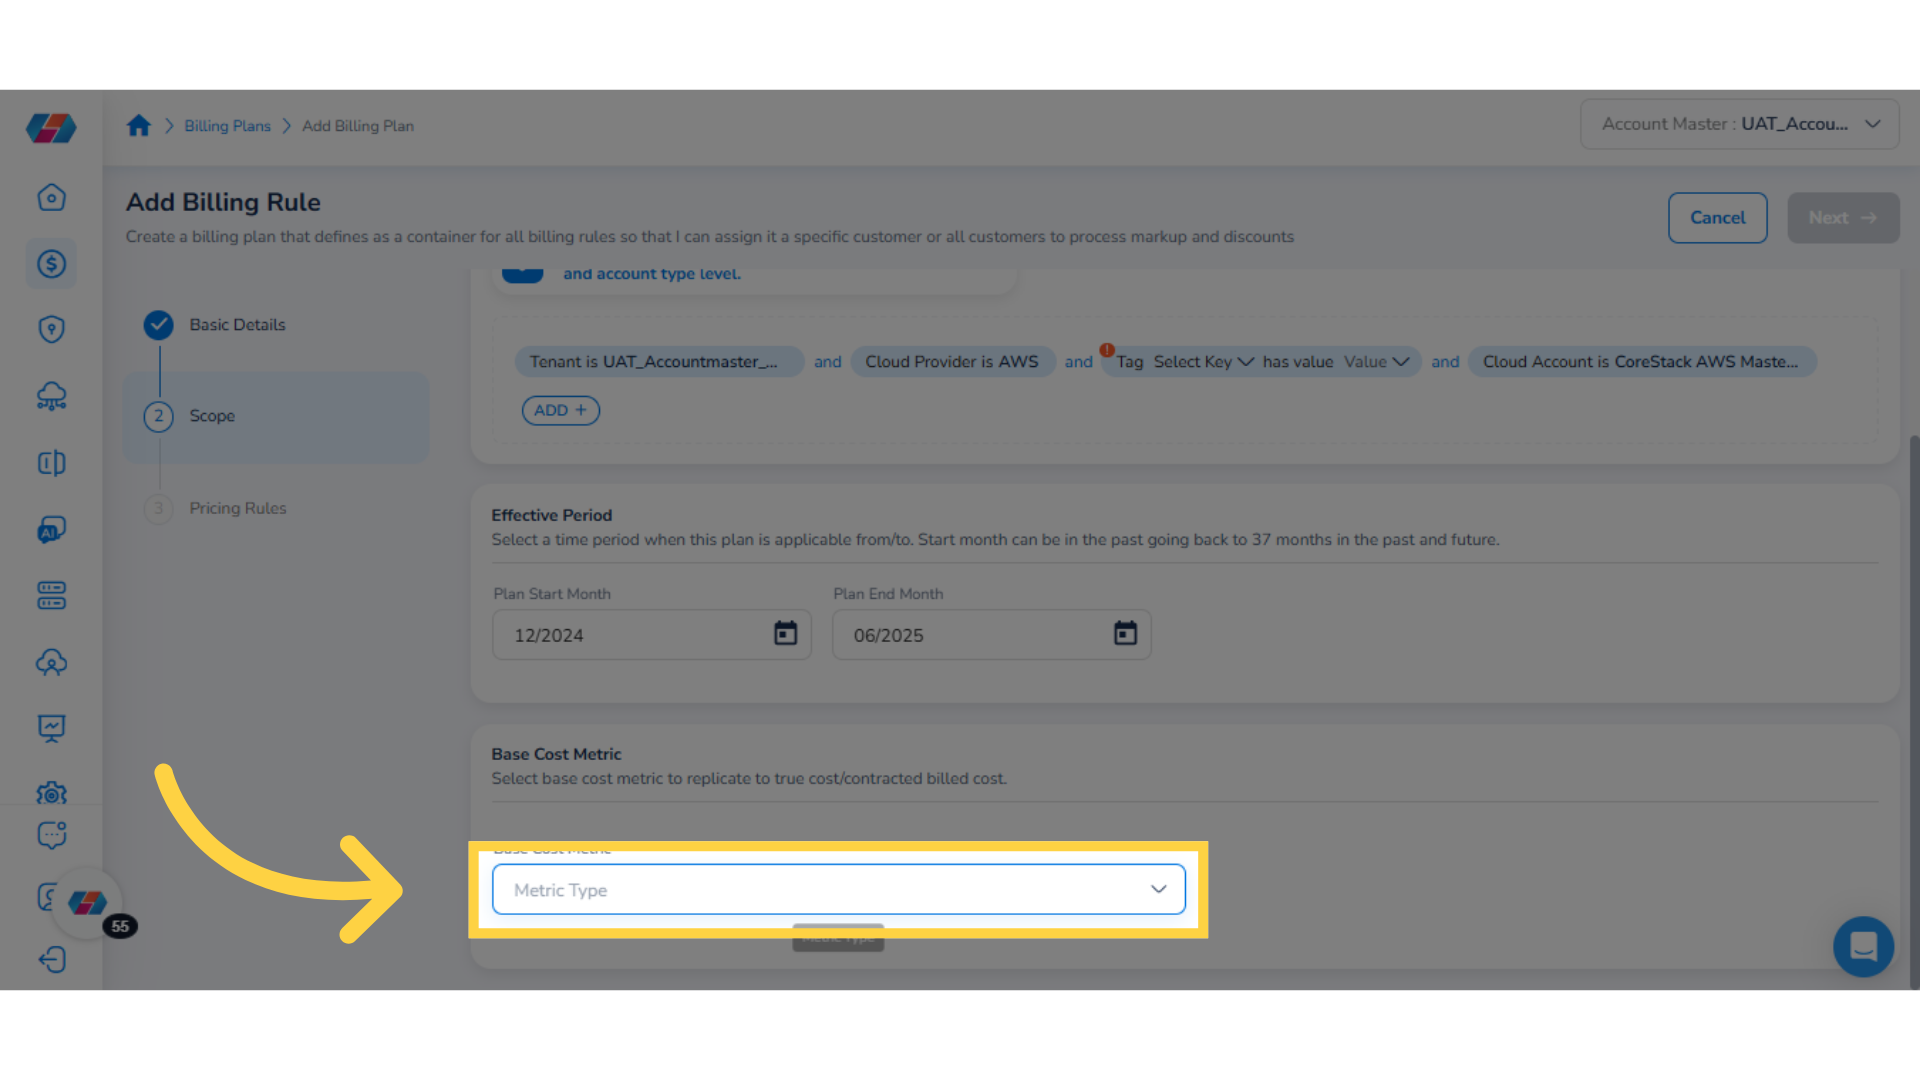
7. Select an Option from "Base Cost Metric" drop-down
In the Base Cost Metric drop-down list, click to select an option.
The available options are Billed Cost, Effective Cost, List Cost, Partner Contracted Cost, and Customer Contracted Cost.
8. Select an Option from "Destination Cost Metric" drop-down
In the Destination Cost Metric drop-down list, click to select an option where the plan should write its calculated values and click Next. The available options for Destination Cost Metric are -- Partner Contracted Cost, Customer Contracted Cost, and Dimension Contracted Cost.
- Customer Contracted Cost: This option writes to customer contractor cost which is customer buy cost or partner sell price.
- Partner Contracted Cost: This option writes to partner contractor cost which is partner buy-price.
- Dimension Contracted Cost: This option writes allocations destined for dimension or any markup discounts inside an enterprise use case.
Adding Pricing Rule
Perform the following steps to add pricing rule:
1. Add Pricing Rule
To add a pricing rule, click Add Pricing Rule.
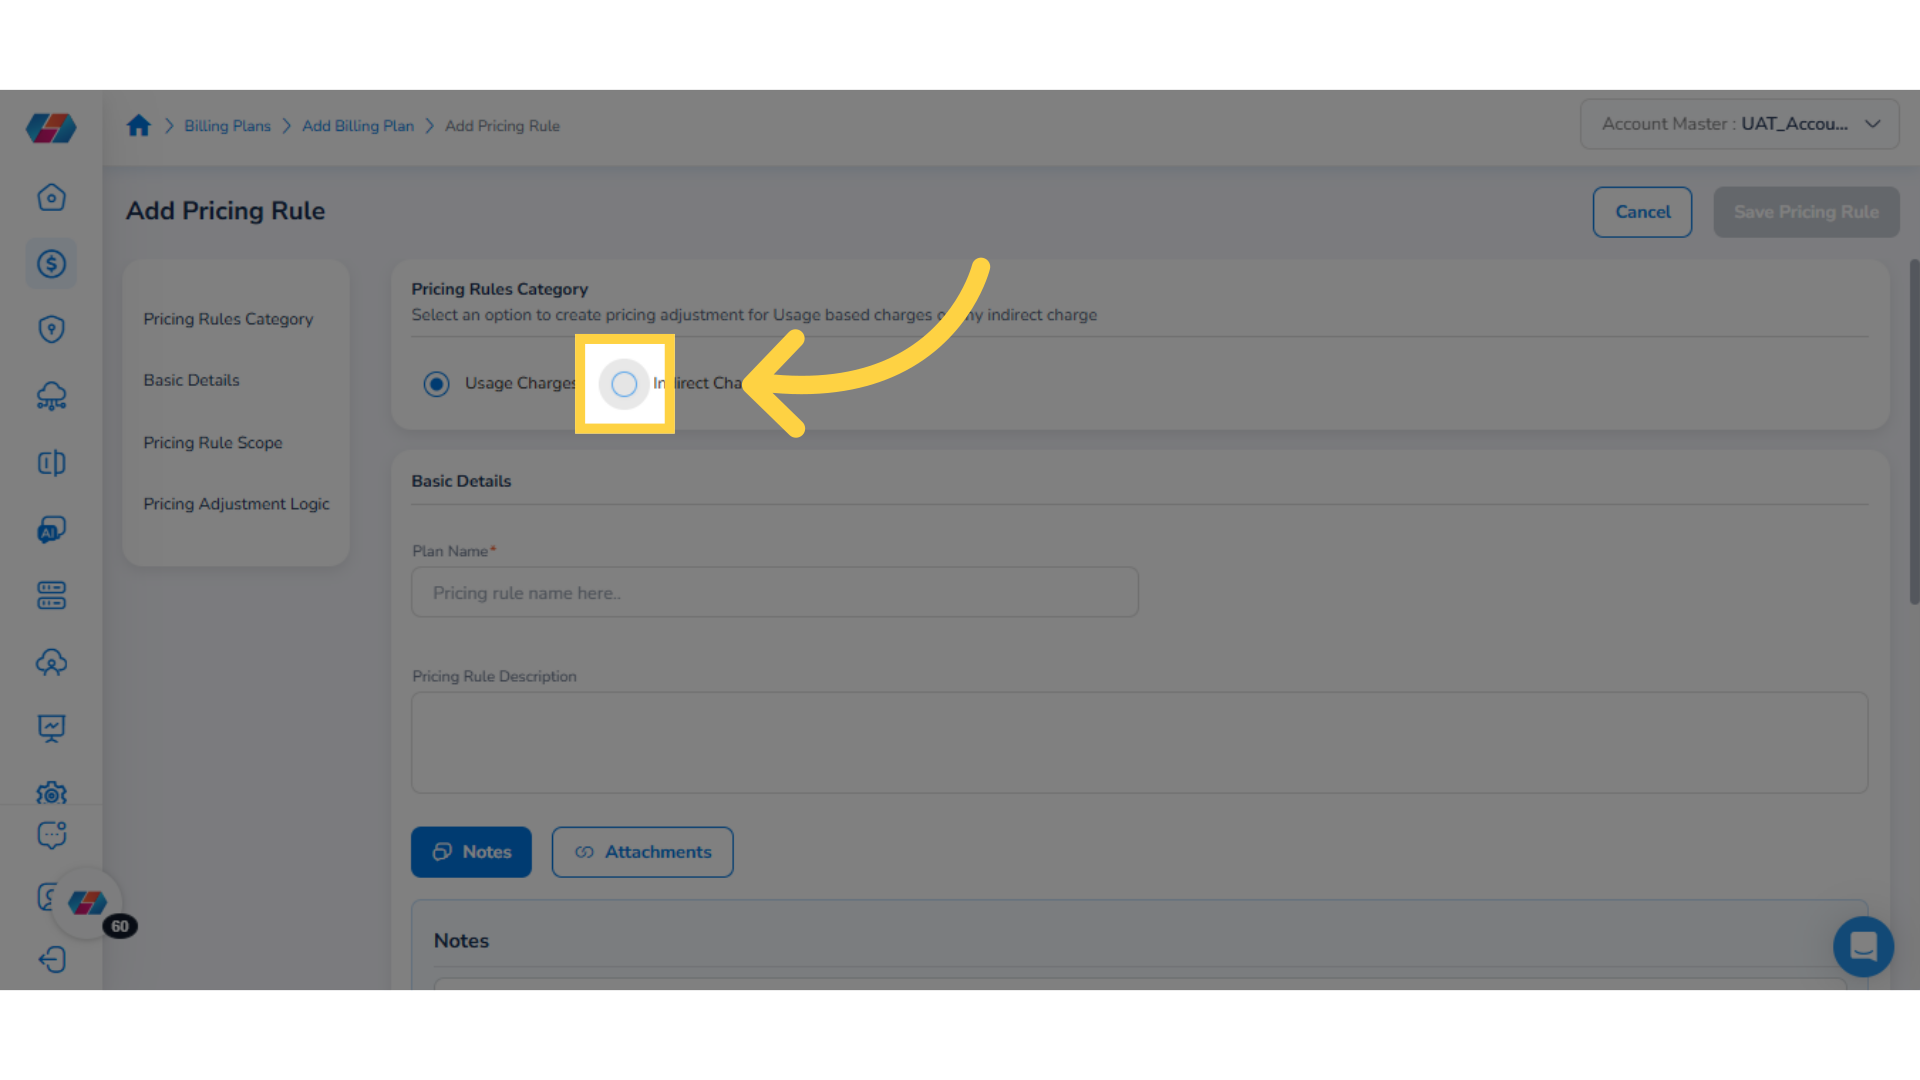
2. Select a Pricing Rule Category
In the Pricing Rule Category field, select either Usage Charges or Indirect Charges.
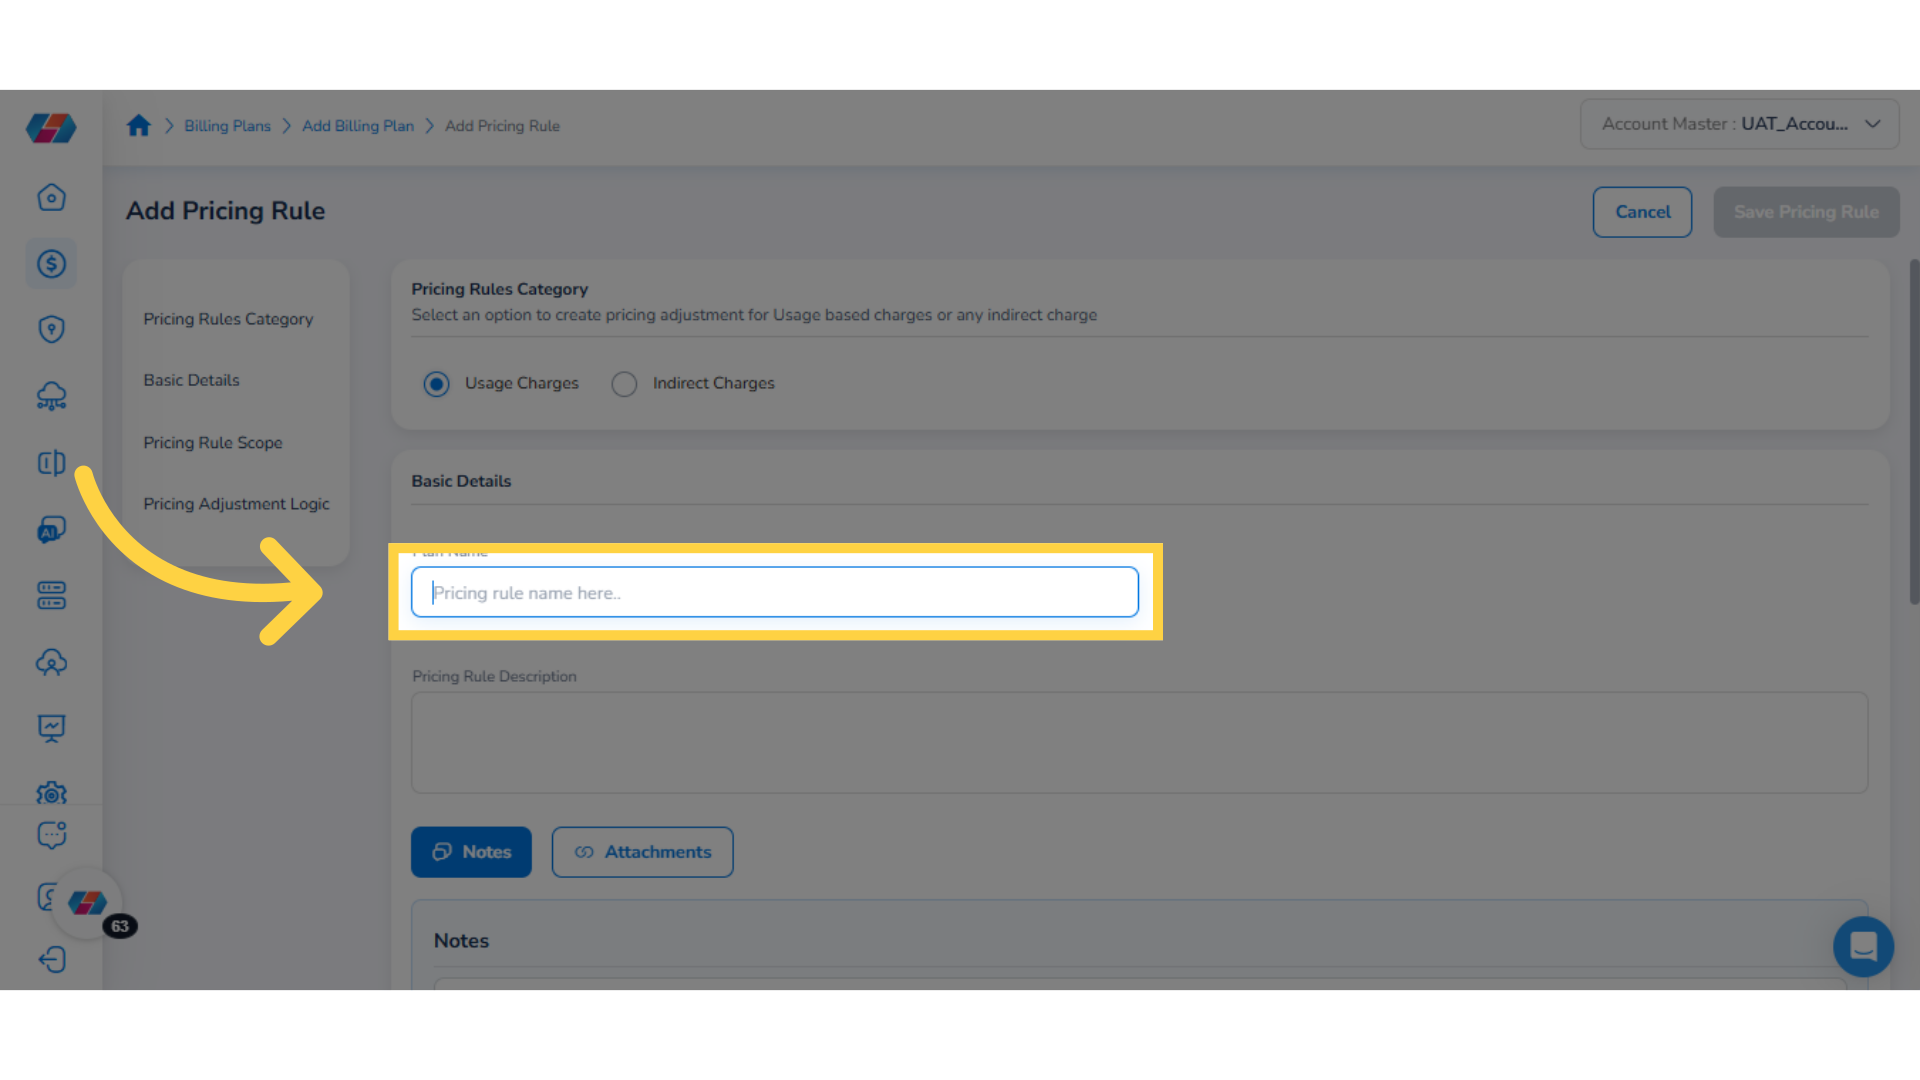
3. Enter Plan Name
In the Plan Name box, type the name of the pricing plan.
4. Add Pricing Rule Description
In the Pricing Rule Description text box, add the rule description.
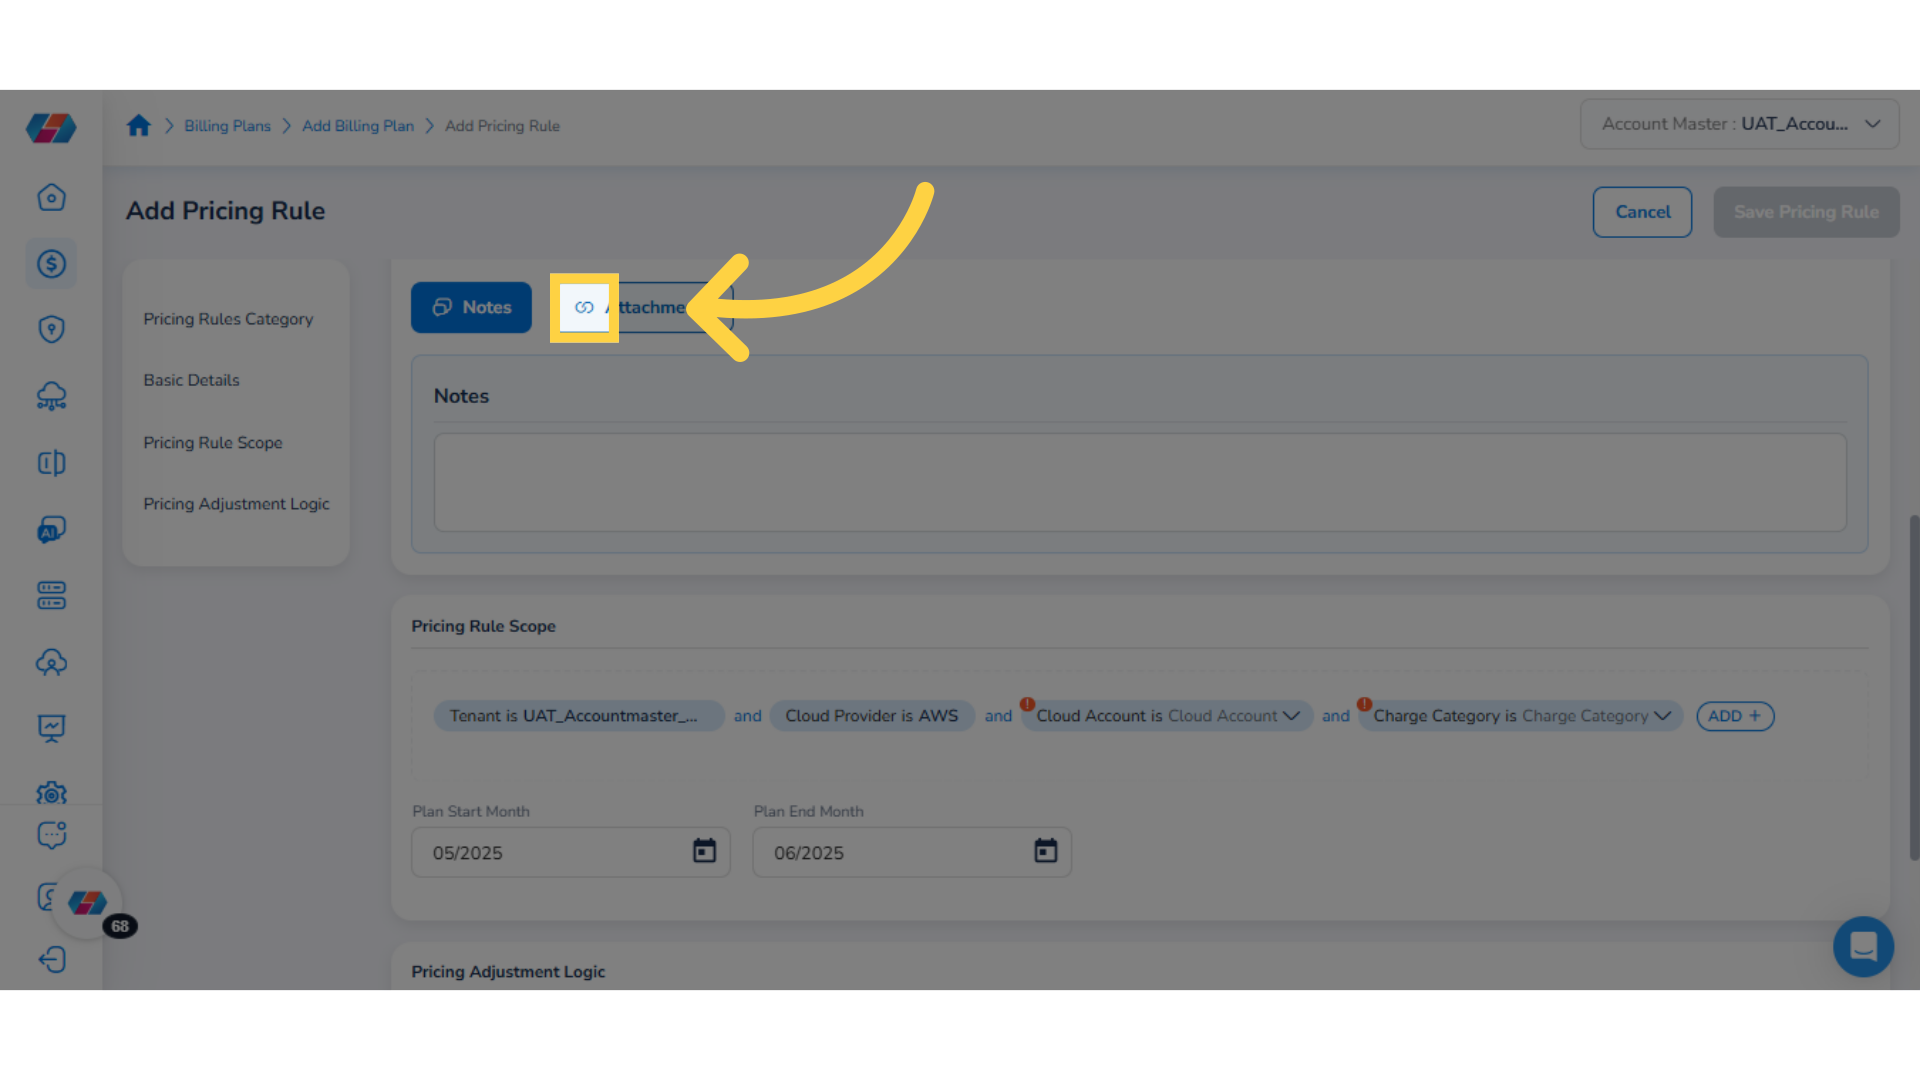
5. Select Notes or Attachments
Click to select either Notes or Attachments.
6. Add "Notes"
If you select Notes, then you can add any relevant notes about the Billing Plan.
7. Select "Attachments"
If you select Attachments, then add any relevant attachments about the Billing Plan.
8. Fill Details in "Pricing Rule Start Month" and "Pricing Rule End Month"
In the Pricing Rule Scope section, fill the Pricing Rule Start Month and Pricing Rule End Month.
- In the Pricing Rule Start Month, click the calendar and select a start month for the pricing rule.
- Next, in the Pricing Rule End Month, click the calendar and select an end month for the pricing rule.
9. Add Scope Filters
The Pricing Rule Scope section shows Tenant and Charge Category filters by default and users can select the drop-down list for these filters and change the values for it.
10. Add Additional Filter
To add additional filters, click ADD+ and select an option.
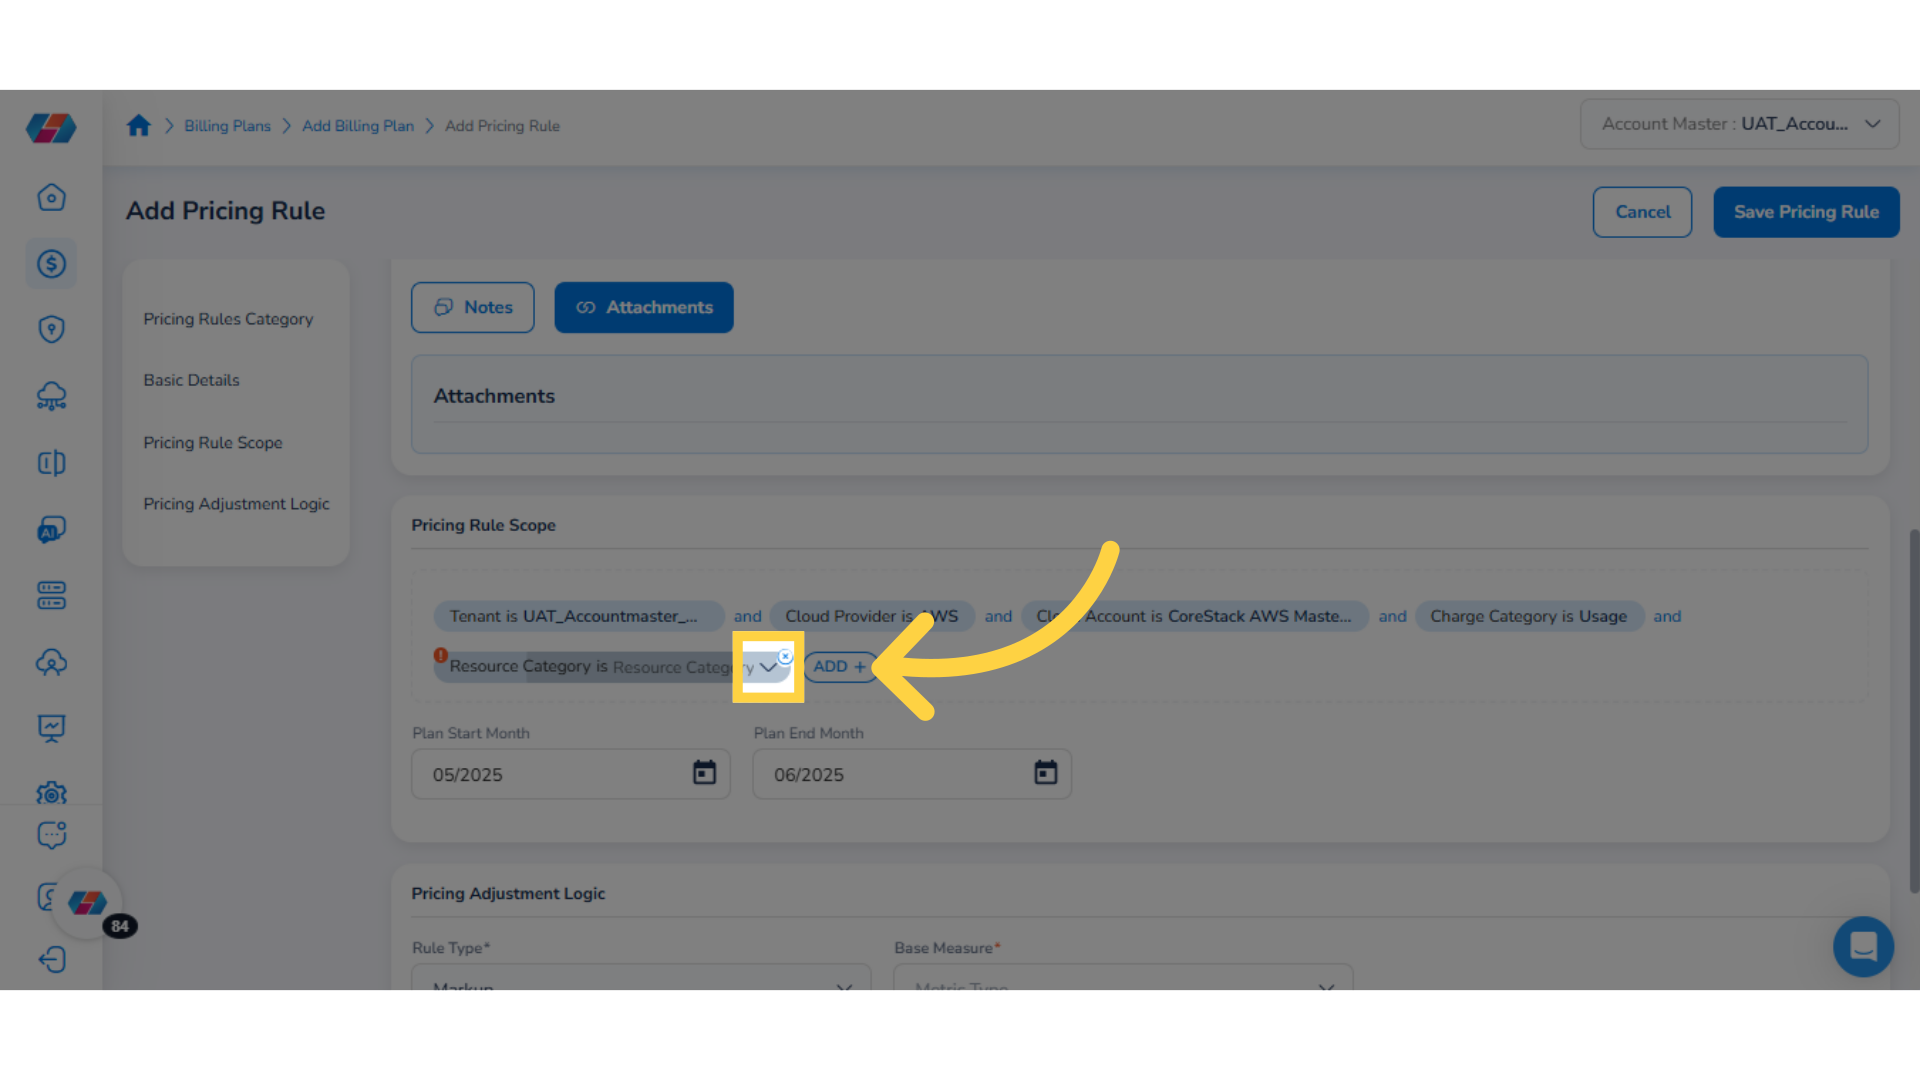
11. Select "Resource Category"
For example, in this case, select the option Resource Category.
Note:The Account filter now includes an option for cost center. This allows users to select the Cost Center option when they select the Account filter.
12. Click drop-down and Select Options for the Filter
Click the drop-down list for the selected filter, select the relevant options, and click Ok.
13. Click "Select All"
You can click Select All to select all available options from the drop-down list or click Clear to remove all selected options.
14. Select the Checkbox
Select the "Include additional charges as part of price adjustment calculations." checkbox. This action will enable the Include Charges button.
15. Click "Include Charges"
Click the Include Charges button to add charges. This action opens the Manage Charges screen.
16. Select "Preview Range"
In the Manage Charges screen, in the Preview Range field, click the calendar icon and select a date range.
17. Add "By Charge Description"
In the "By Charge Description" field, click Add+ and then select either Charge Description Contains or Charge Description Equals. After that, as per the selected option, you can either type a charge value or select an option from the drop-down list.
18. Click "Apply"
View the charge details as per the selected options in the table provided below and click Apply.
19. For the "Indirect Charges" Option Only
In the Pricing Rules Category field, if the users select the option Indirect Charges, then in the Pricing Rule Scope section, users can select the "Also scope by charge description" checkbox. This allows users to view the charge details that is displayed below.
20. Select Rule Type from drop-down
In the Pricing Adjustment Logic section, in the Rule Type drop-down list, select one option from -- Markup, Discount, and Margin.
21. Select "Cost Metric" from drop-down
In the Cost Metric drop-down list, click to select one of the following options:
- Billed Cost
- Effective Cost
- List Cost
- Partner Contracted Cost
- Customer Contracted Cost
- Dimension Contracted Cost
22. Enter "Value"
In the Value box, type a valid percentage value.
23. Click "Save Pricing Rule"
Click Save Pricing Rule to save the rule.
24. Add Another Pricing Rule
The Pricing Rules page appears where users can view the list of pricing rules added for a billing plan. Users can click Add Pricing Rule to add another pricing rule. They can follow the step-by-step flow and fill details in fields to proceed ahead.
25. Activate/Inactivate Pricing Rule
The Pricing Rules page shows the pricing rule details in these columns -- Order, Pricing Rule Name/Description, Rule Scope, Rule Category, Start Month, End Month, Rule Type, Rule Logic, Active, and Actions. In the Active column, users can move the slider to activate or inactivate a pricing rule.
26. Search Details
Users can use the search box to find details.
27. Edit Action
To make changes in a pricing rule, under the Actions column, click the ellipses and select Edit. This will allow you to make the relevant changes in the pricing rule. After making all the changes, click Save Pricing Rule.
28. Delete Action
To remove a pricing rule, under the Actions column, click the ellipses and select Delete. A dialog box appears.
29. Select "Yes" or "No"
In the dialog box, click Yes to delete the pricing rule, else click No.
30. Click "Next"
Click Next to go to the next step.
Adding Charge Allocation
View the Charge Allocation step. In this step, users can create rules to automatically allocate real-time discounts and credits to appropriate entities. On this page, users can create the following:
- Direct Charge Allocation
- Indirect Charge Allocation
- Custom Charge Allocation
Direct Charge Allocation
Perform the following steps for Direct Charge Allocation:
1. Allocate Usage Charge
For Direct Charge Allocation, click Allocate Usage Charge.
2. Basic Information
In the Basic Information step, fill the following fields and click Next.
- In the Charge Name box, type the charge name.
- In the Start Month field, click the calendar icon and select the start month.
- In the End Month field, click the calendar icon and select the end month.
- In the Charge Description text box, type the charge details.
3. Add Scope
Next step is to add scope. There are some pre-defined filters already added for the scope, such as -- Tenant, Charge Category, Billing Currency, and Resource ID. Users can click the drop-down list for these filters and select another value or option. Users can also add custom filters using ADD+.
4. Click ADD+
To add a custom filter, click ADD+.
5. Select "Resource Category"
Click the drop-down list and select a filter to define the scope. In this case, select Resource Category.
Note:The Account filter now includes an option for cost center. This allows users to select the Cost Center option when they select the Account filter.
6. Select Options/Values
Click the drop-down list and select applicable values for Resource Category. After selecting relevant options, click Ok.
7. Click Next
Click Next to go to the next step.
8. Select "Assign to Cost Center(s)"
In the Assign to Cost Center(s) field, select either Cloud Accounts or Tenants.
- If you select Cloud Accounts, then in the Cloud Accounts drop-down list, click to select all relevant options and click Ok.
- If you select Tenants, then in the Tenants drop-down list, click to select all relevant options and click Ok.
After that, click Next to go to the next step.
9. Select "Allocation Method"
In the Allocation Method field, select one option from the following:
- Equally Distribute
- Proportional to spend
- Proportional to usage
- Proportional to Service Category: If a user selects this option, then in the Service Category drop-down list, they will need to select all applicable options and then click Ok.
- Manual Allocation: If a user selects this option, then they need to enter the charge allocation percentage value(s).
After this, click Finish.
10. View Charge Allocation Details
After the Charge Allocation step is complete, users can view all the related details in a table. In the table, users can view -- Order, Charge Allocation Name / Description, Allocation Scope, Start Month, End Month, Active, and Actions.
Users can use the search box to search for any details they are looking for.
Users can use the Add Charge Allocation button to add another charge allocation entry.
11. Additional Actions
Under the Active column, users can move the slider towards left/right to activate/deactivate a charge allocation. Also, under the Actions column, users can click the ellipses and take any of the following action:
- Edit: This action allows the users to modify allocation charge details.
- Delete Rule: This action opens a dialog box where users can select Yes to delete a rule or they can select No.
12. Click "Finish"
After finalizing the changes, click Finish.
13. Edit Billing Plan
After a billing plan is created, users can edit the plan details. To edit a billing plan, on the Billing Configuration page, under the Actions column, click the ellipses and select Edit.
Indirect Charge Allocation
Perform the following steps for Indirect Charge Allocation:
1. Add Indirect Charge Allocation
To add indirect charge allocation, in the Charge Allocation step, click Add Charge Allocation and select Indirect Charge.
2. Fill Basic Information
In the Basic Information step, fill the following fields and click Next.
- In the Charge Name box, type the charge name.
- In the Start Month field, click the calendar and select a start month for charge allocation.
- In the End Month field, click the calendar and select an end month for charge allocation.
- In the Charge Description text box, type the charge details.
3. Select Source as "Automatically allocate charges"
In the Source step, select one option from "Automatically allocate charges" or "Manually allocate charges".
If the option "Automatically allocate charges" is selected, then fill the following:
- In the Filter section, Tenant, Charge Category, and Billing Currency filters appear by default and users can click the drop-down list next to it and select the values they want.
- Users can click ADD+ and add custom filters.
- In the By Charge Description section, click ADD+ and select the Charge Description Contains option. Now, type a charge value as per which details will be filtered and displayed in the table that appears below.
4. Select Source as "Manually allocate charges"
If the option "Manually allocate charges" is selected, then fill the following:
In the By Charge Description section, click ADD+ and select Charge Description Equals option. Now, select relevant option(s) from the drop-down list and click Ok. Details will be filtered and displayed in the table that appears below.
5. Click "Next"
Click Next to go to the next step.
6. Select "Assign to Cost Center(s)"
In the Assign to Cost Center(s) field, select either Cloud Accounts or Tenants. If you select Cloud Accounts, then in the Cloud Accounts drop-down list, click to select all relevant options and click Ok. If you select Tenants, then in the Tenants drop-down list, click to select all relevant options and click Ok. After that, click Next to go to the next step.
7. Select "Allocation Method"
In the Allocation Method field, select one option from the following:
- Equally Distribute
- Proportional to spend
- Proportional to usage
- Proportional to Service Category: If a user selects this option, then in the Service Category drop-down list, they will need to select all applicable options and then click Ok.
- Manual Allocation: If a user selects this option, then they need to enter the charge allocation percentage value(s).
8. Click "Finish"
After this, click Finish.
Custom Charge Allocation
Perform the followin steps for Custom Charge Allocation:
1. Add Custom Charge Allocation
The Charge Allocation screen shows the list of charge allocations added by users.
To add a custom charge, click Add Charge Allocation and select Custom Charge.
2. Fill Basic Information
In the Basic Information step, fill the following fields:
- In the Charge Name box, type the charge name.
- In the Start Month field, click the calendar and select the start month for charge allocation.
- In the End Month field, click the calendar and select the end month for charge allocation.
- In the Start Date field, click the calendar and select the start date for charge allocation.
- In the Frequency drop-down list, click to select an option from -- Daily, Weekly, Monthly, Quarterly, and Yearly.
- In the Charge Description text box, type charge details.
3. Select Source as "Flat Charge"
In the Source step, in the Line Item Type field, users can select either Flat Charge or Percentage Charge.
If the user selects the option Flat Charge, then fill the following:
- In the Credit or Fee field, select either Credit or Fee.
- In the Currency drop-down list, select a currency.
- In the Amountbox, enter the allocation amount.
- In the Charge Categorydrop-down list, click to select an option.
4. Select Source as "Percentage Charge"
If the user selects the option Percentage Charge, then fill the following:
- In the Scope field, select either Usage Charges or Indirect Charges. The Filter section shows Tenant, Charge Category, and Billing Currency as the pre-defined filters.
- To set the scope, users can click the drop-down and select the required values for these filters.
- Users can click ADD+ and add custom filters.
Note:The Account filter now includes an option for cost center. This allows users to select the Cost Center option when they select the Account filter.
Note that if the user selects the option Indirect Charges, then in the By Charge Description field, click ADD+ and select Charge Description Contains. After that, type the charge amount as per which filters will be applied and the table provided below will show details accordingly.
5. Select "Credit/Fee" and "Charge Category"
- In the Credit or Fee field, select either Credit or Fee.
- In the Amount box, enter the allocation amount.
- In the Charge Category drop-down list, click to select an option
6. Select "Assign to Cost Center(s)"
In the Assign to Cost Center(s) field, select either Cloud Accounts or Tenants.
- If you select Cloud Accounts, then in the Cloud Accounts drop-down list, click to select all relevant options and click Ok.
- If you select Tenants, then in the Tenants drop-down list, click to select all relevant options and click Ok.
After that, click Next to go to the next step.
7. Select "Allocation Method"
In the Allocation Method field, select one option from the following:
- Equally Distribute
- Proportional to spend
- Proportional to usage
- Proportional to Service Category: If a user selects this option, then in the Service Category drop-down list, they will need to select all applicable options and then click Ok.
- Manual Allocation: If a user selects this option, then they need to enter the charge allocation percentage value(s).The charge allocation total should be 100%.
8. Click "Finish"
After this, click Finish.
9. View Charge Allocation and Click "Finish"
The Charge Allocation page shows the list of charge allocations that are added. You can click Add Charge Allocation and then add another Usage Charge/Indirect Charge/Custom Charge.
Under the Active column, you can move the slider to activate or deactivate a charge allocation. Also, under the Actions column, users can click ellipses and select either Edit or Delete Rule action. After making all the changes and adding charge allocations, click Finish. The billing plan appears on the Billing Configuration page.
The guide covered a comprehensive walkthrough of adding billing plans in the platform, including creating plan names, entering details, specifying scopes, selecting metrics, and setting pricing rules. By following these instructions, users can efficiently set up and manage billing plans in the application.
Updated 8 months ago