

Tenant Management
Learn how to create and manage tenants in CoreStack, assign administrators, configure notifications, and enable Azure credential expiry alerts.
Feature Overview
Tenant Management is a Platform capability within CoreStack that lets you create multiple isolated tenants inside a single organization account. It is most relevant when different departments, business units, or customers need their own segregated Cloud Accounts, Tools, Templates, Scripts, and Jobs within the same CoreStack instance. This feature is most valuable to Account Admins who need to structure the platform around organizational boundaries and delegate day-to-day administration to tenant-level users. It is not a substitute for Account Hierarchy Management, which organizes cloud accounts rather than platform-level tenants.
Note: A newly created tenant does not appear in the interface until you log out and log back in to Corestack
How It Works
When an Account Admin creates a new tenant, CoreStack provisions an isolated data boundary that keeps Cloud Accounts, Tools, Templates, Scripts, and Jobs separate from every other tenant in the organization. From there, the Account Admin assigns administrators and configures email notifications, configuration management tracking, and activity queue settings scoped to that tenant. Once configured, users mapped to the tenant see only the data and settings relevant to it, while Account Admins retain the ability to switch between tenants to view any tenant's information. Tenant-level settings persist until an Account Admin edits, suspends, or deletes the tenant.
Prerequisites
Before you begin, ensure the following:
- Role: You have the Account Admin role assigned in CoreStack.
- Access: You can access Settings > Tenant Management in the CoreStack navigation.
- For Azure Credentials Expiry Alerts specifically: You have the Global Administrator role in Microsoft Entra ID. This is an Azure AD role, not a CoreStack role — it's required because the action takes place in the Azure Portal, not in CoreStack.
Creating a New Tenant
Navigate to Settings > Tenant Management. The Tenant Management screen displays, with Active and Suspended tabs listing tenants in each state.
Follow these steps to create a new tenant:
Step 1: Open the tenant creation form
Click the Add icon in the Tenant Management screen.
Step 2: Name the tenant
Enter a unique value in the Tenant Name field. The name must be unique within your CoreStack account.
Step 3: Describe the tenant
Enter a short description of the tenant in the Description field.
Step 4: Configure email notifications
Select the notification settings that meet your requirements:
- Jobs: Enable notifications for scheduled and on-demand job executions
- Cloud Account Configuration: Enable notifications for cloud account access failures
Step 5: Configure configuration management tracking
Select the tracking mechanism for the tenant from Configuration Management: ITSM Change Management or Change Tracking Reference.
Step 6: Configure the activity queue
Select the activities allowed for this tenant from the Activity Queue list, then configure each selected activity's details in its corresponding dropdown.
Step 7: Create the tenant
Click Create Tenant. The new tenant is created and listed in the Tenant Management table.
Note: You must log out and log back in to CoreStack before the new tenant appears in the interface.
Additional Tasks
Adding Administrators
Navigate to Settings > Tenant Management, select the tenant from the list, then click the Administrators tab.
Follow these steps to add an administrator:
Step 1: Select the user
Select a user from the drop-down list on the Administrators tab.
Step 2: Tag the user to the tenant
Click the Plus icon to tag the selected user with the tenant.
Managing Existing Tenants
Navigate to Settings > Tenant Management, then select a tenant from the list. The tenant's detail panel opens on the right with several tabs.
Use the following actions to manage the selected tenant:
- To edit the tenant description, click Edit in the Tenant Info tab.
- To suspend or reactivate the tenant, click Suspend or Reactivate in the Tenant Info
tab. - To delete the tenant, click Delete in the Tenant Info tab.
- To edit notification settings, click Edit in the Notification Settings tab.
- To edit activity queue settings, click Edit in the Activity Queue Settings tab.
- To edit configuration tracking settings, click Edit in the Configuration Management tab.
- To view the default roles tagged to the tenant, click the Default Roles tab.
- To show or hide table columns, click the hamburger icon and select the columns to display.
Warning: Deleting a tenant cannot be undone.
Renaming a Tenant
Navigate to Settings > Tenant Management. The Tenants tab is active by default.
Click the tenant you want to rename. The Tenant Info panel opens on the right.
Note: A View history link next to Tenant Name indicates the tenant has been renamed before — click it to open rename history in the Audit Log.
Step 1: Open the inline edit field
Click the pencil icon next to the Tenant Name field. The field becomes an editable text input.
Step 2: Enter the new name
Type the new tenant name.
Requirements: must be 3-100 characters long, with no special characters ('" # ? / ), and the first character must be alphanumeric (Abc, 123).
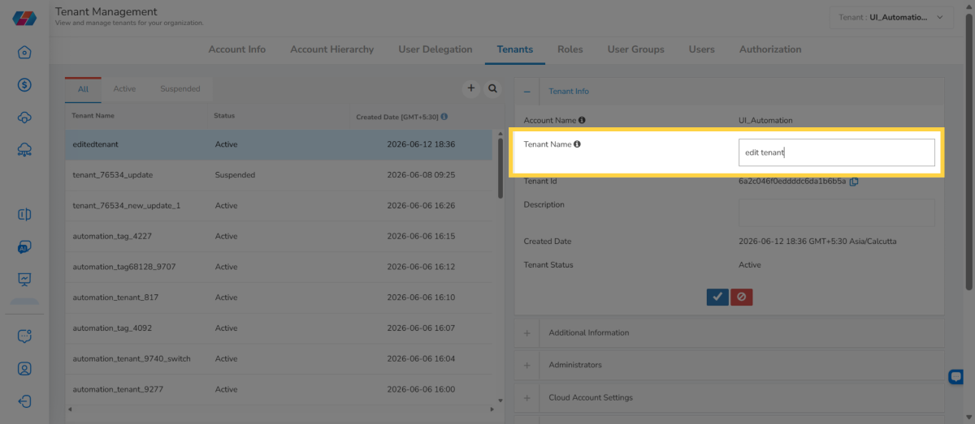
Tip: Click the cancel icon to discard without saving.
Step 3: Click Apply
Click Apply. The RENAME TENANT? confirmation dialog opens.
Step 4: Review the confirmation dialog
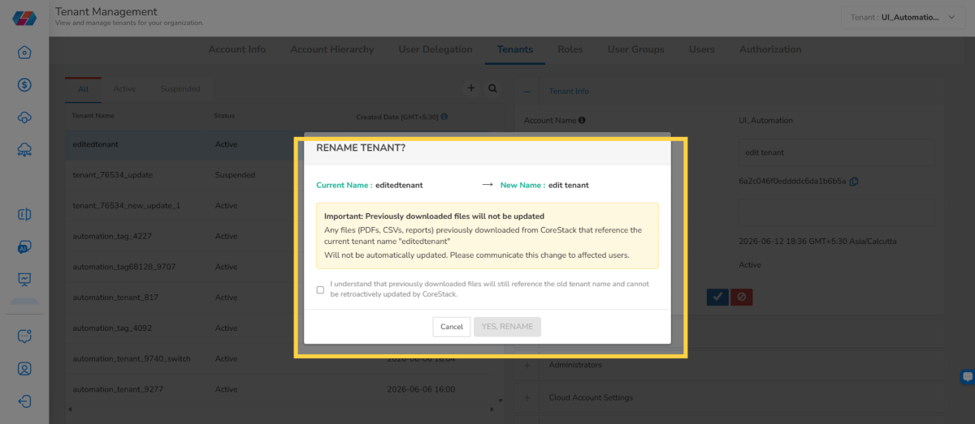
Important: Previously downloaded files (PDFs, CSVs, reports) that reference the current tenant name will not be updated. Communicate this change to affected users before proceeding.
Step 5: Acknowledge and confirm
Check the acknowledgment checkbox, then click YES, RENAME.
The dialog closes and the rename takes effect immediately across all dashboards, reports, and selector dropdowns. An Audit Log entry is created and a View history link appears in the Tenant Info panel.
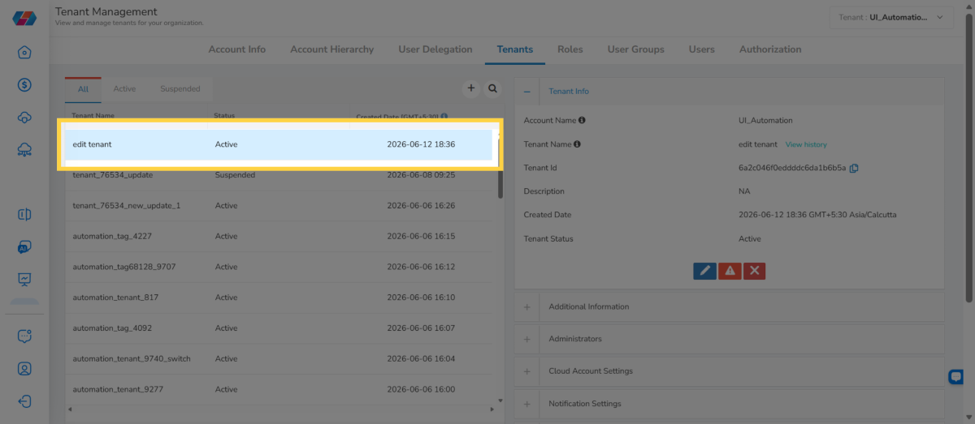
To view rename history, click View history in the Tenant Info panel.
Enabling Azure Credentials Expiry Alerts
CoreStack can monitor the expiry of the application credentials used by the Azure App Registration that connects your Azure environment to CoreStack. To enable this monitoring, an Azure Administrator grants the app registration the Application.Read.All Microsoft Graph API permission.
Note: This task takes place in the Azure Portal, not in CoreStack, and requires the Global Administrator role in Microsoft Entra ID.
Navigate to Microsoft Entra ID > App registrations in the Azure Portal, then select the application used for Azure credential expiry alerts.
Follow these steps to grant the permission:
Step 1: Open API permissions
In the App Registration menu, select API permissions.
Step 2: Start adding a permission
Click + Add a permission.
Step 3: Select the Microsoft Graph API
Select Microsoft Graph.
Step 4: Choose the permission type
Select Application permissions.
Step 5: Find the required permission
Search for Application.Read.All.
Step 6: Select the permission
Select the checkbox next to Application.Read.All.
Step 7: Add the permission
Click Add permissions. The permission is added to the API permissions list in a "not granted" state.
Step 8: Grant admin consent
On the API permissions page, click Grant admin consent for <Azure AD tenant name>, then confirm. The permission status changes to granted.
Tip:
<Azure AD tenant name>refers to your Microsoft Entra ID tenant, not a CoreStack tenant.
Frequently Asked Questions
Q: Why doesn't my new tenant show up right after I click Create Tenant?
CoreStack requires a fresh session to load newly created tenants. Log out and log back in to CoreStack, then check the Active tab in Tenant Management again.
Q: Can I add more than one administrator to a tenant?
Yes. Repeat the Adding Administrators steps for each additional user — select the user from the drop-down and click the Plus icon to tag them to the tenant.
Troubleshooting
New tenant doesn't appear in the Tenant Management list
Cause: CoreStack caches tenant membership for the duration of a session, so newly created tenants don't load until the session refreshes.
Solution:
- Log out of CoreStack.
- Log back in with the same account.
- Navigate to
Settings > Tenant Managementand confirm the tenant now appears in the Active tab.
If the issue persists, contact CoreStack support with the tenant name, your account name, and the approximate time the tenant was created.
"Grant admin consent" is grayed out in the Azure Portal
Cause: The signed-in Azure account doesn't have the Global Administrator role required to grant tenant-wide admin consent.
Solution:
- Confirm your assigned roles in
Microsoft Entra ID > Roles and administrators. - If you don't have Global Administrator, ask an existing Global Administrator to either grant the consent directly or temporarily assign you the role.
- Retry Grant admin consent for
<Azure AD tenant name>once the correct role is in place.
If the issue persists, contact CoreStack support with the App Registration name and the Azure AD tenant name.
Updated 3 months ago