

Dimensions
Explore how to effectively manage Dimensions in CoreStack.
Feature Overview
This guide provides a clear, step-by-step approach for adding and configuring dimensions for better cloud account control. The newly introduced Dimensions capability enhances the FinOps platform by enabling users to define custom dimensions for enriched cost visibility, allocation, and business context.
For example, Dimensions can be used to split charges from one group to another (e.g. Shared Team → Team 1, Team 2), or more clearly map charges to cost centers. Dimensions also come with filtering support, and dynamic processing means that no re-ingestion is required. This feature leverages existing platform dimensions and introduces powerful tools for organizing, analyzing, and allocating cloud costs more effectively.
Core features include:
- Custom Dimensions: Create via YAML; define scopes (time/tenant) and use presets like account groups, virtual tags, or service categories.
- Dimension Groups: Built with flexible filters and additional attributes to support granular, business-context groupings.
- Meta & Hierarchical Dimensions: Build nested structures to reflect organizational profiles.
- Access Control: RBAC at dimension and individual group levels to manage visibility and editing permissions. Cost Allocation: Available methods include equal, fixed percentage, and proportional to spend.
Note: The guided UI Wizard for creating and editing dimensions is controlled by the feature flag
ui_2602_f_dimension_creation_wizard. If this flag is not enabled for your organization, the Add Dimension and Edit flows will open the YAML editor directly, as before.
How It Works
Dimensions work by applying grouping rules that match cloud resources to output groups — for example, filtering any resource where the cloud provider is AWS into a group named “AWS Workloads.” When a dimension is deployed, CoreStack processes incoming billing data against these rules, so no re-ingestion of historical data is required. Users can build dimensions using either the step-by-step UI Wizard or the YAML editor. Changes take effect on the next cost data processing cycle after the dimension is saved.
Prerequisites
Before you begin, ensure the following:
-
Role: You have the Account Admin role or a FinOps module role with dimension create/edit permissions in CoreStack.
-
Cloud accounts: At least one cloud account (AWS, Azure, GCP, or OCI) is onboarded and connected in CoreStack.
-
Access: You can navigate to Settings > Dimensions in the CoreStack left navigation panel.
Viewing Dimensions Page
Navigate to Settings > Dimensions in the left navigation panel. The Dimensions page opens.
The Dimensions page lists all configured dimensions with the following columns: Name, Type, State, Version, Groups, and Actions.

View Dimensions Page
Click a dimension name in the Name column to open its detail view. The detail view shows the current configuration in two sections: Dimension Details and Version Configuration.

Note: Account Admins can view and edit dimensions regardless of who originally created them.

Enable or disable a dimension
In the State column, move the slider to the right to enable a dimension, or to the left to disable it.
Actions on Dimensions
Click the ellipsis (⋯) in the Actions column for a dimension to see the available actions:

- View: Open the dimension detail view (read-only)

- Update: Edit the dimension. A popup appears asking whether to edit via the UI Wizard or the YAML Editor.
- Delete: Remove the dimension. A confirmation prompt appears before deletion.

Note: Account Admins can edit dimensions regardless of who created them.
Adding a Dimension
You can create a dimension using either the guided UI Wizard or the YAML Editor.
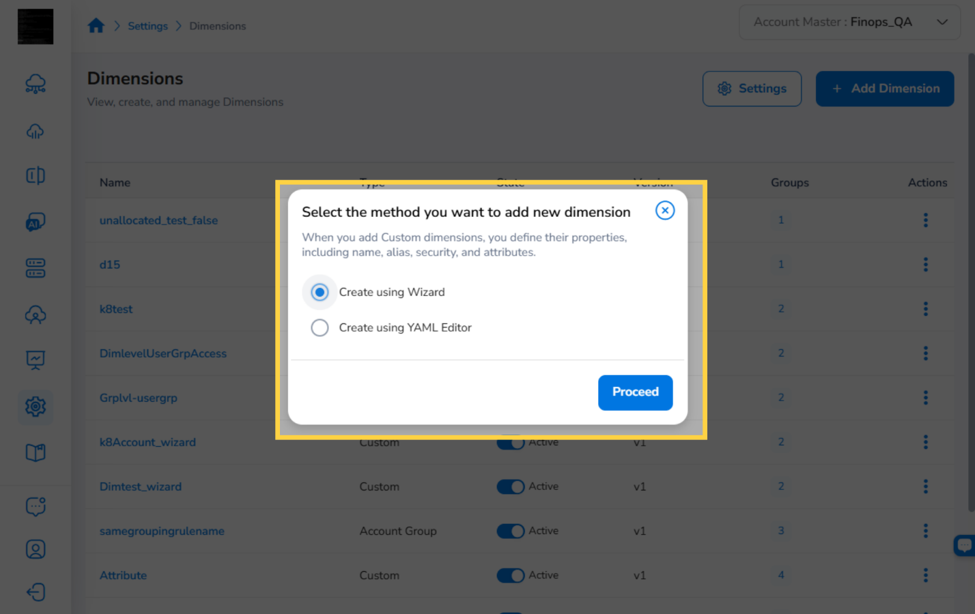
Click + Add Dimension on the Dimensions page. A popup appears with two options:
-
Create using Wizard — Walk through a step-by-step form. Recommended for most configurations.
-
Create using YAML Editor — Open the YAML editor directly (existing behavior, for advanced use).
Select your preferred method and click Proceed.
Creating a Dimension Using the Wizard
The wizard guides you through four steps: Basic Details → Set Dimension Attributes → Grouping Rule(s) → Advanced Settings.
Step 1: Basic Details
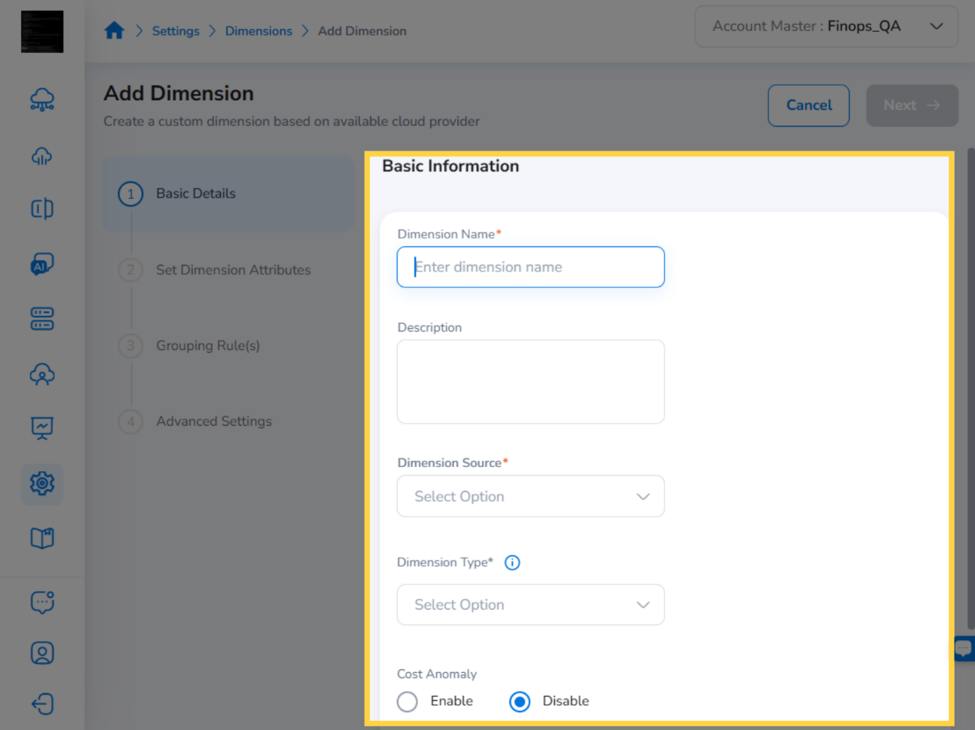
Enter the dimension’s foundational configuration:
-
Dimension Name (required): A unique name for this dimension.
-
Description (optional): A brief description of the dimension’s purpose.
-
Dimension Source (required): Select Billing to source data from billing records.
-
Dimension Type (required): Select Custom to define your own grouping logic.
-
Cost Anomaly: Select Enable to activate anomaly detection for this dimension, or Disable to skip it.
-
Effective Start Date / Effective End Date (required): Set the date range during which the dimension is active.
Click Next to proceed.
Step 2: Set Dimension Attributes
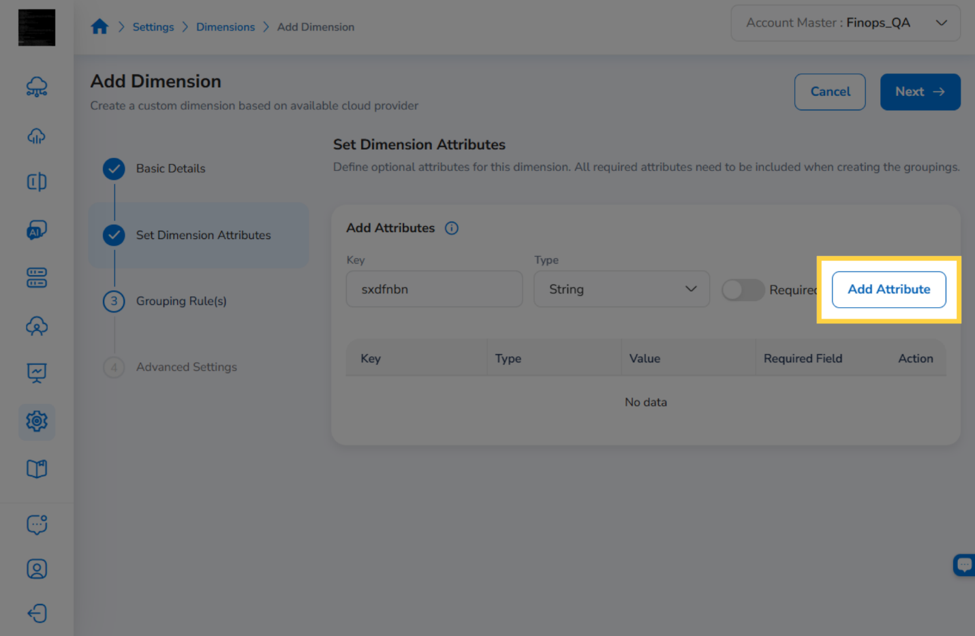
Define the attributes that grouping rules in this dimension can use as filter conditions. For each attribute you want to add:
- Enter an attribute Key (a name that identifies the attribute, such as env or team).
- Select a Type (for example, String).
- Click Add Attribute.
The attribute appears in the table below. Add as many attributes as needed. Click Next to proceed.
Grouping Rule(s)
Grouping rules define which cloud resources belong to each group within this dimension. Click Add Grouping Rule to open the rule editor.
In the rule editor, configure the following sections:
Name and Attributes
Enter a Grouping Rule Name and optionally a description. The attributes you defined in Step 2 are available here as condition fields.
Grouping Rule Definition - Filters
Check Grouping Rule Definition - Filters to enable filter conditions for this rule. Click ADD + to define filter conditions — for example, filtering by Provider (AWS, Azure, GCP, OCI), Region, Resource Category, or other billing dimensions. You can add multiple conditions to refine which resources this rule matches.
Grouping Rule Definition - Platform Filters (K8s) (optional)
Check this option to apply Kubernetes-specific filters, targeting resources within specific clusters and container accounts.
Dependent Grouping Rule (optional)
Check Dependent Grouping Rule and select an existing grouping rule to link this rule to another grouping in this dimension.
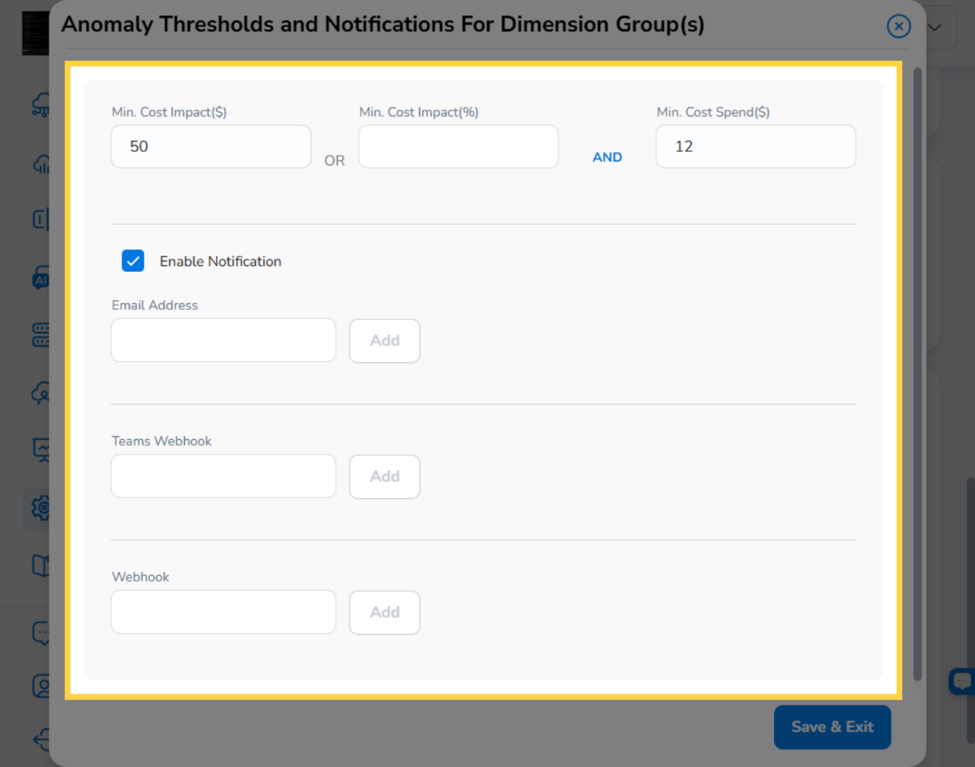
Anomaly Thresholds and Notifications (optional)
Click Add to configure cost anomaly alerts for this grouping rule. In the form, set the minimum cost impact and spend thresholds, enable notifications, and add recipient email addresses or webhooks.
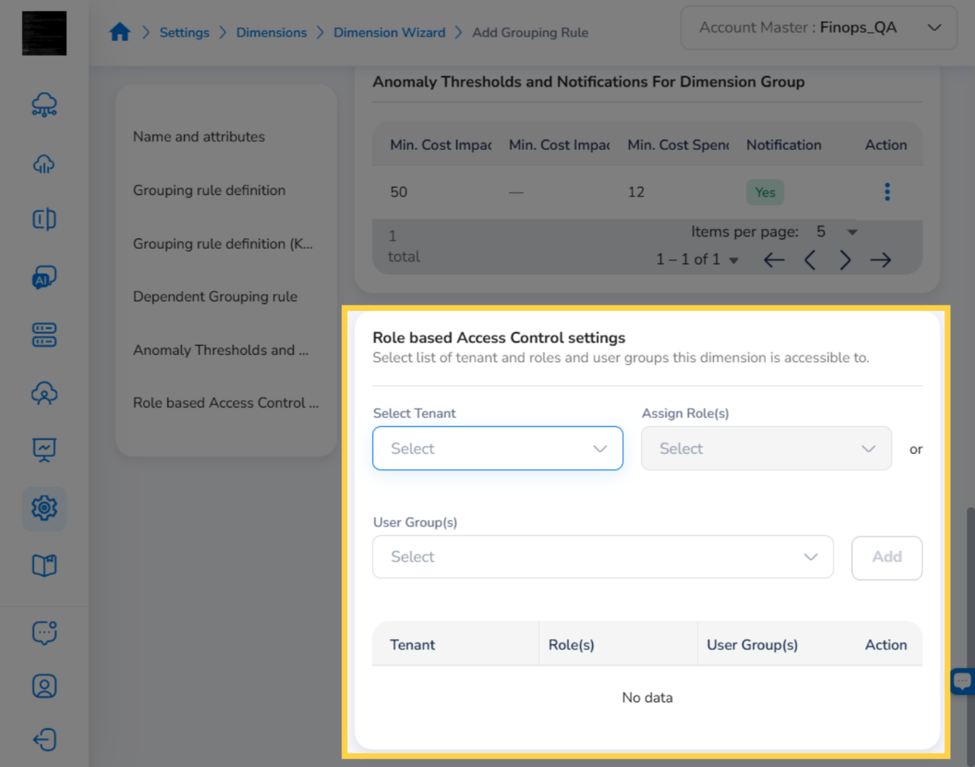
Role based Access Control settings (optional)
Assign tenant, role, and user group access to restrict who can view or modify this grouping rule.
When done, click Save Grouping Rule to save the rule and return to the wizard. Repeat to add more grouping rules as needed.
Click Next to proceed.
Step 4: Advanced Settings
Configure dimension-level options:
| Setting | Description |
|---|---|
| Cost Centre | Set to Yes to designate this dimension as a cost center for reporting. |
| Precompute | Set to Yes to pre-aggregate cost data for faster dashboard loading. |
| Unallocated | Set to Yes to display costs for resources not matched by any grouping rule as an “Unallocated” group. |
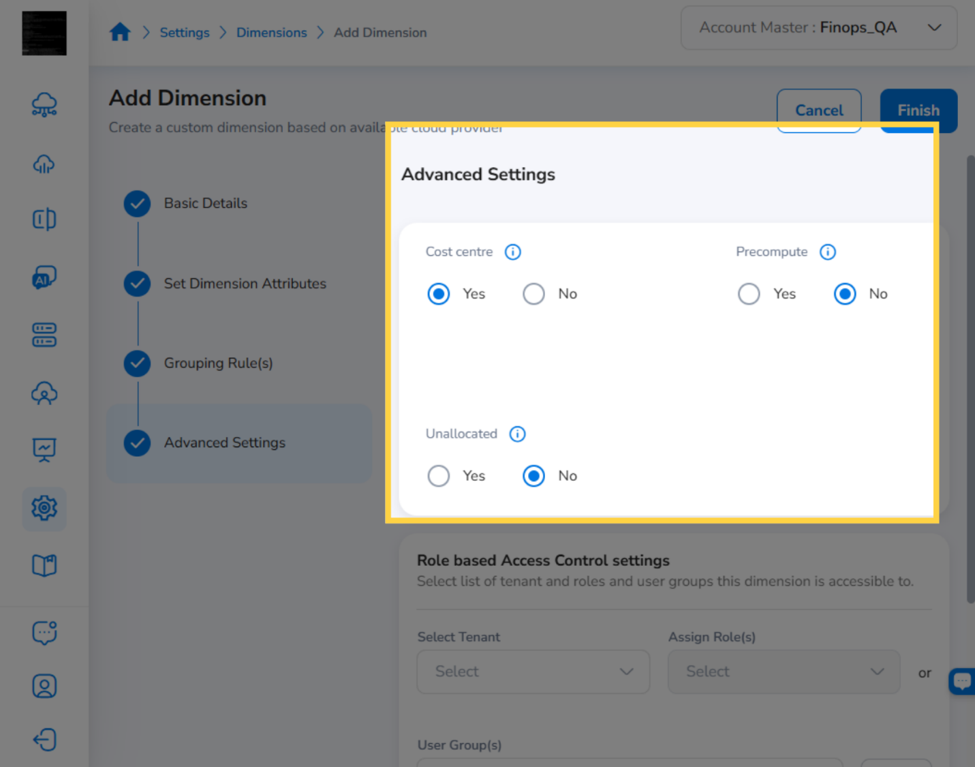
Optionally configure Role based Access Control settings to control which tenants and roles can use this dimension in FinOps+ reports.
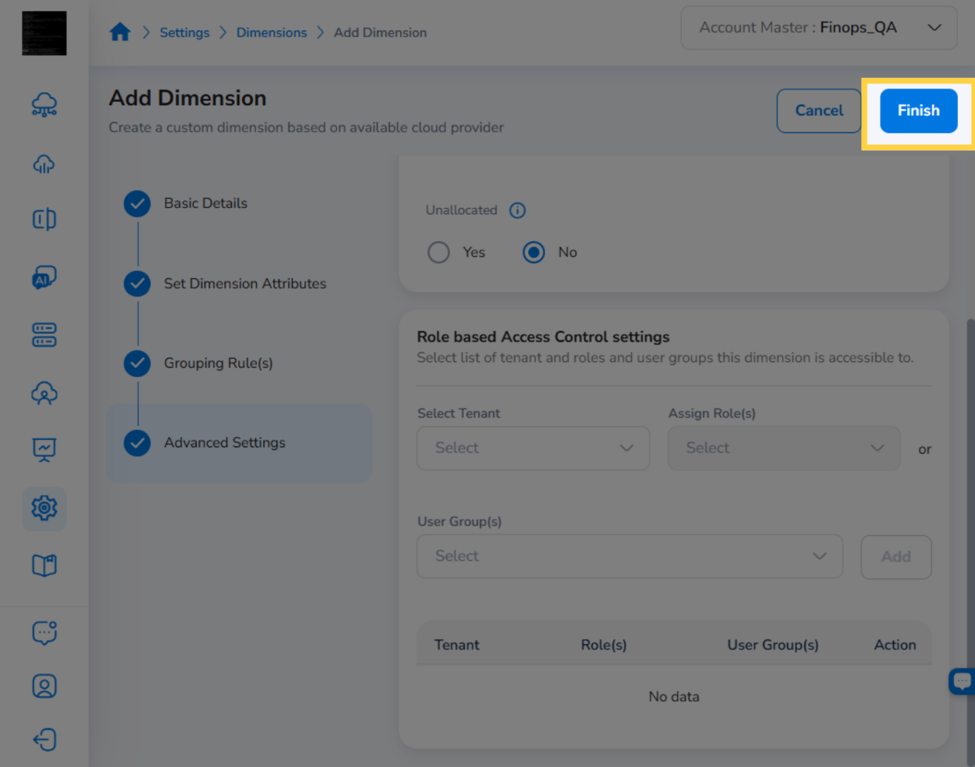
Click Finish to create the dimension. A success banner confirms the dimension was created, and it appears at the top of the Dimensions list.
Creating a Dimension Using the YAML Editor
In the Add Dimension popup, select Create using YAML Editor and click Proceed. The Create Dimension page opens with two YAML editor sections: Dimension Info and Version Configuration.

Enter or paste your YAML configuration in each section, then click Save to create the dimension.
Add Details
Follow the prompt to add details or make changes.

Configuring the Unallocated Cost Setting in the YAML Editor
In the Version Configuration section, the include_unallocated_cost field controls whether a system-generated Unallocated grouping rule is added to the dimension. Set it to true or false directly in the YAML:
include_unallocated_cost: true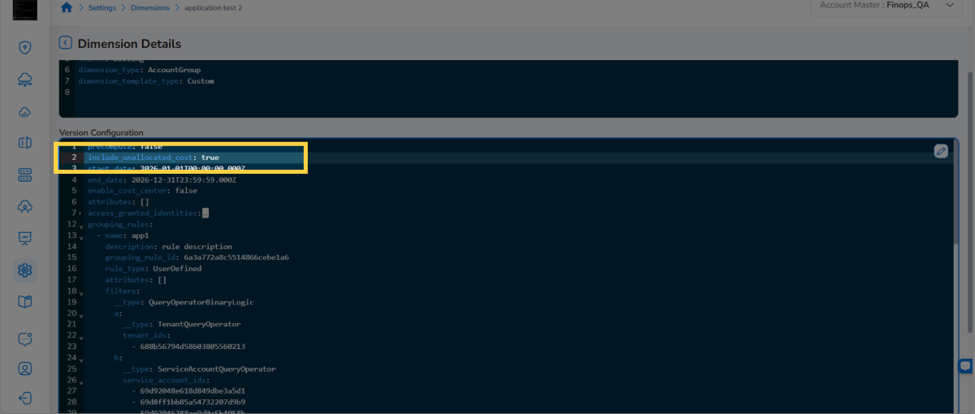
When set to true, CoreStack automatically appends an Unallocated grouping rule to the dimension after saving. You can verify this by scrolling to the end of the Version Configuration YAML in the saved dimension — the rule appears with the following properties:
name: Unallocated
description: System defined rule to capture unallocated cost.
grouping_rule_id: unallocated-cost-rule
  rule_type: System
This rule captures all costs not matched by any of your user-defined grouping rules. When set to false, this rule is not added and unmatched costs are not surfaced anywhere the dimension is used.
Note: To update the
include_unallocated_costsetting on an existing dimension, open the dimension via Edit > Actions (...) and change the field value directly, then click Save.
Click "Save"
After adding details and finalizing the line items, click Save.
Dimension Settings
Use Dimension Settings to make a dimension mandatory for specific tenants and the products they apply to. You select one or more tenants and products, and then add the combination to the mandatory list.
Step 1: Open Dimension Settings
Click Settings. The Dimension Settings dialog box opens.

Step 2: Select Tenant(s)
In the Dimension Settings dialog box, in the Select Tenant(s) drop-down list, click to select all tenants and then click Ok.

Step 3: Select Product(s)
Open the Select Product(s) drop-down list and select one or more products. To include every product, select all products. Click Ok to confirm your selection.

Step 4: Add the selection to Mandatory List
Click Add to Mandatory List. The selected tenants and their corresponding products are added to the mandatory list and appear in the Tenants and Products columns.

Step 5: Remove tenants from the Mandatory List
To remove an entry, select the checkbox next to each tenant you want to remove, and then click Delete selected. The selected entries are removed from the mandatory list.

Editing a Dimension
From the Actions menu
On the Dimensions page, click the ellipsis (⋯) for the dimension you want to edit and select Update. A popup appears — choose Edit via UI Wizard or Edit via YAML Editor and click Proceed.
From the Dimension Detail View
Open the dimension by clicking its name, then click the Edit icon (pencil) in the top-right corner. A popup appears with the same method selection. Click the X to close the editing view without saving.
Editing via the UI Wizard
The wizard opens pre-populated with the existing dimension configuration. Work through the four steps to make your changes:
-
Step 1 (Basic Details): Update the dimension name, description, source, type, cost anomaly setting, or effective date range.
-
Step 2 (Set Dimension Attributes): Add or remove dimension attributes. Note that removing an attribute used by an existing grouping rule may affect that rule’s behavior.
-
Step 3 (Grouping Rule(s)): Add, edit, or remove grouping rules and their filter conditions.
-
Step 4 (Advanced Settings): Update Cost centre, Precompute, Unallocated settings, and RBAC.
Click Finish to save and apply your changes
Note: If the dimension was originally created with advanced YAML configurations not yet supported in the wizard, those sections are preserved as read-only. They will not be removed when you save via the wizard. Use the YAML Editor to modify unsupported sections.
Editing via the YAML Editor
When you choose Edit via YAML Editor, the full YAML editor opens with the current configuration loaded. Make your changes directly in the YAML, then click Save.
Frequently Asked Questions
Q: Can I switch from the Wizard to the YAML Editor mid-configuration?
Wizard progress is not carried over to the YAML editor. If you switch, the YAML editor loads the last saved version of the dimension. Complete and save the wizard flow first if you want to preserve your changes before switching.
Q: What happens to configurations the Wizard doesn’t support when I edit via the Wizard?
The Wizard preserves any configurations it does not yet support. These sections appear as read-only and are not modified when you save. Use the YAML Editor to change unsupported configurations.
Q: I defined an attribute in Step 2 but it doesn’t appear as a filter option in Step 3. Why?
Attributes defined in Step 2 are available as condition fields in the Name and Attributes section of the grouping rule editor, not in the Filters dropdown. The Filters dropdown contains standard billing dimensions (Provider, Region, etc.). If you want to use a custom attribute as a filter condition, confirm the attribute was saved correctly by clicking Back to Step 2 to verify it appears in the attributes table.
Q: Can multiple users edit the same dimension at the same time?
Concurrent edits are not supported. If another user saves a change while you are editing, you will see a conflict prompt. Reload the dimension to get the latest version before making your changes.
Q: Is the UI Wizard available to all users?
The Wizard is available to users with dimension create/edit permissions — the same role
requirement as for the YAML editor. It is also controlled by the feature flag
ui_2602_f_dimension_creation_wizard. If the flag is not enabled for your organization,
the popup will not appear and the YAML editor opens directly. Contact your CoreStack
administrator to enable it.
Troubleshooting
The “Add Dimension” popup does not show a Wizard option — only the YAML Editor opens
Cause: The Dimension UI Wizard feature flag (ui_2602_f_dimension_creation_wizard) is
not enabled for your organization.
Solution:
- Contact your CoreStack platform administrator to enable the ui_2602_f_dimension_creation_wizard feature flag.
- Once enabled, refresh the page and click + Add Dimension — the popup with both options will appear.
If you cannot enable the flag yourself, contact CoreStack support with your tenant ID and the flag name.
Dimension creation fails or shows an error after clicking Finish
Cause: A required field may be incomplete, or the system encountered a transient error during save.
Solution:
- Check for inline validation errors in the wizard steps. Required fields are marked with a red indicator.
- If no inline errors appear, navigate back through the wizard steps to confirm all required fields are completed.
- If the error persists, switch to Edit via YAML Editor, review the YAML, and click Save.
Contact CoreStack support with your tenant ID, dimension name, full error message text, and the steps you followed if the issue is not resolved.
A grouping rule is not matching the expected cloud resources
Cause: The most common causes are an incorrect filter field or value, a cloud provider sync lag, or a mismatch between the attribute key and the actual billing data.
Solution:
- In Step 3, open the grouping rule and verify the filter field and value are correct. Filter values such as Provider names are case-sensitive.
- Confirm the cloud account sync is up to date in CoreStack (Settings > Cloud Accounts).
- If the problem persists, switch to Edit via YAML Editor to inspect the generated configuration directly.
Updated 4 months ago