

Create, Share, and Delete Dashboard Views
Feature Overview
Dashboard Views is a feature within CoreStack’s FinOps module that lets users save a specific combination of filters, group-bys, and display settings on the FinOps Dashboard as a named, reusable configuration. Views are most relevant when you regularly need to revisit the same cost slice — for example, a filtered view by provider and account for a specific team — without reconfiguring filters from scratch each session.
This feature is most valuable to FinOps Practitioners, FinOps Admins, and Finance Business Partners who need to organize, revisit, and share cost data configurations across teams. Standard views are shared across all users who have access to the same dashboard; private views are visible only to the user who created them. Dashboard Views do not change the underlying cost data — they only save and restore a display configuration.
Note: Deep link sharing (the Copy Link, Save & Copy Link, and Update & Copy Link actions) requires the dashboard to be in a saved view state. Recipients who access a deep link will see data filtered to their own RBAC entitlements — they may see less data than the sender if their access scope differs.
How It Works
When you apply filters or group-bys on the FinOps Dashboard, that configuration exists only for your current session unless you save it as a view. Saving a view assigns it a stable View ID and a name, making it available from the View drop-down list on every subsequent visit. Once a view is saved, you can generate a shareable deep link — a stable URL that encodes the View ID — and send it to colleagues via Slack, email, or a ticketing system. When a recipient opens the link, the system loads the saved view configuration and applies their own RBAC entitlements to the data rendered, so each recipient sees only the cost data they are authorized to access.
Prerequisites
Before you begin, ensure the following:
- Role: You have the FinOps Practitioner, FinOps Admin, or FinOps Account Admin role assigned in CoreStack
- Access: You can access the FinOps Dashboard in the CoreStack navigation
- Dashboard access: The dashboard you want to share must be accessible to the intended recipient — if they do not have access to the dashboard, the deep link will not resolve for them
Creating a Dashboard View
Navigate to FinOps > Dashboard. Apply any filters or group-bys you want to save before starting these steps.
Follow these steps to save the current filter configuration as a named view:
Step 1: Open the dashboard menu
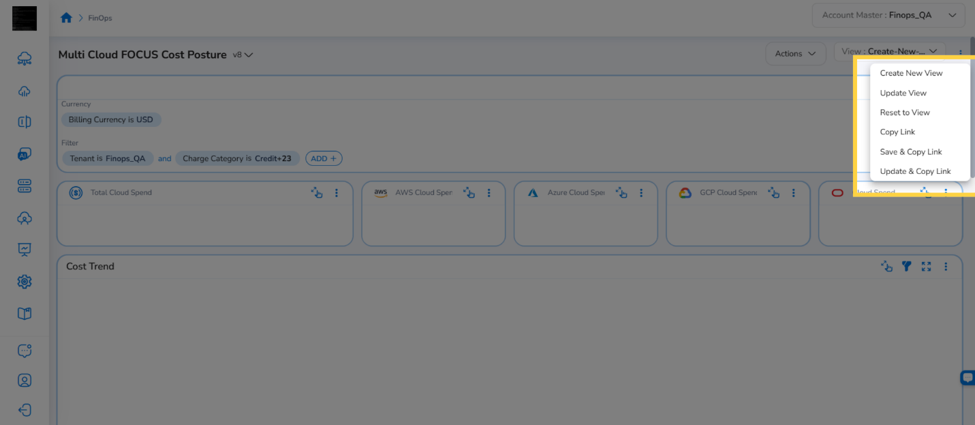
Click the ellipsis (⋯) icon at the top-right of the dashboard page. A drop-down menu appears.
Step 2: Click “Create New View”
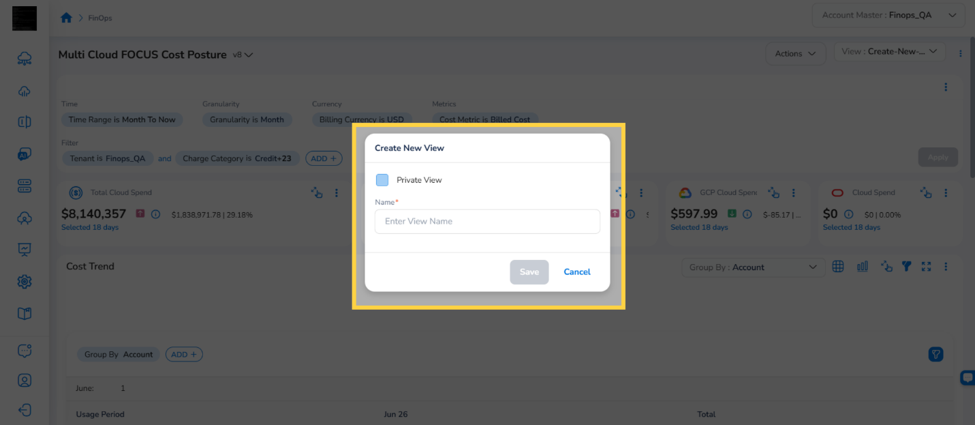
In the drop-down menu, click Create New View. The Create New View dialog box opens.
Step 3: Enter a view name
In the Name field, type a descriptive name for the view.
Step 4: Set view visibility (optional)
To make the view visible only to yourself, select the Private View checkbox. Leave the checkbox clear to make the view a standard (shared) view available to all users who have access to this dashboard.
Note: Standard views are shared across all users with dashboard access. Private views are accessible only to the user who created them.
Step 5: Save the view
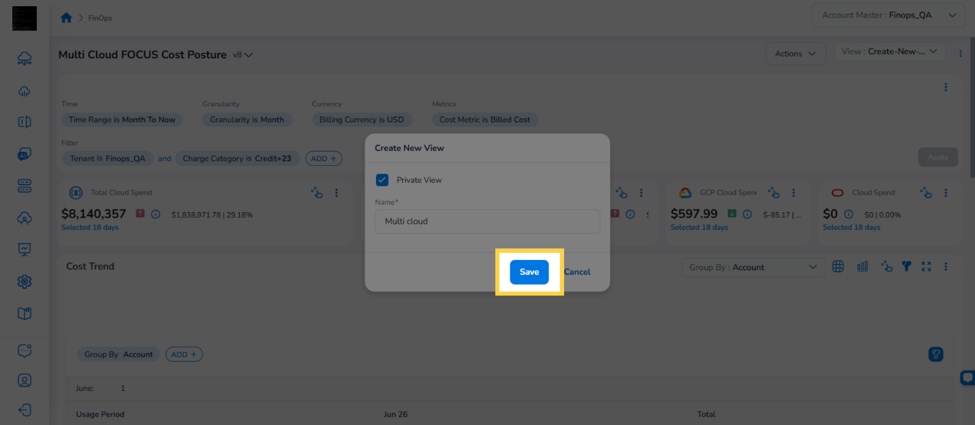
Click Save. The view is saved and appears in the View drop-down list.
Tip: If you have many saved views, use descriptive names that include the team, provider, or time period (for example, “AWS – Engineering Q2 2026”) to make views easier to find later.
Sharing a Dashboard View via Deep Link
Deep Link lets you generate a stable, shareable URL from any saved view on the FinOps Dashboard. The link encodes the saved view’s ID — not the full filter state — so it is short, stable, and safe to share via Slack, email, or a ticketing system. Recipients open the link and see the same view configuration, with data rendered according to their own access entitlements.
Navigate to FinOps > Dashboard and select the saved view you want to share from the View drop-down list.
Step 1: Open the view action menu
Click the ellipsis (⋯) icon at the top-right of the dashboard. The view action menu shows three deep link options.
Step 2: Choose the appropriate copy action
Select the action that matches your intent:
-
Copy Link — Copies the link for the currently saved view as-is. Use this when the view is already saved and you have not made any unsaved changes.
-
Save & Copy Link — Saves the current filter state as a new view (you will be prompted to enter a view name), then copies the link. Use this when you have applied filters but have not yet saved them as a view.
-
Update & Copy Link — Updates the existing saved view with your latest filter changes, then copies the refreshed link. Use this when you have modified an existing view and want the link to reflect those changes.
Step 3: Complete the prompted action (if applicable)
- If you chose Copy Link: No further input is needed. Proceed to Step 4.
- If you chose Save & Copy Link: A dialog prompts you to enter a view name. Type the name, then click Save.
- If you chose Update & Copy Link with no unsaved changes: The system confirms the link is already up to date and copies it without creating a new version.
Step 4: Paste and share the link
The deep link URL is now copied to your clipboard and a toast notification confirms: “Link copied to clipboard”. Paste the URL into Slack, email, a support ticket, or any other channel.
Note: : If your browser does not support the clipboard API, the URL will appear in a text field modal — copy it manually from there.
What recipients experience
When a recipient clicks the deep link:
-
If they are not logged in: They are redirected to the CoreStack login page. After authenticating, the shared view loads automatically.
-
If they are logged in and have dashboard access: The FinOps Dashboard opens with the saved view configuration applied. Data is filtered to match their RBAC entitlements — they may see less data than you if their access scope is narrower.
-
If their entitlements return no data: The dashboard displays the message “No data available based on your access”. This is expected behavior, not an error.
-
If the saved view has been deleted: The recipient is redirected to their role-appropriate default FinOps Dashboard view and shown the message “The requested view is no longer available or has been removed.”
-
If they do not have access to the dashboard: A notification indicates they do not have access to this dashboard.
Recipients can save any view they access via a deep link as an independent saved view under their own account by clicking Save as New View. This new view has no dependency on the original shared view.
Deleting a Dashboard View
Warning: Deleting a view is permanent and cannot be undone. Any deep links pointing to that view will stop working — recipients will see the message “The requested view is no longer available or has been removed.”
Navigate to FinOps > Dashboard and open the View drop-down list.
Step 1: Locate the view to delete
In the View drop-down list, find the view you want to remove.
Step 2: Click the delete icon
Click the delete icon next to the view name.
Step 3: Confirm deletion
In the confirmation dialog that appears, click Yes to permanently delete the view.
Frequently Asked Questions
Q: What is the difference between “Copy Link”, “Save & Copy Link”, and “Update & Copy Link”?
All three actions copy a shareable URL to your clipboard, but they differ in what happens to the view before the link is copied. Copy Link copies the link for the existing saved view without making any changes. Save & Copy Link first saves your current filter state as a new view (prompting you for a name), then copies the link — use this when you have unsaved changes you want to preserve as a new view. Update & Copy Link updates the existing saved view with your current filter state and then copies the refreshed link — use this when you have modified a view and want the link to reflect those changes.
Q: Will the person I share the link with see the same data I see?
Not necessarily. Deep links are RBAC-safe: each recipient sees data filtered to their own access entitlements in CoreStack, not yours. If a recipient has a narrower access scope, they may see fewer accounts, providers, or cost items than you do. In some cases, they may see no data at all — the dashboard will display “No data available based on your access” rather than showing an error.
Q: Can I share a view I haven’t saved yet?
Yes — use Save & Copy Link from the ellipsis menu. This saves your current filter state as a new view (you’ll be prompted to name it) and immediately copies the deep link. You do not need to save the view as a separate step first.
Q: What is a private view, and who can see it?
A private view is visible only to the user who created it. When creating a view, select the Private View checkbox to make it private. Standard views (created without this checkbox) are visible to all users who have access to the same dashboard.
Q: What happens to existing deep links if I update or delete a view?
If you update a view (using Update & Copy Link), existing deep links for that view will now reflect the updated configuration — the same link resolves to the new filter state. If you delete a view, all deep links pointing to it will stop working, and recipients who click them will see the message “The requested view is no longer available or has been removed.”
Troubleshooting
“The requested view is no longer available or has been removed.” appears when opening a deep link
Cause: The saved view that the deep link references has been deleted, or the View ID in the URL is invalid.
Solution:
- Ask the person who shared the link to check whether the view still exists in their dashboard.
- If the view was deleted, ask them to recreate it, save it, and share a new deep link using Copy Link.
- If the view exists, ask them to copy the link again directly from the view action menu to ensure the URL is correct.
If the issue persists, contact CoreStack Support with the following details: the full deep link URL, your tenant ID, and the dashboard name.
“No data available based on your access” appears after opening a deep link
Cause: Your RBAC entitlements do not grant access to any of the cost data in the shared view. This is expected behavior — the view configuration loaded correctly, but your access scope does not include the underlying accounts or cost dimensions.
Solution:
- Verify that you have been assigned the appropriate role in CoreStack for the data in question.
- Ask the view owner which cloud accounts or providers are included in the view, and confirm your account access with your CoreStack admin.
- If your access has recently changed, allow a few minutes for entitlements to refresh and then reload the link.
Contact your FinOps Account Admin or Account Admin to request access to the relevant accounts or cost metrics.
The "Copy Link" option is visible in the view action menu
Cause: The deep link feature may not be enabled for your tenant, or you may not have a saved view selected. Deep link options only appear for views that have been explicitly saved — they are not available for the default unsaved dashboard state.
Solution:
- Confirm that a named view is selected in the View drop-down list (not the default unsaved state).
- If you have unsaved filter changes, use Save & Copy Link to save and share in one step.
- If the option is still not visible, contact your FinOps Account Admin to confirm that deep link sharing is enabled for your tenant.
Note that the Cloud Account filter has been renamed to Account, and the Cloud Provider filter has been renamed to Provider.
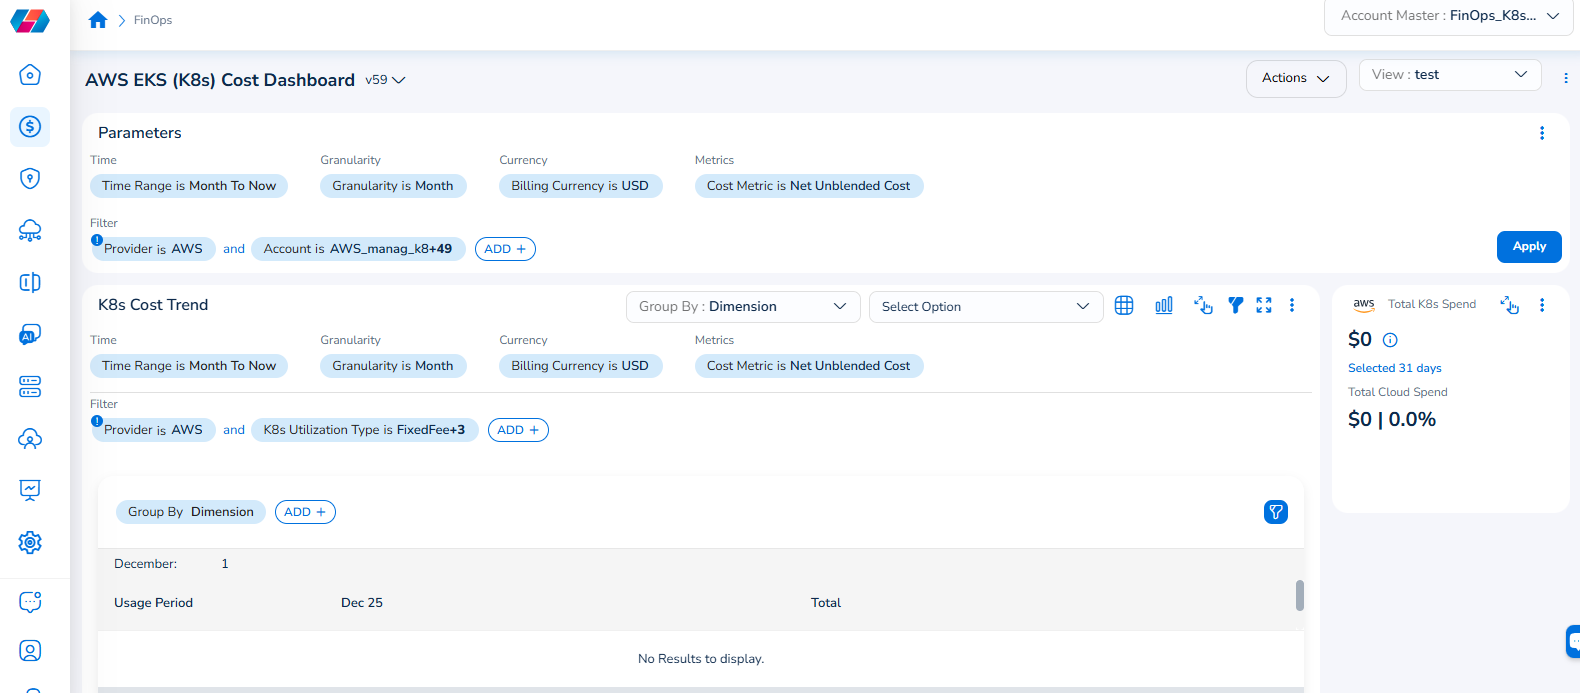
For example, if you see the dashboard shown in the screenshot below, the Parameters > Filter section shows the Provider filter for which the value selected is AWS.
To add the Account filter, users can click ADD+ and select Account. In the drop-down list that appears, users can select all applicable values, and click Ok. Details will be displayed in widgets as per the selected filter(s).
In every widget that is available within a dashboard, users can click the Filter icon that appears on the top-right side of the widget and view the pre-defined filters. The Provider filter appears as a pre-defined filter. Users can use the ADD+ option to add custom filters and they have the option to add the Account filter from here.
Updated 4 months ago